2019 MERCEDES-BENZ GLE change time
[x] Cancel search: change timePage 117 of 398
The interior lighting automatically switches on if
you:
R Unlock the vehicle
R Open a door
R Remove the SmartKey from the ignition lock
The interior lighting is switched on for a set time when the SmartKey is removed from the ignition
lock. This delayed switch-off can be adjusted via
the multimedia system (see Digital Operator's
Manual). Crash-responsive emergency lighting
The interior lighting is activated automatically if
the vehicle is involved in an accident.
X To switch off the crash-responsive emer-
gency lighting:
press the hazard warning
lamp button.
or X Lock and then unlock the vehicle using the
SmartKey. Replacing bulbs (vehicles with LED
headlamps)
The front and rear light clusters of your vehicle
are equipped with light-emitting diodes. Do not
replace the vehicle's bulbs yourself. Contact a
qualified specialist workshop which has the nec-
essary specialist knowledge and tools to carry
out the work required.
Lamps are an important aspect of vehicle safety. You must therefore make sure that these func-
tion correctly at all times. Have the headlamp
setting checked regularly. Replacing bulbs (vehicles with halo-
gen headlamps)
Important safety notes
G
WARNING
Bulbs, lamps and connectors can get very hot when operating. If you change a bulb, you
could burn yourself on these components.
There is a risk of injury. Allow these components to cool down before
changing a bulb.
Do not use a bulb if it has been dropped or if its
glass tube has been scratched.
The bulb may explode if:
R you touch it
R it is hot
R you drop it
R you scratch it
Use bulbs only in closed lamps that have been
designed for this purpose. Only install spare
bulbs of the same type and the specified volt-
age.
Marks on the glass tube reduce the service life
of the bulbs. Do not touch the glass tube with
your bare hands. If necessary, clean the glass
tube when cold with alcohol or spirit and rub it
off with a lint-free cloth.
Protect bulbs from moisture during operation.
Do not allow bulbs to come into contact with
liquids.
Replace only the bulbs listed (Y page 115).
Have the bulbs that you cannot replace yourself
replaced at a qualified specialist workshop.
If you require assistance replacing bulbs, con-
sult a qualified specialist workshop.
If the new bulb still does not light up, consult a
qualified specialist workshop.
Headlamps and lights are an important aspect of
vehicle safety. You must therefore make sure
that these function correctly at all times. Have
the headlamp setting checked regularly. Overview of bulb replacement - bulb
types
You can replace the following bulbs. The bulb
type can be found in the legend. Replacing bulbs (vehicles with halogen headlamps)
115Lights and windshield wipers Z
Page 129 of 398
Optimum use of automatic climate
control
The following contains notes and recommenda-
tions on optimum use of the dual-zone auto-
matic climate control or 3-zone automatic cli-
mate control.
R You can switch on climate control by using the
0058 and005A or0058 and0056 buttons.
The indicator lamps in the 0058and
005A buttons or the 0058and0056 buttons
light up.
R Vehicles with 3-zone automatic climate
control: in automatic mode, you can also use
the 00F0 button to set a climate mode
(FOCUS/MEDIUM/DIFFUSE). The MEDIUM
level is recommended.
R Set the temperature to 72 ‡ (22 †).
R Only use the "Windshield defrosting" function
briefly until the windshield is clear again.
R Only use air-recirculation mode briefly, e.g. if
there are unpleasant outside odors or when in a tunnel. The windows could otherwise fog up,
since no fresh air is drawn into the vehicle in
air-recirculation mode.
R Vehicles with 3-zone automatic climate
control: use the ZONE function to adopt the
temperature settings on the driver's side for
the front-passenger side and the rear com-
partment as well. The indicator lamp above
the 00D6 button goes out.
R Vehicles with 3-zone automatic climate
control: use the "residual heat" function if
you want to heat or ventilate the vehicle inte- rior when the ignition is switched off. The
residual heat function can only be activated or
deactivated with the ignition switched off.
R If you change the settings of the climate con-
trol system, the climate status display
appears for approximately three seconds at
the bottom of the screen in the multimedia
system display. You will see the current set-
tings of the various climate control functions.
During automatic engine switch-off, the climate
control system only operates at a reduced capa-
city. If you require the full climate control output, you can switch off the ECO start/stop function
by pressing the ECO button (Y page 140). Operating the climate control sys-
tems
Activating/deactivating climate con-
trol
General notes When the climate control is switched off, the air
supply and air circulation are also switched off.
The windows could fog up. Therefore, switch off
climate control only briefly
Activate climate control primarily using the
0058 button (Y page 128).
In the rear compartment, you can also switch
climate control on and off using the 0058and
0078 buttons.
Activating/deactivating X
Turn the SmartKey to position 0048in the igni-
tion lock (Y page 135).
X To activate: press the0058button.
The indicator lamp in the 0058button lights
up. Airflow and air distribution are set to auto-
matic mode.
X To deactivate: press the0078button.
The indicator lamp in the 0078button lights
up. Switching cooling with air dehumidi-
fication on/off
Activating/deactivating X
To activate: press the005Aor0056 button.
The indicator lamp in the 005Aor0056 button
lights up.
X To deactivate: press the005Aor0056 but-
ton.
The indicator lamp in the 005Aor0056 button
goes out. The "Cooling with air dehumidifica-
tion" function has a delayed switch-off fea-
ture. Operating the climate control systems
127Climate control
Page 130 of 398
Problems with the "Cooling with air dehumidification" function
Problem
Possible causes/consequences and
0050
0050Solutions The indicator lamp in the
005A or0056 button
flashes three times or
remains off. The "Cool-
ing with air dehumidifi-
cation" function cannot
be switched on. Cooling with air dehumidification has been deactivated due to a mal-
function.
X Visit a qualified specialist workshop. Setting climate control to automatic
General notes In automatic mode, the set temperature is main-
tained automatically at a constant level. The
system automatically regulates the temperature of the dispensed air, the airflow and the air dis- tribution.
The "Cooling with air dehumidification" function
is activated automatically in automatic mode.
In the rear compartment, you can also switch
climate control for the rear seats to automatic
mode using the 0058button.
Automatic control X
Turn the SmartKey to position 0048in the igni-
tion lock (Y page 135).
X Set the desired temperature.
X To activate: press the0058button.
The indicator lamp in the 0058button lights
up. Automatic air distribution and airflow are
activated.
X To switch to manual mode: press the008F
button.
3-zone automatic climate control: when auto-
matic mode is activated, you can select a cli-
mate mode (Y page 128). Adjusting the climate mode settings
You can select the following climate mode set-
tings in automatic mode:
FOCUS high airflow, slightly cooler setting
MEDIUM medium airflow, standard setting
DIFFUSE low airflow, slightly warmer and draft- free setting X
Turn the SmartKey to position 0048in the igni-
tion lock (Y page 135).
X Press the 0058button.
X Press the 00F0button repeatedly until the
desired climate mode appears in the display. Setting the temperature
Dual-zone automatic climate control Different temperatures can be set for the driv-
er's and front-passenger sides.
X Turn the SmartKey to position 0048in the igni-
tion lock (Y page 135).
X To increase or decrease: turn control0043or
0084 counter-clockwise or clockwise
(Y page 123).
Only change the temperature setting in small
increments. Start at 72 ‡ (22 †).
3-zone automatic climate control You can select different temperature settings
for the driver's and front-passenger sides as well
as for the rear compartment.
X Turn the SmartKey to position 0048in the igni-
tion lock (Y page 135).
X To increase or decrease temperature in
the front compartment:
turn control0043or
0084 counter-clockwise or clockwise
(Y page 125).
Only change the temperature setting in small
increments. Start at 72 ‡ (22 †).
X To increase or reduce the temperature in
the rear compartment using the front con-
trol panel: press the00D6button.
The indicator lamp in the 00D6button goes
out. 128
Operating the climate control systemsClimate control
Page 136 of 398
Notes on breaking-in a new vehicle
Important safety notes
The sensor system of some driving and driving
safety systems adjusts automatically while a
certain distance is being driven after the vehicle has been delivered or after repairs. Full system
effectiveness is not reached until the end of this
teach-in procedure.
New and replaced brake pads and discs only
reach their optimum braking effect after several hundred kilometers of driving. Compensate for
this by applying greater force to the brake pedal. The first 1000 miles (1500 km)
The more you look after the engine when it is
new, the more satisfied you will be with its per-
formance in the future. R You should therefore drive at varying vehicle
and engine speeds for the first 1000 miles
(1500 km).
R Avoid heavy loads, e.g. driving at full throttle,
during this period.
R Change gear in good time, before the tach-
ometer needle is 00C3of the way to the red area
of the tachometer.
R Do not manually shift to a lower gear to brake
the vehicle.
R Try to avoid depressing the accelerator pedal
beyond the point of resistance (kickdown).
Additional breaking-in notes for Mercedes-AMG
vehicles:
R Do not drive faster than 85 mph (140 km/h)
for the first 1,000 miles (1,500 km).
R Only allow the engine to reach a maximum
engine speed of 4,500 rpm briefly.
R Change gear in good time.
R Ideally, for the first 1,000 miles (1,500 km),
drive in the Comfortdrive program.
After 1000 mile s(1500 km), you can increase
the engine speed gradually and accelerate the
vehicle to full speed.
You should also observe these notes on break-
ing in if the engine or parts of the drive train on your vehicle have been replaced.
Always observe the maximum permissible
speed. Driving
Important safety notes
G
WARNING
Objects in the driver's footwell can restrict the pedal travel or obstruct a depressed pedal.
The operating and road safety of the vehicle is
jeopardized. There is a risk of an accident.
Make sure that all objects in the vehicle are
stowed correctly, and that they cannot enter
the driver's footwell. Install the floormats
securely and as specified in order to ensure
sufficient clearance for the pedals. Do not use loose floormats and do not place floormats on
top of one another. G
WARNING
Unsuitable footwear can hinder correct usage of the pedals, e.g.:
R shoes with thick soles
R shoes with high heels
R slippers
There is a risk of an accident.
Wear suitable footwear to ensure correct
usage of the pedals. G
WARNING
If you switch off the ignition while driving,
safety-relevant functions are only available
with limitations, or not at all. This could affect, for example, the power steering and the brake
boosting effect. You will require considerably
more effort to steer and brake. There is a risk of an accident.
Do not switch off the ignition while driving. G
WARNING
If the parking brake has not been fully
released when driving, the parking brake can:
R overheat and cause a fire
R lose its hold function.
There is a risk of fire and an accident. Release
the parking brake fully before driving off. 134
DrivingDriving and pa
rking
Page 139 of 398
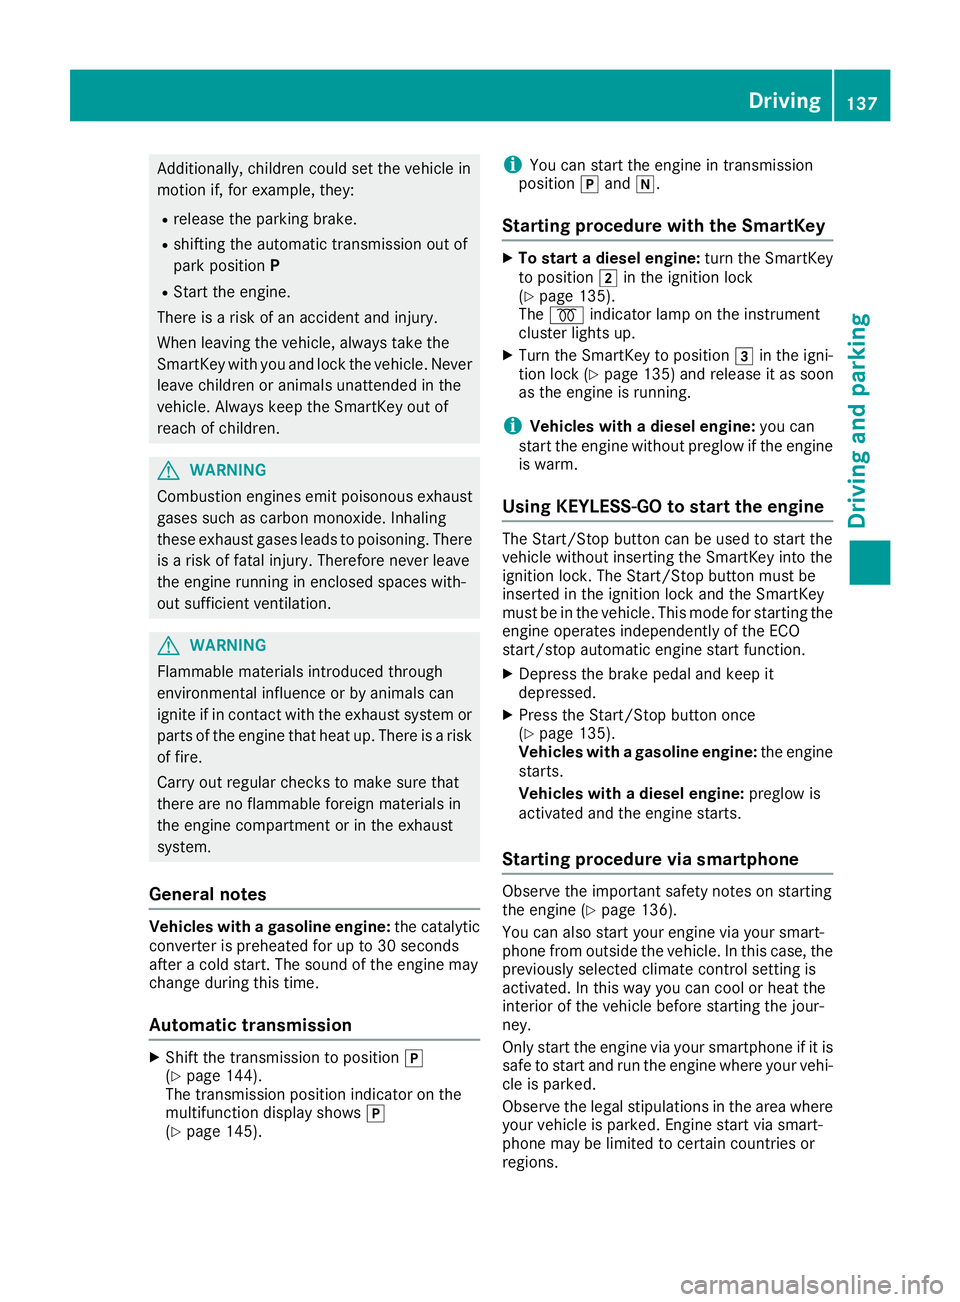
Additionally, children could set the vehicle in
motion if, for example, they:
R release the parking brake.
R shifting the automatic transmission out of
park position P
R Start the engine.
There is a risk of an accident and injury.
When leaving the vehicle, always take the
SmartKey with you and lock the vehicle. Never
leave children or animals unattended in the
vehicle. Always keep the SmartKey out of
reach of children. G
WARNING
Combustion engines emit poisonous exhaust
gases such as carbon monoxide. Inhaling
these exhaust gases leads to poisoning. There is a risk of fatal injury. Therefore never leave
the engine running in enclosed spaces with-
out sufficient ventilation. G
WARNING
Flammable materials introduced through
environmental influence or by animals can
ignite if in contact with the exhaust system or parts of the engine that heat up. There is a risk
of fire.
Carry out regular checks to make sure that
there are no flammable foreign materials in
the engine compartment or in the exhaust
system.
General notes Vehicles with a gasoline engine:
the catalytic
converter is preheated for up to 30 seconds
after a cold start. The sound of the engine may
change during this time.
Automatic transmission X
Shift the transmission to position 005D
(Y page 144).
The transmission position indicator on the
multifunction display shows 005D
(Y page 145). i
You can start the engine in transmission
position 005Dand 005C.
Starting procedure with the SmartKey X
To start a diesel engine: turn the SmartKey
to position 0048in the ignition lock
(Y page 135).
The 0028 indicator lamp on the instrument
cluster lights up.
X Turn the SmartKey to position 0049in the igni-
tion lock (Y page 135) and release it as soon
as the engine is running.
i Vehicles with a diesel engine:
you can
start the engine without preglow if the engine
is warm.
Using KEYLESS-GO to start the engine The Start/Stop button can be used to start the
vehicle without inserting the SmartKey into the
ignition lock. The Start/Stop button must be
inserted in the ignition lock and the SmartKey
must be in the vehicle. This mode for starting the engine operates independently of the ECO
start/stop automatic engine start function.
X Depress the brake pedal and keep it
depressed.
X Press the Start/Stop button once
(Y page 135).
Vehicles with a gasoline engine: the engine
starts.
Vehicles with a diesel engine: preglow is
activated and the engine starts.
Starting procedure via smartphone Observe the important safety notes on starting
the engine (Y
page 136).
You can also start your engine via your smart-
phone from outside the vehicle. In this case, the previously selected climate control setting is
activated. In this way you can cool or heat the
interior of the vehicle before starting the jour-
ney.
Only start the engine via your smartphone if it is
safe to start and run the engine where your vehi-
cle is parked.
Observe the legal stipulations in the area where your vehicle is parked. Engine start via smart-
phone may be limited to certain countries or
regions. Driving
137Driving an d parking Z
Page 144 of 398
Problem
Possible causes/consequences and
0050
0050Solutions Vehicles with a gasoline
engine:
The engine is not running
smoothly and is misfir-
ing. There is a malfunction in the engine electronics or in a mechanical
component of the engine management system.
X Only depress the accelerator pedal slightly.
Otherwise, non-combusted fuel may get into the catalytic converter
and damage it.
X Have the cause rectified immediately at a qualified specialist work-
shop. The coolant temperature
gage shows a value
above 248 ‡ (120 †). The coolant level is too low. The coolant is too hot and the engine is no
longer being cooled sufficiently.
X Stop as soon as possible and allow the engine and the coolant to
cool down.
X Check the coolant level (Y page 324). Observe the warning notes
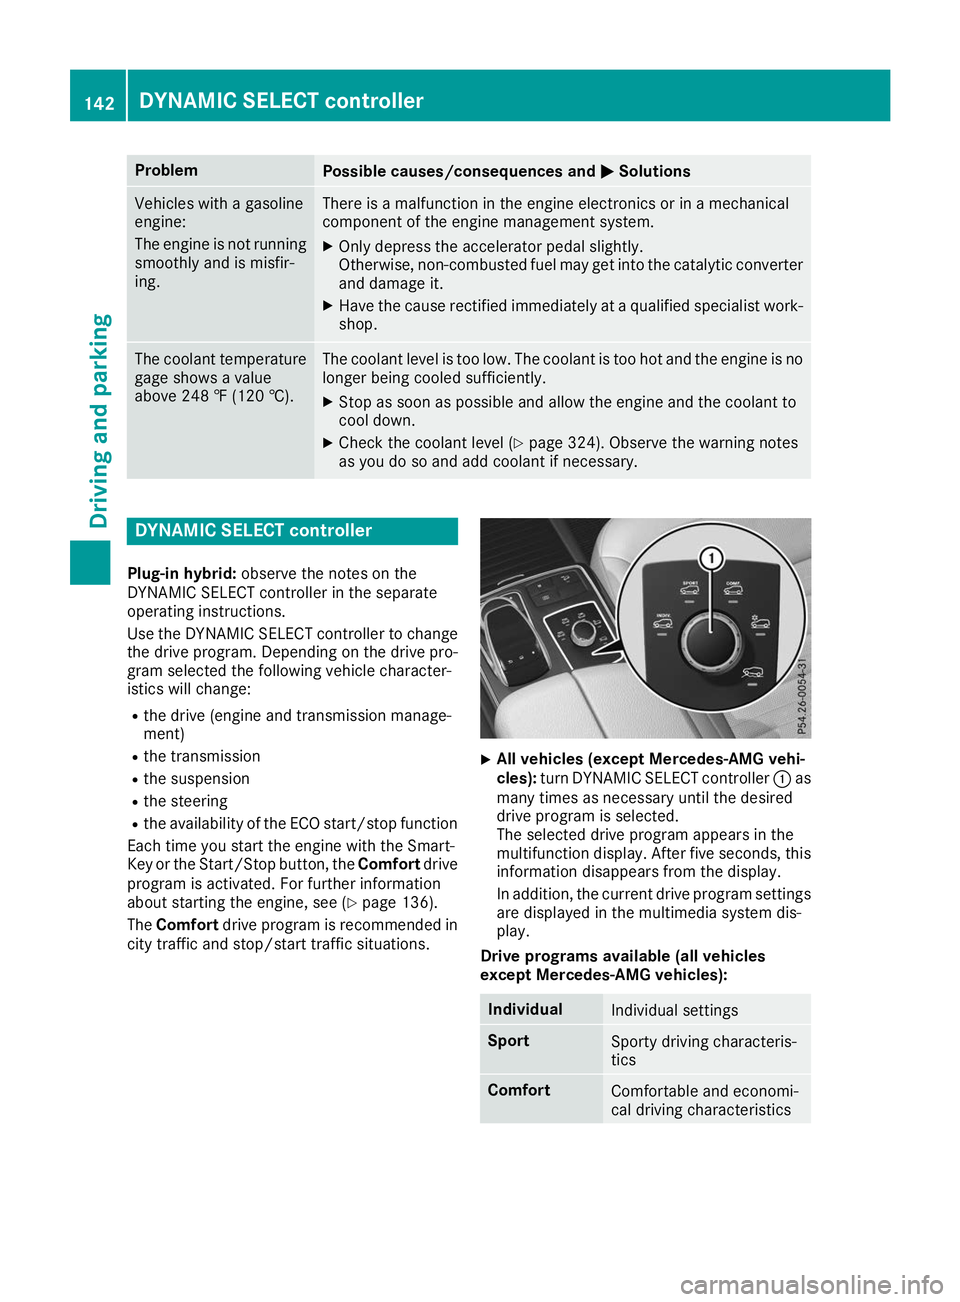
as you do so and add coolant if necessary. DYNAMIC SELECT controller
Plug-in hybrid: observe the notes on the
DYNAMIC SELECT controller in the separate
operating instructions.
Use the DYNAMIC SELECT controller to change the drive program. Depending on the drive pro-
gram selected the following vehicle character-
istics will change:
R the drive (engine and transmission manage-
ment)
R the transmission
R the suspension
R the steering
R the availability of the ECO start/stop function
Each time you start the engine with the Smart-
Key or the Start/Stop button, the Comfortdrive
program is activated. For further information
about starting the engine, see (Y page 136).
The Comfort drive program is recommended in
city traffic and stop/start traffic situations. X
All vehicles (except Mercedes-AMG vehi-
cles):
turn DYNAMIC SELECT controller 0043as
many times as necessary until the desired
drive program is selected.
The selected drive program appears in the
multifunction display. After five seconds, this information disappears from the display.
In addition, the current drive program settings
are displayed in the multimedia system dis-
play.
Drive programs available (all vehicles
except Mercedes-AMG vehicles): Individual
Individual settings
Sport
Sporty driving characteris-
tics
Comfort
Comfortable and economi-
cal driving characteristics 142
DYNAMIC SELECT controllerDriving and parking
Page 149 of 398
Comfort drive program
The
Comfort drive program has the following
characteristics:
R comfort-oriented engine and transmission
settings.
R optimal fuel consumption resulting from the
automatic transmission shifting up sooner.
R the vehicle pulls away more gently in forward
and reverse gears, unless the accelerator
pedal is depressed fully.
R the automatic transmission shifting up
sooner. This results in the vehicle being driven
at lower engine speeds and the wheels being less likely to spin.
Sport drive program The
Sport drive program has the following char-
acteristics:
R sporty engine and transmission settings.
R the automatic transmission shifts up later.
The fuel consumption possibly being higher
as a result of the later automatic transmission
shift points.
R the suspension exhibits sporty damping (vehi-
cles with AIRMATIC).
Drive program Sport Plus (Mercedes-
AMG vehicles) The
Sport Plus drive program has the following
characteristics:
R the vehicle exhibits particularly sporty driving
characteristics.
R the vehicle pulls away in first gear.
R the automatic transmission shifts up later.
The fuel consumption possibly being higher
as a result of the later automatic transmission
shift points.
R the suspension exhibits particularly firm
springing and damping settings (vehicles with AIRMATIC).
R the ECO start/stop function is deactivated, it
can, however, be activated again using the
ECO button (Y page 140). Individual drive program In the
Individual drive program, the following
properties of the drive program can be selected:
R the drive (engine and transmission manage-
ment)
R the transmission
R the suspension (vehicles with AIRMATIC)
R all vehicles (except Mercedes-AMG vehicles):
the steering
To select the gears in the Individualdrive pro-
gram permanently using the steering wheel pad- dle shifters, select the permanent manual gear-
shift program.
Information about configuring the Individual
drive program with the multimedia system can
be found in the Digital Operator's Manual. Manual gear shifting
General notes You can change gear yourself using the steering
wheel paddle shifters. The transmission must be
in position 005Bto do this.
Depending on which steering wheel paddle
shifter is pulled, the automatic transmission
immediately shifts into the next gear down or
up, if permitted.
To use manual shifting, you have two options:
R temporary setting
R permanent setting
If you activate manual gearshifting, the current
gear appears in the multifunction display
instead of transmission position 005B.
If manual gearshifting is deactivated, the gears
will be selected automatically. Automatic transmission
147Driving and parking Z
Page 150 of 398
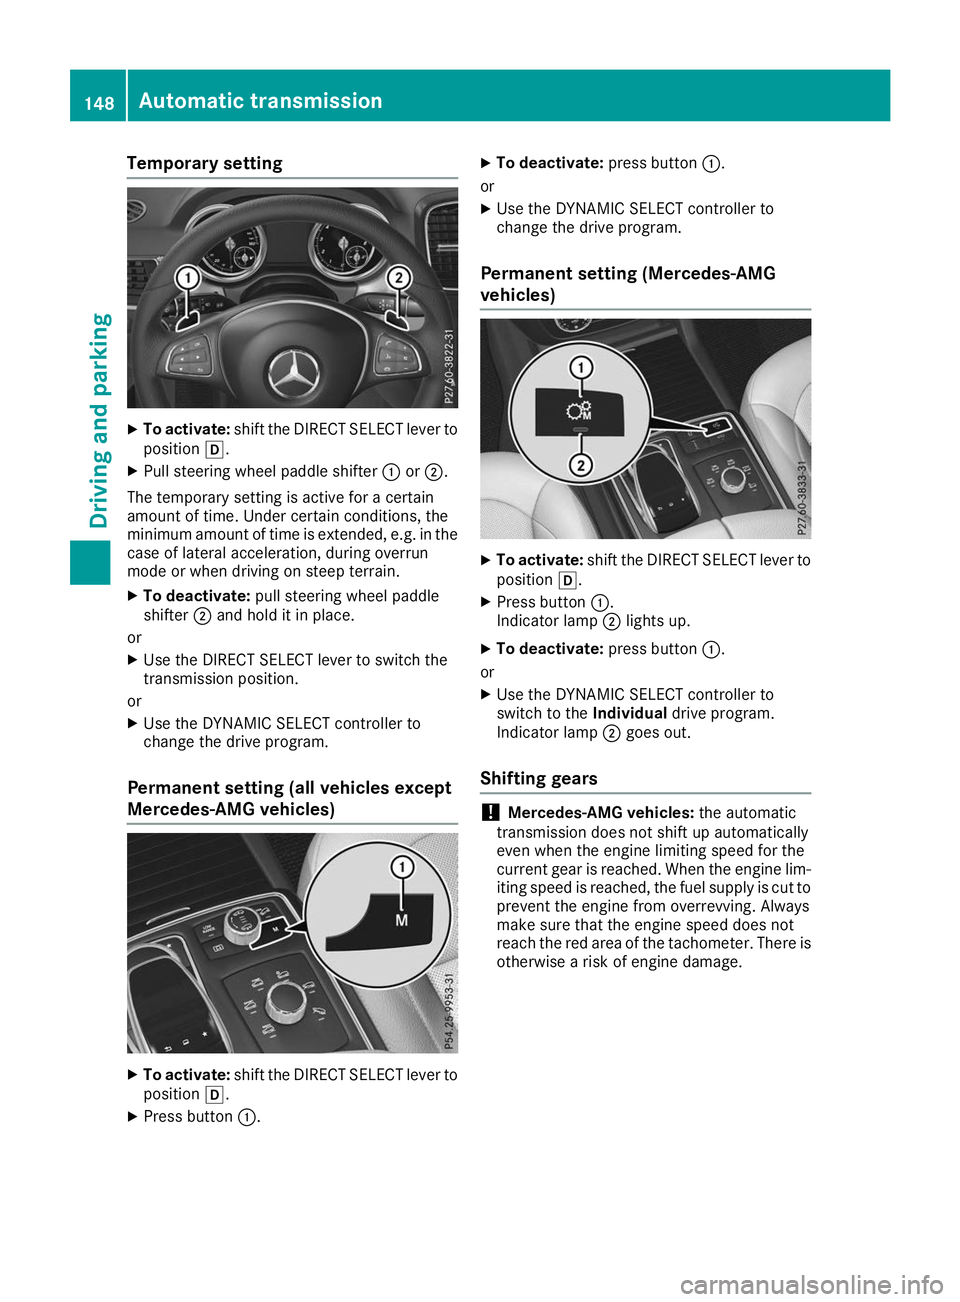
Temporary setting
X
To activate: shift the DIRECT SELECT lever to
position 005B.
X Pull steering wheel paddle shifter 0043or0044.
The temporary setting is active for a certain
amount of time. Under certain conditions, the
minimum amount of time is extended, e.g. in the
case of lateral acceleration, during overrun
mode or when driving on steep terrain.
X To deactivate: pull steering wheel paddle
shifter 0044and hold it in place.
or
X Use the DIRECT SELECT lever to switch the
transmission position.
or X Use the DYNAMIC SELECT controller to
change the drive program.
Permanent setting (all vehicles except
Mercedes-AMG vehicles) X
To activate: shift the DIRECT SELECT lever to
position 005B.
X Press button 0043. X
To deactivate: press button0043.
or
X Use the DYNAMIC SELECT controller to
change the drive program.
Permanent setting (Mercedes-AMG
vehicles) X
To activate: shift the DIRECT SELECT lever to
position 005B.
X Press button 0043.
Indicator lamp 0044lights up.
X To deactivate: press button0043.
or X Use the DYNAMIC SELECT controller to
switch to the Individualdrive program.
Indicator lamp 0044goes out.
Shifting gears !
Mercedes-AMG vehicles:
the automatic
transmission does not shift up automatically
even when the engine limiting speed for the
current gear is reached. When the engine lim- iting speed is reached, the fuel supply is cut to
prevent the engine from overrevving. Always
make sure that the engine speed does not
reach the red area of the tachometer. There is
otherwise a risk of engine damage. 148
Automatic transmissionDriving an
d parking