2019 MERCEDES-BENZ GLE COUPE navigation
[x] Cancel search: navigationPage 10 of 697
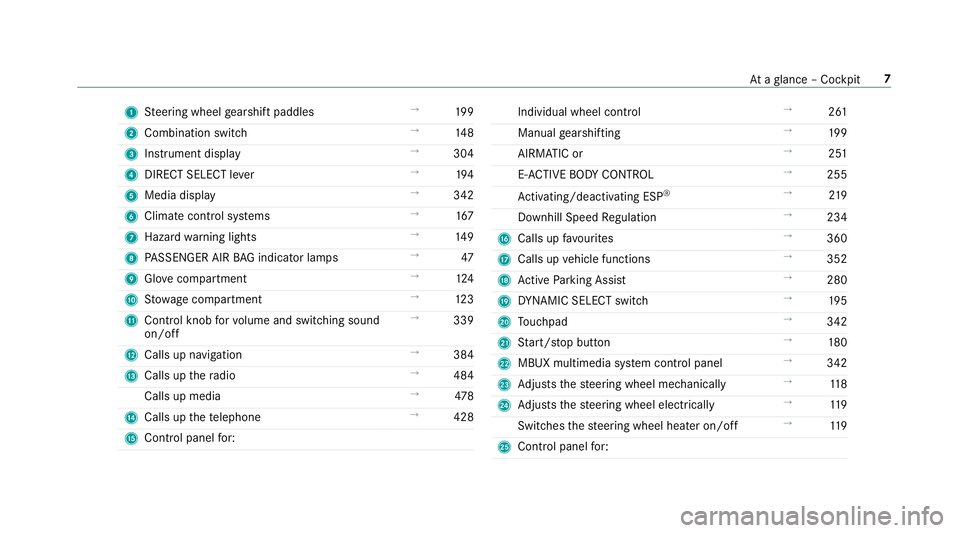
1
Steering wheel gearshift paddles →
19 9
2 Combination swit ch →
14 8
3 Instrument display →
304
4 DIRECT SELECT le ver →
194
5 Media display →
342
6 Climate contro l systems →
167
7 Haza rdwa rning lights →
14 9
8 PASSENGER AIR BAG indicator lamps →
47
9 Glovecompa rtment →
124
A Stow age compartment →
12 3
B Control knob forvo lume and switching sound
on/off →
339
C Calls up navigation →
384
D Calls up thera dio →
484
Calls up media →
478
E Calls up thete lephone →
428
F Cont rol panel for: Individual wheel control
→
261
Manual gearshifting →
19 9
AIRMATIC or →
251
E- AC TIVE BODY CONTROL →
255
Ac tivating/deactivating ESP ®
→
219
Downhill Speed Regulation →
234
G Calls up favo urites →
360
H Calls up vehicle functions →
352
I Active Parking Assist →
280
J DYNA MIC SELECT switch →
19 5
K Touchpad →
342
L Start/ stop button →
180
M MBUX multimedia sy stem control panel →
342
N Adjusts thesteering wheel mechanically →
11 8
O Adjusts thesteering wheel electrically →
11 9
Switches thesteering wheel heater on/off →
11 9
P Control panel for: At
aglance – Cockpit 7
Page 36 of 697
Data
storage Electronic control units
Elect
ronic control units are fitted in your vehicle.
Some of these are necessary forth e safe opera‐
tion of your vehicle, while some assist you when
driving (driver assis tance sy stems). In addition,
yo ur vehicle pr ovides com fort and enter tainment
functions, which are also made possible byelec‐
tronic control units.
Elect ronic control units contain da tamemories
which can temp orarily or permanently store
te ch nical information about theve hicle's operat‐
ing state, component loads, main tenance
re qu irements and tech nical events or faults.
In general, this information documents thest ate
of a component part, a module, a sy stem or the
sur roundings such as:
R operating status of sy stem components (e.g.
fi ll le vels, battery status, tyre pressure)
R status messages concerning theve hicle or
its individual components (e.g. number of
wheel revo lutions/speed, longitudinal accel‐ eration, lateral acceleration, display of
fas‐
te ned seat belts)
R malfunctions or faults in impor tant sy stem
components (e.g. lights, brakes)
R information on events leading tovehicle
damage
R system reactions in special driving situations
(e.g. airbag deployment, inter vention of sta‐
bility control sy stems)
R ambient conditions (e.g. temp erature, rain
sensor)
In addition toprov iding the actual control unit
function, this data assists the manufacturer in
de tecting and rectifying faults and optimising
ve hicle functions. The majority of this data is
te mp orary and is only processed in theve hicle
itself. Only a small portion of the data is stored
in theeve nt or fault memor y.
When your vehicle is serviced, tech nical da ta
from theve hicle can be read out byservice net‐
wo rkemplo yees (e.g. workshops, manufactur‐
ers) or third parties (e.g. breakdown services).
Services include repair services, maintenance
processes, warranty claims and quality assur‐ ance measures,
forex ample. The read out is per‐
fo rm ed via the legally prescribed port forthe
diagnostics connection in theve hicle. The
re spective service network locations or third
parties collect, process and use the data. They
document tech nical statuses of theve hicle,
assist in finding faults and impr oving quality and
are transmitted tothe manufacturer, if neces‐
sar y.Fu rthermore, the manufacturer is subject
to product liability. Forth is, the manufacturer
requ irestech nical da tafrom vehicles.
Fa ult memories in theve hicle can be reset by a
service outlet as part of repair or maintenance
wo rk.
Depending on the selected equipment, you can
import data into vehicle con venience and info‐
ta inment functions yourself.
This includes, forex ample:
R multimedia data such as music, films or pho‐
to sfo r playback in an integrated multimedia
sy stem
R address book data for use in connection with
an integrated hands-free sy stem or an inte‐
grated navigation sy stem General no
tes33
Page 37 of 697
R
entered navigation destinations
R data about the use of internet services
This data can be sa ved locally in theve hicle or it
is located on a device which you ha veconnected
to theve hicle (e.g. a smartphone, USB flash
drive or MP3 pla yer). If this data is stored in the
ve hicle, you can dele teit at any time. This data
is sent tothird parties only at your requ est, par‐
ticular lywhen you use online services in accord‐
ance with the settings that you ha veselected.
Yo u can store or change con venience settings/
individualisations in theve hicle at any time.
Depending on the equipment, this includes, for
ex ample:
R settings forth e seat and steering wheel posi‐
tions
R suspension and climate control settings
R customisations such as interior lighting
If yo ur vehicle is accordingly equipped, you can
connect your smartphone or ano ther mobile end
device totheve hicle. You can cont rolth is by
means of the control elements integrated in the
ve hicle. Images and audio from the smartphone can be output via
the multimedia sy stem. Cer‐
ta in information is simultaneously transfer redto
yo ur smartphone.
Depending on the type of integration, this can
include:
R general vehicle data
R position data
This allo wsyouto use selected apps on your
smartphone, such as navigation or music play‐
bac k.There is no fur ther interaction between the
smartphone and theve hicle; in particular, vehi‐
cle data is not directly accessible. Which type of
fur ther data processing occurs is de term ined by
th e pr ovider of the specific app used. Which set‐
tings you can make, if an y,depends on the spe‐
cific app and the operating sy stem of your
smartphone. Online services
Wire
less network connection
If yo ur vehicle has a wireless network connec‐
tion, it enables data tobe exc hanged between
yo ur vehicle and additional sy stems. The wire‐ less network connection is enabled via
theve hi‐
cle's transmission and reception unit or via con‐
nected mobile end devices (e.g. sma rtphones).
Online functions can be used via the wireless
network connection. This includes online serv‐
ices and applications/apps pr ovided bythe man‐
ufacturer or other pr oviders.
Manu factu rer's se rvices
Re garding online services of the manufacturer,
th e individual functions are described bythe
manufacturer in a suita ble place (e.g. Owner's
Manual, website of the manufacturer) along with
th ere leva nt da taprotection information. Per‐
sonal data may be used forth e pr ovision of
online services. Data is exchanged via a secure
connection, e.g. the manufacturer's designated
IT sy stems. Personal data is collected, pro‐
cessed and used via the pr ovision of services
ex clusively on the basis of legal permissions or
with prior consent.
The services and functions (sometimes subject
to afe e) can usually be activated or deactivated.
In some cases, this also applies tothe entire
ve hicle's data connection. This excludes, in par‐
ticular, legally prescribed functions and services. 34
General no tes
Page 47 of 697
Pr
otection bythe airbags Depending on
the accident situation, an airbag
may supplement the pr otection of fere dby a cor‐
re ctly fastened seat belt. &
WARNING Risk of inju ryor death due to
incor rect seat position
If yo u deviate from the cor rect seat position,
th e airbag cann otper form its intended pro‐
te ctive function and deployment may even
cause fur ther injuries.
In order toavo idrisks, each vehicle occupant
must alw ays make sure of thefo llowing:
R Fasten seat belts cor rectly. Pregnant
wo men must take particular care to
ensure that the lap belt ne ver lies across
th e abdomen.
R Adopt the cor rect seat position and keep
as faraw ay as possible from the airbags.
R Obser vethefo llowing information. #
Alw ays make sure that there are no
objects between the airbag and vehicle
occupant. To
avo idtherisks resulting from the deployment
of an airbag, each vehicle occupant must
obser vethefo llowing information in particular:
R Before starting your journe y,adjust your seat
co rrectly; the driver's seat and front
passenger seat should be mo ved as far back
as possible.
When doing so, alw ays obser vethe informa‐
tion on the cor rect driver's seat position
(/ page 108).
R Onlyhold thesteering wheel bythesteering
wheel rim. This allow sth e airbag tobe fully
deplo yed.
R Alw ays lean against the seat backrest when
th eve hicle is in motion. Do not lean forw ards
or against the door or side windo w.You may
ot herwise be in the deployment area of the
airbags.
R Alw ayske ep your feet on thefloor. Do not
put your feet on the cockpit, forex ample. Yo
ur feet may otherwise be in the deploy‐
ment area of the airbag.
R Ifch ildren are tra velling in theve hicle,
obser vethe additional no tes (/ page 52).
R Alw aysstow and secure objects cor rectl y.
Objects in theve hicle interior may pr event an
airbag from functioning cor rectly. Each vehicle
occupant must alw ays make sure of thefo llow‐
ing in particular:
R There are no people, animals or objects
between theve hicle occupants and an air‐
bag.
R There are no objects between the seat, door
and door pillar (B-pillar).
R There are no hard objects, e.g. coat hangers,
hanging on the grab handles or coat hooks.
R There are no accessory parts, such as mobile
navigation devices, mobile phones or cup
holders, attached totheve hicle within the
deployment area of an airbag, e.g. on the
cockpit, on the door, on the side window or
on the side wall trim. 44
Occupant saf ety
Page 197 of 697
If
th e sy stem does not inter vene du ring the
eve nt ahead, no thing will be displa yed. The sys‐
te m is passive.
ECO Assist is active only in drive programs ;
and A.
Sy stem limits
ECO Assist can function even more precisely if
th ero ute is adhered towhen route guidance is
active. The basic function is also available with‐
out active route guidance. Notall information
and traf fic situations can be fore seen. The qual‐
ity depends on the map data.
ECO Assist is only an aid. The driver is responsi‐
ble forke eping a safe dis tance from theve hicle
in front, forve hicle speed and for braking in
good time. The driver must be ready tobrake at
all times ir respective of whe ther the sy stem
inter venes.
The sy stem may be impaired or may not function
in thefo llowing situations:
R If visibility is poor (e.g. due toinsuf ficient illu‐
mination of thero ad, high lyvariable shade
conditions, rain, sno w,fog or heavy spr ay). R
Ifth ere is glare (e.g. from oncoming traf fic,
di re ct sunlight or reflections).
R Ifth ere is dirt on the windscreen in the vicin‐
ity of the multifunction camera or the camera
is mis ted up, damaged or obscured.
R If tra ffic signs are hard todiscern (e.g. due to
dirt, snow or insuf ficient lighting, or because
th ey are obscured).
R Ifth e information on the navigation sy stem's
digital map is incor rect or out of da te.
R Ifth e signs are ambiguous (e.g. traf fic signs
in roadwor ksor in adjacent lanes). DY
NA MIC SELECT switch Fu
nction of theDY NA MIC SELECT switch Depending on
the engine and equipment, the
ve hicle has dif fere nt drive programs.
Use theDY NA MIC SELECT switch tochange
between thefo llowing drive programs:
= (Individual) : individual settings
B (Sport +): particularly sporty driving style C
(Sport): sporty driving style
A (Comfort): comfortable and economical
driving style
; (Eco):particularly economical driving
st yle
N (CURVE): comfortable driving with cur ve
inclination function (vehicles with
E‑ AC TIVE BODY CONTROL)
F Offroad: driving on less demanding off-
ro ad terrain
% The drive prog ram selected appears in the
multifunction display of the on-board com‐
puter.
Depending on the drive prog ram, thefo llowing
sy stems change their characteristics:
R drive
-
engine and transmission management
- Active Dis tance Assi stDISTRONIC
R ESP ®
R vehicles with AIRMATIC or E‑ACTIVE
BO DY CONT ROL: 194
Driving and pa rking
Page 292 of 697
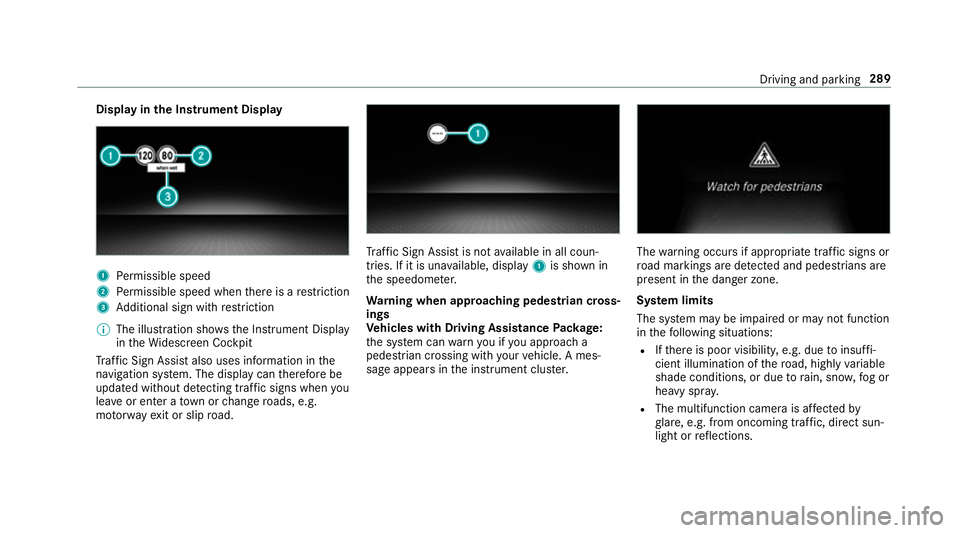
Display in
the Instrument Display 1
Perm issible speed
2 Perm issible speed when there is a restriction
3 Additional sign with restriction
% The illu stra tion sho wsthe Instrument Display
in theWi descreen Cockpit
Tr af fic Sign Assi stalso uses information in the
navigation sy stem. The display can therefore be
updated without de tecting traf fic signs when you
lea veor enter a town or change roads, e.g.
mo torw ay ex it or slip road. Tr
af fic Sign Assi stis not available in all coun‐
tries. If it is una vailable, display 1is shown in
th e speedome ter.
Wa rning when app roaching pedestrian cross‐
ings
Ve hicles with Driving Assistance Package:
th e sy stem can warnyou if you approach a
pedestrian crossing with your vehicle. A mes‐
sage appears inthe instrument clus ter. The
warning occurs if appropriate traf fic signs or
ro ad markings are de tected and pedestrians are
present in the danger zone.
Sy stem limits
The sy stem may be impaired or may not function
in thefo llowing situations:
R Ifth ere is poor visibility, e.g. due toinsuf fi‐
cient illumination of thero ad, high lyvariable
shade conditions, or due torain, sno w,fog or
heavy spr ay.
R The multifunction camera is af fected by
gl are, e.g. from oncoming traf fic, di rect sun‐
light or reflections. Driving and parking
289
Page 293 of 697
R
The windscreen is dirty in the area of the
multifunction camera, or the camera is mis‐
te d up, damaged or co vered.
R Ifth e traf fic signs are ha rdtodetect, e.g. due
to dirt or sno w,or because they are co vered,
or due toinsuf ficient lighting.
R Ifth e information in the navigation sy stem's
digital map is incor rect or out-of-da te.
R The signs are ambiguous, e.g. traf fic signs on
construction sites or in adjacent lanes.
R Ifyo u turn sharpl y,yo u may pass traf fic signs
th at are outside the camera's field of vision.
Setting Traf fic Sign Assist
Re quirements:
R Only vehicles with Driving Assistance
Pa ckage:
Ac tive Dis tance Assi stDISTRONIC mu stbe
activated forth e automatic adoption of
speed limits. Multimedia sy
stem:
4 © 5
Settings 5
Assistance
5 Traffic Sign Assist
Ac tivating/deactivating automatic adoption
of speed limits (only vehicles with Driving
Assistance Package) #
Select Adopt limit. #
Activate or deacti vate the function.
The speed limits de tected byTraf fic Sign
Assi stare automatically adop tedby Active
Dis tance Assi stDISTRONIC.
% If one of thefo llowing sy stems is activated,
th e speed de tected can be manually adop ted
as the speed limit:
R Active Dis tance Assi stDISTRONIC
R Cruise control
R Variable limiter
Fu rther information (/ page 238).
Displaying de tected traf fic signs in the
medi a display #
Select Display in head unit. #
Activate or deacti vate the function.
Ad justing the type of warning #
Select Visual & audible ,Visual orNone.
Ad justing the warning threshold
This value de term ines the speed at which a
wa rning is issued when exceeded. #
Select Warning threshold. #
Set the desired speed. Blind Spot Assist and
Active Blind Spot
Assi stwith exitwa rning Fu
nction of Blind Spot Assist and Active
Blind Spot Assi stwith exitwa rning
Blind Spot Assist and Active Blind Spot Assi st
use two lateral, rear-facing radar sensors to
monitor the area up to40 m behind and 3 m
next toyour vehicle.
If a vehicle is de tected at speeds ab ove appr ox‐
imately 12km/h and this vehicle subsequently
enters the monitoring range di rectly next to your
ve hicle, thewa rning lamp in the outside mir ror
lights up red. 290
Driving and parking
Page 309 of 697
Obser
vethe legal requ irements forth e count ry
in which you are cur rently driving when operat‐
ing the on-board computer.
% The on-board computer displa yswill appear
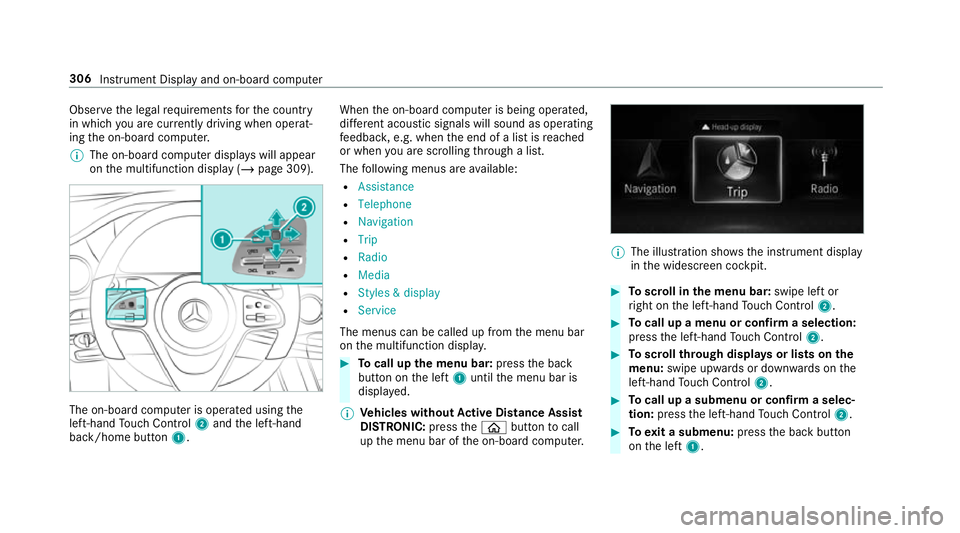
on the multifunction display (/ page 309).The on-board computer is operated using
the
left-hand Touch Control 2and the left-hand
back/home button 1. When
the on-board computer is being operated,
dif fere nt acoustic signals will sound as operating
fe edbac k,e.g. when the end of a list is reached
or when you are sc rolling thro ugh a list.
The following menus are available:
R Assistance
R Telephone
R Navigation
R Trip
R Radio
R Media
R Styles & display
R Service
The menus can be called up from the menu bar
on the multifunction displa y. #
Tocall up the menu bar: pressthe back
button on the left 1until the menu bar is
displa yed.
% Ve
hicles without Active Di stance Assist
DISTRO NIC:press theò button tocall
up the menu bar of the on-board computer. %
The illustration sho wsthe instrument display
in the widescreen cockpit. #
Toscroll in the menu bar: swipe left or
ri ght on the left-hand Touch Control 2. #
Tocall up a menu or confirm a selection:
press the left-hand Touch Control 2. #
Toscroll through displa ysor lists on the
menu: swipe upwards or down wards on the
left-hand Touch Control 2. #
Tocall up a submenu or confirm a selec‐
tion: press the left-hand Touch Control 2. #
Toexit a submenu: pressthe back button
on the left 1. 306
Instrument Display and on-board computer