2019 MERCEDES-BENZ GLE COUPE fuel cap
[x] Cancel search: fuel capPage 14 of 697
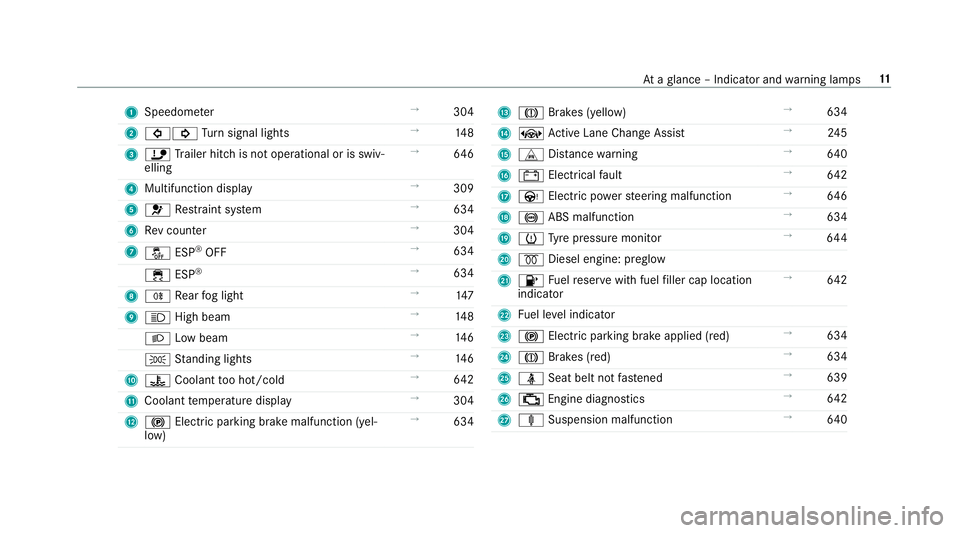
1
Speedom eter →
304
2 #! Turn signal lights →
14 8
3 ï Trailer hit chis not operational or is swiv‐
elling →
646
4 Multifunction display →
309
5 6 Restra int sy stem →
634
6 Rev counter →
304
7 å ESP®
OFF →
634
÷ ESP®
→
634
8 R Rear fog light →
147
9 K High beam →
14 8
L Low beam →
14 6
T Standing lights →
14 6
A ? Coolant too hot/cold →
642
B Coolant temp erature display →
304
C ! Electric pa rking brake malfunction (yel‐
low) →
634 D
J Brakes (yellow) →
634
E ± Active Lane Change Assi st→
24 5
F L Distance warning →
640
G # Electrical fault →
642
H Ù Electric po werst eering malfunction →
646
I ! ABS malfunction →
634
J h Tyre pressure monitor →
644
K % Diesel engine: preglow
L 8 Fuelreser vewith fuel filler cap location
indicator →
642
M Fuel le vel indicator
N ! Electric parking brake applied (red) →
634
O J Brakes (red) →
634
P ü Seat belt not fastened →
639
Q ; Engine diagnostics →
642
R ä Suspension malfunction →
640 At
aglance – Indicator and warning lamps 11
Page 176 of 697
#
Press button 1.
The red or blue indicator lamp on button 1
will light up or go out.
Indicator lamp colours: R blue: stationary ventilation is switched on
R red: stationary heater is swit ched on
R Yello w: departure time preselected
The stationary heater/ stationary ventilation will
switch off au tomatically af ter 50 minutes.
Setting thest ationary heater / stationary
ve ntilation via the multimedia sy stem #
Call up the air conditioning menu
(/ page 167). #
Select Auxiliary heating.
Selecting the departu retime #
Select the time TIME A: XX, TIME B: XXor
TIME C: XX.
Setting the departu retime #
Select the time TIME A: XX, TIME B: XXor
TIME C: XX. #
Select the pen beside the time. #
Set a time.
Setting thest ationary heater/stationary ven‐
tilation via remo tecont rol
Re quirements:
R The fuel tank is filled toat least reser vefuel
le ve l.
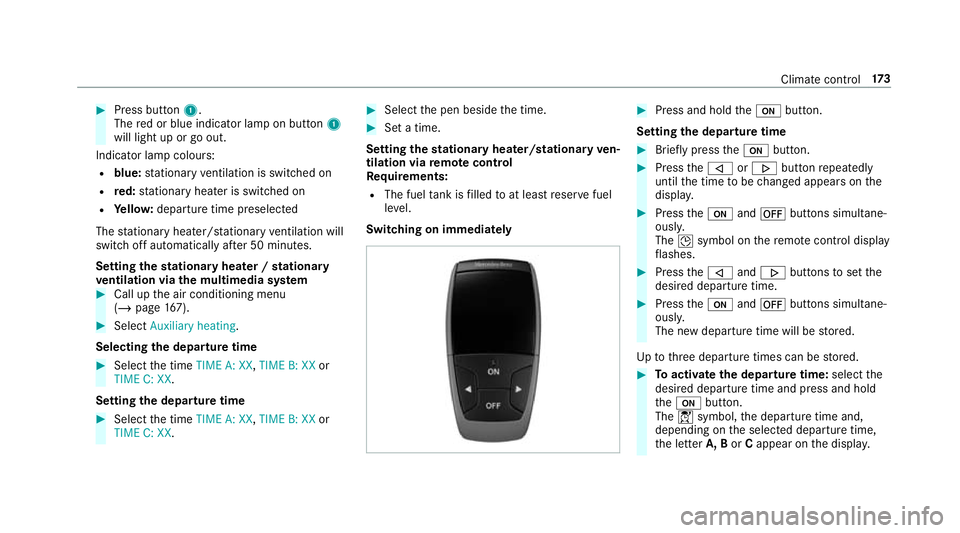
Switching on immedia tely #
Press and hold theu button.
Setting the departu retime #
Brie fly press theu button. #
Press the, or. button repeatedly
until the time tobe changed appears on the
displa y. #
Press theu and^ buttons simultane‐
ousl y.
The Îsymbol on there mo tecontrol displ ay
fl ashes. #
Press the, and. buttons toset the
desired departure time. #
Press theu and^ buttons simultane‐
ousl y.
The new departure time will be stored.
Up tothre e departure times can be stored. #
Toactivate the departu retime: select the
desired departure time and press and hold
th eu button.
The Ísymbol, the departure time and,
depending on the selected departure time,
th e letter A, BorCappear on the displa y. Climate cont
rol17 3
Page 205 of 697
Re
fuelling Re
fuelling theve hicle &
WARNING Risk offire or explosion from
fuel
Fu els are highly flammable. #
Fire, naked flames, smoking and crea‐
tion of spar ksmust be avoided. #
Swit choff the ignition and, if available,
th est ationary heater, before and while
re fuelling theve hicle. &
WARNING Risk of inju ryfrom fuels
Fu els are poisonous and hazardous to your
health. #
Do not swallow fuel or let it come into
contact with skin, eyes or clo thing. #
Do not inhale fuel vapour. #
Keep children away from fuel. #
Keep doors and windo wsclosed du ring
th ere fuelling process. If
yo u or other people come into contact with
fuel, obser vethefo llowing: #
Immediately rinse fuel off your skin with
soap and water. #
If fuel comes into contact with your
ey es, immediately rinse them thor‐
oughly with clean water.Seek medical
attention immediately. #
Ifyo u swallow fuel, seek medical atten‐
tion immediatel y.Do not induce vomit‐
ing. #
Change immediately out of clo thing that
has come into con tact wi thfuel. &
WARNING Risk offire or explosion from
elect rostatic charge
Electros tatic charge can crea tespar ksand
th ereby ignite fuel vapours. #
Before opening the fuel filler cap or tak‐
ing hold of the pump nozzle, touch the
me tallic body of theve hicle.
This dischar ges any electros tatic charge
th at may ha vebuilt up. #
Do not get into theve hicle again during
th ere fuelling process.
Otherwise, electros tatic charge could
build up again. &
WARNING Risk offire from fuel mixture
Ve hicles with a diesel engine:
If yo u mix diesel fuel with petrol, theflash
point of the fuel mixture is lo werth an that of
pure diesel fuel.
While the engine is running, component
pa rts in theex haust sy stem may overheat
without warning. #
Neverre fuel using petrol. #
Never mix petrol with diesel fuel. 202
Driving and parking
Page 207 of 697
#
Have the fuel tank and fuel lines
drained compl etely. *
NO
TEDo not use petrol torefuel vehi‐
cles with a diesel engine If
yo u ha veacciden tally refuelled with the
wrong fuel:
R do not swit chthe ignition on. Otherwise,
fuel can enter the fuel sy stem.
Even small amounts of the wrong fuel
could result in damage tothe fuel sy stem
and the engine. The repair costs are high. #
Consult a qualified specialist workshop. #
Have the fuel tank and fuel lines
drained compl etely. *
NO
TEDama getothe fuel sy stem caused
by ove rfilled fuel tanks #
Only fill th e fuel tank until the pump
nozzle switches off. If
yo u ha veadded too much fuel because of a
defective filling pump, for ins tance: #
Do not switch the ignition on. #
Consult a qualified specialist workshop. *
NO
TEFuel may spr ayout when you
re mo vethe fuel pump nozzle #
Only fill th e fuel tank until the pump
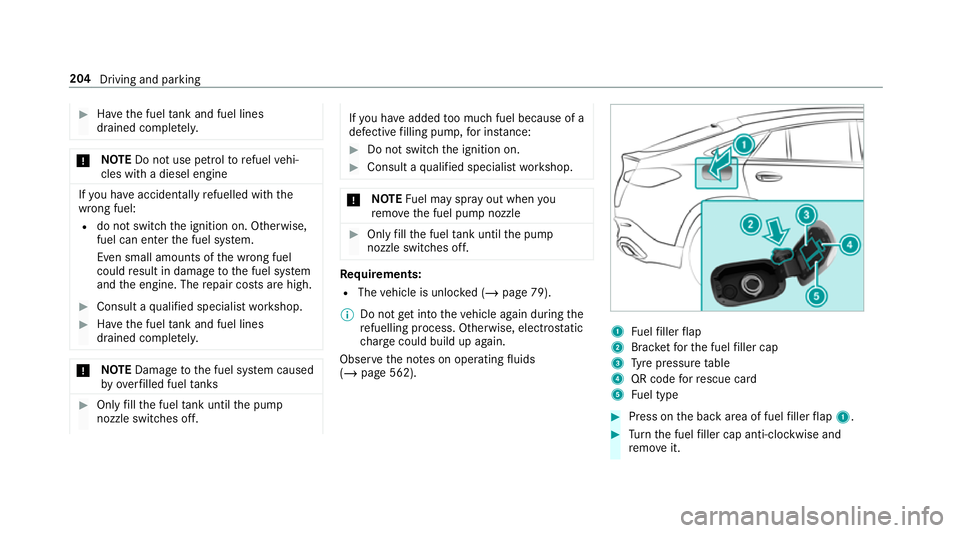
nozzle switches off. Re
quirements:
R The vehicle is unloc ked (/ page 79).
% Do not get into theve hicle again during the
re fuelling process. Otherwise, electros tatic
ch arge could build up again.
Obser vethe no tes on operating fluids
(/ page 562). 1
Fuelfiller flap
2 Brac ketfo rth e fuel filler cap
3 Tyre pressure table
4 QR code forre scue card
5 Fuel type #
Press on the back area of fuel filler flap 1. #
Turn the fuel filler cap anti-clockwise and
re mo veit. 204
Driving and parking
Page 208 of 697
#
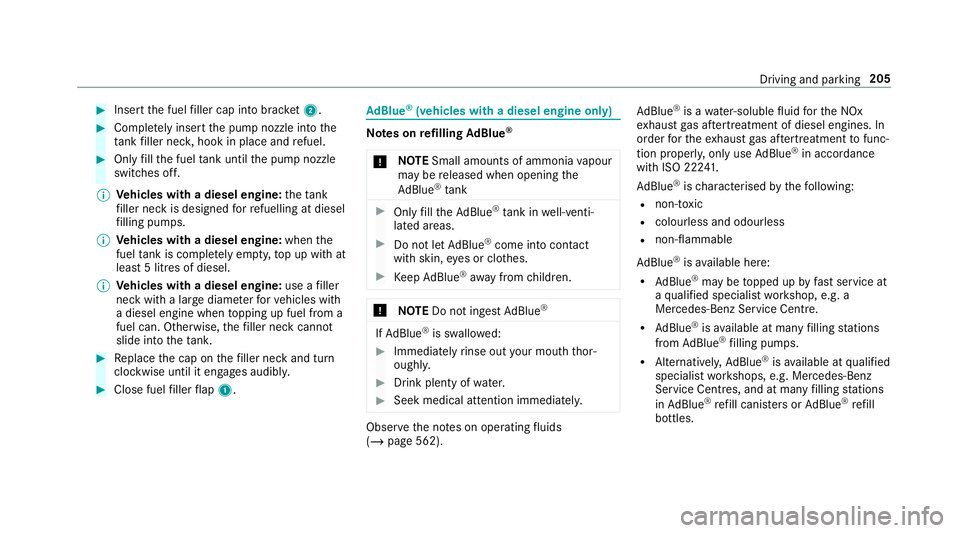
Insert the fuel filler cap into brac ket2. #
Comp lete ly inse rtthe pump nozzle into the
ta nk filler nec k,hook in place and refuel. #
Only fill th e fuel tank until the pump nozzle
switches off.
% Vehicles with a diesel engine: theta nk
fi ller neck is designed forre fuelling at diesel
fi lling pumps.
% Vehicles with a diesel engine: whenthe
fuel tank is compl etely em pty, top up with at
least 5 litres of diesel.
% Vehicles with a diesel engine: use afiller
neck with a lar gediame terfo rve hicles with
a diesel engine when topping up fuel from a
fuel can. Otherwise, thefiller neck cannot
slide into theta nk. #
Replace the cap on thefiller neck and turn
clockwise until it engages audibl y.#
Close fuel filler flap 1. Ad
Blue ®
(vehicles with a diesel engine on ly) Note
s onrefilling AdBlue ®
* NO
TESmall amounts of ammonia vapour
may be released when opening the
Ad Blue ®
tank #
Only fill th eAd Blue ®
tank in well-venti‐
lated areas. #
Do not let AdBlue ®
come into contact
wi th skin, eyes or clo thes. #
Keep AdBlue ®
aw ay from children. *
NOTEDo not ingest AdBlue ® If
Ad Blue ®
is swallo wed: #
Immediately rinse out your mouth thor‐
oughl y. #
Drink plenty of water. #
Seek medical attention immediately. Obser
vethe no tes on operating fluids
(/ page 562). Ad
Blue ®
is a water-soluble fluid forth e NOx
ex haust gas af tertre atment of diesel engines. In
order forth eex haust gas af tertre atment tofunc‐
tion properly, only use AdBlue ®
in acco rdance
with ISO 22 241.
Ad Blue ®
is ch aracterised bythefo llowing:
R non-t oxic
R colourless and odourless
R non-flammable
Ad Blue ®
is available here:
R AdBlue ®
may be topped up byfast service at
a qu alified specialist workshop, e.g. a
Mercedes-Benz Service Centre.
R AdBlue ®
is available at many filling stations
from AdBlue ®
filling pumps.
R Alternativel y,Ad Blue ®
is available at qualified
specialist workshops, e.g. Mercedes-Benz
Service Centres, and at many filling stations
in Ad Blue ®
re fill canis ters or AdBlue ®
re fill
bottles. Driving and parking
205
Page 209 of 697
%
Ensu rethe connection between there fill
con tainer and vehicle filler neck does not
drip.
Re fill Ad Blue ®
* NOTEEngine dama gedue toAd Blue ®
being in the fuel #
AdBlue ®
must not be used tofill the
fuel tank. #
Only use AdBlue ®
to fill th eAd Blue ®
ta nk. #
Do not overfill theAd Blue ®
tank. *
NO
TEContamination of theve hicle inte‐
ri or due toAd Blue ®
lea kage #
Afterto pping up, carefully close the
Ad Blue ®
re fill con tainer. #
Avoid car rying AdBlue ®
re fill con tainers
permanently in theve hicle. Re
quirements:
R The vehicle is unloc ked. The
following messages appear in order in the
multifunction display when theAd Blue ®
tank
requ irestopping up:
R Refill AdBlue See Owner’s Manual . The
Ad Blue ®
tan k is down tothere ser veleve l.
R AdBlue system fault Emergency op. in XXX
miles See Owner's Manual .Yo u can on ly
drive theve hicle over the dis tance shown.
The AdBlue ®
tank is down tothere ser ve
le ve l.
R Top up AdBlue Perf. reduced: XXX km/h No
start in XXX km .Yo u can on ly drivetheve hi‐
cle at the speed shown and overth e dis tance
shown. Top up AdBlue ®
as soon as possible.
R Refill AdBlue No start in XXX miles. You can
on ly drive theve hicle overth e dis tance
shown. Top up AdBlue ®
as soon as possible.
R XX,X l Top up AdBlue Engine start not possi-
ble. The vehicle can no longer be star ted.
Yo u can see theAd Blue ®
ra nge and le vel in the
multifunction display (/ page310). %
The AdBlue ®
ra nge shown depends strongly
on the driving style and operating condi‐
tions. The actual range can therefore deviate
from the calculated range.
Opening the AdBlue ®
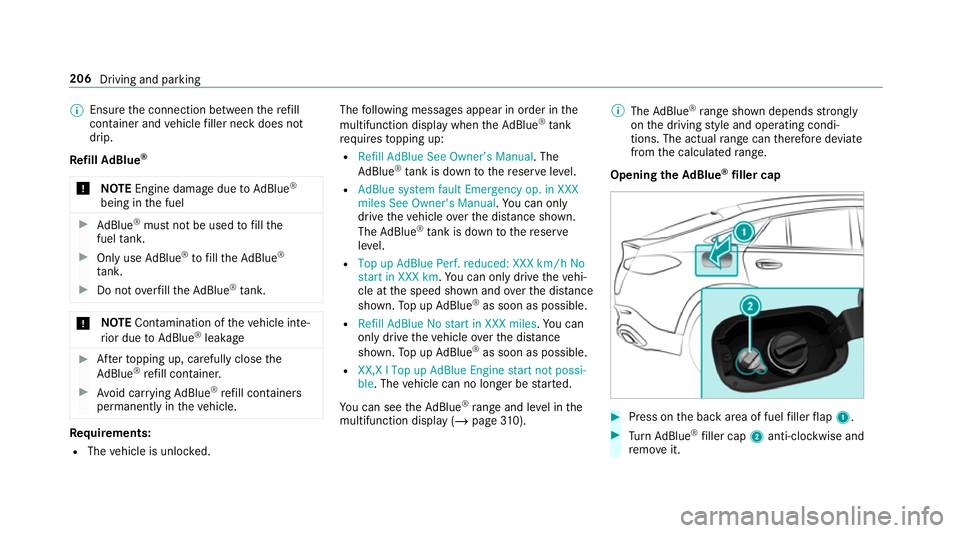
filler cap #
Press on the back area of fuel filler flap 1. #
Turn AdBlue ®
filler cap 2anti-clockwise and
re mo veit. 206
Driving and parking
Page 210 of 697
%
You can also store theAd Blue ®
filler cap in
th e fuel filler cap holder in the fuel filler flap
hin gearm.
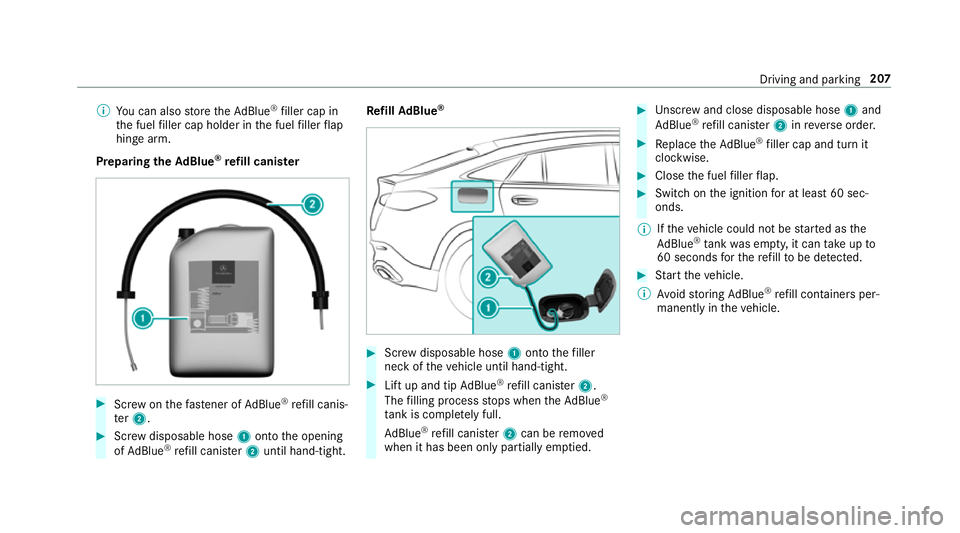
Prepa ring theAd Blue ®
re fill canis ter #
Screw onthefast ener of AdBlue ®
re fill canis‐
te r2. #
Screw disposable hose 1onto the opening
of Ad Blue ®
re fill canis ter2 until hand-tight. Re
fill Ad Blue ® #
Screw disposable hose 1onto thefiller
neck of theve hicle until hand-tight. #
Lift up and tip AdBlue ®
re fill canis ter2.
The filling process stops when theAd Blue ®
ta nk is compl etely full.
Ad Blue ®
re fill canis ter2 can be remo ved
when it has been only partially em ptied. #
Unscr ew and close disposable hose 1and
Ad Blue ®
re fill canis ter2 inreve rse order. #
Replace theAd Blue ®
filler cap and turn it
clockwise. #
Close the fuel filler flap. #
Swit chon the ignition for at least 60 sec‐
onds.
% Ifth eve hicle could not be star ted as the
Ad Blue ®
tan kwa s em pty, it can take up to
60 seconds forth ere fill to be de tected. #
Start theve hicle.
% Avoid storing AdBlue ®
re fill con tainers per‐
manently in theve hicle. Driving and parking
207
Page 307 of 697
Instrument display
overview
Mercedes-AMG vehicles: be sure toobser ve
th e no tes in the Supplement. Otherwise, you
may failto recognise dangers. &
WARNING Risk of accident due toan
instrument display malfunction
If th e Instrument Display has failed or mal‐
functioned, you may not recognise function
re strictions applying tosaf etyre leva nt sys‐
te ms.
The operating saf ety of your vehicle may be
impaired. #
Drive on carefull y.#
Have theve hicle checked immediately
at a qualified specialist workshop. If
th e operating saf ety of your vehicle is
impaired, park theve hicle immediately and
safel y.Con tact a qualified specialist workshop. Instrument display in
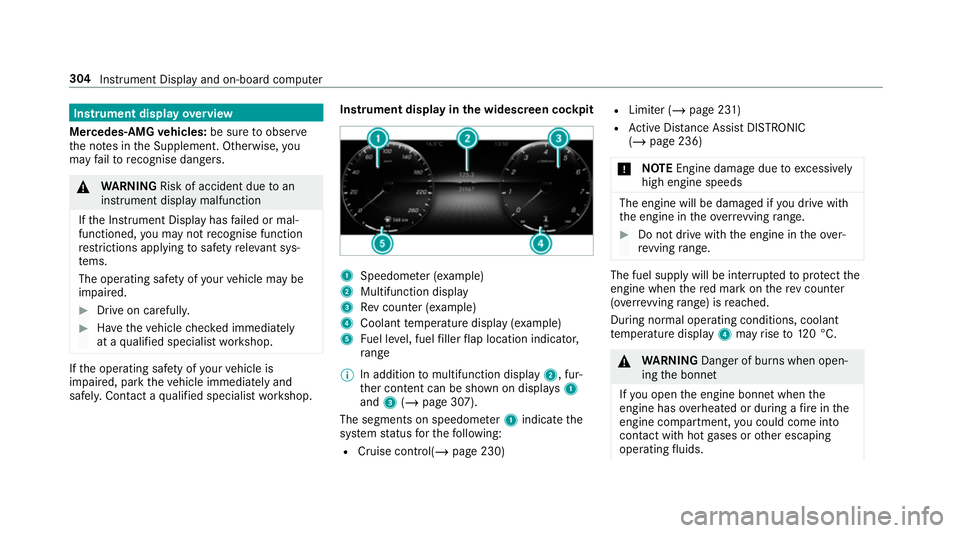
the widescreen cockpit 1
Speedome ter (e xamp le)
2 Multifunction display
3 Rev counter (e xample)
4 Coolant temp erature display (e xamp le)
5 Fuel le vel, fuel filler flap location indicator,
ra nge
% In addition tomultifunction display 2, fur‐
th er conte nt can be shown on displ ays1
and 3(/ page 307).
The segments on speedome ter1 indica tethe
sy stem status forth efo llowing:
R Cruise control(/ page 230) R
Limiter (/ page 231)
R Active Dis tance Assi stDISTRONIC
(/ page 236)
* NO
TEEngine dama gedue toexcessively
high engine speeds The engine will be damaged if
you drive with
th e engine in theov errevving range. #
Do not drive wi th the engine in theove r‐
re vving range. The fuel supply will be inter
rupted toprotect the
engine when there d mark on there v counter
(o ve rrev ving range) is reached.
During no rmal operating conditions, coolant
te mp erature display 4may rise to120 °C. &
WARNING Danger of bu rns when open‐
ing the bonn et
If yo u open the engine bonn etwhen the
engine has overheated or during a fire inthe
engine compartment, you could come into
contact with hot gases or other escaping
operating fluids. 304
Instru ment Display and on-board computer