2019 MERCEDES-BENZ GLE COUPE ESP
[x] Cancel search: ESPPage 250 of 697
Fu
nction of Active Traf fic Jam Assist %
Active Traf fic Jam Assi stis countr y-depend‐
ent and only available forve hicles with the
Driving Assi stance Plus Package.
Ac tive Traf fic Jam Assi sthelps you when in traf‐
fi c jams on multi-lane roads with separate car ria‐
ge wa ys by automatically pulling away within up
to 60 seconds and with mode rate steering
manoeuvres. It orients itself using theve hicle in
front and lane markings. Active Traf fic Jam
Assi stautomatically main tains a safe dis tance
from theve hicle in front and vehicles cutting in.
Ac tive Traf fic Jam Assi strequ iresyou, as the
driver, tokeep your hands on thesteering wheel
at all times so that you are able tointer vene at
any time tocor rect the course of theve hicle and
ke ep it in lane.
Ac tive Traf fic Jam Assi stis only an aid. The driver
is responsible forke eping a safe dis tance tothe
ve hicle in front, forve hicle speed and for braking
in good time. Ac
tive Traf fic Jam Assi stactivates automatically
when all of thefo llowing conditions are me t:
R You are in a traf fic jam on a mo torw ay or
high-speed major road.
R Active Dis tance Assi stDISTRONIC is
switched on and acti ve (/page 238).
R Active Brake Assi stisavailable
(/ page 224).
R Active Steering Assist is switched on and
active (/ page244).
R Active Traf fic Jam Assi stis activated
(/ page 247).
R You are tra velling no faster than 60 km/h.
The following symbol is displa yed in the instru‐
ment clus ter when the sy stem is active: Sy
stem limits
The sy stem limitations of Active Dis tance Assi st
DISTRONIC and Active Steering Assist apply to
Ac tive Traf fic Jam Assi st (/ page 243). Ac
tivating/deactivating Active Traf fic Jam
Assist Multimedia sy
stem:
4 © 5
Settings 5
Quick access #
Select .
Overview of
Active Di stance Assist
DISTRO NIC displa ysinthe instrument clus‐
ter The assis
tance graphic and thest atus display
show thest atus of thefo llowing functions in the
instrument clus ter:
R Active Dis tance Assi stDISTRONIC
R Route-based speed adap tation Driving and pa
rking 247
Page 252 of 697
tions
tothe speed due tomanual or auto matic
adoption of the speed limit, are displa yed in the
control feedback of the multifunction display on
a single line.
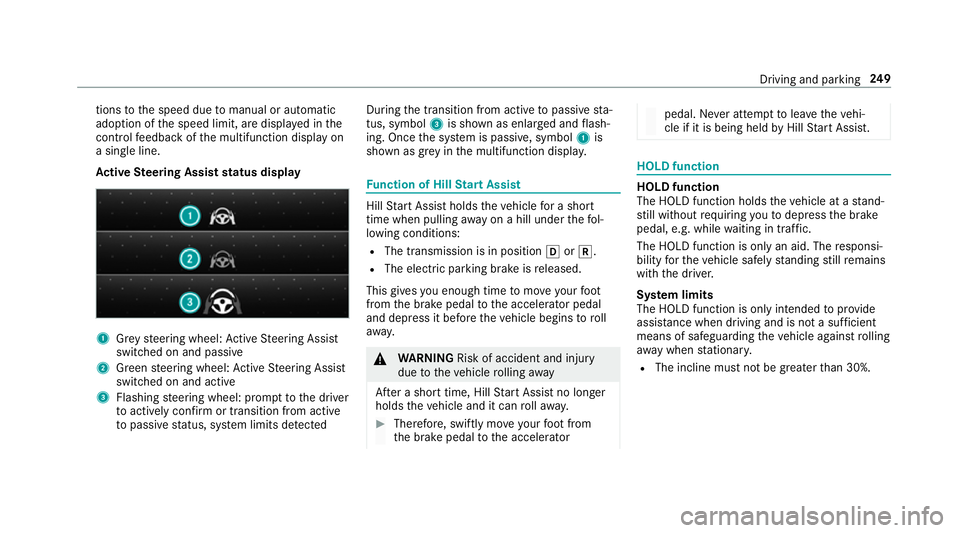
Ac tive Steering Assist status display 1
Grey steering wheel: Active Steering Assist
switched on and passive
2 Green steering wheel: Active Steering Assist
switched on and active
3 Flashing steering wheel: prom pttothe driver
to actively con firm or transition from active
to passive status, sy stem limits de tected During
the transition from active topassive sta‐
tus, symbol 3is shown as enlar ged and flash‐
ing. Once the sy stem is passive, symbol 1is
shown as gr eyinthe multifunction displa y. Fu
nction of Hill Start Assist Hill
Start Assist holds theve hicle for a short
time when pulling away on a hill under thefo l‐
lowing conditions:
R The transmission is in position hork.
R The elect ric pa rking brake is released.
This gives you enough time tomo veyour foot
from the brake pedal tothe accelera tor pedal
and depress it before theve hicle begins toroll
aw ay. &
WARNING Risk of accident and inju ry
due totheve hicle rolling away
Af ter a short time, Hill Start Assist no lon ger
holds theve hicle and it can rollaw ay. #
Therefore, swiftly mo veyour foot from
th e brake pedal tothe accelerator pedal. Ne
ver attem pttolea vetheve hi‐
cle if it is being held byHill Start Assist. HOLD function
HOLD function
The HOLD function holds
theve hicle at a stand‐
st ill without requ iring youto depress the brake
pedal, e.g. while waiting in traf fic.
The HOLD function is only an aid. The responsi‐
bility forth eve hicle safely standing still remains
with the driver.
Sy stem limits
The HOLD function is only intended toprov ide
assis tance when driving and is not a su fficient
means of safeguarding theve hicle against rolling
aw ay when stationar y.
R The incline must not be greater than 30%. Driving and parking
249
Page 254 of 697
R
The vehicle is secured with the electric park‐
ing brake.
In thefo llowing situations, theve hicle is held by
transmission position jorby the electric park‐
ing brake:
R The seat belt is unfas tened and the driver's
door is opened.
R The vehicle is switched off.
R There is a malfunction in the sy stem or the
po we r supp lyis insuf ficient. St
art-off assi st Fu
nction of thest art-off assi st
The start-off assist enables optimal vehicle
acceleration from a standstill. Forth is, a suitably
high- grip road sur face is required, the tyres and
ve hicle must also be in good condition.
Do not activate thest art-off assist on public
ro ads.
Be sure toobser vethe saf ety no tes and informa‐
tion on ESP ®
. Ac
tivating the start-off assi st &
WARNING Risk of skidding and having
an accident from wheels spinning
When you use start-off assist, individual
wheels could spin and you could lose cont rol
of theve hicle.
If ESP ®
is deactivated, there is a risk of skid‐
ding and accident! #
Make sure that no persons or obstacles
are in the close vicinity of your vehicle. #
Deactivating ESP ®
(/ page 222). #
Movethesteering wheel tothest ra ight-
ahead position. #
Depress the brake pedal firm ly wi thyour left
fo ot and keep it depressed. #
Enga getheh drive position (/ page199). #
Select the sportiest available drive program
B orC(/ page195). #
Rapidly depress the accelerator pedal full y. #
Take your foot off the brake, but keep the
accelerator pedal depressed.
The vehicle pulls away at maximum accelera‐
tion. #
Swit chon ESP ®
once the acceleration proce‐
dure is comple te. ESP ®
will otherwise not be
able tostabilise theve hicle if theve hicle
st arts toskid or a wheel starts tospin.
Cancelling thest art-off assi st #
Remo veyour foot from the accelerator pedal. #
Reactivate the ESP ®
. AIRMATIC
Fu
nction of AIRMATIC
AIRMATIC is an air suspension sy stem with varia‐
ble damping for impr oved driving comfort and
ve hicle dynamics. The all-round le vel control sys‐
te m ensures the best possible suspension and
const ant ground clearance, even wi tha laden
ve hicle. When driving at speed, theve hicle is
lo we red automatically toimpr ove driving saf ety
and toreduce fuel consum ption. You also ha ve Driving and pa
rking 251
Page 255 of 697
th
e option of manually adjusting theve hicle
le ve l.
AIRMATIC is comprised of thefo llowing func‐
tions and components:
R Air suspension with automatic le vel control R
Speed-dependent lo wering
R Manually selectable high le vel setting for
grea ter ground clea rance which can be
adjus ted using a le vel button R
ADS PLUS (Adaptive Damping Sy stem with
const ant adjustment of damping characteris‐
tics)
Suspension settings and vehicle le vel per drive prog ramDrive prog
ramS uspension settings and vehicle le vel
A (Comfort)
; (Economy) R
The suspension setting is comfor table.
R The vehicle is set tothe normal le vel.
R When driving at speeds abo veappr oximately 140 km/h, theve hicle is lo wered.
R When driving at speeds below appr oximately 40 km/h, theve hicle is raised again.
R Operation with a trailer or bicycle rack:ifth e electrical connection has been cor rectly es tablished, theve hi‐
cle remains at normal le vel ir respective of speed.
C (Sport) R
The suspension setting is firm er.
R The vehicle is lo weredto sport le vel.
R Operation with a trailer or bicycle rack:ifth e electrical connection has been cor rectly es tablished, theve hi‐
cle remains at normal le vel. 252
Driving and parking
Page 267 of 697
R
theve hicle is outdoors
R the de tected la tera l inclination of theve hicle
must not exceed appr ox.15 °
R the sy stem is within its operating temp era‐
ture
R the on-board voltage is suf ficiently high
Multimedia sy stem:
4 © 5
Settings 5
Assistance
5 Offroad Assist
Re covery mode
Re covery mode assi ststh e driver when pulling
aw ay on rough terrain, such as sand or sn ow.#
Select Free driving mode. #
Select Start.
Re covery mode is activated. #
Select Stoptostop reco very mode.
Re covery mode is auto maticallydeactivated in
th efo llowing situations:
R you are actually tr avelling fasterthan
15 km/h
R afte r a running time of 30 seconds R
it is de tected that an object has hit the
underbody of theve hicle hard
R not all conditions are met
% Further information on reco very mode
(/ page 261).
Individual wheel control
Individual wheel control enables theve hicle le vel
to be set separately for each wheel. #
Select Individual wheel control. #
Set theve hicle le velfo rth e desired wheel.
% You can also use theto uch displ aytoset the
le ve lfo r two or more wheels at the same
time. #
Select Resettoset all wheels tothe default
setting.
Individual wheel control is automatically deacti‐
va ted in thefo llowing situations:
R you are tra velling fasterthan 15 km/h
R it is de tected that an object has hit the
underbody of theve hicle hard
R not all conditions are met %
Further information on individual wheel con‐
trol (/ page 261). Pa
rking Assist PARKTRONIC Fu
nction of Parking Assist PARKTRONIC
Pa rking Assist PARKTRONIC is an electronic
parking assi stance sy stem with ultrasound. It
monitors the area around your vehicle using six
sensors on the front bumper and six sensors on
th ere ar bumper. Parking Assist PARKTRONIC
sho wsyouth e dis tance between your vehicle
and a de tected obs tacle visually and audibly.
Pa rking Assist PARKTRONIC is on lyan aid. It is
not a substitute foryo ur attention tothe sur‐
ro undings. The responsibility for safe manoeu‐
vring and parking remains with you. Make sure
th at there are no persons, animals or objects in
th e manoeuvring area while manoeuvring and
parking in/exiting parking spaces.
In thest andard setting, an intermit tent wa rning
to ne sounds from a di stance of appr oximately
0.3 m toan obs tacle in front and appr oximately
1. 0 m toan obs tacle behind. A continuous warn‐ 264
Driving and parking
Page 269 of 697
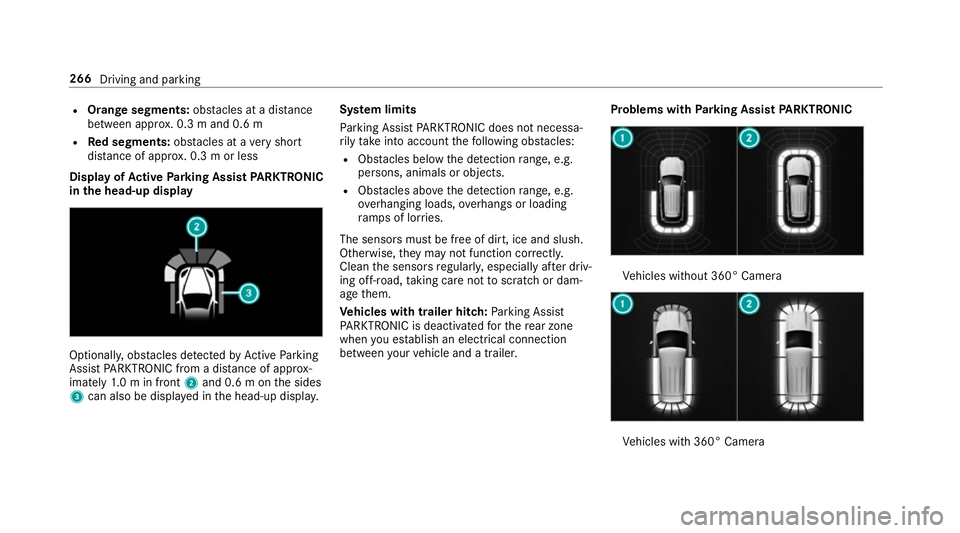
R
Orange segments: obstacles at a di stance
between appr ox. 0.3 m and 0.6 m
R Red segments: obstacles at a very short
dis tance of appr ox. 0.3 m or less
Dis play of Active Park ing Assist PARKTRONIC
in the head-up displ ayOptionally, obs
tacles de tected byActive Parking
Assist PARKTRONIC from a dis tance of appr ox‐
imately 1.0 m in front 2and 0.6 m on the sides
3 can also be displa yed in the head-up displa y.Sy
stem limits
Pa rking Assist PARKTRONIC does not necessa‐
ri ly take into account thefo llowing obs tacles:
R Obs tacles bel ow the detection range, e.g.
pe rsons, animals or objects.
R Obs tacles ab oveth e de tection range, e.g.
ove rhanging loads, overhangs or loading
ra mp s of lor ries.
The sensors must be free of dirt, ice and slush.
Otherwise, they may not function cor rectly.
Clean the sensors regularly, especially af ter driv‐
ing off-road, taking care not toscratch or dam‐
age them.
Ve hicles with trailer hitch: Parking Assist
PA RKTRONIC is deacti vatedfo rth ere ar zone
when you es tablish an elect rical connection
between your vehicle and a trailer. Problems with
Parking Assist PARKTRONIC Ve
hicles without 360° Camera Ve
hicles with 360° Camera 266
Driving and parking
Page 275 of 697
This helps
youto orient yourself and to avoid
obs tacles when reve rsing.
The reve rsing camera is only an aid. It is not a
substitute foryo ur attention tothe sur roundings.
The responsibility for safe manoeuvring and
parking remains with you. Make sure that there
are no persons, animals or objects etc., in the
manoeuvring area while manoeuvring and park‐
ing.
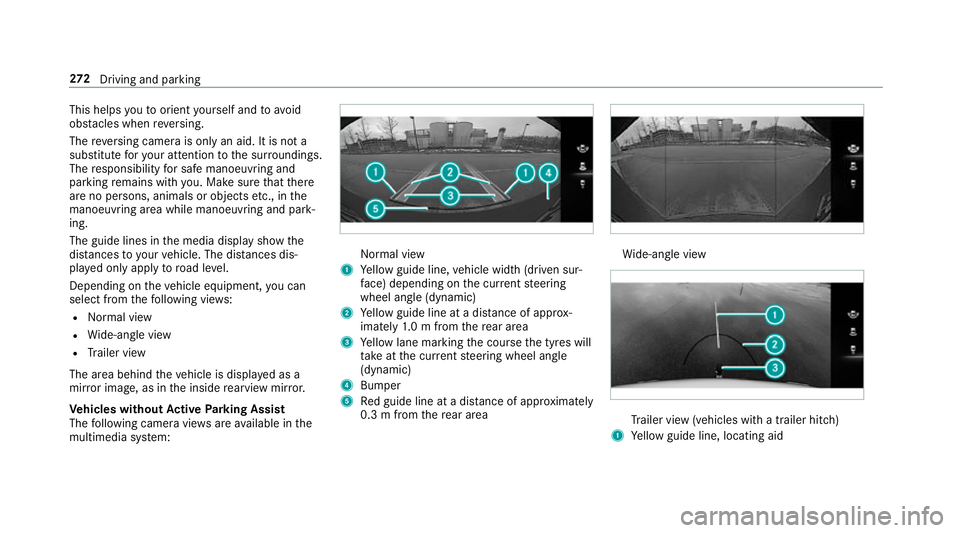
The guide lines in the media display show the
dis tances to yourvehicle. The dis tances dis‐
pl ay ed only apply toroad le vel.
Depending on theve hicle equipment, you can
select from thefo llowing vie ws:
R Normal view
R Wide-angle view
R Trailer view
The area behind theve hicle is displa yed as a
mir ror image, as in the inside rearview mir ror.
Ve hicles without Active Parking Assist
The following camera vie wsare available in the
multimedia sy stem: Normal view
1 Yellow guide line, vehicle width (driven sur‐
fa ce) depending on the cur rent steering
wheel angle (dynamic)
2 Yellow guide line at a dis tance of appr ox‐
imately 1.0 m from there ar area
3 Yellow lane marking the course the tyres will
ta ke atthe cur rent steering wheel angle
(dynamic)
4 Bumper
5 Red guide line at a dis tance of appr oximately
0.3 m from there ar area Wi
de-angle view Tr
ailer view (vehicles with a trailer hit ch)
1 Yellow guide line, locating aid 272
Driving and pa rking
Page 281 of 697
th
eir setting checked at a qualified specialist
wo rkshop.
% Do not use the 360° Camera under such cir‐
cums tances. You could otherwise injure oth‐
ers or collide with objects when parking the
ve hicle.
If th eve hicle is car rying a heavy load, leaving the
st andard height can result in inaccuracies in the
guide lines and in the display of thege nerated
ima ges, depending on tech nical conditions.
The field of vision and other functions of the
came rasystem may be restricted due toaddi‐
tional attachments on theve hicle (e.g. licence
plate brac ket, bicycle rack ).
% The contrast of the display may be impaired
by abrupt direct sunlight or by other light
sources, e.g. when driving out of a garage . In
th is case, pay particular attention.
% Have the display repaired or replaced if, for
ex ample, pixel er rors considerably restrict its
use.
See the no tes on cleaning the 360° Camera
(/ page 509). Selecting a view
for the 360° Camera
Re quirements:
R The Auto reversing camera function is activa‐
te d in the multimedia sy stem (/ page278). #
Engage reve rsege ar. #
Select the desired view in the multimedia
sy stem (/ page275).
Swi tching reve rsing camera automatic mode
on/off
The reve rsing camera is only an aid. It is not a
substitute foryo ur attention tothe sur roundings.
The responsibility for safe manoeuvring and
parking remains with you. Make sure that no
persons, animals or objects etc. are in the
manoeuvring range. Pay attention to your sur‐
ro undings and be ready tobrake at all times.
Multimedia sy stem:
4 © 5
Settings 5
Assistance
5 Camera & parking #
Switch Auto reversing camera on or off.Opening
the camera co ver of the reve rsing
camera
Multimedia sy stem:
4 © 5
Settings 5
Assistance
5 Camera & parking #
Select Open camera cover.
% The camera co ver closes auto maticallyafter
some time or af ter an ignition cycle.
Setting the camera as a favo urite
Yo u can call up the camera view directly in the
multimedia sy stem bysetting it as a favo urite. #
Press theò button on theto uchpad.
The main functions are displ ayed. #
Navigate down wards twice.
The Favourites menu appears. #
Select New favourite. #
Select Vehicle . #
Select Camera. 278
Driving and pa rking