2019 MERCEDES-BENZ GLE COUPE ESP
[x] Cancel search: ESPPage 156 of 697
On
very rare occasions, Adaptive Highbeam
Assist Plus may failto recognise other road
users that ha velights, or may recognise
th em too late.
In this, or in similar situations, the automatic
main beam will not be deactivated or will be
activated despite the presence of other road
users. #
Alw ays obser vethe tra ffic carefully and
switch off the main beam in good time. Ad
aptive Highbeam Assist Plus cannot take into
account road, weather or traf fic conditions.
De tection may be restricted in thefo llowing
cases:
R In poor visibilit y,e.g. fog, heavy rain or snow
R Ifth ere is dirt on the sensors or the sensors
are obscured
Ad aptive Highbeam Assist Plus is on lyan aid.
Yo u are responsible for adju sting theve hicle's
lighting tothe pr evailing light, visibility and traf‐
fi c conditions. %
Adaptive Highbeam Assist Plus is available
on ly in vehicles with Intelligent Light Sy stem. The
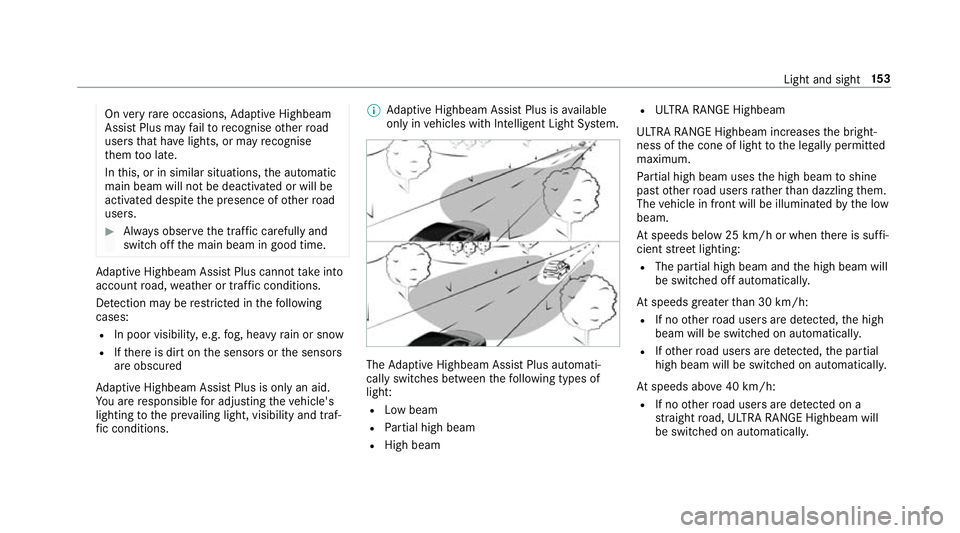
Adaptive Highbeam Assist Plus automati‐
cally swit ches between thefo llowing types of
light:
R Low beam
R Partial high beam
R High beam R
ULTRA RANGE Highbeam
ULTRA RANGE Highbeam inc reases the bright‐
ness of the cone of light tothe legally permitted
maximum.
Pa rtial high beam uses the high beam toshine
past other road users rath er than dazzling them.
The vehicle in front will be illuminated bythe low
beam.
At speeds below 25 km/h or when there is suf fi‐
cient stre et lighting:
R The partial high beam and the high beam will
be switched off automaticall y.
At speeds greater than 30 km/h:
R If no other road users are de tected, the high
beam will be switched on automaticall y.
R Ifot her road users are de tected, the partial
high beam will be switched on automaticall y.
At speeds abo ve40 km/h:
R If no other road users are de tected on a
st ra ight road, ULTRA RANGE Highbeam will
be swit ched on automaticall y. Light and sight
15 3
Page 164 of 697
Ad
justing the outside mir rors #
Press button 1or3 toselect the outside
mir rorto be adjus ted. #
Press button 4toadjust the position of the
mir rorgl ass.
Engaging the outside mir rors
If an outside mir ror has been forc ibly disen‐
ga ge d, proceed as follo ws. #
Vehicles without electrically folding outside
mir rors: manually mo vethe outside mir ror
into the cor rect position. #
Vehicles with electrically folding outside mir‐
ro rs: press and hold button 2.
Yo u will hear a click and the mir ror will audi‐
bly engage in position. The outside mir ror will
now be set tothe cor rect position. Au
tomatic anti-dazzle mir rors function &
WARNING Risk of acid bu rns and poi‐
soning due tothe anti-dazzle mir ror elec‐
trolyte
Electrolyte may escape if theglass in an
automatic anti-dazzle mir ror breaks.
The electrolyte is hazardous tohealth and
causes ir rita tion. It mu stnot come into con‐
ta ct wi thyour skin, eyes,respiratory or gans
or clo thing or be swallo wed. #
Ifyo u come into contact with electro‐
ly te , obser vethefo llowing:
R Immediately rinse the electrolyte
from your skin with water and seek
medical attention.
R If electrolyte comes into contact
with your eyes, immediately rinse
th em thoroughly with clean water
and seek medical attention.
R Ifth e electrolyte is swallo wed,
immediately rinse your mouth out
th oroughl y.Do not induce vomiting.
Seek medical attention immediately. R
Immedia tely ch ange out of clo thing
which has been con taminated with
electrolyte.
R If an allergic reaction occurs, seek
medical attention immediatel y. The inside
rearview mir ror and the outside mir‐
ro r on the driver's side will automatically go into
anti-dazzle mode if light from a headlamp hits
th e sensor on the inside rearview mir ror.
Sy stem limits
The sy stem will not go into anti-dazzle mode if:
R The engine is switched off.
R Reversege ar is engaged.
R The interior lighting is swit ched on. Fr
ont-passenger outside mir ror parking posi‐
tion function %
The pa rking position is available on ly invehi‐
cles with a memory function.
The parking position makes parking easier. Light and sight
161
Page 168 of 697
Overview of climate control sy
stems Note
s on climate control An interior air
filter in combination with the pre‐
fi lter in the engine compartment must alw ays be
used so that the air conditioning sy stem, pollu‐
tion lebutton vel monitoring and the air filtration
wo rkcor rectly. Ma kesure that thefilter is ins tal‐
led cor rectly and thefilter housing in the engine
compartment is closed cor rectly using the cap
and alw ays tightly sealed when in operation. Use
fi lters recommended and appr ovedby
Mercedes-Benz. Alw ays ha veservice workcar‐
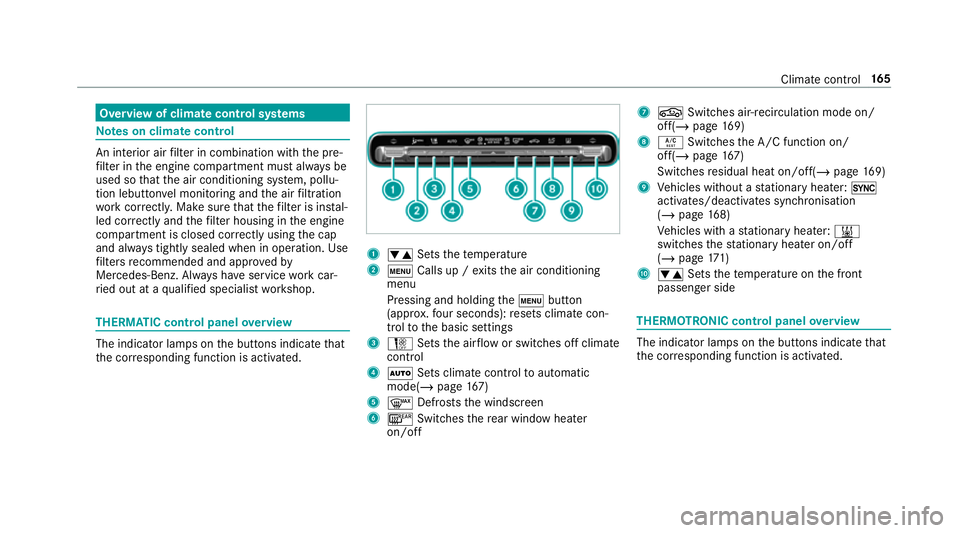
ri ed out at a qualified specialist workshop. THERMATIC control panel
overview The indicator lamps on
the buttons indicate that
th e cor responding function is activated. 1
w Setsthete mp erature
2 t Calls up / exits the air conditioning
menu
Pressing and holding thet button
(appr ox.fo ur seconds): resets climate con‐
trol tothe basic settings
3 H Setsthe air flow or switches off climate
control
4 Ã Sets climate control toautomatic
mode(/ page167)
5 ¬ Defrosts the windscreen
6 ¤ Switches there ar wind owheater
on/off 7
g Switches air-recirculation mode on/
off(/ page169)
8 Á Switches the A/C function on/
off(/ page167)
Switches residual heat on/off(/ page169)
9 Vehicles without a stationary heater: 0
activates/deactivates syn chronisation
(/ page 168)
Ve hicles with a stationary heater: &
swit ches thest ationary heater on/off
(/ page 171)
A w Setsthete mp erature on the front
passenger side THERMOTRONIC control panel
overview The indicator lamps on
the buttons indicate that
th e cor responding function is activated. Climate
control 16 5
Page 182 of 697
Driving
Note
s on Mercedes-AMG vehicles Obser
vethe no tes on thefo llowing topics in the
Supplement, as you may otherwise failto recog‐
nise dangers:
R AMG RIDE CONTROL
R (DYNAMIC SELECT switch) drive programs
R Functions of ESP ® Switching the po
wer supp lyor ignition on
without starting the engine &
WARNING Risk of accident and inju ry
due tochildren left unat tended in the
ve hicle
If ch ildren are left unat tended in theve hicle,
th ey could:
R Open doo rs,th ereby endangering other
persons or road users.
R Get out and be stru ck byoncoming traf‐
fi c. R
Ope rate ve hicle equipment and become
trapped, forex ample.
In addition, thech ildren could also set the
ve hicle in motion, forex ample by:
R Releasing the parking brake.
R Changing the transmission position.
R Starting theve hicle. #
Never lea vechildren unat tended in the
ve hicle. #
When leaving theve hicle, alw aysta ke
th eke y with you and lock theve hicle. #
Keep theve hicle key out of reach of
ch ildren. Also obser
vethe "No tes on pets in theve hicle".
This also applies tothe Digital Vehicle Key if the
"Digital Vehicle Key" function is activated via
Mercedes me connect.
Re quirements:
R theke y is located in theve hicle and thekey
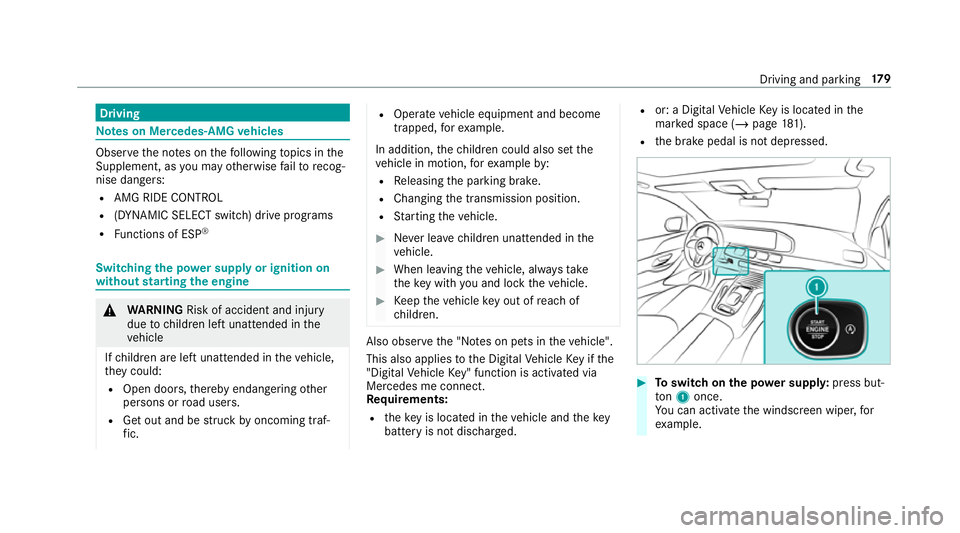
battery is not dischar ged. R
or: a Digital Vehicle Key is located in the
mar ked space (/ page181).
R the brake pedal is not depressed. #
Toswitch on the po wer supp ly:press but‐
to n1 once.
Yo u can activate the windscreen wiper, for
ex ample. Driving and parking
17 9
Page 190 of 697
#
When driving on unpa vedro ads or off-
ro ad, regular lych eck theve hicle under‐
side. #
Remo vetrapped plants or other flam‐
mable material, in particular. #
Ifth ere is damage, consult a qualified
specialist workshop immediately. When driving off-road, subs
tances su chas sand,
mud and water orwate r mixed with oil may get
into the brakes. This may lead toare duction in
braking ef fect or total brake failure as a result of
increased wear. The braking characteristics will
va ry depending on the material that has entered
th e sy stem. Clean the brakes af ter driving off-
ro ad. If youth en notice reduced braking ef fect
or hear scraping noises, ha vethe brake sy stem
ch ecked at a qualified specialist workshop.
Ad just your driving style to thech anged braking
ch aracteristics. *
NO
TEDama gecaused bydriving over
obs tacles The
vehicle can be damaged by:
R driving up on high kerbs or unpa ved
ro ads.
R quickly driving over obs tacles su chas
ke rbs, speed bumps or po tholes.
R heavy objects hitting the underbody or
ch assis components. #
Do not drive over obs tacles that could
damage theve hicle. #
Check theve hicle regular lyfor dama ge
during off-road driving. #
Adjust theve hicle speed tosuit the
ro ad sur face conditions. #
Ifth ere is damage, consult a qualified
specialist workshop immediately. +
ENVIRONMENTAL
NOTEEnvironmental
dama gedue tonon-obser vance of pro‐
hibition signs Environmental pr
otection has priority. Treat
nature with respect. #
Be sure toobser veprohibition signs. Checklist before driving off-road
Check
thefo llowing points before driving off-
ro ad:
R Fuel le vel
R Vehicles with a diesel engine: AdBlue ®
le vel
R Engine oil le vel:fill engine oil up tothe maxi‐
mum le velto ensure full gradeability
(/ page 498).
R Tyre-change tool kit and spare wheel
R Tyres and wheels
% Further information about special all-ter rain
tyres forre trofitting can be ob tained from a
qu alified specialist workshop. Driving and parking
187
Page 196 of 697
it will appear on
the multifunction displa y.The
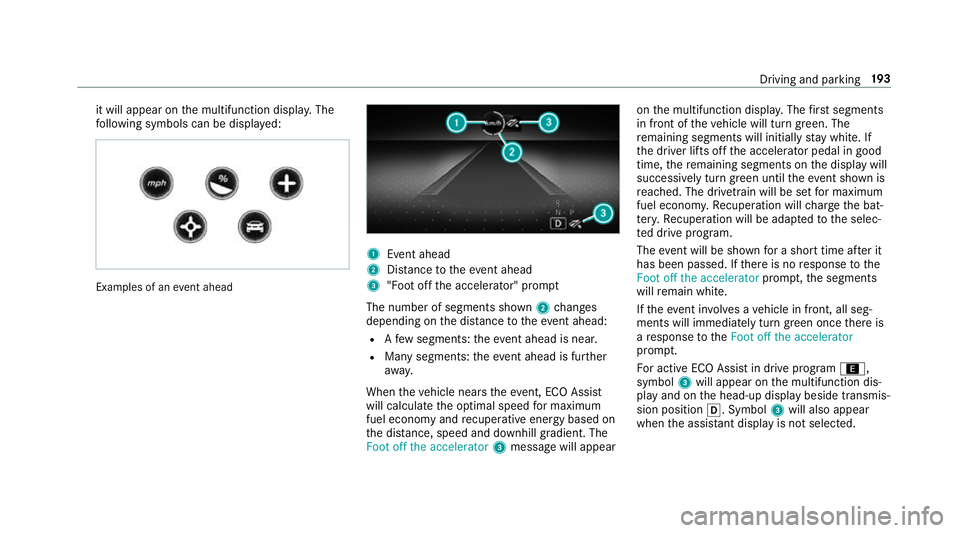
fo llowing symbols can be displa yed: Examples of an
event ahead 1
Event ahead
2 Distance totheeve nt ahead
3 "Foot off the accelerator" prom pt
The number of segments shown 2changes
depending on the dis tance totheeve nt ahead:
R Afew segments: theeve nt ahead is nea r.
R Many segments: theeve nt ahead is fur ther
aw ay.
When theve hicle nears theeve nt, ECO Assi st
will calculate the optimal speed for maximum
fuel economy and recuperati veenergy based on
th e dis tance, speed and downhill gradient. The
Foot off the accelerator 3message will appear on
the multifunction displa y.The firs t segments
in front of theve hicle will turn green. The
re maining segments will initially stay white. If
th e driver lifts off the accelera tor pedal in good
time, there maining segments on the display will
successively turn green until theeve nt shown is
re ached. The driv etra in will be set for maximum
fuel econom y.Re cuperation will charge the bat‐
te ry.Re cuperation will be adap tedto the selec‐
te d drive prog ram.
The event will be shown for a short time af ter it
has been passed. If there is no response tothe
Foot off the accelerator prompt,th e segments
will remain white.
If th eev ent in volves a vehicle in front, all seg‐
ments will immediately turn green once there is
a re sponse totheFoot off the accelerator
prom pt.
Fo r active ECO Assist in drive program ;,
symbol 3will appear on the multifunction dis‐
play and on the head-up display beside transmis‐
sion position h. Symbol3will also appear
when the assis tant displ ayis not selec ted. Driving and parking
19 3
Page 197 of 697
If
th e sy stem does not inter vene du ring the
eve nt ahead, no thing will be displa yed. The sys‐
te m is passive.
ECO Assist is active only in drive programs ;
and A.
Sy stem limits
ECO Assist can function even more precisely if
th ero ute is adhered towhen route guidance is
active. The basic function is also available with‐
out active route guidance. Notall information
and traf fic situations can be fore seen. The qual‐
ity depends on the map data.
ECO Assist is only an aid. The driver is responsi‐
ble forke eping a safe dis tance from theve hicle
in front, forve hicle speed and for braking in
good time. The driver must be ready tobrake at
all times ir respective of whe ther the sy stem
inter venes.
The sy stem may be impaired or may not function
in thefo llowing situations:
R If visibility is poor (e.g. due toinsuf ficient illu‐
mination of thero ad, high lyvariable shade
conditions, rain, sno w,fog or heavy spr ay). R
Ifth ere is glare (e.g. from oncoming traf fic,
di re ct sunlight or reflections).
R Ifth ere is dirt on the windscreen in the vicin‐
ity of the multifunction camera or the camera
is mis ted up, damaged or obscured.
R If tra ffic signs are hard todiscern (e.g. due to
dirt, snow or insuf ficient lighting, or because
th ey are obscured).
R Ifth e information on the navigation sy stem's
digital map is incor rect or out of da te.
R Ifth e signs are ambiguous (e.g. traf fic signs
in roadwor ksor in adjacent lanes). DY
NA MIC SELECT switch Fu
nction of theDY NA MIC SELECT switch Depending on
the engine and equipment, the
ve hicle has dif fere nt drive programs.
Use theDY NA MIC SELECT switch tochange
between thefo llowing drive programs:
= (Individual) : individual settings
B (Sport +): particularly sporty driving style C
(Sport): sporty driving style
A (Comfort): comfortable and economical
driving style
; (Eco):particularly economical driving
st yle
N (CURVE): comfortable driving with cur ve
inclination function (vehicles with
E‑ AC TIVE BODY CONTROL)
F Offroad: driving on less demanding off-
ro ad terrain
% The drive prog ram selected appears in the
multifunction display of the on-board com‐
puter.
Depending on the drive prog ram, thefo llowing
sy stems change their characteristics:
R drive
-
engine and transmission management
- Active Dis tance Assi stDISTRONIC
R ESP ®
R vehicles with AIRMATIC or E‑ACTIVE
BO DY CONT ROL: 194
Driving and pa rking
Page 198 of 697
-
suspension settings
- vehicle le vel
R electric po werst eering Note
s onthero of load display Cer
tain drive programs and ESP ®
settings are
unsuitable for transporting a roof load.
When setting or selecting these drive prog rams,
a crossed-through vehicle with a roof load is
shown as a warning. When this symbol is shown,
th e selected drive program is not suitable for
transpo rting a load on thero of.
The following drive programs are af fected:
R Sport drive program
R Sport + drive program
R Individual drive program wi th the ESP ®
set‐
ting Sport or Sport+
% The symbol is also shown in thefo llowing sit‐
uations:
R Within theth emes if a cor responding
drive program is sa ved Fo
r more information on themes see
(/ page 356).
R Within there set display if the pr eviously
active drive prog ram is unsui table forthe
transpo rtof a roof load
Fo r fur ther information on there set dis‐
pla y,see (/ page196). Selec
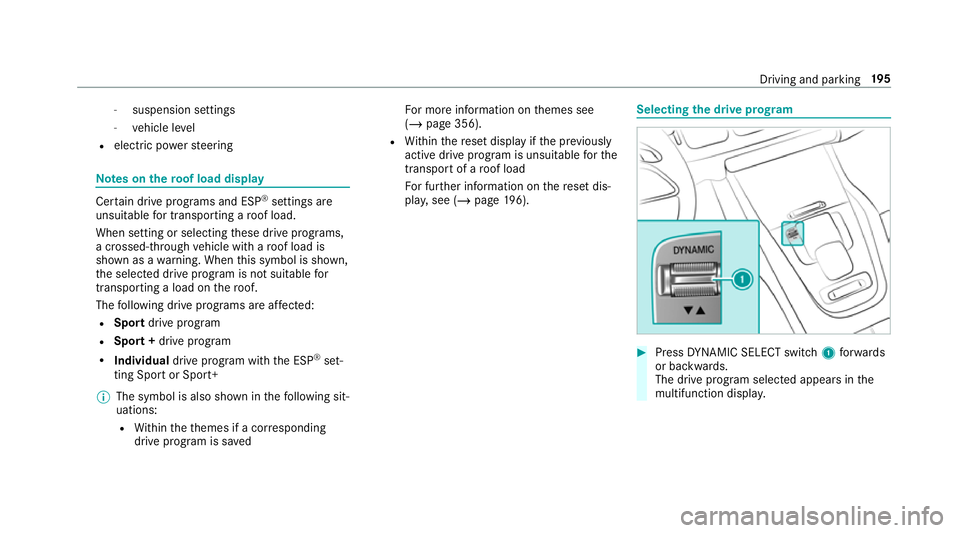
ting the drive prog ram #
Press DYNA MIC SELECT switch 1forw ards
or backwards.
The drive prog ram selected appears in the
multifunction displa y. Driving and pa
rking 19 5