Page 172 of 697
air distribution setting
forth e driver side is adop‐
te d automatically for all clima tecontrol zones. #
Press the 0 button.
The synchronisation function is deactivated if
th e settings for one of theot her climate zones
are changed. Ac
tivating/deactivating the climate control
syn chro nisation function using the multime‐
dia sy stem Climate control can be set centrally using
the
synchronisation function. The driver's settings
fo rte mp erature, air quantity and air distribution
are adop ted automatically for all clima tezones. #
Call up the air conditioning menu
(/ page 167). #
Select First row of seats. #
Select SYNC.
Depending on the pr evious status, the func‐
tion is activated or deactivated. Demisting
the windo ws Wi
ndo wsmis ted up on the inside #
Press theà button. #
Ifth e windo wscontinue tomist up: press the
¬ button.
Wi ndo wsmis ted up on the outside #
Switch on the windscreen wipers. #
Press theà button. Switching air-recirculation mode on/off
#
Press theg button.
The interior air will be recirculated.
Air-reci rculation mode automatically swit ches to
fresh air mode af ter some time.
% If air-recirculation mode is switched on, the
windo wsmay mist up more quickl y.Switch
on ai r-re circulation mode only brie fly. Switches
there sidual heat on/off Re
quirements: R
theve hicle is par ked.
It is possible tomake use of there sidual heat
from the engine tocontinue heating or ventilat‐
ing the front compartment of theve hicle for
appr oximately 30 minutes, depending on the
te mp erature set. #
Toactivate: press button Á.
Re sidual heat will be switched off automaticall y. Switching
there sidual heat in there ar
on/off Re
quirements:
R theve hicle is par ked.
When there sidual heat of the engine is activated
in there ar compartment, you can heat or venti‐
la te there ar compartment for appro ximately
30 minutes. #
Press the 5 button (/ page166). Clima
tecontrol 16 9
Page 173 of 697
Ac
tivating/deactivating ionisation The ionisation impr
oves thequ ality of theve hi‐
cle's interior air. The ionisation of the interior air
is odourless. #
Call up the air conditioning menu
(/ page 167). #
Select Air quality. #
Select IONISATION .
Depending on the pr evious status, the func‐
tion is activated or deactivated. Fr
ag rance sy stem Setting
the frag rance sy stem
Re quirements:
R Automatic clima tecontrol is acti vated.
R The glove box is closed.
The fragrance sy stem distributes a pleasant fra‐
grance thro ughout theve hicle interior from a fla‐
con located in theglov e box. #
Call up the air conditioning menu
(/ page 167). #
Select Air quality. #
Select AIR FRESHENER .
The fragrance sy stem begins at the highest
intensit y. #
Keep pressing until the desired intensity is
re ached.
% The intensity le vels can be selec ted in the
fo llowing order: Strong - Medium - Weak -
Off
Inserting or removing the flacon ofthe fra‐
gr ance sy stem &
WARNING Risk of inju ryfrom liquid per‐
fume
If ch ildren open theflacon, they could drink
th e liquid perfume or it could come into con‐
ta ct wi th theireyes. #
Do not lea vechildren unat tended in the
ve hicle. #
Consult a doctor immediately if liquid
perfume has been drunk. #
If liquid perfume comes into contact
with your eyes or skin, rinse your eyes
with clean water. #
If sym ptoms continue, consult a doctor. +
ENVIRONMENTAL
NOTEEnvironmental
dama gedue toimproper disposal of full
fl acons Fu
llflacons must not be disposed
of with household waste. #
Fu
llflacons must be take nto
a harmful subs tance collection point. 17 0
Climate cont rol
Page 174 of 697
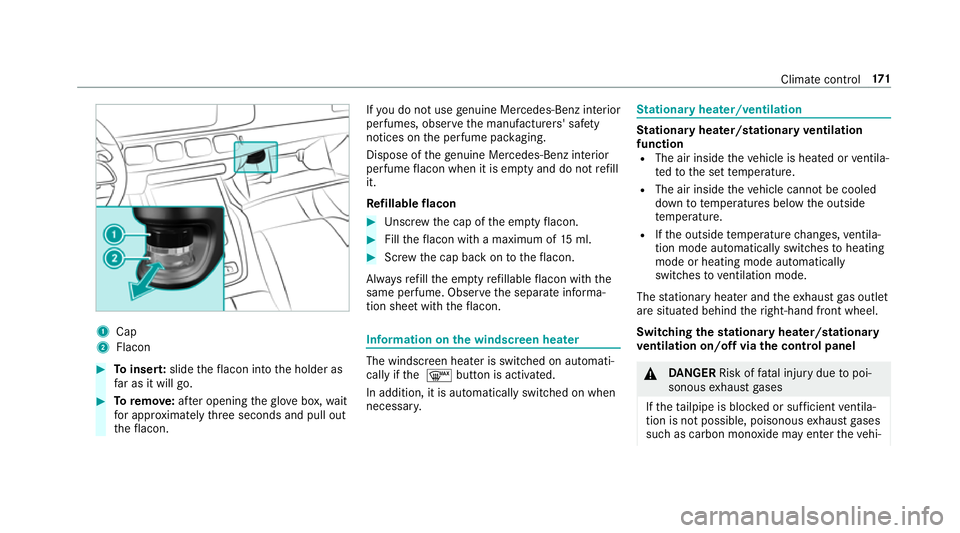
1
Cap
2 Flacon #
Toinser t:slide theflacon into the holder as
fa r as it will go. #
Toremo ve:af te r opening theglov e box, wait
fo r appro ximately thre e seconds and pull out
th eflacon. If
yo u do not use genuine Mercedes-Benz interior
pe rfumes, obse rveth e manufacturers' saf ety
notices on the perfume pac kaging.
Dispose of thege nuine Mercedes-Benz interior
pe rfume flacon when it is em pty and do not refill
it.
Re fillable flacon #
Unscr ew the cap of the em ptyflacon. #
Filltheflacon with a maximum of 15ml. #
Screw the cap back on totheflacon.
Alw aysre fill th e em ptyre fillable flacon with the
same perfume. Obser vethe separate informa‐
tion sheet with theflacon. Information on
the windscreen heater The windscreen heater is swit
ched on automati‐
cally if the ¬ button is activated.
In addition, it is automatically switched on when
necessar y. St
ationary heater/ventilation St
ationary heater/stationary ventilation
function R The air inside theve hicle is heated or ventila‐
te dto the set temp erature.
R The air inside theve hicle cannot be cooled
down totemp eratures below the outside
te mp erature.
R Ifth e outside temp erature changes, ventila‐
tion mode au tomatical lyswitches toheating
mode or heating mode automatically
switches toventilation mode.
The stationary heater and theex haust gas outlet
are situated behind theright-hand front wheel.
Switching thest ationary heater/stationary
ve ntilation on/off via the control panel &
DANG ER Risk of fata l injury due topoi‐
sonous exhaust gases
If th eta ilpipe is bloc ked or suf ficient ventila‐
tion is not possible, poisonous exhaust gases
such as carbon monoxide may enter theve hi‐ Climate control
171
Page 176 of 697
#
Press button 1.
The red or blue indicator lamp on button 1
will light up or go out.
Indicator lamp colours: R blue: stationary ventilation is switched on
R red: stationary heater is swit ched on
R Yello w: departure time preselected
The stationary heater/ stationary ventilation will
switch off au tomatically af ter 50 minutes.
Setting thest ationary heater / stationary
ve ntilation via the multimedia sy stem #
Call up the air conditioning menu
(/ page 167). #
Select Auxiliary heating.
Selecting the departu retime #
Select the time TIME A: XX, TIME B: XXor
TIME C: XX.
Setting the departu retime #
Select the time TIME A: XX, TIME B: XXor
TIME C: XX. #
Select the pen beside the time. #
Set a time.
Setting thest ationary heater/stationary ven‐
tilation via remo tecont rol
Re quirements:
R The fuel tank is filled toat least reser vefuel
le ve l.
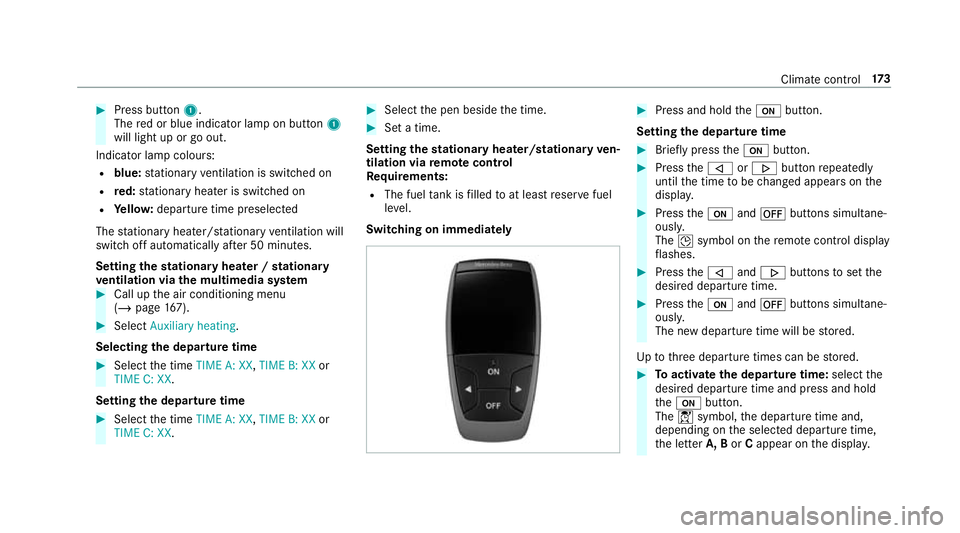
Switching on immedia tely #
Press and hold theu button.
Setting the departu retime #
Brie fly press theu button. #
Press the, or. button repeatedly
until the time tobe changed appears on the
displa y. #
Press theu and^ buttons simultane‐
ousl y.
The Îsymbol on there mo tecontrol displ ay
fl ashes. #
Press the, and. buttons toset the
desired departure time. #
Press theu and^ buttons simultane‐
ousl y.
The new departure time will be stored.
Up tothre e departure times can be stored. #
Toactivate the departu retime: select the
desired departure time and press and hold
th eu button.
The Ísymbol, the departure time and,
depending on the selected departure time,
th e letter A, BorCappear on the displa y. Climate cont
rol17 3
Page 178 of 697
#
Ta
ke dischar ged batteries to a
qu alified specialist workshop or to a
collection point for used batteries. Re
quirements:
R a CR2450 lithium battery #
Push a pointed object into recess 1. #
Slide battery co ver2 backwards in the
direction of the ar row. #
Insert new battery 3with the lettering
fa cing up wards. #
Slide battery co ver2 inthe opposite direc‐
tion tothe ar row onto there mo tecontrol
until the battery co ver engages. Climate control
175
Page 180 of 697
#
Toopen or close center air vents: turn
cont roller 2up or down as far as it will go. #
Toopen or close side air vents: turn con‐
troller 2tothe left or right as far as it will
go. #
Toadjust the air direction: hold airvent 1
in the cent reand mo veit up or down or to
th e left or right. Ad
justing the rear air vents #
Toopen or close: turn controller2tothe
left or right as far as it will go. #
Toadjust the air direction: hold airvent 1
in the cent reand mo veit up or down or to
th e left or right. Opening or closing
the air vent in thegl ove
box
* NO
TEDama geto te mperature-sensitive
objects in theglove box Te
mp erature-sensitive objects stored in the
gl ove box may be damaged bythe air vent
located inside theglove compa rtment. #
Close the air vent when you heat the
ve hicle. #
Athigh outside temp eratures, open the
air vent and switch on the A/C func‐
tion. Au
tomatic clima tecontrol must be switched on
in order tocool theglove box. Climate control
17 7
Page 181 of 697
1
Airvent controller
2 Airvent #
Toopen or close: turn controller1 tothe
left or right. 17 8
Climate cont rol
Page 339 of 697
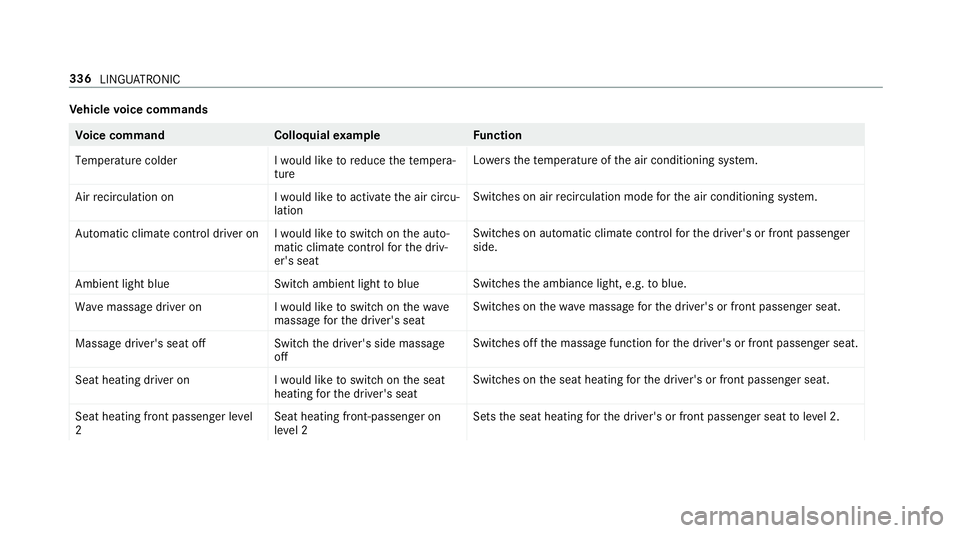
Ve
hicle voice commands Vo
ice command Colloquialexample Function
Temperature colder I would like to reduce the tempera-
tureLo
we rsthete mp erature of the air conditioning sy stem.
Air recirculation on I would like to activate the air circu-
lationSwitches on air
recirculation mode forth e air conditioning sy stem.
Automatic climate control driver on I would like to switch on the auto- matic climate control for the driv-
er's seatSwitches on automatic climate control
forth e driver's or front passenger
side.
Ambient light blue Switch ambient light to blueSwitches
the ambiance light, e.g. toblue.
Wave massage driver on I would like to switch on the wave
massage for the driver's seatSwitches on
thewav e massage forth e driver's or front passenger seat.
Massage driver's seat off Switch the driver's side massage
offSwitches off
the massage function forth e driver's or front passenger seat.
Seat heating driver on I would like to switch on the seat
heating for the driver's seatSwitches on
the seat heating forth e driver's or front passenger seat.
Seat heating front passenger level
2 Seat heating front-passenger on
level 2Sets
the seat heating forth e driver's or front passenger seat toleve l 2. 336
LINGU ATRO NIC