2019 MERCEDES-BENZ GLE COUPE fuel cap
[x] Cancel search: fuel capPage 13 of 370
Engine oil
Adding .......................................... .298
Additives ........................................ 362
Checking the oil level ..................... 297
Checking the oil level using the
dipstick .......................................... 298
Display message ............................ 238
Filling capacity ............................... 362
Notes about oil grades ................... 361
Notes on oil level/consumption .... 297
Temperature (on-board computer, Mercedes-AMG vehicles) .............. .220
Engine switch-off
see ECO start/stop function
Entering an address
see also Digital Operator's Man-
ual ................................................. .264
ESP ®
(Electronic Stability Pro-
gram)
AMG menu (on-board computer) ... 220
Characteristics ................................. 68
Deactivating/activating ................... 68
Display message ............................ 224
Function/notes ................................ 67
General notes .................................. 67
Important safety information ........... 68
Warning lamp ................................. 256
ETS/4ETS (Electronic Traction Sys-
tem) ...................................................... 67
Exhaust check ................................... 147
Exhaust pipe (cleaning instruc-
tions) ................................................. .306
Exterior lighting
see Lights
Exterior mirrors
Adjusting ....................................... 102
Dipping (automatic) ....................... 103
Folding in when locking (on-boardcomputer) ...................................... 219
Folding in/out (automatically) ....... 103
Folding in/out (electrically) ........... 103
Out of position (troubleshooting) ... 103
Setting ........................................... 103
Storing settings (memory func-
tion) ............................................... 105
Storing the parking position .......... 104
Eyeglasses compartment ................. 274 F
Favorites Overview ........................................ 266
Filler cap
see Refueling
Flat tire
MOExtended tire s.......................... 311
Preparing the vehicle ..................... 310
TIREFIT kit ...................................... 312
see Emergency spare wheel
Floormats ........................................... 295
Fog lamps (extended range) ............. 109
Folding the rear bench seat for-
wards/back ....................................... 275
Fording
Off-road ......................................... 151
On flooded roads ........................... 151
Frequencies
Mobile phone ................................. 357
Two-way radio ................................ 357
Fuel
Additives ........................................ 361
Consumption statistics .................. 211
Displaying the current consump-
tion ................................................ 212
Displaying the range ...................... 212
Driving tips .................................... 147
Fuel gaug e....................................... 36
Grade (gasoline )............................ 360
Important safety notes .................. 360
Problem (malfunction) ................... 143
Refueling ........................................ 142
Tank content/reserve fue l............. 360
Fuel filler flap
Opening ......................................... 143
Fuel level
Calling up the range (on-board
computer) ...................................... 212
Fuel tank
Capacity ........................................ 360
Problem (malfunction) ................... 143
Fuses
Allocation chart ............................. 324
Before changing ............................. 324
Dashboard fuse box ....................... 325
Fuse box in the engine compart-
ment .............................................. 325 Index
11
Page 22 of 370
T
Tachometer ........................................ 208
Tailgate
Display message ............................ 248
Emergency unlocking ....................... 85
Important safety notes .................... 82
Limiting the opening angle ............... 85
Opening dimensions ...................... 364
Opening/closing (automatically
from inside) ...................................... 84
Opening/closing (automatically
from outside) ................................... 83
Opening/closing (from outside) ....... 82
Tank content
Fuel gauge ....................................... 36
Technical data
Capacities ...................................... 359
Drawbar load (maximum) ............... 367
Information .................................... 357
Tires/wheels ................................. 352
Trailer load s................................... 367
Vehicle data ................................... 364
Telephone
Accepting a call (multifunction
steering wheel) .............................. 215
Authorizing a mobile phone (con-
necting) ......................................... 268
Authorizing a mobile phone via the device manager (connecting )......... 269
Connecting a mobile phone
(device manager) ........................... 269
Connecting a mobile phone (gen-
eral information) ............................ 268
Display message ............................ 249
Menu (on-board computer) ............ 214
Number from the phone book ........ 215
Redialing ........................................ 215
Rejecting/ending a call ................. 215
see also Digital Operator's Man-
ual .................................................. 264
Temperature
Coolant (display in the instrumentcluster) .......................................... 209
Coolant (on-board computer,
Mercedes-AMG vehicles) ............... 220
Engine oil (on-board computer,
Mercedes-AMG vehicles) ............... 220 Outside temperature ...................... 208
Setting (climate control )................ 120
Transmission oil (on-board com-
puter, Mercedes-AMG vehicles) ..... 220
Through-loading feature ................... 275
Timing (RACETIMER) ......................... 221
Tire pressure
Calling up (on-board computer) ..... 334
Checking manually ........................ 333
Display message ............................ 245
Maximum ....................................... 333
Not reached (TIREFIT) .................... 313
Notes ............................................. 332
Reached (TIREFIT) .......................... 314
Recommended ............................... 330
Tire pressure loss warning system
General notes ................................ 333
Important safety notes .................. 334
Restarting ...................................... 334
Tire pressure monitor
Checking the tire pressure elec-
tronically ........................................ 336
Function/note s............................. 334
General notes ................................ 334
Important safety notes .................. 335
Radio type approval for the tire
pressure monitor ........................... 337
Restarting ...................................... 337
Warning lamp ................................. 263
Warning message .......................... 336
Tire pressure table ............................ 331
Tire-change tool kit ........................... 310
TIREFIT kit
Important safety notes .................. 312
Storage location ............................ 310
Tire pressure not reached .............. 313
Tire pressure reached .................... 314
Using ............................................. 312
Tires
Aspect ratio (definition) ................. 347
Average weight of the vehicle
occupants (definition) .................... 345
Bar (definition) ............................... 345
Changing a whee l.......................... 347
Characteristics .............................. 345
Checking ........................................ 327
Curb weight (definition) ................. 346
Definition of terms ......................... 345 20
Index
Page 83 of 370

Automatic locking feature
X
To deactivate: press and hold button 0043for
about five seconds until a tone sounds.
X To activate: press and hold button 0044for
about five seconds until a tone sounds.
If you press one of the two buttons and do not
hear a tone, the relevant setting has already
been selected.
The vehicle is locked automatically when the
ignition is switched on and the wheels are turn-
ing.
You could therefore be locked out if:
R the vehicle is being pushed.
R the vehicle is being towed.
R the vehicle is on a roller dynamometer.
You can also switch the automatic locking func-
tion on and off using the on-board computer
(Y page 219). Power closing
Power closing pulls the doors into their locks
automatically even if they are only partly closed.
X To power close a door: push the door into
the lock up to the first detent position.
Power closing will pull the door fully closed. Unlocking/locking the driver's door
using the mechanical key
i If you want to centrally lock the vehicle using
the mechanical key, begin by pressing the
locking button for the interior locking mech-
anism while the driver's door is open. Then
proceed to lock the driver's door using the
mechanical key. X
Insert the mechanical key as far as it will go
into opening 0043in the protective cap.
X Pull and hold the door handle.
X Pull the protective cap on the mechanical key
as straight as possible away from the vehicleuntil it releases.
X Release the door handle. X
To unlock: turn the mechanical key counter-
clockwise as far as it will go to position 0047.
X To lock: turn the mechanical key clockwise as
far as it will go to position 0047.
X Re-install the protective covering.
If you use the mechanical key to unlock and
open the driver's door, the anti-theft alarm sys- tem will be triggered. Switch off the alarm
(Y page 73).
If you lock the vehicle as described above, the
fuel filler flap is not locked. The anti-theft alarm
system is not armed. Doors
81Opening and closing Z
Page 144 of 370
Refueling
Important safety notes
G
WARNING
Fuel is highly flammable. Risk of fire and
explosion by improper handling of fuel.
You must avoid fire, open flames, smoking
and creating sparks. Switch off the ignition
before refueling and, if present, switch off the auxiliary heating. G
WARNING
Fuels are toxic and harmful to health. There is a risk of injury.
You must avoid fuels coming into contact with
skin, eyes and clothes or being swallowed.
Do not inhale the fuel vapors. Keep children
away from fuels.
Keep doors and windows closed during the
refueling process.
If you or others come into contact with fuel,
observe the following points:
R Immediately rinse the fuel off your skin with
soap and water.
R If you get fuel into your eyes, immediately
rinse your eyes throughly with clean water.
Seek medical attention immediately.
R Seek medical attention immediately if fuel
has been swallowed. Do not induce vomit-
ing.
R Immediately change out of clothing which
has come into contact with fuel. G
WARNING
Electrostatic charging can lead to the creation
of sparks and ignite fuel vapor. There is a risk of fire and explosion.
Touch the metallic body of the vehicle before
you open the fuel filler cap or handle the pump nozzle. Any possible electrostatic charge
present will in this way be depleted.
Do not get into the vehicle again during the
refueling process. Otherwise, electrostatic
charge could build up again. !
Do not use diesel to refuel vehicles with a
gasoline engine. Do not switch on the ignition if you accidentally refuel with the wrong fuel.
Otherwise, the fuel will enter the fuel system. Even small amounts of the wrong fuel could
result in damage to the fuel system and the
engine. Notify a qualified specialist workshop
and have the fuel tank and fuel lines drained
completely.
! Overfilling the fuel tank could damage the
fuel system.
! Take care not to spill any fuel on painted
surfaces. You could otherwise damage the
paintwork.
! Use a filter when adding fuel from a fuel can.
The fuel lines and/or the fuel injection system could otherwise be blocked by particles fromthe fuel can.
Do not get into the vehicle again during the refu-
eling process. Otherwise, electrostatic charge
could build up again.
If you overfill the fuel tank, fuel could spray out
when the fuel pump nozzle is removed.
For further information on fuel and fuel quality
(Y page 360). Refueling
General information Pay attention to the important safety notes
(Y
page 142).
The fuel filler flap is unlocked or locked auto-
matically when you unlock or lock the vehicle
with the SmartKey or using KEYLESS-GO.
The position of the fuel filler cap is displayed
00B6 in the instrument cluster. The arrow next
to the filling pump indicates the side of the vehi- cle. 142
RefuelingDriving and parking
Page 145 of 370
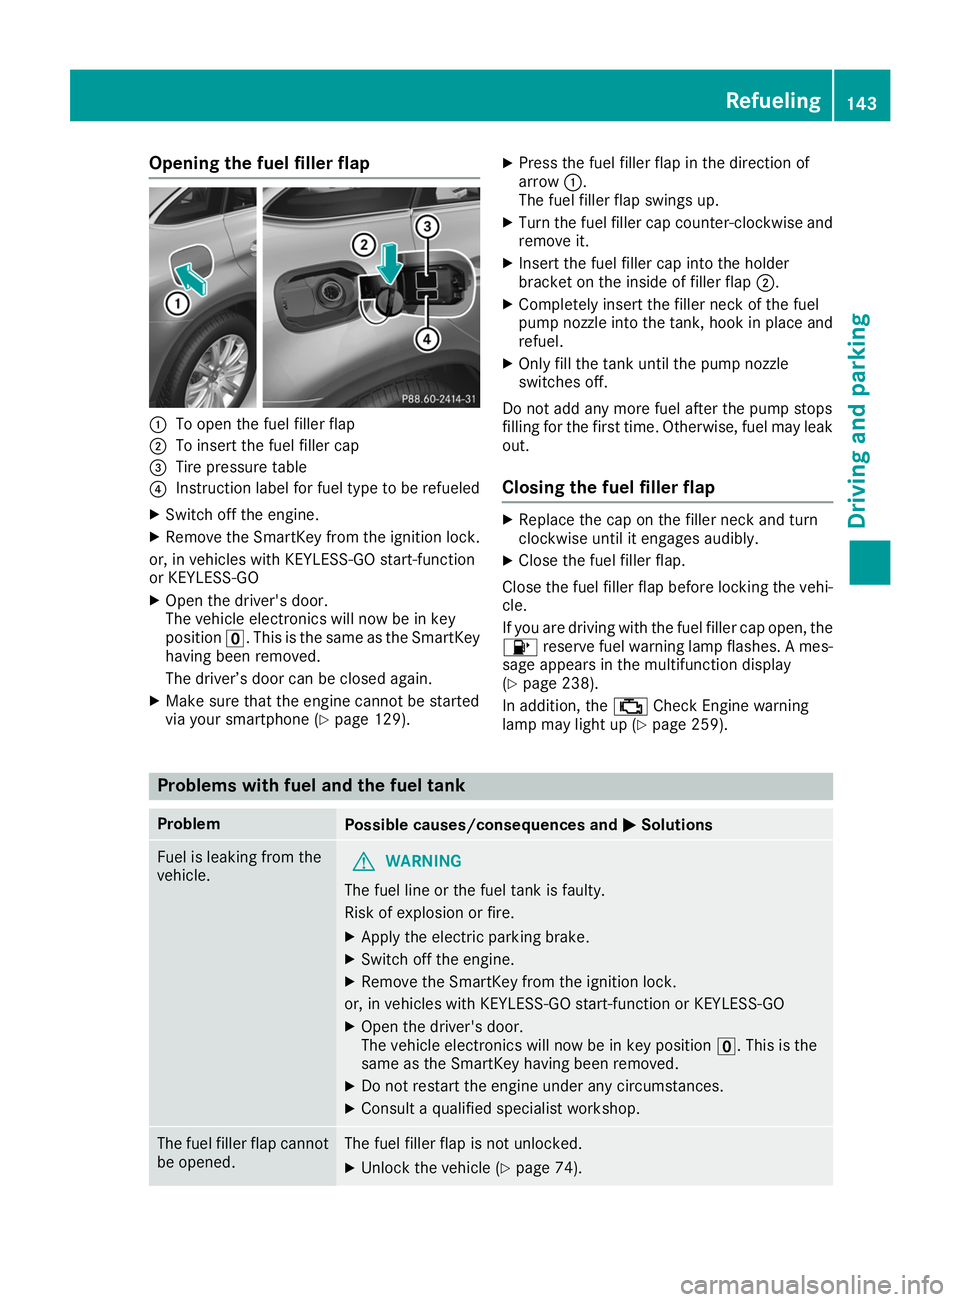
Opening the fuel filler flap
0043
To open the fuel filler flap
0044 To insert the fuel filler cap
0087 Tire pressure table
0085 Instruction label for fuel type to be refueled
X Switch off the engine.
X Remove the SmartKey from the ignition lock.
or, in vehicles with KEYLESS-GO start-function
or KEYLESS‑GO
X Open the driver's door.
The vehicle electronics will now be in key
position 0092. This is the same as the SmartKey
having been removed.
The driver’s door can be closed again.
X Make sure that the engine cannot be started
via your smartphone (Y page 129).X
Press the fuel filler flap in the direction of
arrow 0043.
The fuel filler flap swings up.
X Turn the fuel filler cap counter-clockwise and
remove it.
X Insert the fuel filler cap into the holder
bracket on the inside of filler flap 0044.
X Completely insert the filler neck of the fuel
pump nozzle into the tank, hook in place and
refuel.
X Only fill the tank until the pump nozzle
switches off.
Do not add any more fuel after the pump stops
filling for the first time. Otherwise, fuel may leak out.
Closing the fuel filler flap X
Replace the cap on the filler neck and turn
clockwise until it engages audibly.
X Close the fuel filler flap.
Close the fuel filler flap before locking the vehi-
cle.
If you are driving with the fuel filler cap open, the 00B6 reserve fuel warning lamp flashes. A mes-
sage appears in the multifunction display
(Y page 238).
In addition, the 00B9Check Engine warning
lamp may light up (Y page 259). Problems with fuel and the fuel tank
Problem
Possible causes/consequences and
0050 0050Solutions Fuel is leaking from the
vehicle.
G
WARNING
The fuel line or the fuel tank is faulty.
Risk of explosion or fire. X Apply the electric parking brake.
X Switch off the engine.
X Remove the SmartKey from the ignition lock.
or, in vehicles with KEYLESS-GO start-function or KEYLESS ‑GO
X Open the driver's door.
The vehicle electronics will now be in key position 0092. This is the
same as the SmartKey having been removed.
X Do not restart the engine under any circumstances.
X Consult a qualified specialist workshop. The fuel filler flap cannot
be opened. The fuel filler flap is not unlocked.
X Unlock the vehicle (Y page 74). Refueling
143Driving and parking Z
Page 202 of 370
speed and do not countersteer. Apply the
brake as necessary.
Please observe the manufacturer's operating
instructions for the trailer coupling if a detach-
able trailer coupling is used.
Couple and uncouple the trailer carefully. If you do not couple the trailer to the towing vehicle
correctly, the trailer could become detached.
Make sure that the following values are not
exceeded:
R the permissible trailer drawbar noseweight
R the permissible trailer load
R the permissible rear axle load of the towing
vehicle
R the maximum permissible gross vehicle
weight of both the towing vehicle and the
trailer
The applicable permissible values, which must
not be exceeded, can be found:
R in the vehicle documents
R on the identification plates for the trailer tow
hitch and the trailer
R on the vehicle identification plate
If the values differ, the lowest value applies.
When towing a trailer, your vehicle's handling
characteristics will be different in comparison
with when driving without a trailer.
The vehicle/trailer combination:
R is heavier
R is restricted in its acceleration and gradient-
climbing capability
R has an increased braking distance
R is affected more by strong crosswinds
R demands more sensitive steering
R has a larger turning circle
This could impair the handling characteristics.
When towing a trailer, always adjust your speed to the current road and weather conditions. Do
not exceed the maximum permissible speed for
your vehicle/trailer combination. Notes on towing a trailer
General notes !
If you have a trailer tow hitch retrofitted,
changes to the cooling system and drive train may be necessary, depending on the vehicle
type.
If you have a trailer tow hitch retrofitted,
observe the anchorage points on the chassis
frame.
R Do not exceed the legally prescribed maxi-
mum speed for vehicle/trailer combinations
in the relevant country.
This lowers the risk of an accident.
R Only install an approved trailer coupling on
your vehicle.
More information on availability and installa-
tion can be obtained at any qualified special-
ist workshop.
R The bumpers of your vehicle are not suitable
for installing detachable trailer couplings.
R Do not install hired trailer couplings or other
detachable trailer couplings on the bumpers
of your vehicle.
R If you no longer need the ball coupling,
remove it from the ball coupling recess. This
will reduce the risk of damage to the ball cou- pling.
When towing a trailer, set the tire pressure on
the rear axle of the towing vehicle for the max-
imum load. You will find the values in the tire
pressure table in the fuel filler flap of the vehicle
(Y page 346).
Please note that when towing a trailer, the fol-
lowing driving systems have limited availability
or are not available at all:
R Parking Assist PARKTRONIC (Y page 173)
R Blind Spot Assist (Y page 191)
R Active Lane Keeping Assist (Y page 197)
On vehicles without level control, the height of
the ball coupling will alter according to the load
placed on the vehicle. If necessary, use a trailer
with a height-adjustable drawbar.
You will find installing dimensions and loads
under "Technical data" (Y page 367).
Driving tips Also observe the notes on pulling away with a
trailer (Y
page 130).
The maximum permissible speed for vehicle/
trailer combinations depends on the type of
trailer. Before beginning the journey, check the
trailer's documents to see what the maximum
permissible speed is for your trailer. Observe the 200
Towing a trailerDriving and parking
Page 241 of 370
Display messages
Possible causes/consequences and
0050
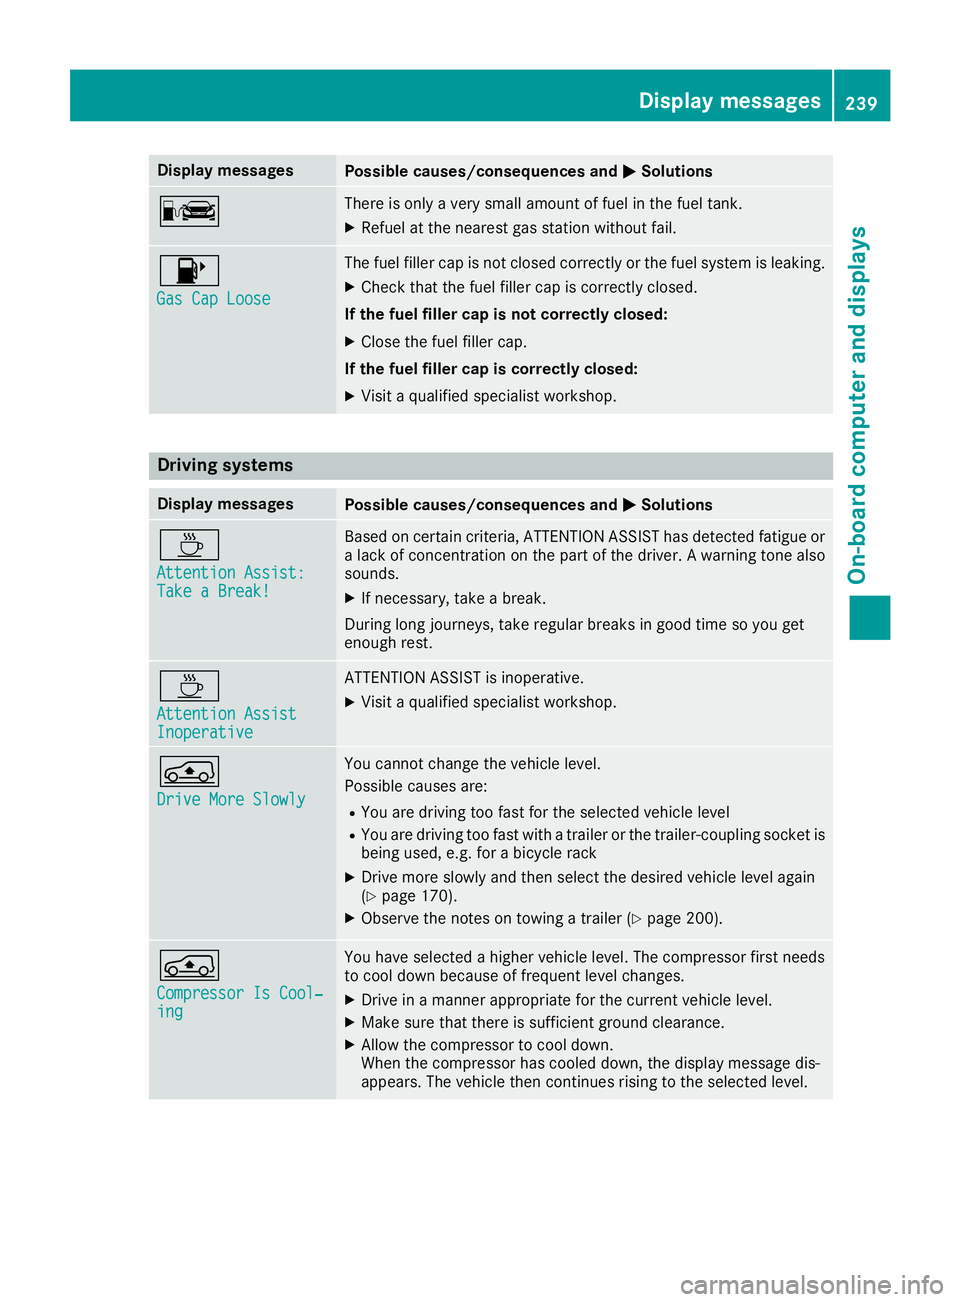
0050Solutions 00A8 There is only a very small amount of fuel in the fuel tank.
X Refuel at the nearest gas station without fail. 00B6
Gas Cap Loose Gas Cap Loose The fuel filler cap is not closed correctly or the fuel system is leaking.
X Check that the fuel filler cap is correctly closed.
If the fuel filler cap is not correctly closed:
X Close the fuel filler cap.
If the fuel filler cap is correctly closed:
X Visit a qualified specialist workshop. Driving systems
Display messages
Possible causes/consequences and
0050 0050Solutions 00AD
Attention Assist: Attention Assist:
Take a Break! Take a Break! Based on certain criteria, ATTENTION ASSIST has detected fatigue or
a lack of concentration on the part of the driver. A warning tone also
sounds.
X If necessary, take a break.
During long journeys, take regular breaks in good time so you get
enough rest. 00AD
Attention Assist Attention Assist
Inoperative Inoperative ATTENTION ASSIST is inoperative.
X Visit a qualified specialist workshop. 00C4
Drive More Slowly Drive More Slowly You cannot change the vehicle level.
Possible causes are:
R You are driving too fast for the selected vehicle level
R You are driving too fast with a trailer or the trailer-coupling socket is
being used, e.g. for a bicycle rack
X Drive more slowly and then select the desired vehicle level again
(Y page 170).
X Observe the notes on towing a trailer (Y page 200).00C4
Compressor Is Cool‐ Compressor Is Cool‐
ing ing You have selected a higher vehicle level. The compressor first needs
to cool down because of frequent level changes.
X Drive in a manner appropriate for the current vehicle level.
X Make sure that there is sufficient ground clearance.
X Allow the compressor to cool down.
When the compressor has cooled down, the display message dis-
appears. The vehicle then continues rising to the selected level. Display
messages
239On-board computer and displays Z
Page 262 of 370
Warning/
indicator
lamp
0051
0051 Signal type
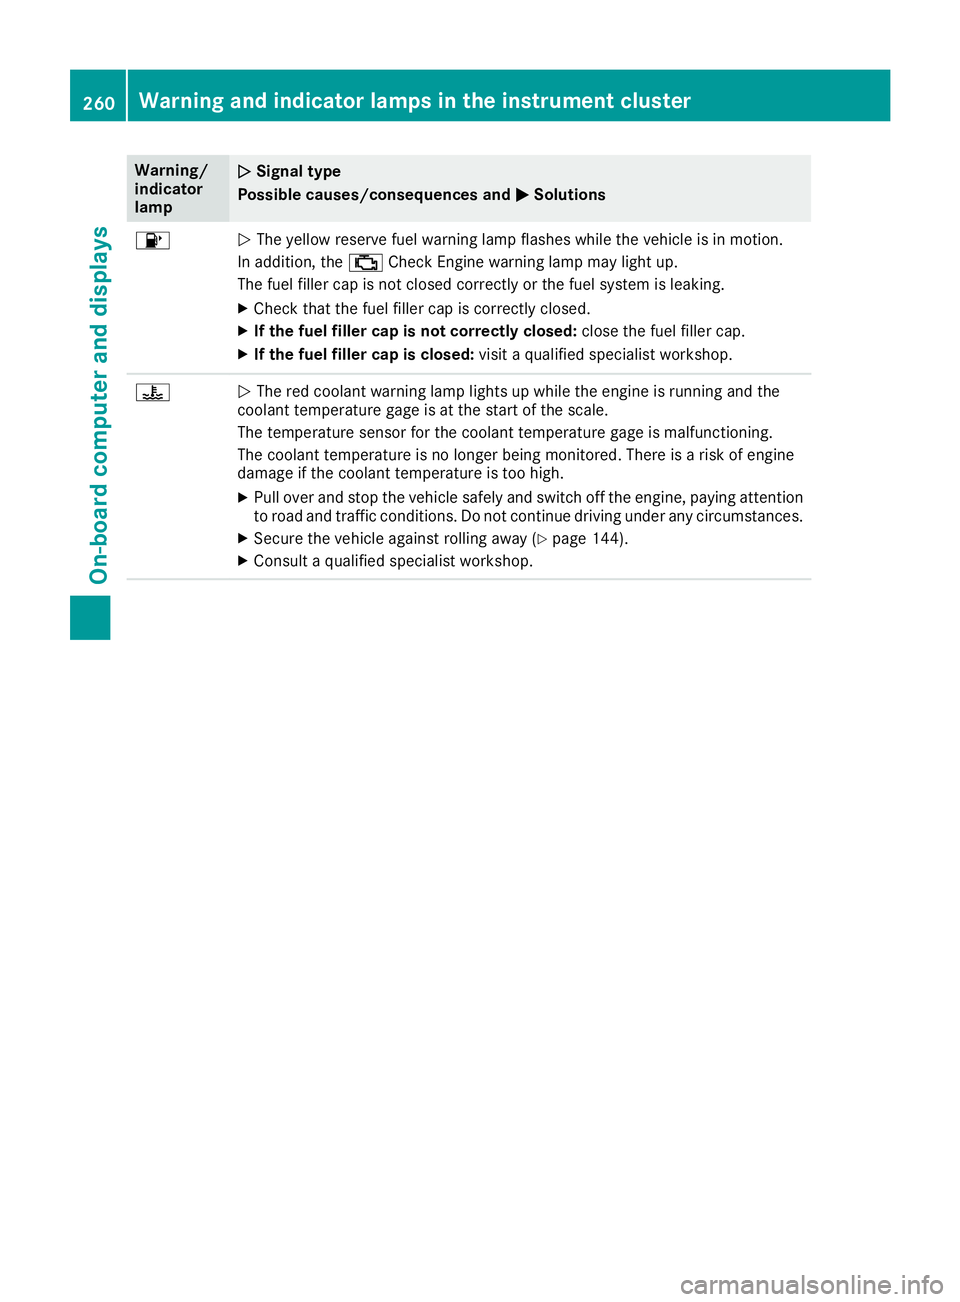
Possible causes/consequences and 0050 0050Solutions 00B6
0051
The yellow reserve fuel warning lamp flashes while the vehicle is in motion.
In addition, the 00B9Check Engine warning lamp may light up.
The fuel filler cap is not closed correctly or the fuel system is leaking.
X Check that the fuel filler cap is correctly closed.
X If the fuel filler cap is not correctly closed: close the fuel filler cap.
X If the fuel filler cap is closed: visit a qualified specialist workshop.00AC
0051
The red coolant warning lamp lights up while the engine is running and the
coolant temperature gage is at the start of the scale.
The temperature sensor for the coolant temperature gage is malfunctioning.
The coolant temperature is no longer being monitored. There is a risk of engine
damage if the coolant temperature is too high.
X Pull over and stop the vehicle safely and switch off the engine, paying attention
to road and traffic conditions. Do not continue driving under any circumstances.
X Secure the vehicle against rolling away (Y page 144).
X Consult a qualified specialist workshop. 260
Warning and indicator lamps in the instrument clusterOn-board computer and displays