2019 MERCEDES-BENZ GLE COUPE towing
[x] Cancel search: towingPage 303 of 370
Driving abroad
An extensive Mercedes-Benz Service network is
also available in other countries. You can obtain further information from any authorized
Mercedes-Benz Center. Care
General notes
H
Environmental note
Dispose of empty packaging and cleaning
cloths in an environmentally responsible man- ner.
! When cleaning your car, do not use:
R dry, coarse or hard cloths
R abrasive cleaning agents
R solvents
R cleaning agents containing solvents
Do not scrub.
Do not touch the surfaces and films with hard
objects, e.g. rings or ice scrapers. Otherwise,
you may scratch or damage the surfaces and films.
! Do not park your vehicle for a long period of
time directly after cleaning, particularly after
cleaning the wheel rim with wheel cleaner.
Wheel cleaner can lead to the increased cor-
rosion of the brake discs and pads. Therefore,
drive for a few minutes after cleaning. By
heating up the brakes, the brake discs and
pads dry. The vehicle can then be parked for a long period of time.
Regular care of your vehicle is a condition for
retaining the quality in the long term.
Use care products and cleaning agents recom-
mended and approved by Mercedes-Benz. Washing the vehicle and cleaning the
paintwork
Automatic car wash G
WARNING
Braking efficiency is reduced after washing
the vehicle. There is a risk of an accident. After the vehicle has been washed, brake
carefully while paying attention to the traffic
conditions until full braking power is restored.
! Before driving into an automatic car wash,
make sure that it is suitable for the dimen-
sions of the vehicle. In particular, make sure
that:
R there is enough ground clearance between
the vehicle underbody and the guide rails of the automatic car wash.
R the clearance width of the automatic car
wash, in particular the width of the guide
rails, is adequate (for further information on
the width of the tire wall on the rear wheel,
see "Technical data")
R you enter the automatic car wash straight
and in the center of the guide rails in order
to avoid damaging the tires or wheel rims.
Fold in the exterior mirrors before the vehicle is washed. The exterior mirrors could other-
wise be damaged.
! When Active Distance Assist DISTRONIC or
the HOLD function is activated, the vehicle
brakes automatically in certain situations.
To avoid damage to the vehicle, deactivate
Active Distance Assist DISTRONIC and the
HOLD function in the following or similar sit-
uations:
R when towing the vehicle
R in the car wash
! Never clean your vehicle in a Touchless
Automatic Car Wash as these use special
cleaning agents. These cleaning agents can
damage the paintwork or plastic parts.
! Make sure that:
R the side windows and the sliding sunroof
are fully closed.
R that the blower of the ventilation/heating
system is switched off (OFF button has
been pressed).
R the windshield wiper switch is at position
005A.
The vehicle may otherwise be damaged.
! In car washes with a towing mechanism,
make sure that the automatic transmission is
in transmission position 005C; otherwise, the
vehicle could be damaged.
R Vehicles with a SmartKey: Care
301Maintenance and care Z
Page 312 of 370
Vehicle tool kit
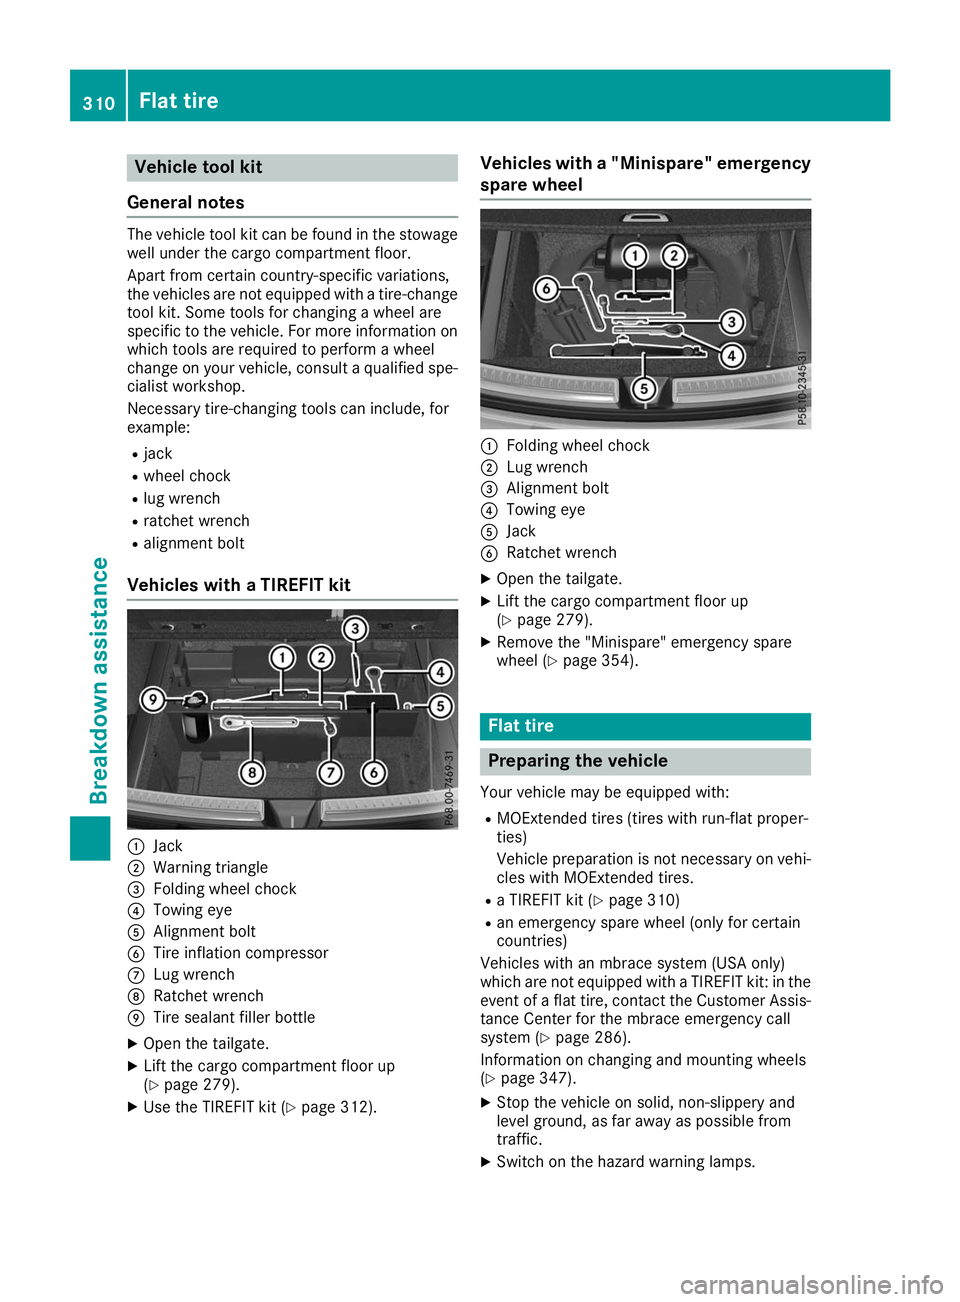
General notes The vehicle tool kit can be found in the stowage
well under the cargo compartment floor.
Apart from certain country-specific variations,
the vehicles are not equipped with a tire-change
tool kit. Some tools for changing a wheel are
specific to the vehicle. For more information on
which tools are required to perform a wheel
change on your vehicle, consult a qualified spe-
cialist workshop.
Necessary tire-changing tools can include, for
example:
R jack
R wheel chock
R lug wrench
R ratchet wrench
R alignment bolt
Vehicles with a TIREFIT kit 0043
Jack
0044 Warning triangle
0087 Folding wheel chock
0085 Towing eye
0083 Alignment bolt
0084 Tire inflation compressor
006B Lug wrench
006C Ratchet wrench
006D Tire sealant filler bottle
X Open the tailgate.
X Lift the cargo compartment floor up
(Y page 279).
X Use the TIREFIT kit (Y page 312). Vehicles with a "Minispare" emergency
spare wheel 0043
Folding wheel chock
0044 Lug wrench
0087 Alignment bolt
0085 Towing eye
0083 Jack
0084 Ratchet wrench
X Open the tailgate.
X Lift the cargo compartment floor up
(Y page 279).
X Remove the "Minispare" emergency spare
wheel (Y page 354). Flat tire
Preparing the vehicle
Your vehicle may be equipped with: R MOExtended tires (tires with run-flat proper-
ties)
Vehicle preparation is not necessary on vehi-
cles with MOExtended tires.
R a TIREFIT kit (Y page 310)
R an emergency spare wheel (only for certain
countries)
Vehicles with an mbrace system (USA only)
which are not equipped with a TIREFIT kit: in the event of a flat tire, contact the Customer Assis-tance Center for the mbrace emergency call
system (Y page 286).
Information on changing and mounting wheels
(Y page 347).
X Stop the vehicle on solid, non-slippery and
level ground, as far away as possible from
traffic.
X Switch on the hazard warning lamps. 310
Flat tireBreakdo
wn assis tance
Page 323 of 370
Towing and tow-starting
Important safety notes
G
WARNING
Functions relevant to safety are restricted or
no longer available if:
R the engine is not running.
R the brake system or the power steering is
malfunctioning.
R there is a malfunction in the voltage supply
or the vehicle's electrical system.
If your vehicle is being towed, much more
force may be necessary to steer or brake.
There is a risk of an accident.
In such cases, use a tow bar. Before towing,
make sure that the steering moves freely. G
WARNING
When towing or tow-starting another vehicle
and its weight is greater than the permissible gross weight of your vehicle, the:
R the towing eye could detach itself
R the vehicle/trailer combination could roll-
over.
There is a risk of an accident.
When towing or tow-starting another vehicle,
its weight should not be greater than the per- missible gross weight of your vehicle.
Details on the permissible gross vehicle weight
of your vehicle can be found on the vehicle iden-
tification plate (Y page 358).
! When Active Brake Assist, Active Distance
Assist DISTRONIC or the HOLD function is
activated, the vehicle brakes automatically in
certain situations.
To avoid damage to the vehicle, deactivate
these systems in the following or similar sit-
uations:
R when towing the vehicle
R in the car wash
! Make sure that the electric parking brake is
released. If the electric parking brake is faulty,
visit a qualified specialist workshop. !
Only secure the tow rope or tow bar at the
towing eyes, or the trailer tow hitch, if availa-
ble. You could otherwise damage the vehicle.
! Observe the following points when towing
with a tow rope:
R Secure the tow rope on the same side on
both vehicles.
R Make sure that the tow rope is not longer
than legally permitted. Mark the tow rope in
the middle, e.g. with a white cloth
(11.8 x 11.8 in). This will make other road
users aware that a vehicle is being towed.
R Only secure the tow cable to the towing
eyes or, if available, to the trailer tow hitch.
R Observe the brake lamps of the towing
vehicle while driving. Always maintain a dis-
tance a distance so that the tow rope does not sag.
R Do not use steel cables or chains to tow
your vehicle. You could otherwise damage
the vehicle.
! Do not use the trailer tow hitch for recovery
or towing. Do not use the towing eye for
recovery. this could damage the vehicle. If in
doubt, have the vehicle recovered using a
crane.
! When towing, pull away slowly and
smoothly. Pull the towed vehicle as straight as possible and not at an acute angle. Excessive
tractive power could damage the vehicles.
When towing, it is preferable to use a rigid tow-
ing bar as opposed to a tow rope. A rigid towing bar helps to keep the tractive power low.
! When towing away vehicles with KEYLESS-
GO, use the key instead of the Start/Stop
button. The automatic transmission may oth-
erwise shift to position 005Dwhen you open the
driver's or front-passenger door, which could damage the transmission.
! Do not tow with sling-type equipment. This
could damage the vehicle.
! Vehicles with differential locks: make sure
the differential locks are in automatic mode.
When towing, the differential locks must not
be switched on. The transmission may other- wise be damaged.
! You may tow the vehicle for a maximum dis-
tance of 30 miles (50 kilometers). A towing Towing and tow-starting
321Breakdown assistance Z
Page 324 of 370
speed of 30 mph (50 km/h) must not be
exceeded.
For towing distances over 30 miles
(50 kilometers), the entire vehicle must be
raised and transported.
It is better to have the vehicle transported than
to have it towed away.
If the vehicle has suffered transmission damage, have it transported on a transporter or trailer.
The automatic transmission must be in position
005C when the vehicle is being towed.
The battery must be connected and charged.
Otherwise, you:
R cannot turn the SmartKey to position 0048in
the ignition lock
R cannot release the electric parking brake
R cannot shift the automatic transmission to
position 005C
Disarm the automatic locking feature before the vehicle is towed (Y page 219). You could other-
wise be locked out when pushing or towing the
vehicle. Permitted towing methods
Mercedes-Benz recommends transporting your
vehicle in the case of a breakdown, rather than
towing it away.
When towing away, use a towing rope or a tow-
ing bar with both axles on the ground. Do not use any tow bar systems. Installing/removing the towing eye
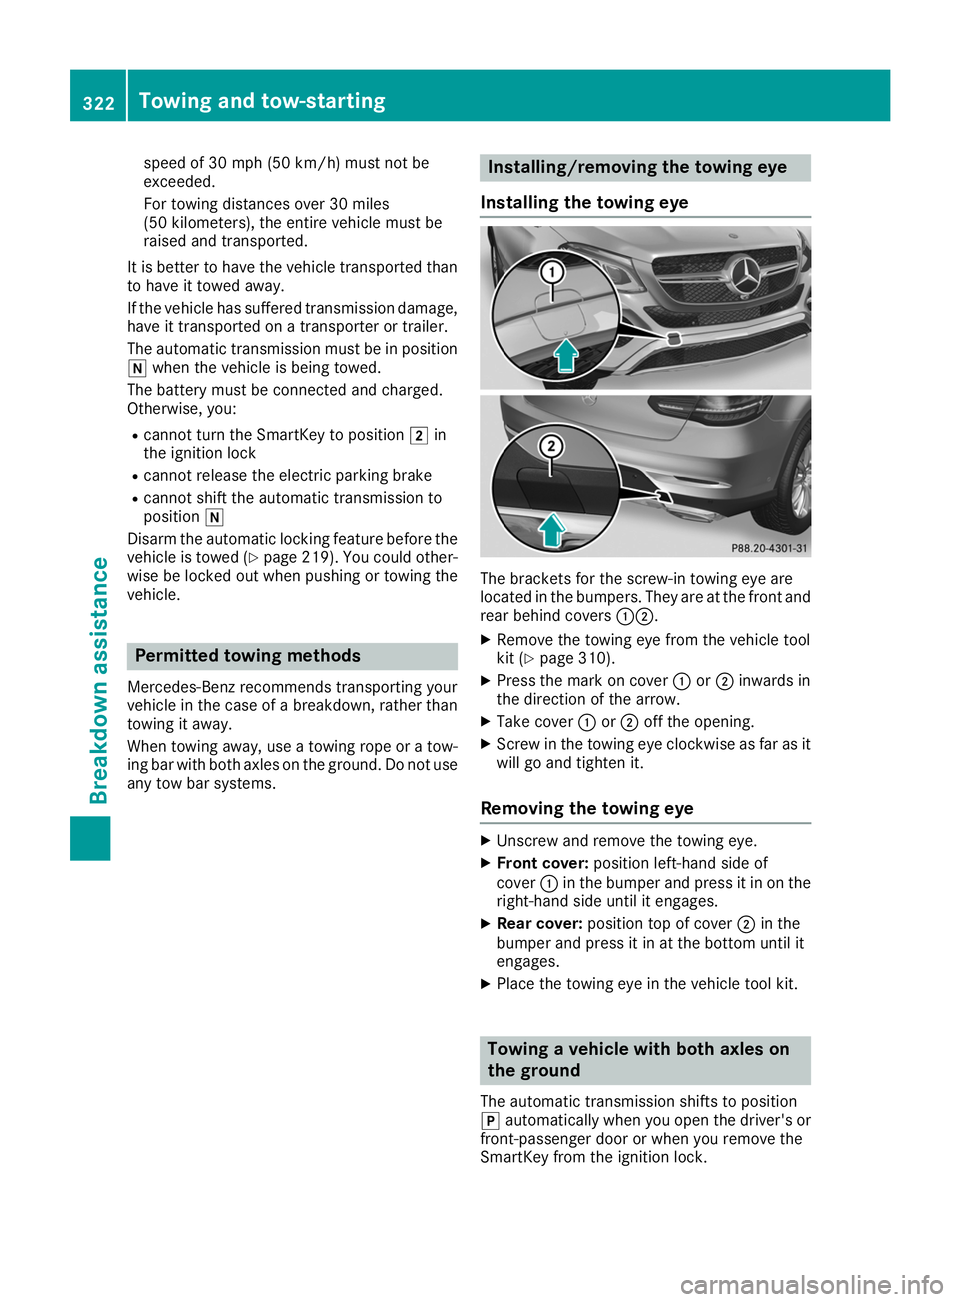
Installing the towing eye The brackets for the screw-in towing eye are
located in the bumpers. They are at the front and
rear behind covers 00430044.
X Remove the towing eye from the vehicle tool
kit (Y page 310).
X Press the mark on cover 0043or0044 inwards in
the direction of the arrow.
X Take cover 0043or0044 off the opening.
X Screw in the towing eye clockwise as far as it
will go and tighten it.
Removing the towing eye X
Unscrew and remove the towing eye.
X Front cover: position left-hand side of
cover 0043in the bumper and press it in on the
right-hand side until it engages.
X Rear cover: position top of cover 0044in the
bumper and press it in at the bottom until it
engages.
X Place the towing eye in the vehicle tool kit. Towing a vehicle with both axles on
the ground
The automatic transmission shifts to position
005D automatically when you open the driver's or
front-passenger door or when you remove the
SmartKey from the ignition lock. 322
Towing and tow-startingBreakdown assistance
Page 325 of 370
In order to ensure that the automatic transmis-
sion stays in position 005Cwhen towing away the
vehicle, you must observe the following points:
X Make sure that the vehicle is stationary.
X Turn the SmartKey to position 0048in the igni-
tion lock.
X Depress and hold the brake pedal.
X Shift the automatic transmission to position
005C.
X Leave the SmartKey in position 0048in the igni-
tion lock.
X Release the brake pedal.
X Release the electric parking brake.
X Switch on the hazard warning lamps
(Y page 108).
In order to signal a change of direction when
towing the vehicle with the hazard warning
lamps switched on, use the combination switch as usual. In this case, only the indicator lamps
for the direction of travel flash. After resetting
the combination switch, the hazard warning
lamp starts flashing again. Transporting the vehicle
4MATIC vehicles/vehicles with auto-
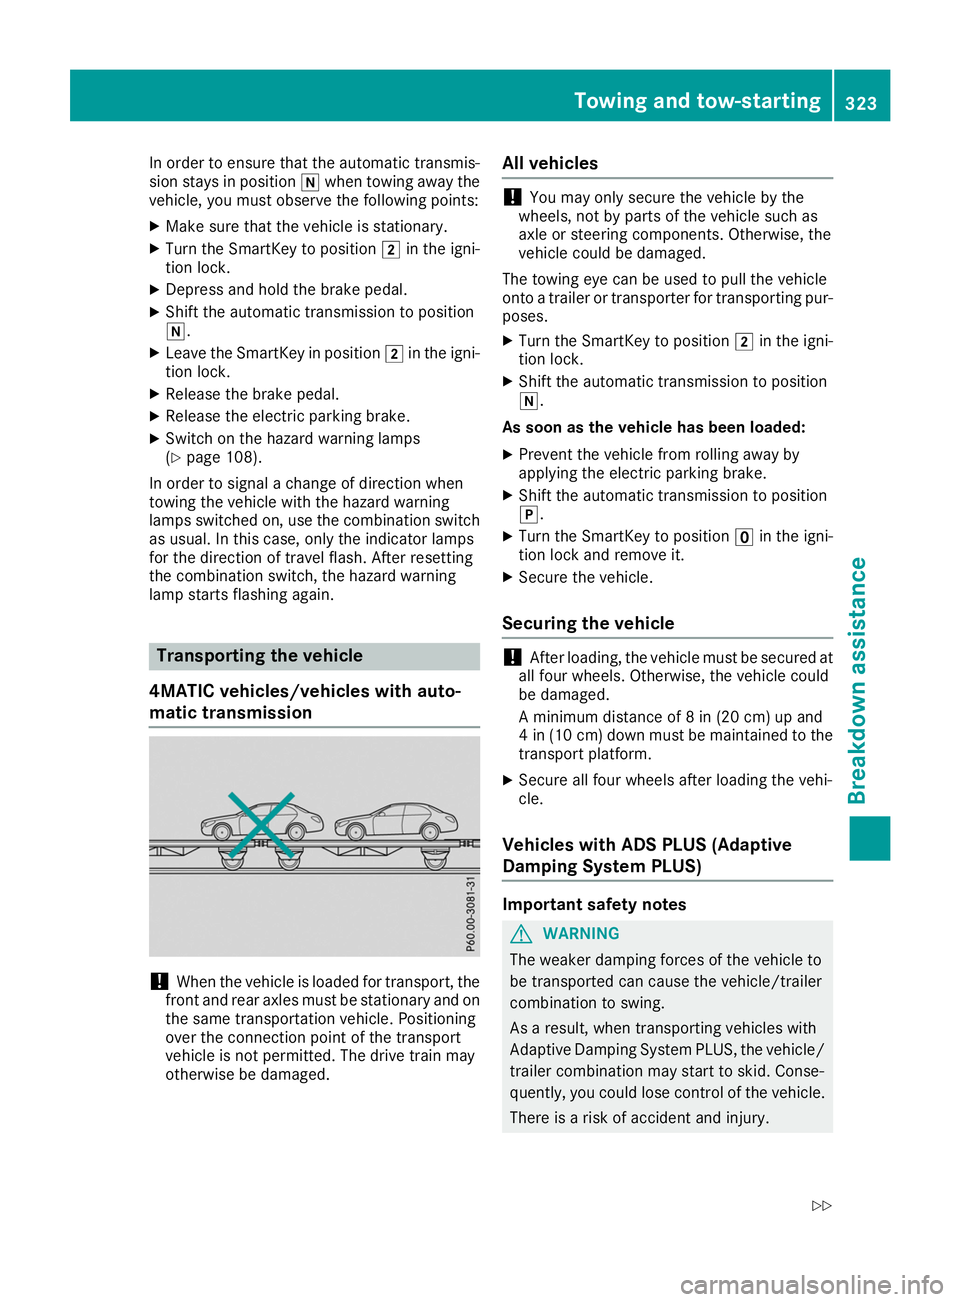
matic transmission !
When the vehicle is loaded for transport, the
front and rear axles must be stationary and on
the same transportation vehicle. Positioning
over the connection point of the transport
vehicle is not permitted. The drive train may
otherwise be damaged. All vehicles !
You may only secure the vehicle by the
wheels, not by parts of the vehicle such as
axle or steering components. Otherwise, the
vehicle could be damaged.
The towing eye can be used to pull the vehicle
onto a trailer or transporter for transporting pur-
poses.
X Turn the SmartKey to position 0048in the igni-
tion lock.
X Shift the automatic transmission to position
005C.
As soon as the vehicle has been loaded:
X Prevent the vehicle from rolling away by
applying the electric parking brake.
X Shift the automatic transmission to position
005D.
X Turn the SmartKey to position 0092in the igni-
tion lock and remove it.
X Secure the vehicle.
Securing the vehicle !
After loading, the vehicle must be secured at
all four wheels. Otherwise, the vehicle could
be damaged.
A minimum distance of 8 in (20 cm) up and
4 in (10 cm) down must be maintained to the transport platform.
X Secure all four wheels after loading the vehi-
cle.
Vehicles with ADS PLUS (Adaptive
Damping System PLUS) Important safety notes
G
WARNING
The weaker damping forces of the vehicle to
be transported can cause the vehicle/trailer
combination to swing.
As a result, when transporting vehicles with
Adaptive Damping System PLUS, the vehicle/ trailer combination may start to skid. Conse-
quently, you could lose control of the vehicle.
There is a risk of accident and injury. Towing and tow-starting
323Breakdown assistance
Z
Page 341 of 370
X
Step 1: Locate the statement "The combined
weight of occupants and cargo should never
exceed XXX kg or XXX lbs." on your vehicle’s
Tire and Loading Information placard.
X Step 2: Determine the combined weight of
the driver and passengers that will be riding in
your vehicle.
X Step 3: Subtract the combined weight of the
driver and passengers from XXX kilograms or
XXX lbs. X
Step 4: The resulting figure equals the avail-
able amount of cargo and luggage load capa- city. For example, if the "XXX" amount equals
1400 lbs and there will be five 150-lb pas-
sengers in your vehicle, the amount of avail-
able cargo and luggage load capacity is
650 lbs (1400 - 750 (5 x 150) = 650 lbs).
X Step 5: Determine the combined weight of
luggage and cargo being loaded on the vehi-
cle. That weight may not safely exceed the
available cargo and luggage load capacity cal- culated in step 4. Example: steps 1 to 3
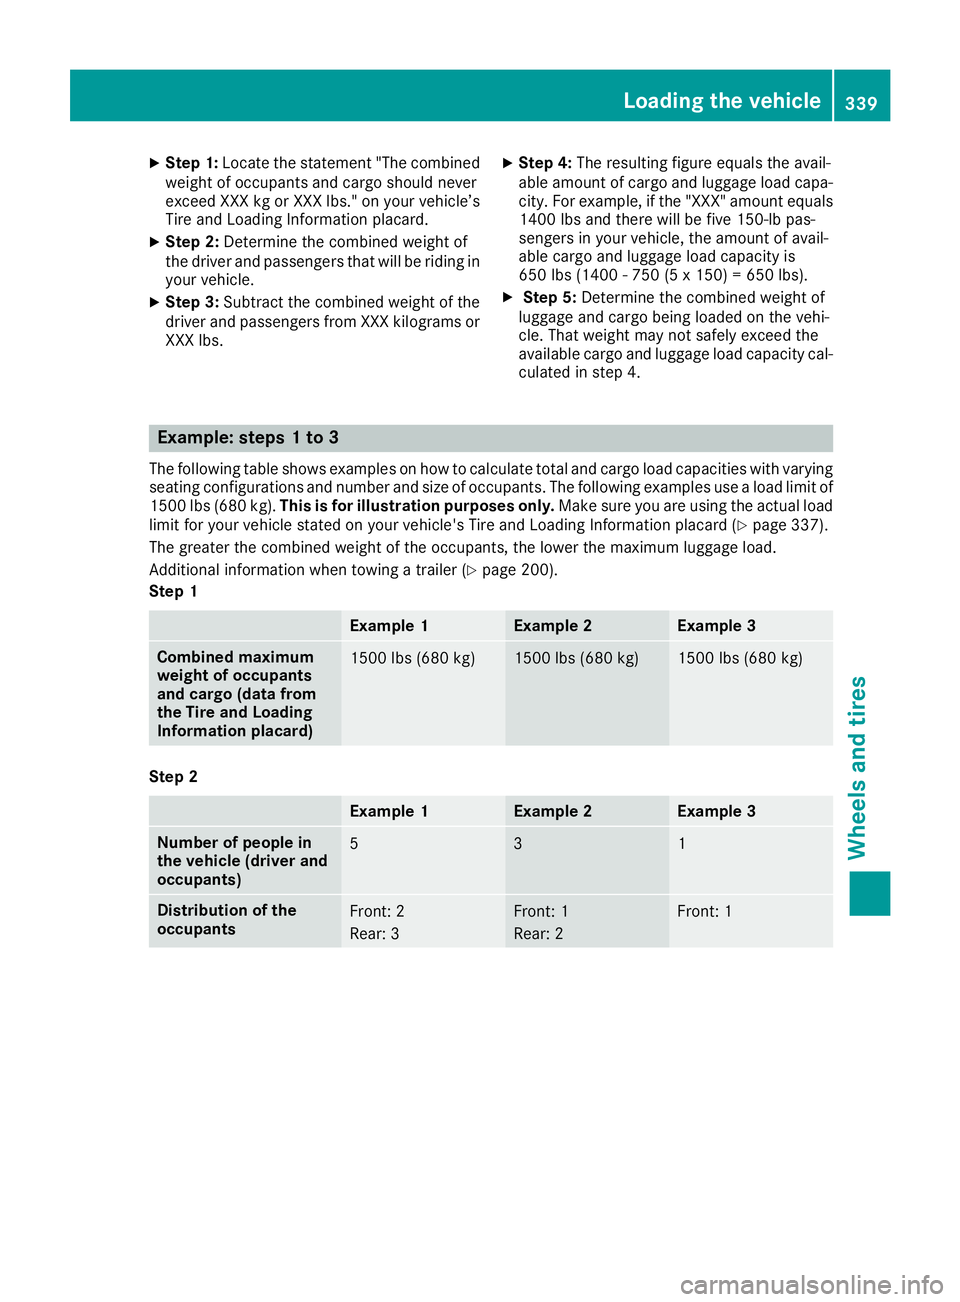
The following table shows examples on how to calculate total and cargo load capacities with varying seating configurations and number and size of occupants. The following examples use a load limit of
1500 lbs (680 kg). This is for illustration purposes only. Make sure you are using the actual load
limit for your vehicle stated on your vehicle's Tire and Loading Information placard (Y page 337).
The greater the combined weight of the occupants, the lower the maximum luggage load.
Additional information when towing a trailer (Y page 200).
Step 1 Example 1 Example 2 Example 3
Combined maximum
weight of occupants
and cargo (data from
the Tire and Loading
Information placard)
1500 lbs (680 kg) 1500 lbs (680 kg) 1500 lbs (680 kg)
Step 2
Example 1 Example 2 Example 3
Number of people in
the vehicle (driver and
occupants)
5 3 1
Distribution of the
occupants
Front: 2
Rear: 3 Front: 1
Rear: 2 Front: 1Loading the vehicle
339Wheels and tires Z
Page 356 of 370
tion reliably. Only restart the tire pressure loss
warning system or tire pressure monitor when
the defective wheel has been replaced with a
new wheel.
Vehicles with tire pressure monitor: after
mounting an emergency spare wheel, the sys-
tem may still display the tire pressure of the
removed wheel for a few minutes. The value dis- played for the mounted emergency spare wheel
is not the same as the current tire pressure of
the emergency spare wheel. Removing/stowing the emergency
spare wheel
Vehicles with a "Minispare" emergency
spare wheel under the cargo compart-
ment floor Always observe the instructions and safety
notes in the "Mounting a wheel" section
(Y page 348).
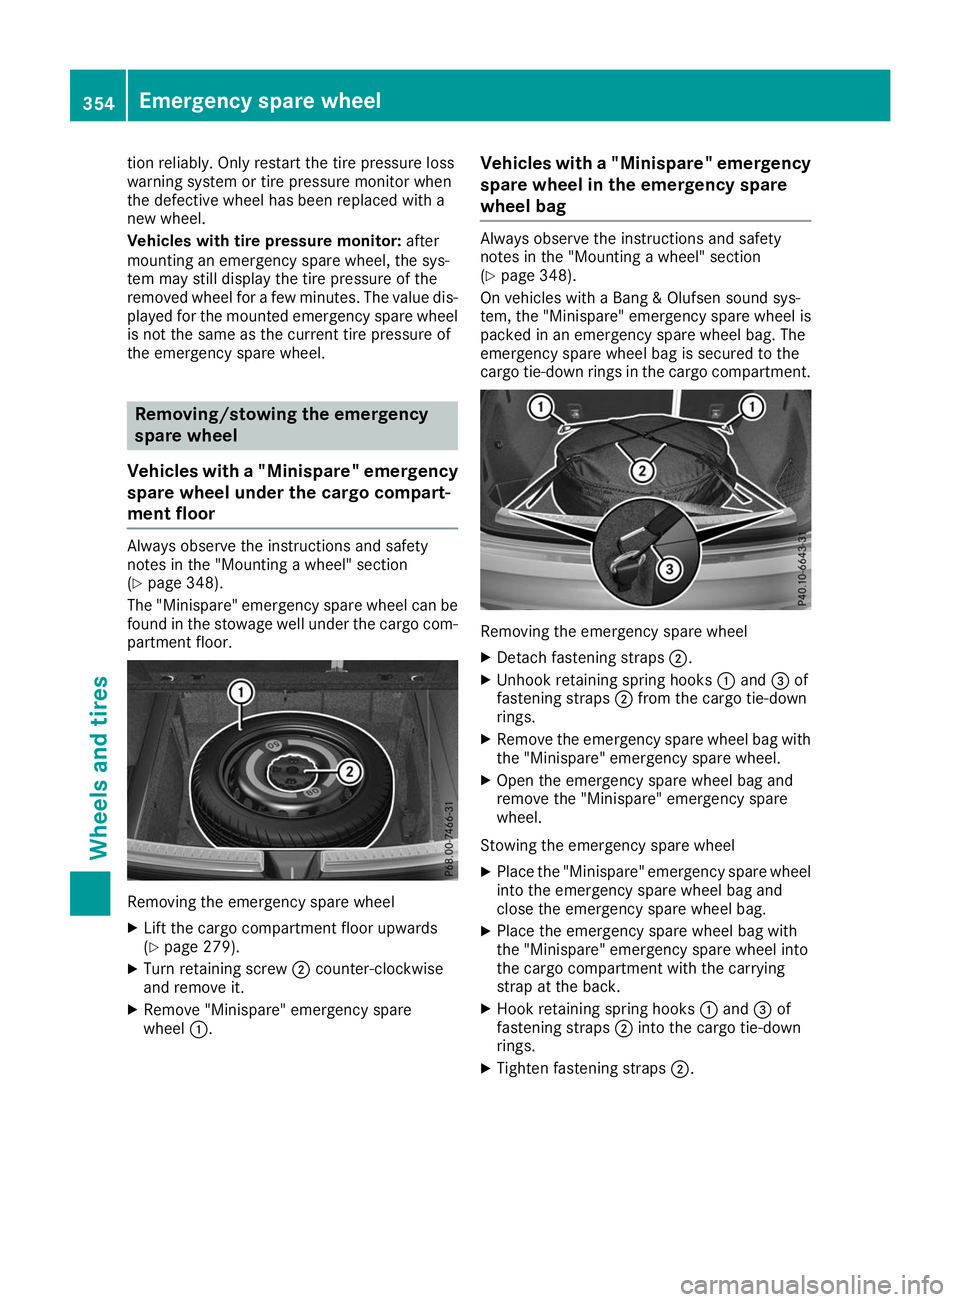
The "Minispare" emergency spare wheel can be
found in the stowage well under the cargo com- partment floor. Removing the emergency spare wheel
X Lift the cargo compartment floor upwards
(Y page 279).
X Turn retaining screw 0044counter-clockwise
and remove it.
X Remove "Minispare" emergency spare
wheel 0043. Vehicles with a "Minispare" emergency
spare wheel in the emergency spare
wheel bag Always observe the instructions and safety
notes in the "Mounting a wheel" section
(Y page 348).
On vehicles with a Bang & Olufsen sound sys-
tem, the "Minispare" emergency spare wheel is packed in an emergency spare wheel bag. The
emergency spare wheel bag is secured to the
cargo tie-down rings in the cargo compartment. Removing the emergency spare wheel
X Detach fastening straps 0044.
X Unhook retaining spring hooks 0043and 0087of
fastening straps 0044from the cargo tie-down
rings.
X Remove the emergency spare wheel bag with
the "Minispare" emergency spare wheel.
X Open the emergency spare wheel bag and
remove the "Minispare" emergency spare
wheel.
Stowing the emergency spare wheel X Place the "Minispare" emergency spare wheel
into the emergency spare wheel bag and
close the emergency spare wheel bag.
X Place the emergency spare wheel bag with
the "Minispare" emergency spare wheel into
the cargo compartment with the carrying
strap at the back.
X Hook retaining spring hooks 0043and 0087of
fastening straps 0044into the cargo tie-down
rings.
X Tighten fastening straps 0044.354
Emergency spare
wheelWheels and tires
Page 357 of 370
Mercedes-AMG vehicles with a collaps-
ible spare wheel under the cargo com-
partment floor !
Only place the collapsible spare wheel in the
vehicle when it is dry. Otherwise, moisture
may get into the vehicle.
Always observe the instructions and safety
notes in the "Mounting a wheel" section
(Y page 348).
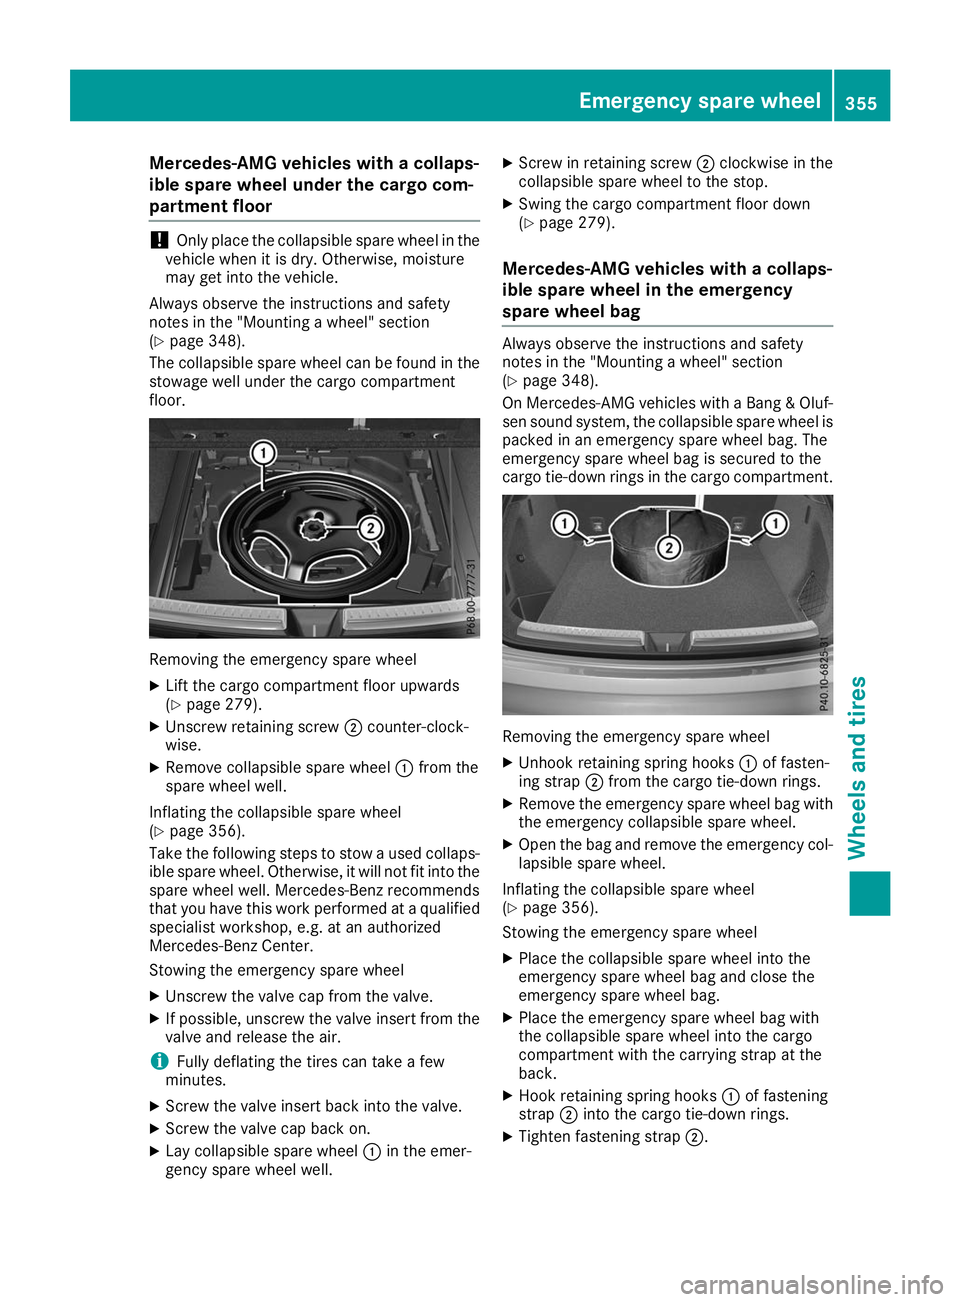
The collapsible spare wheel can be found in the stowage well under the cargo compartment
floor. Removing the emergency spare wheel
X Lift the cargo compartment floor upwards
(Y page 279).
X Unscrew retaining screw 0044counter-clock-
wise.
X Remove collapsible spare wheel 0043from the
spare wheel well.
Inflating the collapsible spare wheel
(Y page 356).
Take the following steps to stow a used collaps- ible spare wheel. Otherwise, it will not fit into the
spare wheel well. Mercedes-Benz recommends
that you have this work performed at a qualified
specialist workshop, e.g. at an authorized
Mercedes-Benz Center.
Stowing the emergency spare wheel
X Unscrew the valve cap from the valve.
X If possible, unscrew the valve insert from the
valve and release the air.
i Fully deflating the tires can take a few
minutes.
X Screw the valve insert back into the valve.
X Screw the valve cap back on.
X Lay collapsible spare wheel 0043in the emer-
gency spare wheel well. X
Screw in retaining screw 0044clockwise in the
collapsible spare wheel to the stop.
X Swing the cargo compartment floor down
(Y page 279).
Mercedes-AMG vehicles with a collaps-
ible spare wheel in the emergency
spare wheel bag Always observe the instructions and safety
notes in the "Mounting a wheel" section
(Y page 348).
On Mercedes-AMG vehicles with a Bang & Oluf-
sen sound system, the collapsible spare wheel is
packed in an emergency spare wheel bag. The
emergency spare wheel bag is secured to the
cargo tie-down rings in the cargo compartment. Removing the emergency spare wheel
X Unhook retaining spring hooks 0043of fasten-
ing strap 0044from the cargo tie-down rings.
X Remove the emergency spare wheel bag with
the emergency collapsible spare wheel.
X Open the bag and remove the emergency col-
lapsible spare wheel.
Inflating the collapsible spare wheel
(Y page 356).
Stowing the emergency spare wheel
X Place the collapsible spare wheel into the
emergency spare wheel bag and close the
emergency spare wheel bag.
X Place the emergency spare wheel bag with
the collapsible spare wheel into the cargo
compartment with the carrying strap at the
back.
X Hook retaining spring hooks 0043of fastening
strap 0044into the cargo tie-down rings.
X Tighten fastening strap 0044. Emergency spare wheel
355Wheels and tires Z