2019 MERCEDES-BENZ GLC SUV heater
[x] Cancel search: heaterPage 169 of 673
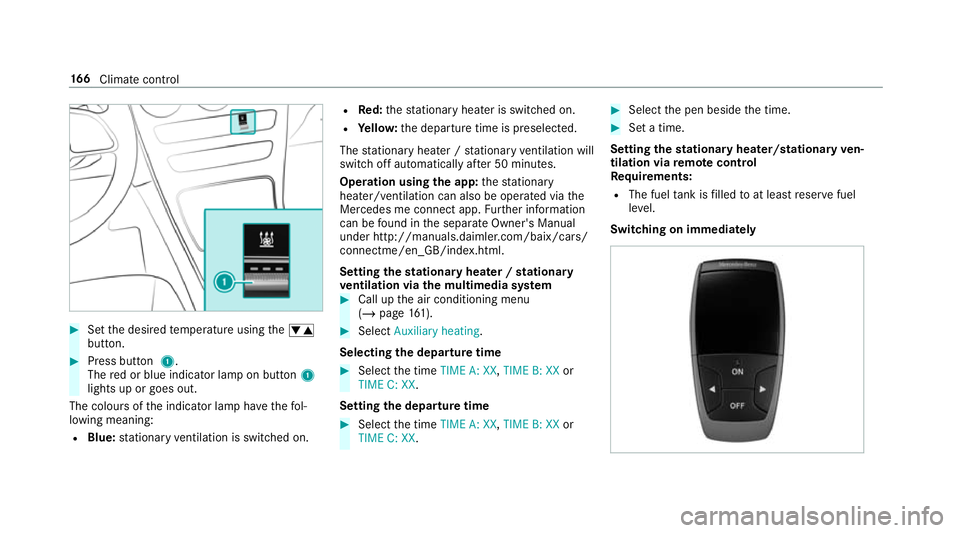
#
Set the desired temp erature using thew
button. #
Press button 1.
The red or blue indicator lamp on button 1
lights up or goes out.
The colours of the indicator lamp ha vethefo l‐
lowing meaning:
R Blue: stationary ventilation is switched on. R
Red:thest ationary heater is swit ched on.
R Yello w: the departure time is preselected.
The stationary heater / stationary ventilation will
switch off au tomatical lyafte r 50 minutes.
Operation using the app: thest ationary
heater/ ventilation can also be operated via the
Mercedes me connect app. Further information
can be found in the separate Owner's Manual
under http://manuals.daimler.com/baix/cars/
connectme/en_GB/index.html.
Setting thest ationary heater / stationary
ve ntilation via the multimedia sy stem #
Call up the air conditioning menu
(/ page 161). #
Select Auxiliary heating.
Selecting the departure time #
Select the time TIME A: XX, TIME B: XXor
TIME C: XX.
Setting the departu retime #
Select the time TIME A: XX, TIME B: XXor
TIME C: XX. #
Select the pen beside the time. #
Set a time.
Setting thest ationary heater/stationary ven‐
tilation via remo tecont rol
Re quirements:
R The fuel tank is filled toat least reser vefuel
le ve l.
Switching on immedia tely 16 6
Climate cont rol
Page 170 of 673
#
Press and hold theu button.
Setting the departu retime #
Brie fly press theu button. #
Press the, or. button repeatedly
until the time tobe changed appears on the
displa y. #
Press theu and^ buttons simultane‐
ousl y.
The Îsymbol on there mo tecontrol displ ay
fl ashes. #
Press the, and. buttons toset the
desired departure time. #
Press theu and^ buttons simultane‐
ousl y.
The new departure time will be stored.
Up tothre e departure times can be stored. #
Toactivate the departu retime: select the
desired departure time and press and hold
th eu button.
The Ísymbol, the departure time and,
depending on the selected departure time,
th e letter A, BorCappear on the displa y. #
Todeactivate the departure time: select
th e desired departure time and press and
hold the^ button.
OFF will appear on the displa y. #
Tocheck thest atus of thest ationary
heater: briefly press theu button.
Switching off immediately #
Press and hold the^ button.
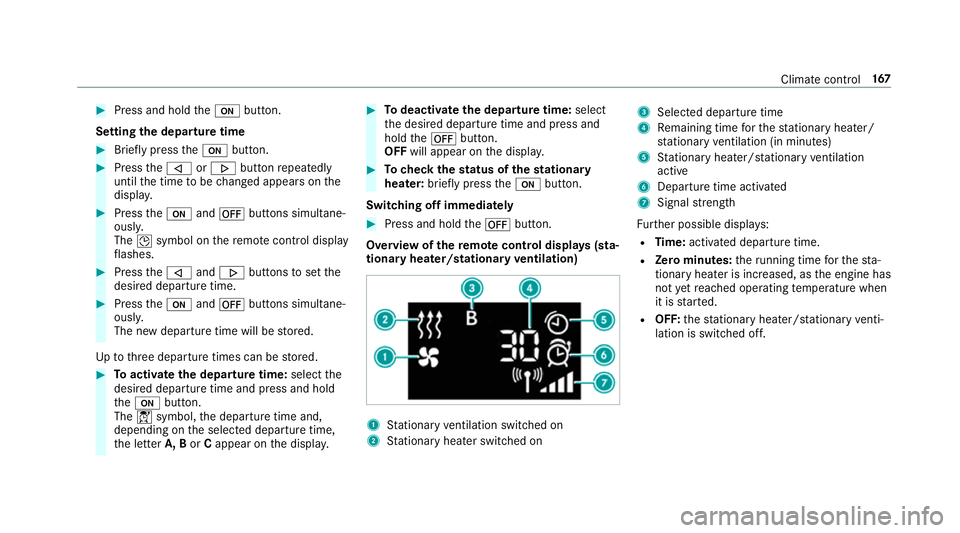
Overview of there mo tecont rol displa ys(sta‐
tiona ryheater/stationary ventilation) 1
Stationary ventilation switched on
2 Stationary heater swit ched on 3
Selected departure time
4 Remaining time forth est ationary heater/
st ationary ventilation (in minu tes)
5 Stationary heater/ stationary ventilation
acti ve
6 Departure time acti vated
7 Signal stre ngth
Fu rther possible displa ys:
R Time: activated departure time.
R Zero minutes: theru nning time forth est a‐
tionary heater is inc reased, as the engine has
not yetre ached operating temp erature when
it is star ted.
R OFF: thest ationary heater/ stationary venti‐
lation is switched off. Clima
tecontrol 167
Page 171 of 673
Re
placing the remo tecont rol bat tery (sta‐
tiona ryheater) &
DANG ER Serious damage tohealth
caused byswallowing batteries
Batteries contain toxic and cor rosive sub‐
st ances. Swallowing bat teries may cause
serious damage tohealth.
There is a risk of fata l injur y. #
Keep batteries out of there ach of chil‐
dren. #
If batteries are swallo wed, seek medical
attention immediately. +
ENVIRONMEN
TALNO TEEnvironmental
dama gedue toimproper disposal of bat‐
te ries Batteries conta
intoxic and cor ro‐
sive subs tances. #
Ta
ke dischar ged batteries to a
qu alified specialist workshop or to a
collection point for used batteries. Re
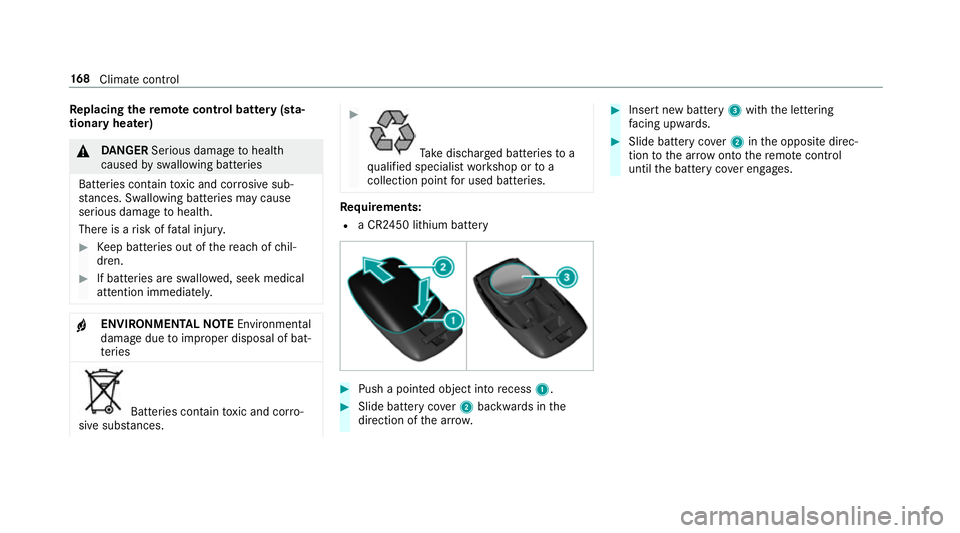
quirements:
R a CR2450 lithium battery #
Push a pointed object into recess 1. #
Slide battery co ver2 backwards in the
direction of the ar row. #
Insert new battery 3with the lettering
fa cing up wards. #
Slide battery co ver2 inthe opposite direc‐
tion tothe ar row onto there mo tecontrol
until the battery co ver engages. 16 8
Climate cont rol
Page 172 of 673
Problems with
there mo tecont rolfo r the stationary heater/stationary ventilation Problem
Possible causes/consequences and M
MSolutions
FA IL¨ The signal transmission between
the transmit ter and theve hicle is faulty. #
Chan geyour position in relation totheve hicle, moving closer if necessar y.
FA IL The
star ter battery is not suf ficiently charge d. #
Char gethest ar ter batter y.
The fuel tank content is below there ser vefuel le vel. #
Refuel at the nearest filling station.
FA IL¯ The
stationary heater is malfunctioning. #
Have thest ationary heater checked at a qualified specialist workshop. Air
vents Ad
justing the front air vents &
WARNING ‑ Risk of bu rns/frostbite due
to not maintaining a su fficient dis tance
to the air vents
Ve ry hot or very cold air can flow from the air
ve nts. This could
result in burns or frostbite in the
immediate vicinity of the air vents. #
Alw ays ensure that all vehicle occu‐
pants maintain a suf ficient di stance to
th e air vents. #
If necessa ry,re direct the air flow to
ano ther area of theve hicle interior. To
guarantee theflow of fresh air thro ugh the air
ve nts into theve hicle interior, comply with the
fo llowing:
R Alw ayske ep theve nts and theve ntilation
grille in theve hicle interior free.
R Keep the air inlet free of deposits
(/ page 482). Climate control
16 9
Page 180 of 673
&
WARNING Risk of accident due to
unsuitable foot we ar
Operating the pedals may be impaired by
we aring unsuitable foot we ar, e.g.:
R plat form shoes
R high-heeled shoes
R slippers #
Alw ayswe ar suitable foot we ar when
driving so that you can operate the ped‐
als safel y. &
WARNING Risk of accident when switch‐
ing off the ignition when driving
If yo u swit choff the ignition while driving,
saf ety functions are restricted or no longer
av ailable. This may af fect the po werst eering
sy stem and the brake forc e boosting, for
ex ample.
Yo u will then need touse considerably more
fo rc eto steer and brake. #
Do not switch off the ignition while driv‐
ing. &
DANG ER Risk death caused by exhaust
ga ses
Combustion engines emit poisonous exhaust
ga ses such as carbon monoxide. Inhaling
th ese exhaust gases is hazardous tohealth
and leads topoisoning. #
Never lea vethe engine or, if present,
th e auxiliary heating running in an
enclosed space wi thout suf ficient venti‐
lation. &
WARNING Risk of skidding and of an
accident due toshifting down on slippery
ro ad sur faces
If yo u shift down on slippery road sur faces to
inc rease the engine braking ef fect, the drive
wheels may lose traction. #
Do not shift down on slippery road sur‐
fa ces toinc rease the engine braking
ef fect. &
DANG ER Risk of fata l injuries due topoi‐
sonous exhaust gases
If th eta ilpipe is bloc ked or suf ficient ventila‐
tion is not possible, poisonous exhaust gases
such as carbon monoxide may enter theve hi‐
cle. This is the case, forex ample, if theve hi‐
cle is stuck in sn ow. #
When the engine or thest ationary
heater are running, keep theta ilpipe
and the area around theve hicle clear of
sno w. #
Open a window on the side of theve hi‐
cle facing the wind toensure an ade‐
qu ate supply of fresh air. &
WARNING Risk of accident due tothe
brake sy stem overheating
If yo u lea veyour foot on the brake pedal
when driving, the brake sy stem may over‐
heat.
This increases the braking dis tance and the
brake sy stem may evenfa il. Driving and parking
17 7
Page 183 of 673
R
Obser vethe no tes on the cross-country ABS
(/ page 210).
R Ifnecessa ry, select theF orG drive
prog ram (vehicles with an Off-road pac kage)
before driving off-road (/ page187).
R Select a vehicle le vel suitable for off-road ter‐
ra in (/ page244). Toavo id damaging the
ve hicle, make sure there is alw ays suf ficient
ground clearance.
R Alw ayske ep the engine running and in gear
when driving on downhill gradients and
slopes. Obse rveth e no tes on driving in
mountainous terrain.
R Do not drive on unknown terrain that is not
easily visible and stay on mar kedro utes.
R Alw ayske ep the doors and windo wsclosed
while theve hicle is in motion.
R Deactivate Active Dis tance Assi st
DISTRONIC, cruise control and theva riable
limiter.
R Adapt your driving style to thete rrain. R
Do not use the HOLD function on steep
downhill or uphill gradients with slippery or
loose sur faces.
Driving on sand
When driving on sand, also obser vethefo llowing
instructions:
R Select theF drive prog ram.
R Select a higher vehicle le vel.
R Shift toa lo werge ar.
R Drive quickly toove rcome thero lling resist‐
ance, otherwise theve hicle may dig itself in.
R Drive in the trac ksofother vehicles if possi‐
ble. Make sure that thefo llowing prerequi‐
sites are me t:
- the tyre ruts are not too deep
- the sand is firm enough
- the ground clearance is suf ficient
Mercedes -AMG vehicles: observeth e no tes in
th e Supplement. Otherwise, you may failto rec‐
ognise dangers.
Fo rding Also obser
vethefo llowing information when
fo rd ing:
R Drive at no more than 10 km/h.
R Obser vethe maximum permissible ford ing
dep th (/ page 550).
R Switch off automatic climate control
(/ page 161).
R Vehicles with stationary heater/ventila‐
tion: switch thest ationary heater/ ventilation
off (/ page 165).
R Ensure that a bow wave does not form asyou
drive.
R Do not stop in thewa ter and do not switch
off the engine. Ensure the ECO start/ stop
function is switched off (/ page183).
Driving in mountainous terrain
Also obse rveth efo llowing information when
driving in moun tainous terrain:
R Obse rveth eva lues of the approach/depar‐
ture angle and of the maximum gradient
(/ page 550).
R Avoid high engine speeds. 18 0
Driving and pa rking
Page 196 of 673
R
Vehicles with 48 V on-board electrical
sy stem (EQ Boost tech nology): the com‐
bustion engine is switched off. All of theve hi‐
cle functions remain active.
Glide mode is activated if thefo llowing condi‐
tions are me t:
R drive prog ram ; is selected.
R the speed is within a suitable range.
R thero ad's course is suitable, e.g. no steep
uphill or downhill inclines or tight bends.
R there is no trailer coupled tothe trailer hitch,
and no bicycle rack fitted.
R you do not depress the accelera tor or brake
pedal (e xcept for light brake applications).
% Glide mode can also be activated if you ha ve
selected the "Eco" setting forth e drive in the
drive prog ram =.
Glide mode is deactivated again if one of the
conditions is no longer met.
Glide mode can also be pr evented bythefo llow‐
ing parame ters:
R incline R
downhill gradient
R temp erature
R height
R speed
R operating status of the engine
R traffic situation Fu
nction of the 4MATIC
4MATIC ensures that all four wheels are driven
when needed. Toge ther with ESP ®
and 4ETS,
4MATIC impr ovesth e traction of your vehicle
whene ver a driven wheel spins due toinsuf fi‐
cient traction.
If yo ufa ilto adapt your driving style, 4MATIC can
neither reduce therisk of an accident nor over‐
ri de the la wsof ph ysics. 4MATIC cannot take
account of road, weather and traf fic conditions.
4MATIC is only an aid. You are responsible espe‐
cially for maintaining a safe dis tance from the
ve hicle in front, forve hicle speed, for braking in
good time and forst ay ing in lane. %
In wint ryroad conditions, the maximum
ef fect of 4MATIC can be achie ved only if you
use winter tyres (M+S tyres), with sn ow
ch ains if necessar y. Re
fuelling Re
fuelling theve hicle &
WARNING Risk offire or explosion from
fuel
Fu els are highly flammable. #
Fire, naked flames, smoking and crea‐
tion of spar ksmust be avoided. #
Swit choff the ignition and, if available,
th est ationary heater, before and while
re fuelling theve hicle. &
WARNING Risk of inju ryfrom fuels
Fu els are poisonous and hazardous to your
health. #
Do not swallow fuel or let it come into
contact with skin, eyes or clo thing. Driving and parking
19 3
Page 509 of 673
St
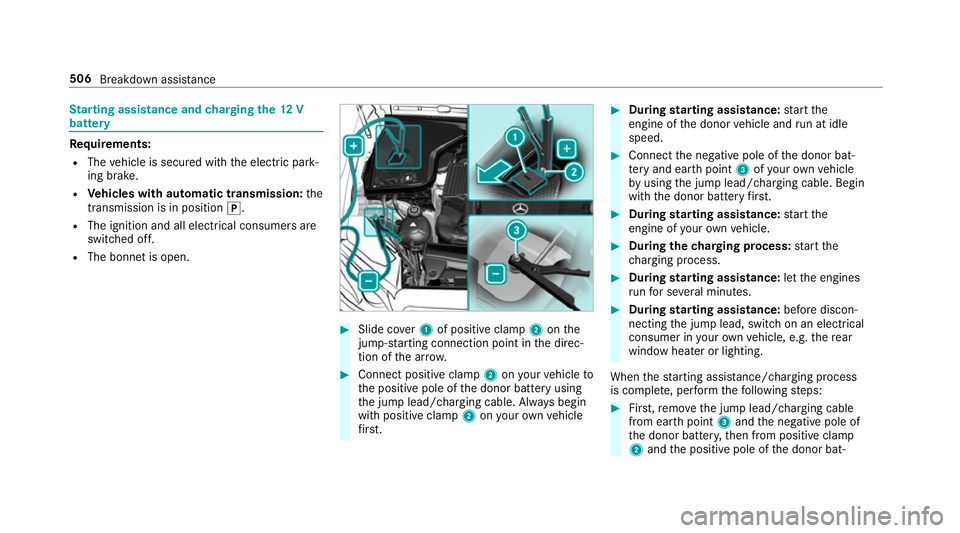
arting assi stance and charging the12 V
battery Re
quirements:
R The vehicle is secured with the electric park‐
ing brake.
R Vehicles with automatic transmission: the
transmission is in position j.
R The ignition and all electrical consumers are
switched off.
R The bonnet is open. #
Slide co ver1 of positive clamp 2onthe
jump-s tarting connection point in the direc‐
tion of the ar row. #
Connect positive clamp 2onyour vehicle to
th e positive pole of the donor battery using
th e jump lead/charging cable. Alw ays begin
with positive clamp 2onyour ow nve hicle
fi rs t. #
During starting assi stance: start the
engine of the donor vehicle and run at idle
speed. #
Connect the negative pole of the donor bat‐
te ry and ear thpoint 3ofyour ow nve hicle
by using the jump lead/charging cable. Begin
with the donor battery firs t. #
During starting assi stance: start the
engine of your ow nve hicle. #
During thech arging process: start the
ch arging process. #
During starting assi stance: letthe engines
ru nfo r se veral minutes. #
During starting assi stance: before discon‐
necting the jump lead, switch on an electrical
consumer in your ow nve hicle, e.g. there ar
wind owheater or lighting.
When thest arting assis tance/charging process
is compl ete, per form thefo llowing steps: #
First,re mo vethe jump lead/charging cable
from ear thpoint 3and the negative pole of
th e donor batter y,then from positive clamp
2 and the positive pole of the donor bat‐ 506
Breakdown assis tance