2019 MERCEDES-BENZ GLC fuel cap
[x] Cancel search: fuel capPage 14 of 370
Dipping (automatic) ....................... 105
Folding in/out (automatically) ....... 105
Folding in/out (electrically)........... 105
Out of position (troubleshooting) ... 105
Setting ........................................... 105
Storing settings (memory func-
tion) ............................................... 107
Storing the parking position .......... 106
Eyeglasses compartment................. 279
F
Favorites
Overview ........................................ 271
Features............................................. 289
Filler cap
see Refueling
Flat tire
Changing a wheel/mounting the
spare wheel................................... 350
MOExtended tires.......................... 315
Preparing the vehicle ..................... 315
TIREFIT kit ...................................... 316
Floormats........................................... 298
Frequencies
Mobile phone ................................. 356
Two-way radio ................................ 356
Front wheel arch
Removing/installing the cover ....... 115
Front wheel arch cover
Installing/removing ....................... 115
Fuel
Additives ........................................ 360
Consumption statistics .................. 213
Displaying the current consump-
tion ................................................ 213
Displaying the range ...................... 213
Driving tips .................................... 156
E10 ................................................ 359
Fuel gauge....................................... 36
Gasoline ......................................... 359
Grade (gasoline)............................ 359
Important safety notes .................. 359
Problem (malfunction) ................... 152
Refueling ........................................ 150
Tank content/reserve fuel............. 359
Fuel filler flap
Closing ........................................... 152
Opening ......................................... 151
Fuel level
Calling up the range (on-board
computer) ...................................... 213
Fuel tank
Capacity ........................................ 359
Problem (malfunction) ................... 152
Fuses
Allocation chart ............................. 328
Before changing ............................. 327
Dashboard fuse box ....................... 328
Fuse box in the cargo compart-
ment .............................................. 328
Fuse box in the engine compart-
ment .............................................. 328
Fuse box in the front-passenger
footwell .......................................... 328
Important safety notes .................. 327
G
G-Meter (on-board computer,
Mercedes-AMG vehicles).................. 224
Garage door opener
Clearing the memory ..................... 298
General notes ................................ 295
Important safety notes .................. 296
Opening/closing the garage door..298
Problems when programming ........297
Programming (button in the rear-
view mirror) ................................... 296
Synchronizing the rolling code ....... 296
Gasoline............................................. 359
Gear indicator (on-board com-
puter, Mercedes-AMG vehicles)....... 223
Genuine parts...................................... 27
Glove box...........................................279
Google™ Local Search
see also Digital Operator's Man-
ual ..................................................268
H
Handling control system
see ESP®(Electronic Stability Program)
HANDS-FREE ACCESS.......................... 87
12Index
Page 23 of 370
Summer tires
In winter ........................................332
Sun visor............................................ 290
Suspension settings
AIR BODY CONTROL ......................172
Suspension tuning
AMG sports suspension based on
AIR BODY CONTROL ......................174
SETUP (on-board computer,
Mercedes-AMG vehicles) ...............224
Switching air-recirculation mode
on/off................................................. 126
Switching on media mode
Via the device list.......................... 276
T
Tachometer........................................ 209
Tail lamps
Display message ............................ 239
Tailgate
Display message ............................ 254
Emergency unlocking ....................... 89
HANDS-FREE ACCESS ..................... 87
Important safety notes .................... 84
Limiting the opening angle ............... 89
object detection............................... 85
Opening dimensions ...................... 363
Opening/closing (automatically
from inside) ...................................... 88
Opening/closing (automatically
from outside) ................................... 85
Reversing feature ............................. 85
Tank content
Fuel gauge ....................................... 36
Technical data
Capacities ...................................... 358
Drawbar load (maximum) ............... 364
Information .................................... 356
Trailer loads................................... 364
Vehicle data ................................... 363
Telephone
Accepting a call (multifunction
steering wheel) .............................. 218
Authorizing a mobile phone (con-
necting) ......................................... 275
Connecting a mobile phone
(device manager) ........................... 275
Display message ............................ 255
Introduction ................................... 218
Menu (on-board computer) ............ 218
Number from the phone book ........ 218
Redialing ........................................ 219
Rejecting/ending a call ................. 218
see also Digital Operator's Man-
ual .................................................. 268
see Mobile phone
Temperature
Coolant (display in the instrument
cluster) .......................................... 209
Engine oil (on-board computer,
Mercedes-AMG vehicles) ............... 223
Outside temperature ...................... 209
Setting (climate control)................ 123
Transmission oil (on-board com-
puter, Mercedes-AMG vehicles) ..... 223
Timing (RACETIMER)......................... 225
Tire pressure
Calling up (on-board computer) ..... 337
Checking manually ........................ 336
Display message ............................ 250
Maximum ....................................... 336
Not reached (TIREFIT) .................... 318
Notes ............................................. 334
Reached (TIREFIT) .......................... 318
Recommended ............................... 333
Using the TIREFIT kit ...................... 317
Tire pressure loss warning system
General notes ................................ 336
Important safety notes .................. 336
Restarting ...................................... 337
Tire pressure monitor
Checking the tire pressure elec-
tronically ........................................ 339
Function/notes............................. 337
General notes ................................ 337
Important safety notes .................. 338
Radio type approval for the tire
pressure monitor ........................... 340
Restarting ...................................... 339
Warning lamp ................................. 266
Warning message .......................... 339
Tire pressure sensors
Display message ............................ 251
Tire-change tool kit........................... 314
Index21
Page 151 of 370
Shift recommendation
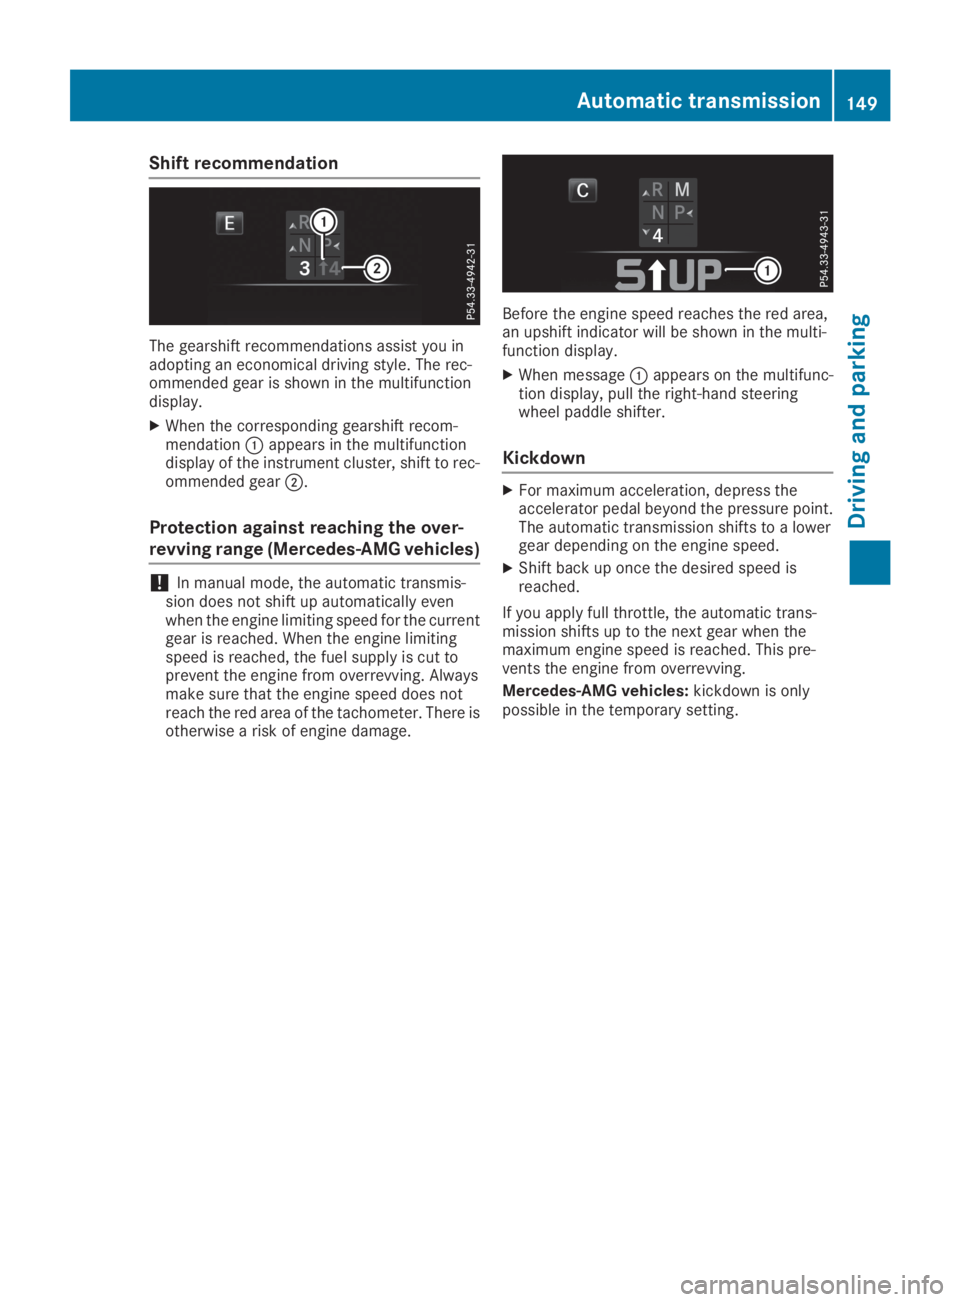
The gearshift recommendations assist you inadopting an economical driving style. The rec-ommended gear is shown in the multifunctiondisplay.
XWhen the corresponding gearshift recom-mendation�Cappears in the multifunctiondisplay of the instrument cluster, shift to rec-ommended gear�D.
Protection against reaching the over-
revving range (Mercedes-AMG vehicles)
!In manual mode, the automatic transmis-sion does not shift up automatically evenwhen the engine limiting speed for the currentgear is reached. When the engine limitingspeed is reached, the fuel supply is cut toprevent the engine from overrevving. Alwaysmake sure that the engine speed does notreach the red area of the tachometer. There isotherwise a risk of engine damage.
Before the engine speed reaches the red area,an upshift indicator will be shown in the multi-function display.
XWhen message�Cappears on the multifunc-tion display, pull the right-hand steeringwheel paddle shifter.
Kickdown
XFor maximum acceleration, depress theaccelerator pedal beyond the pressure point.The automatic transmission shifts to a lowergear depending on the engine speed.
XShift back up once the desired speed isreached.
If you apply full throttle, the automatic trans-mission shifts up to the next gear when themaximum engine speed is reached. This pre-vents the engine from overrevving.
Mercedes-AMG vehicles:kickdown is onlypossible in the temporary setting.
Automatic transmission149
Driving and parking
Z
Page 153 of 370
clean water. Seek medical assistance with-
out delay.
RIf fuel is swallowed, seek medical assis-
tance without delay. Do not induce vomit-
ing.
RImmediately change out of clothing which
has come into contact with fuel.
GWARNING
Electrostatic charge can cause sparks and
thereby ignite fuel vapors. There is a risk of
fire and explosion.
Before you open the fuel filler cap or take hold
of the pump nozzle, touch the metallic vehicle
body. This discharges any electrostatic
charge that may have built up.
Do not get into the vehicle again during the
refueling process. Otherwise, electrostatic
charge could build up again.
Do not get into the vehicle again during the refu-eling process. Otherwise electrostatic chargecould build up again.
!Do not use diesel to refuel vehicles with agasoline engine. Do not switch on the ignitionif you accidentally refuel with the wrong fuel.Otherwise, the fuel will enter the fuel system.Even small amounts of the wrong fuel couldresult in damage to the fuel system and theengine. Notify a qualified specialist workshopand have the fuel tank and fuel lines drainedcompletely.
!Overfilling the fuel tank could damage thefuel system.
!Take care not to spill any fuel on paintedsurfaces. You could otherwise damage thepaintwork.
!Use a filter when adding fuel from a fuel can.The fuel lines and/or the fuel injection systemcould otherwise be blocked by particles fromthe fuel can.
If you overfill the fuel tank, fuel could spray outwhen the fuel pump nozzle is removed.
For further information on fuel and fuel quality(Ypage 358).
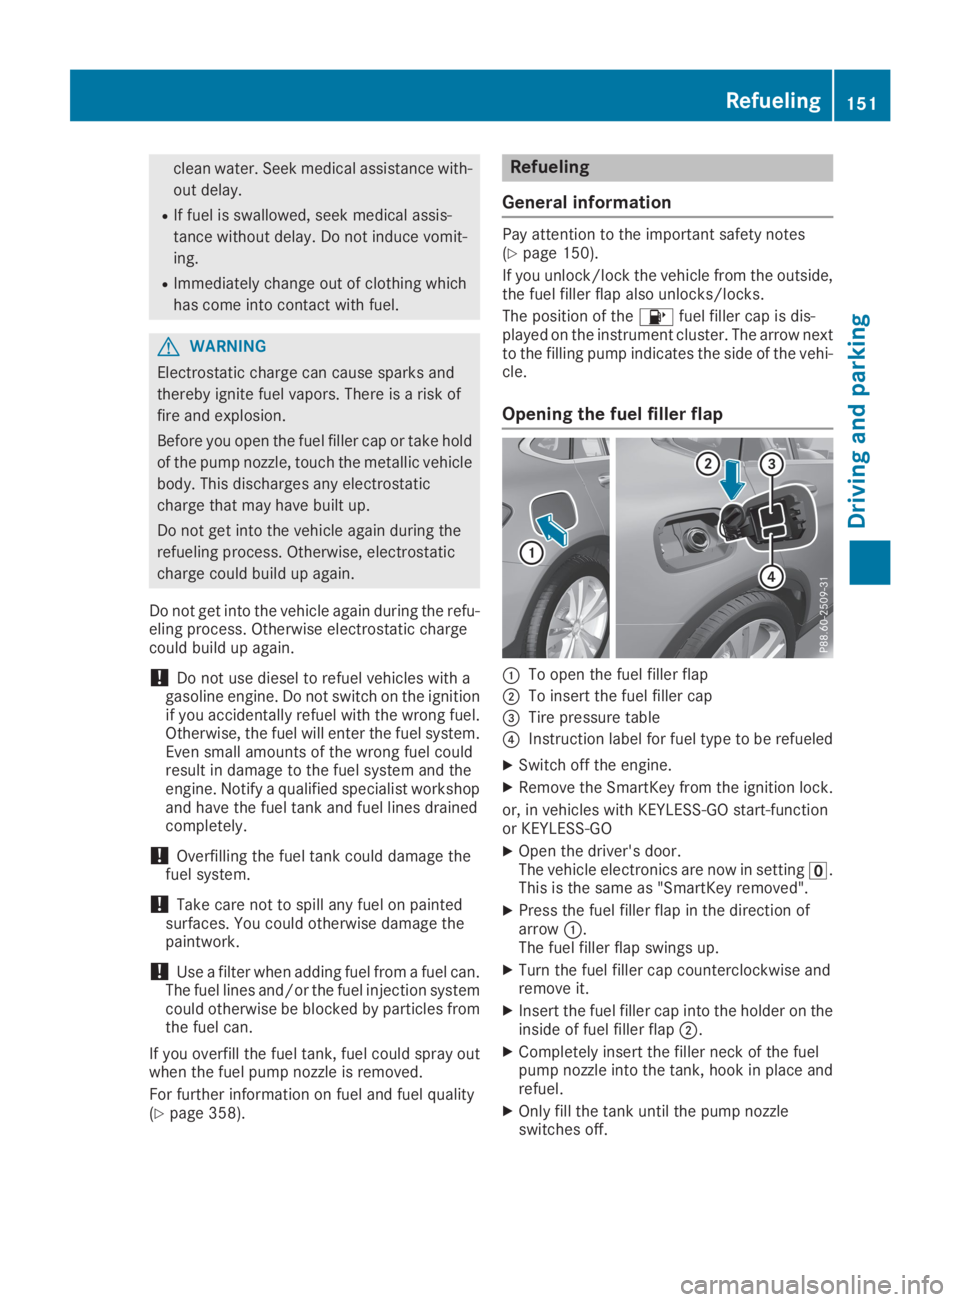
Refueling
General information
Pay attention to the important safety notes(Ypage 150).
If you unlock/lock the vehicle from the outside,the fuel filler flap also unlocks/locks.
The position of the�
Page 154 of 370
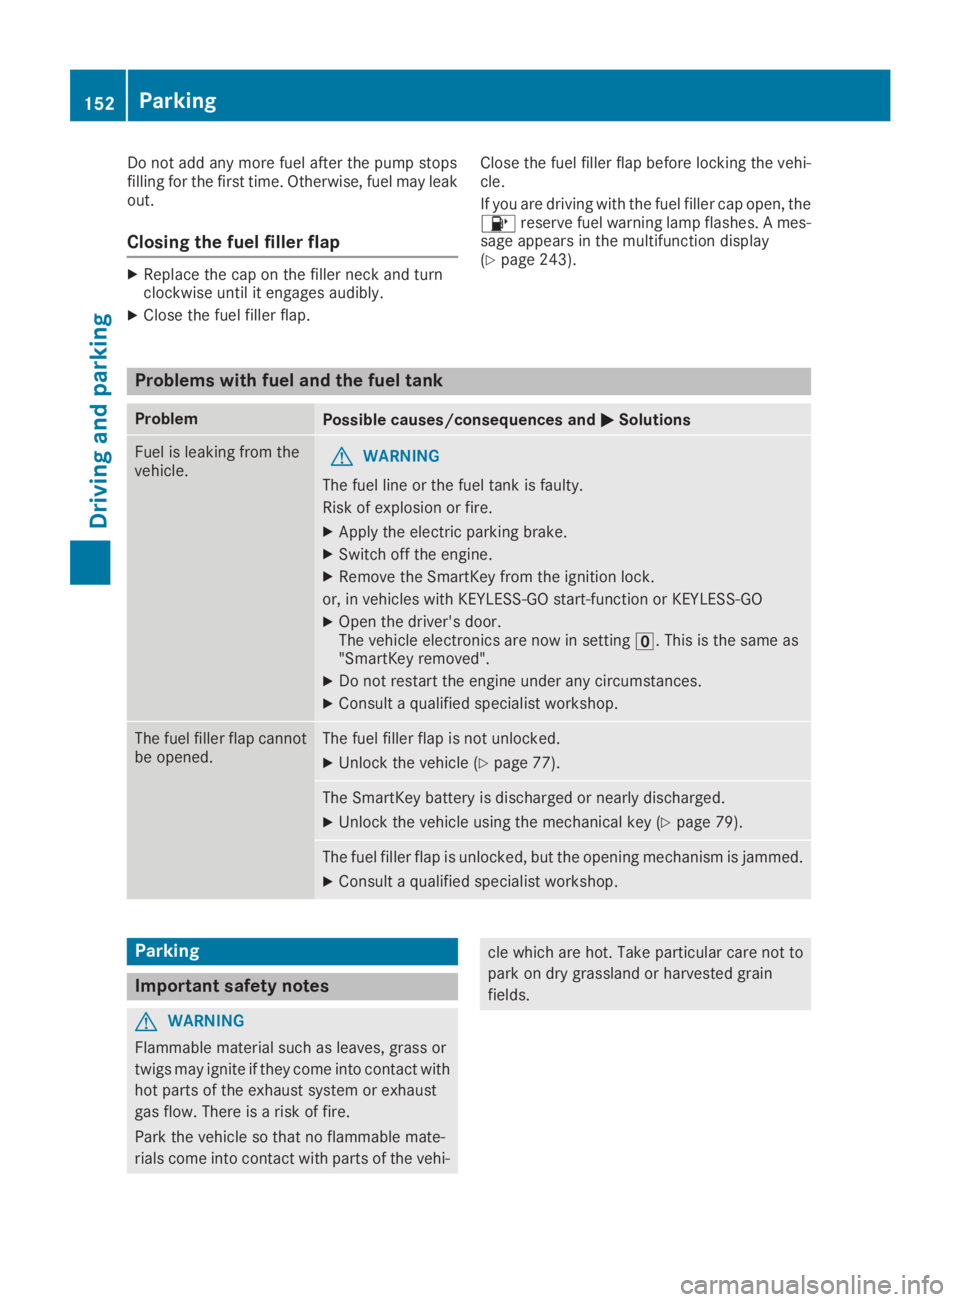
Do not add any more fuel after the pump stopsfilling for the first time. Otherwise, fuel may leakout.
Closing the fuel filler flap
XReplace the cap on the filler neck and turnclockwise until it engages audibly.
XClose the fuel filler flap.
Close the fuel filler flap before locking the vehi-cle.
If you are driving with the fuel filler cap open, the�
Page 205 of 370
For more information, please contact a qualifiedspecialist workshop.
Please observe the manufacturer's operatinginstructions for the trailer coupling if a detach-able trailer coupling is used.
Couple and uncouple the trailer carefully. If youdo not couple the trailer to the towing vehiclecorrectly, the trailer could become detached.
Make sure that the following values are notexceeded:
Rthe permissible trailer drawbar noseweight
Rthe permissible trailer load
Rthe permissible rear axle load of the towingvehicle
Rthe maximum permissible gross vehicleweight of both the towing vehicle and thetrailer
The applicable permissible values, which mustnot be exceeded, can be found:
Rin the vehicle documents
Ron the type plate for the trailer
Ron the vehicle identification plate
If the values differ, the lowest value applies.
When towing a trailer, your vehicle's handlingcharacteristics will be different in comparisonwith when driving without a trailer.
The vehicle/trailer combination:
Ris heavier
Ris restricted in its acceleration and gradient-climbing capability
Rhas an increased braking distance
Ris affected more by strong crosswinds
Rdemands more sensitive steering
Rhas a larger turning circle
This could impair the handling characteristics.
When towing a trailer, always adjust your speedto the current road and weather conditions. Donot exceed the maximum permissible speed foryour vehicle/trailer combination.
Notes on towing a trailer
General notes
RDo not exceed the maximum permissiblespeed for vehicle/trailer combinations in therelevant country.
This lowers the risk of an accident.
ROnly install an approved trailer coupling onyour vehicle.
Further information on availability and oninstallation is available from any authorizedMercedes-Benz Center.
RThe bumpers of your vehicle are not suitablefor installing detachable trailer couplings.
RDo not install hired trailer couplings or otherdetachable trailer couplings on the bumpersof your vehicle.
RIf you no longer need the ball coupling,remove it from the ball coupling recess. Thiswill reduce the risk of damage to the ball cou-pling.
When towing a trailer, set the tire pressure onthe rear axle of the towing vehicle for a maxi-mum load; see the tire pressure table in the fuelfiller flap (Ypage 348).
Please note that when towing a trailer, the fol-lowing driving systems have limited availabilityor are not available at all:
RPARKTRONIC (Ypage 179)
RBlind Spot Assist (Ypage 193)
RActive Lane Keeping Assist (Ypage 200)
On vehicles without level control, the height ofthe ball coupling will alter according to the loadplaced on the vehicle. If necessary, use a trailerwith a height-adjustable drawbar.
You will find permissible trailer loads under"Technical data" (Ypage 364).
Driving tips
Observe the information on ESP®trailer stabili-zation (Ypage 71) and on pulling away with atrailer (Ypage 135).
The maximum permissible speed for vehicle/trailer combinations depends on the type oftrailer. Before beginning the journey, check thetrailer's documents to see what the maximumpermitted speed is. Observe the maximum per-missible speed in the relevant country.
For certain Mercedes-Benz vehicles, the maxi-mum permissible rear axle load is increasedwhen towing a trailer. See the "Technical data"section to find out whether this applies to yourvehicle (Ypage 365). In the event of increasedrear axle load, the vehicle/trailer combinationmay not exceed a maximum speed of 60 mph(100 km/h) for reasons concerning the operat-ing permit. This also applies in countries in
Towing a trailer203
Driving and parking
Z
Page 206 of 370
which the maximum permissible speed for vehi-cle/trailer combinations is above 60 mph(100 km/h).
When towing a trailer, your vehicle's handlingcharacteristics will be different in comparison towhen driving without a trailer and it will con-sume more fuel.
Shift to a lower gear on long and steep downhillgradients.
This also applies to:
Ractivated DISTRONIC PLUS
Ractivated cruise control
This will use the braking effect of the engine, sothat less braking will be required to maintain thespeed. This relieves the load on the brake sys-tem and prevents the brakes from overheatingand wearing too quickly. If you need additionalbraking, depress the brake pedal repeatedlyrather than continuously.
Driving tips
If the trailer swings from side to side:
XDo not accelerate.
XDo not counter-steer.
XBrake if necessary.
RMaintain a greater distance from the vehiclein front than when driving without a trailer.
RAvoid braking abruptly. If possible, brake gen-tly at first to allow the trailer to run on. Then,increase the braking force rapidly.
RThe values given for gradient-climbing capa-bilities from a standstill refer to sea level.When driving in mountainous areas, note thatthe power output of the engine and, conse-quently, the vehicle's gradient-climbing capa-bility, decreases with increasing altitude.
Installing the ball coupling
GWARNING
If the ball coupling is not correctly installed
and secured, it could come loose while driving
and endanger other road users. There is a risk
of an accident and injury.
Install and secure the ball coupling as descri-
bed in the ball coupling manufacturer's instal-
lation instructions. Make sure that the ball
coupling is correctly installed and secured
before every journey.
GWARNING
If the ball coupling is not installed and secured
correctly the trailer may come loose. There is
a risk of an accident.
Install and secure the ball coupling as descri-
bed in the ball coupling installation instruc-
tions. Make sure that the ball coupling is
installed and secured correctly before every
journey.
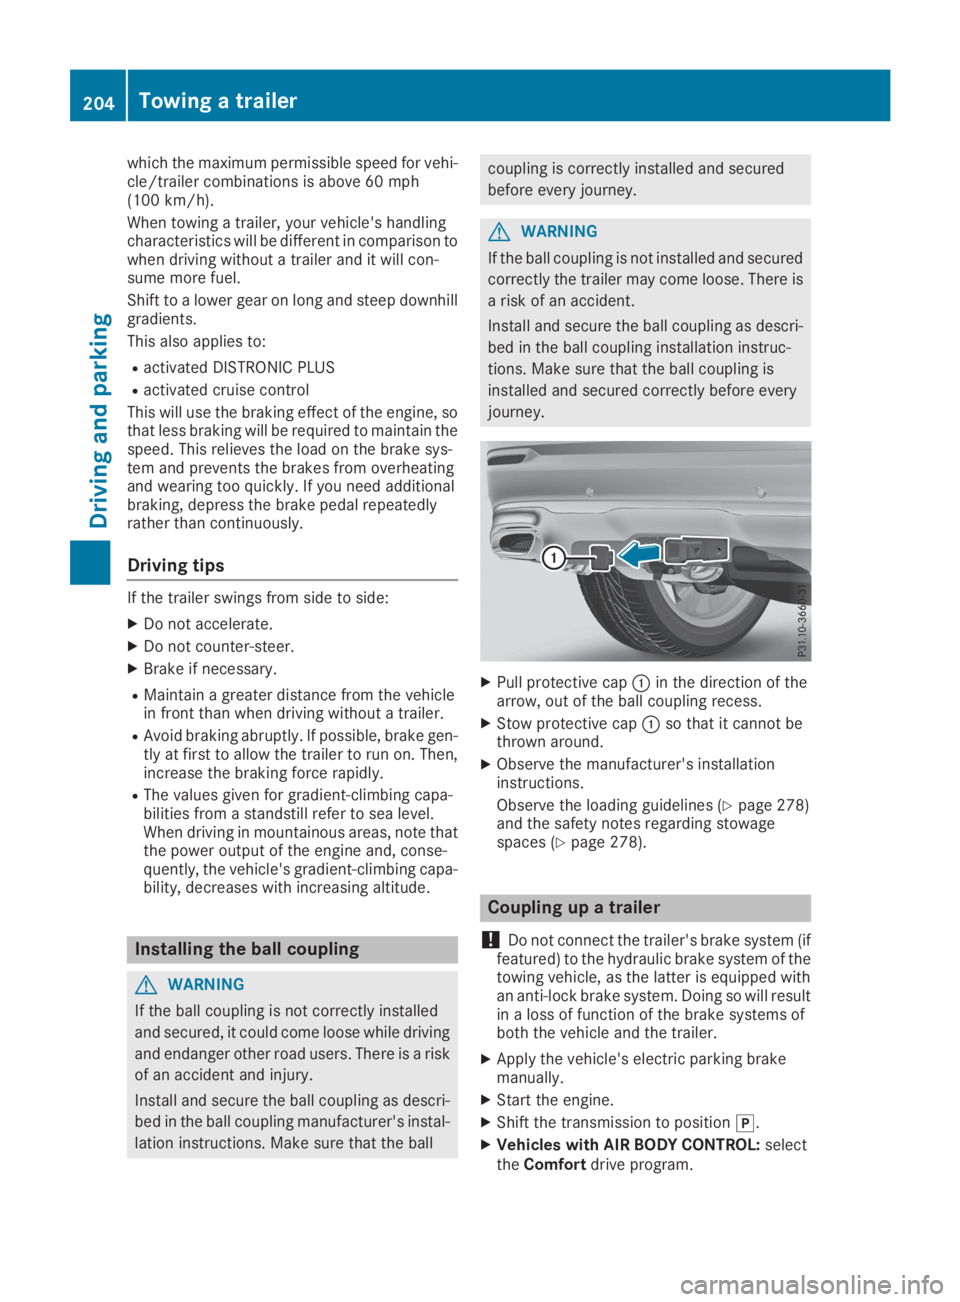
XPull protective cap�Cin the direction of thearrow, out of the ball coupling recess.
XStow protective cap�Cso that it cannot bethrown around.
XObserve the manufacturer's installationinstructions.
Observe the loading guidelines (Ypage 278)and the safety notes regarding stowagespaces (Ypage 278).
Coupling up a trailer
!Do not connect the trailer's brake system (iffeatured) to the hydraulic brake system of thetowing vehicle, as the latter is equipped withan anti-lock brake system. Doing so will resultin a loss of function of the brake systems ofboth the vehicle and the trailer.
XApply the vehicle's electric parking brakemanually.
XStart the engine.
XShift the transmission to position�].
XVehicles with AIR BODY CONTROL:selecttheComfortdrive program.
204Towing a trailer
Driving and parking
Page 320 of 370
have attained a pressure of at least 200 kPa(2.0 bar/29 psi).
If a pressure of 200 kPa (2.0 bar/29 psi) hasbeen attained after five minutes, see "Tire pres-sure reached" (Ypage 318).
If a tire pressure of 200 kPa (2.0 bar/29 psi) hasnot been attained after five minutes, see "Tirepressure not reached" (Ypage 318).
If tire sealant has escaped, clean it off affectedareas as quickly as possible. It is preferable touse clean water.
If your clothes are soiled with tire sealant, havethem cleaned with perchloroethylene at a drycleaner as soon as possible.
Tire pressure not reached
If a tire pressure of 200 kPa (2.0 bar/29 psi) hasnot been attained after ten minutes:
XSwitch off the tire inflation compressor.
XUnscrew the filler hose from the valve of thefaulty tire.Tire sealant may escape when the filler hose isunscrewed.
XVery slowly drive forwards or reverse approx-imately 30 ft (10 m).
XPump up the tire again.
After a maximum of ten minutes, the tire pres-sure must be at least 200 kPa (2.0 bar/29 psi).
GWARNING
If the required tire pressure is not reached
after the specified time, the tire is too badly
damaged. The tire sealant cannot repair the
tire in this instance. Damaged tires and a tire
pressure that is too low can significantly
impair the vehicle's braking and driving char-
acteristics. There is a risk of accident.
Do not continue driving. Contact a qualified
specialist workshop.
Tire pressure reached
GWARNING
A tire temporarily sealed with tire sealant
impairs the driving characteristics and is not
suitable for higher speeds. There is a risk of
accident.
You should therefore adapt your driving style
accordingly and drive carefully. Do not exceed
the specified maximum speed with a tire that
has been repaired using tire sealant.
The maximum permissible speed for a tiresealed with tire sealant is 50 mph (80 km/h).The upper part of the TIREFIT sticker must beaffixed to the instrument cluster in the driver'sfield of vision.
If a tire pressure of 200 kPa (2.0 bar/29 psi) hasbeen attained after ten minutes:
XSwitch off the tire inflation compressor.
XUnscrew the filler hose from the valve of thefaulty tire.Tire sealant may escape when the filler hose isunscrewed.
XStow the tire sealant bottle and the tire infla-tion compressor.
XPull away immediately.
XStop after driving for approximately tenminutes and check the tire pressure with thetire inflation compressor.The tire pressure must now be at least130 kPa (1.3 bar/19 psi).
GWARNING
If the required tire pressure is not reached
after driving for a short period, the tire is too
badly damaged. The tire sealant cannot repair
the tire in this instance. Damaged tires and a
tire pressure that is too low can significantly
impair the vehicle's braking and driving char-
acteristics. There is a risk of accident.
Do not continue driving. Contact a qualified
specialist workshop.
In cases such as the one mentioned above, con-tact an authorized Mercedes-Benz Center. Orcall 1-800-FOR-MERCedes (in the USA) or1-800-387-0100 (in Canada).
XCorrect the tire pressure if it is still at least130 kPa (1.3 bar/19 psi). See the Tire andLoading Information placard on the B-pillar onthe driver's side or the tire pressure table inthe fuel filler flap for values.
XTo increase the tire pressure:switch on thetire inflation compressor.
318Flat tire
Breakdown assistance