2019 MERCEDES-BENZ GLC COUPE buttons
[x] Cancel search: buttonsPage 115 of 657
#
During the adjustment process forthe
easy entry andexitfeature, make sure
th at no one has any body parts in the
sweep of thesteering wheel or the driv‐
er's seat.
If th ere is a risk of becoming trapped bythe
st eering wheel: #
Movethe adjustment le ver of thesteer‐
ing wheel.
The adjustment process is stopped.
If th ere is a risk of becoming trapped bythe
driver's seat: #
Press the seat adjustment switch.
The adjustment process is stopped. #
Never lea vechildren unat tended in the
ve hicle. #
When leaving theve hicle, alw aysta ke
th eke y with you and lock theve hicle.
This also applies tothe digital vehicle
ke y if the "Digital Vehicle Key" function
is activated via Mercedes me connect. Ve
hicles with memory function: you can stop
th e adjustment process bypressing one of the
memory function position switches. &
WARNING Risk of becoming trapped
du ring acti vation of the easy entry and
ex itfeature bychildren
If ch ildren activate the easy entry andexit
fe ature, they can become trapped, pa rticu‐
lar lywhen unat tended. #
Never lea vechildren unat tended in the
ve hicle. #
When leaving theve hicle, alw aysta ke
th eke y with you and lock theve hicle. This also applies
tothe Digital Vehicle Key if the
"Digital Vehicle Key" function is activated via
Mercedes me connect.
If th e easy entry andexitfeature is active, the
st eering wheel will mo veupwards and the driv‐
er's seat will mo veback in thefo llowing situa‐
tions:
R you swit chthe ignition off with the driver's
door open R
you open the driver's door with the ignition
switched off
% The steering wheel will mo veupwards on lyif
it is not already as high as it will go. The driv‐
er's seat will mo vebackwards only if it is not
already in there armost position.
The steering wheel and the driver's seat will
mo veback tothe last drive position in thefo l‐
lowing cases:
R you swit chthe po wer supp lyor the ignition
on when the driver's door is closed
R you close the driver's door with the ignition
switched on
The last drive position will be stored when:
R you swit chthe ignition off
R vehicles with memory function: you call
up the seat settings via the memory function.
R vehicles with memory function: you sa ve
th e seat settings via the memory function.
Ve hicles with memory function: press one of
th e memory function sa ved position buttons to
st op the adjustment process. 11 2
Seats and stowing
Page 120 of 657

If
th e left and right seat backrests are not
engaged and loc ked in place, this will be shown
on the multifunction display of the instrument
clus ter.A wa rning tone will also sound.
If th e cent reseat backrest is not engaged and
loc ked, there d lock verification indicator will be
visible.
The centre and ou ter seat backrests can be fol‐
ded forw ards separatel y.
The outer seat backrests are unloc ked elect ri‐
cally. The release buttons are located inside the
load compartment. #
Insert the seat belt tongue 1into the seat
belt extender 2. #
If at least one section of there ar seat back‐
re st isfolded forw ards, the cor responding
front seat will mo veforw ards slightl y,if nec‐
essar y,to avoid a collision. #
If necessar y,fully insert there ar seat back‐
re st head restra ints. #
Left and right seat backrests: pullthe left
or right release handle 3.
The cor responding seat backrest will fold for‐
wa rds. #
Centre seat backres t:pull there lease cat ch
5 ofthe seat backrest 4forw ards. #
Foldthe seat backrest 4forw ards. Seats and
stowing 117
Page 156 of 657
Overview of climate control sy
stems Note
s on climate control An interior air
filter in combination with the pre‐
fi lter in the engine compartment must alw ays be
used so that the air conditioning sy stem, pollu‐
tion lebutton vel monitoring and the air filtration
wo rkcor rectly. Ma kesure that thefilter is ins tal‐
led cor rectly and thefilter housing in the engine
compartment is closed cor rectly using the cap
and alw ays tightly sealed when in operation. Use
fi lters recommended and appr ovedby
Mercedes-Benz. Alw ays ha veservice workcar‐
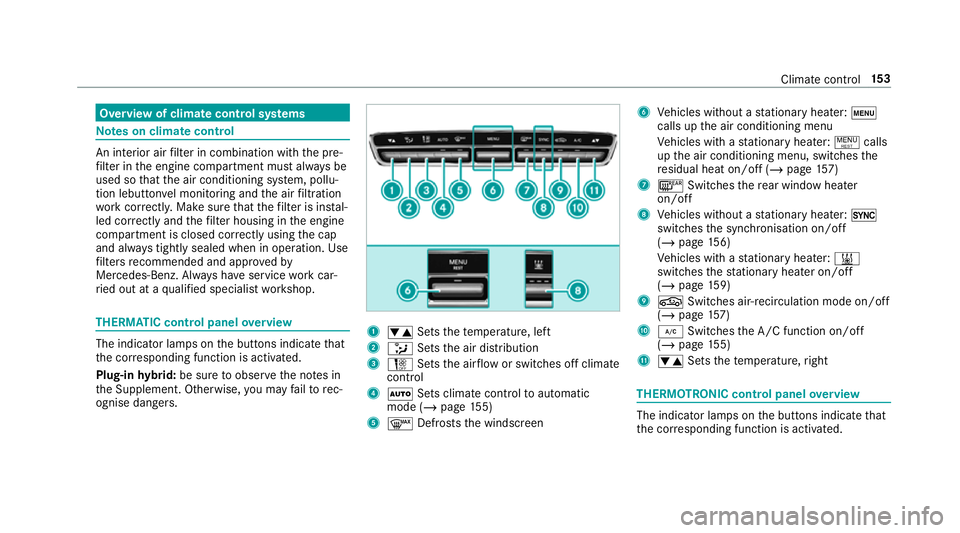
ri ed out at a qualified specialist workshop. THERMATIC control panel
overview The indicator lamps on
the buttons indicate that
th e cor responding function is activated.
Plug-in hybrid: be sure toobser vethe no tes in
th e Supplement. Otherwise, you may failto rec‐
ognise dangers. 1
w Setsthete mp erature, left
2 _ Setsthe air distribution
3 H Setsthe air flow or switches off climate
control
4 Ã Sets climate control toautomatic
mode (/ page155)
5 ¬ Defrosts the windscreen 6
Vehicles without a stationary heater: t
calls up the air conditioning menu
Ve hicles with a stationary heater: !calls
up the air conditioning menu, switches the
re sidual heat on/off (/ page157)
7 ¤ Switches there ar wind owheater
on/off
8 Vehicles without a stationary heater: 0
swit ches the synchronisation on/off
(/ page 156)
Ve hicles with a stationary heater: &
swit ches thest ationary heater on/off
(/ page 159)
9 g Switches ai r-re circulation mode on/off
(/ page 157)
A ¿ Switches the A/C function on/off
(/ page 155)
B w Setsthete mp erature, right THERMOT
RONIC control panel overview The indicator lamps on
the buttons indicate that
th e cor responding function is activated. Climate
control 15 3
Page 164 of 657
#
Press and hold theu button.
Setting the departu retime #
Brie fly press theu button. #
Press the, or. button repeatedly
until the time tobe changed appears on the
displa y. #
Press theu and^ buttons simultane‐
ousl y.
The Îsymbol on there mo tecontrol displ ay
fl ashes. #
Press the, and. buttons toset the
desired departure time. #
Press theu and^ buttons simultane‐
ousl y.
The new departure time will be stored.
Up tothre e departure times can be stored. #
Toactivate the departu retime: select the
desired departure time and press and hold
th eu button.
The Ísymbol, the departure time and,
depending on the selected departure time,
th e letter A, BorCappear on the displa y. #
Todeactivate the departure time: select
th e desired departure time and press and
hold the^ button.
OFF will appear on the displa y. #
Tocheck thest atus of thest ationary
heater: briefly press theu button.
Switching off immediately #
Press and hold the^ button.
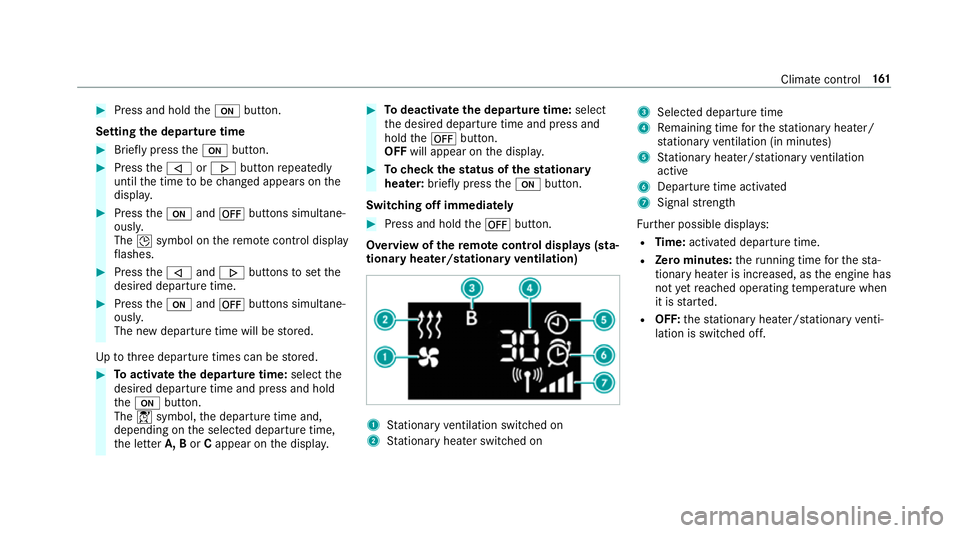
Overview of there mo tecont rol displa ys(sta‐
tiona ryheater/stationary ventilation) 1
Stationary ventilation switched on
2 Stationary heater swit ched on 3
Selected departure time
4 Remaining time forth est ationary heater/
st ationary ventilation (in minu tes)
5 Stationary heater/ stationary ventilation
acti ve
6 Departure time acti vated
7 Signal stre ngth
Fu rther possible displa ys:
R Time: activated departure time.
R Zero minutes: theru nning time forth est a‐
tionary heater is inc reased, as the engine has
not yetre ached operating temp erature when
it is star ted.
R OFF: thest ationary heater/ stationary venti‐
lation is switched off. Clima
tecontrol 161
Page 195 of 657
#
Engage transmission position jin a station‐
ary vehicle with the brake pedal applied
(/ page 181). #
Switch off the engine and the ignition by
pressing the1 button. #
Release the service brake slowl y.#
Get out of theve hicle and lock it.
% When you park theve hicle, you can still
opera tethe side windo wsand the sliding
sunroof for appro ximately five minutes if the
driver's door is closed. Garage door opener
Prog
ramming buttons for the garage door
opener &
WARNING Risk of inju rywhen opening
or closing a door with thega rage door
opener
When you operate or program the door with
th e integrated garage door opener, people in
th era nge of mo vement of the door may
become trapped or stru ck bythe door. #
When using the integrated garage door
opener, alw ays make sure that nobody
is within thera nge of mo vement of the
door. Re
quirements:
R The vehicle has been par ked outside the
ga rage or outside thera nge of mo vement of
th e door.
R The engine is switched off.
R The ignition is switched on.
% The garage door opener function is alw ays
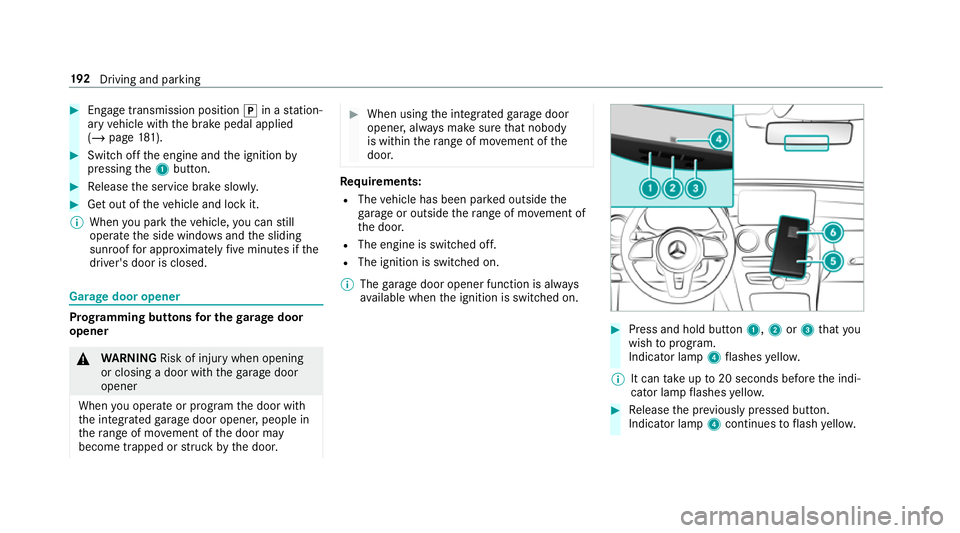
av ailable when the ignition is switched on. #
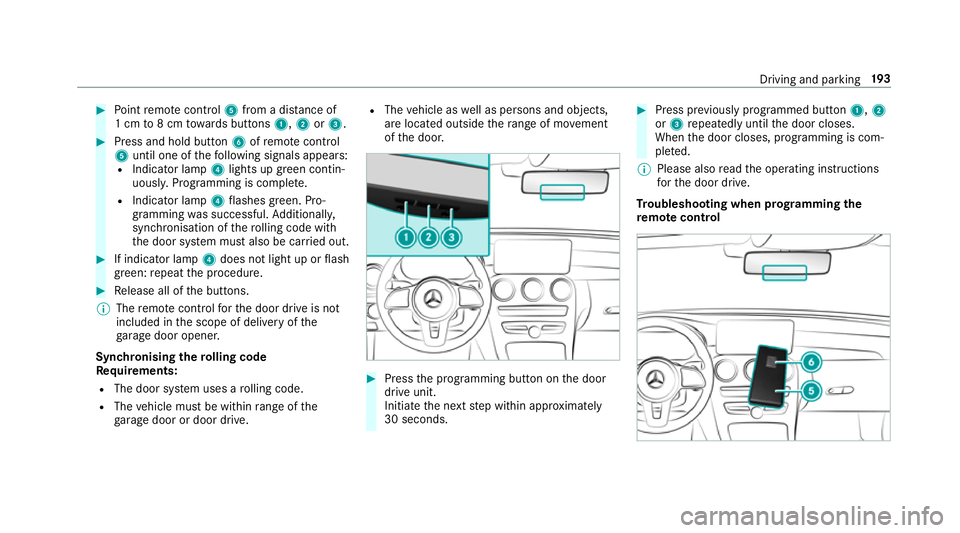
Press and hold button 1,2or3 that you
wish toprog ram.
Indicator lamp 4flashes yello w.
% It can take up to20 seconds before the indi‐
cator lamp flashes yello w. #
Release the pr eviously pressed button.
Indicator lamp 4continues toflash yello w. 19 2
Driving and pa rking
Page 196 of 657
#
Point remo tecontrol 5from a di stance of
1 cm to8 cm towa rds buttons 1,2or3. #
Press and hold button 6ofremo tecontrol
5 until one of thefo llowing signals appears:
R Indicator lamp 4lights up green contin‐
uousl y.Programming is comple te.
R Indicator lamp 4flashes green. Pro‐
gramming was successful. Additionall y,
synchronisation of thero lling code with
th e door sy stem must also be car ried out. #
If indicator lamp 4does not light up or flash
green: repeat the procedure. #
Release all of the buttons.
% The remo tecontrol forth e door drive is not
included in the scope of delivery of the
ga rage door opener.
Synchronising thero lling code
Re quirements:
R The door sy stem uses a rolling code.
R The vehicle must be within range of the
ga rage door or door drive. R
The vehicle as well as persons and objects,
are located outside thera nge of mo vement
of the door. #
Press the programming button on the door
drive unit.
Initiate the next step within appr oximately
30 seconds. #
Press pr eviously prog rammed button 1,2
or 3 repeatedly until the door closes.
When the door closes, programming is com‐
ple ted.
% Please also read the operating instructions
fo rth e door drive.
Tr oubleshooting when prog ramming the
re mo tecont rol Driving and pa
rking 19 3
Page 197 of 657

#
Check if the transmit ter frequency of remo te
control 5is suppo rted. #
Replace the batteries in remo tecontrol 5. #
Hold remo tecontrol 5atvarious angles at
a dis tance between 1 cm to8 cm in front of
th e inside rearview mir ror.Yo u should test
eve ryposition for at least 25 seconds before
trying ano ther position. #
Hold remo tecontrol 5atthe same angles
at various dis tances in front of the inside rear
view mir ror.Yo u should test eve ryposition
fo r at least 25 seconds before trying ano ther
position. #
Notethat some remo tecontrols transmit
only for a limi ted period, press button 6on
re mo tecontrol 5again before transmission
ends. #
Align the aerial line of the door opener unit
with there mo tecontrol.
% Support and additional information on pro‐
gramming:
R Onthe HomeLink ®
Hotline on (0) 08000
466 354 65 or +49 (0) 6838 907-2 77.R
Onthe Internet at http://
www.homelin k.com.
Opening or closing the door
Requ irements:
R The cor responding button is programmed to
operate the door. #
Press and hold buttons 1,2or3 until
th e door opens or closes. #
If indicator lamp 4flashes yellow af ter
appr oximately 20 seconds: press and hold
th e pr eviously pressed button again until the
door opens or closes.
Clearing thega rage door opener memo ry #
Press and hold buttons 1and 3.
Indicator lamp 4lights up yello w. 194
Driving and pa rking
Page 198 of 657
#
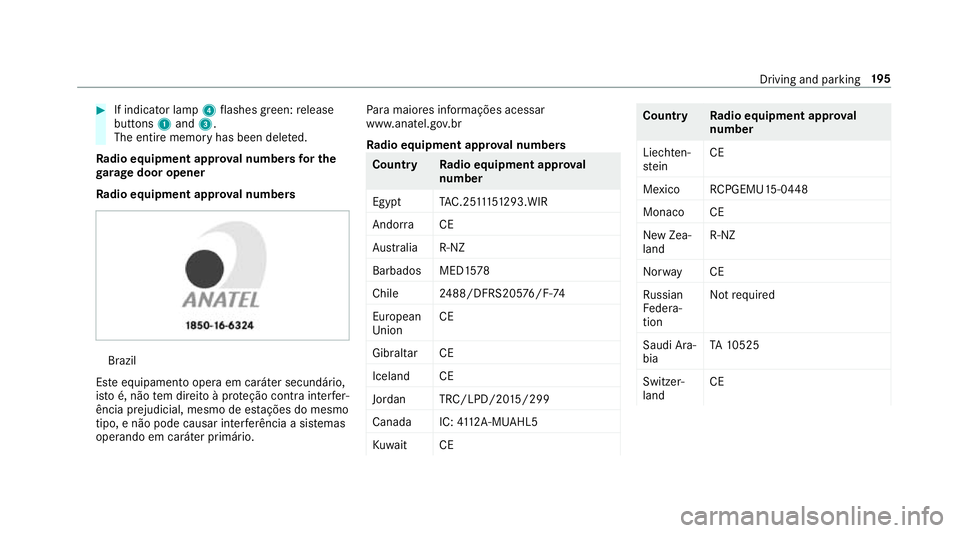
If indicator lamp 4flashes green: release
buttons 1and 3.
The entire memo ryhas been dele ted.
Ra dio equipment appr oval numbers for the
ga rage door opener
Ra dio equipment appr oval numbers Brazil
Es te equipamento opera em caráter secundário,
is to é, não tem direito à pr oteção contra inter fer‐
ência prejudicial, mesmo de es tações do mesmo
tipo, e não pode causar inter ferê ncia a si stemas
operando em caráter primário. Pa
ra maio res informações acessar
www.anatel.go v.br
Ra dio equipment appr oval numbers Countr
yRadio equipment appr oval
number
Egyp tT AC.25 111 51293.WIR
Andor ra CE
Au stra lia R-NZ
Barbados MED1 578
Chile 2488/DFRS205 76/F-74
European
Union CE
Gibral tarCE
Iceland CE
Jordan TRC/LPD/20 15/299
Canad aI C:4112 A-MUAHL5
Ku wa it CE Count
ryRadio equipment appr oval
number
Liechten‐
st ein CE
Mexico RCPGEMU15-0448
Monaco CE
New Zea‐
land R-
NZ
Nor wayCE
Ru ssian
Fe dera‐
tion Not
requ ired
Saudi Ara‐
bia TA
10525
Switzer‐
land CE Driving and parking
19 5