2019 MERCEDES-BENZ GLA trunk
[x] Cancel search: trunkPage 23 of 346
MOExtended tires .......................... 306
Optional equipment weight (defi-
nition) ............................................ 325
PSI (pounds per square inch)
(definition) .....................................324
Replacing ....................................... 325
Service life ..................................... 305
Sidewall (definition) ....................... 325
Speed rating (definition) ................ 324
Storing ...........................................326
Structure and characteristics
(definition) ..................................... 323
Summer tires ................................. 306
Temperature .................................. 319
TIN (Tire Identification Number)
(definition) ..................................... 325
Tire bead (definition) ......................325
Tire pressure (definition) ................ 324
Tire pressures (recommended) ...... 324
Tire size (data) ............................... 329
Tire size designation, load-bear-
ing capacity, speed rating .............. 320
Tire tread ....................................... 305
Tire tread (definition) ..................... 325
Total load limit (definition) ............. 325
Traction ......................................... 319
Traction (definition) ....................... 325
Tread wear..................................... 319
Uniform Tire Quality Grading
Standards ...................................... 319
Uniform Tire Quality Grading
Standards (definition) .................... 323
Wear indicator (definition) ............. 325
Wheel rim (definition) .................... 324
see Flat tire
Tool
see Vehicle tool kit
Top Tether............................................ 56
Tow-starting
Emergency engine starting ............ 301
Important safety notes .................. 298
Installing the towing eye ................ 299
Removing the towing eye ............... 299
Towing
Permitted towing methods ............ 300
Towing a trailer
ESP®(Electronic Stability Pro-
gram) ............................................... 66
Towing away
Important safety guidelines ........... 298
Installing the towing eye ................ 299
Notes for 4MATIC vehicles ............ 301
Removing the towing eye ............... 299
Transporting the vehicle ................ 300
With both axles on the ground ....... 300
With the front axle raised ............... 299
Towing eye......................................... 287
Traction system
see ETS/4ETS (Electronic Trac-
tion System)
Traffic reports
see also Digital Operator's Man-
ual .................................................. 242
Transmission
see Automatic transmission
Transmission position display
(DIRECT SELECT lever)...................... 134
Transporting the vehicle.................. 300
Traveling uphill
Brow of hill ..................................... 156
Driving downhill ............................. 156
Maximum gradient-climbing
capability ....................................... 156
Trim pieces (cleaning instruc-
tions).................................................. 284
Trip computer (on-board com-
puter).................................................. 192
Trip odometer
Calling up ....................................... 192
Resetting (on-board computer) ...... 193
Trunk
Emergency release button ............... 83
Opening (from outside the vehi-
cle, HANDS-FREE ACCESS) .............. 80
Trunk lid
see Tailgate
Turn signals
Display message ............................ 214
Replacing bulbs (front) ................... 108
Switching on/off........................... 104
Two-way radio
Frequencies ................................... 332
Installation ..................................... 332
Transmission output (maximum) .... 332
Index21
Page 73 of 346
KEYLESS-GO start function
General notes
Bear in mind that the engine can be started byany of the vehicle occupants if there is aSmartKey in the vehicle.
Changing the settings of the locking
system
You can change the settings of the lockingsystem. This means that only the driver's doorand the fuel filler flap are unlocked when thevehicle is unlocked. This is useful if you fre-quently travel on your own.
XTo change the setting:press and hold the�6and�7buttons simultaneously forapproximately six seconds until the batteryindicator lamp flashes twice (Ypage 72).
If the setting of the locking system is changedwithin the signal range of the vehicle, pressingthe�7or�6button:
Rlocks or
Runlocks the vehicle
The SmartKey now functions as follows:
XTo unlock:press the�6button once.
XTo unlock centrally:press the�6buttontwice.
XTo lock centrally:press the�7button.
The KEYLESS-GO function is changed as fol-lows:
XTo unlock the driver's door:touch theinner surface of the door handle on the driv-er's door.
XTo unlock centrally:touch the inner sur-face of the door handle on the front-passenger door or the rear door.
XTo lock centrally:touch the outer sensorsurface on one of the door handles.
XTo restore the factory settings:press andhold the�6and�7buttons simultane-ously for approximately six seconds until thebattery check lamp flashes twice(Ypage 72).
Mechanical key
General notes
If the vehicle can no longer be locked orunlocked with the SmartKey or KEYLESS-GO,use the mechanical key.
If you use the mechanical key to unlock andopen the driver's door or the trunk lid, theanti-theft alarm system will be triggered(Ypage 68).
There are several ways to turn off the alarm:
XTo deactivate the alarm with the key:press the�6or�7button on the key.
or
XInsert the SmartKey into the ignition lock.
or
XTo deactivate the alarm with KEYLESS-GO:press the Start/Stop button in the igni-tion lock. The SmartKey must be in the vehi-cle.
or
XLock or unlock the vehicle using KEYLESS-GO. The SmartKey must be outside the vehi-cle.
If you unlock the vehicle using the mechanicalkey, the fuel filler flap will not be unlockedautomatically.
XTo unlock the fuel filler flap:insert theSmartKey into the ignition lock.
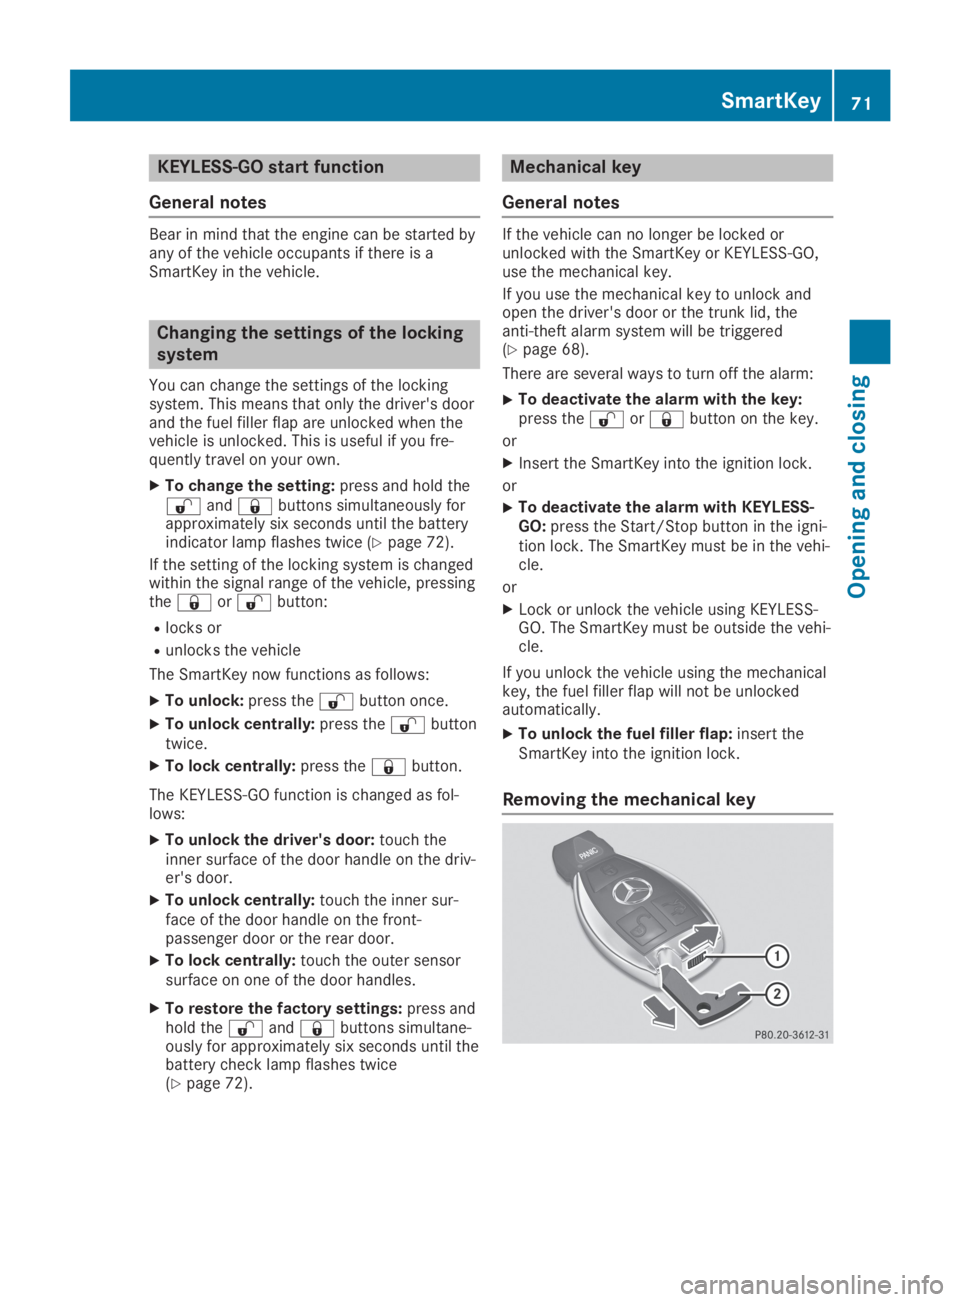
Removing the mechanical key
SmartKey71
Opening and closing
Z
Page 85 of 346
Opening
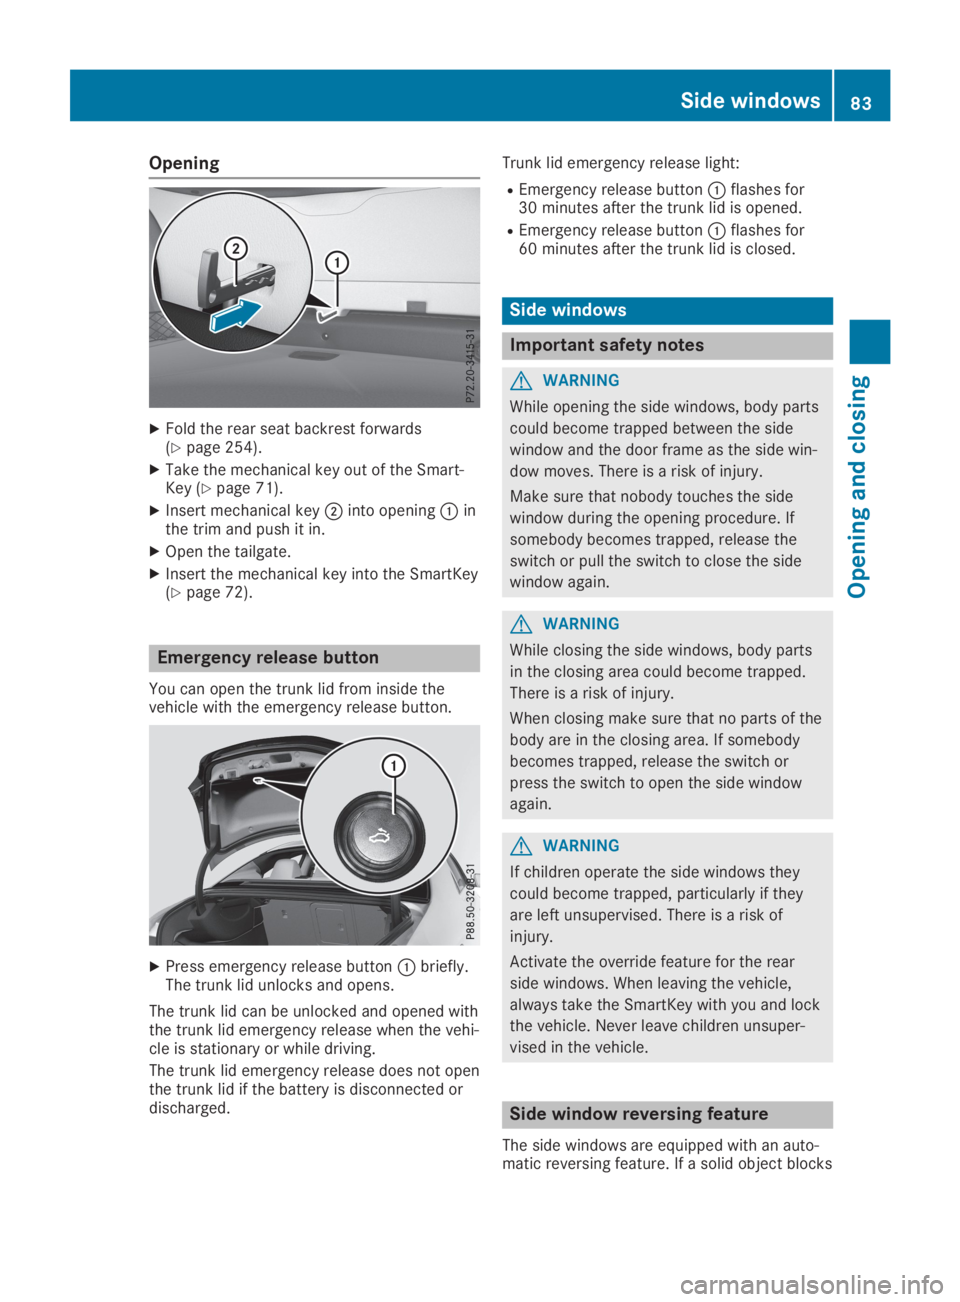
XFold the rear seat backrest forwards(Ypage 254).
XTake the mechanical key out of the Smart-Key (Ypage 71).
XInsert mechanical key�Dinto opening�Cinthe trim and push it in.
XOpen the tailgate.
XInsert the mechanical key into the SmartKey(Ypage 72).
Emergency release button
You can open the trunk lid from inside thevehicle with the emergency release button.
XPress emergency release button�Cbriefly.The trunk lid unlocks and opens.
The trunk lid can be unlocked and opened withthe trunk lid emergency release when the vehi-cle is stationary or while driving.
The trunk lid emergency release does not openthe trunk lid if the battery is disconnected ordischarged.
Trunk lid emergency release light:
REmergency release button�Cflashes for30 minutes after the trunk lid is opened.
REmergency release button�Cflashes for60 minutes after the trunk lid is closed.
Side windows
Important safety notes
GWARNING
While opening the side windows, body parts
could become trapped between the side
window and the door frame as the side win-
dow moves. There is a risk of injury.
Make sure that nobody touches the side
window during the opening procedure. If
somebody becomes trapped, release the
switch or pull the switch to close the side
window again.
GWARNING
While closing the side windows, body parts
in the closing area could become trapped.
There is a risk of injury.
When closing make sure that no parts of the
body are in the closing area. If somebody
becomes trapped, release the switch or
press the switch to open the side window
again.
GWARNING
If children operate the side windows they
could become trapped, particularly if they
are left unsupervised. There is a risk of
injury.
Activate the override feature for the rear
side windows. When leaving the vehicle,
always take the SmartKey with you and lock
the vehicle. Never leave children unsuper-
vised in the vehicle.
Side window reversing feature
The side windows are equipped with an auto-matic reversing feature. If a solid object blocks
Side windows83
Opening and closing
Z
Page 169 of 346
Canceling start-off assist
XRemove your foot from the acceleratorpedal.
XReactivate ESP®.
RACE START (Mercedes-AMG vehi-
cles)
Important safety notes
iRACE START must not be used on normalroads. RACE START must only be activatedand used on dedicated road circuits, outsideof public road use.
iRACE START is only available inMercedes‑AMG vehicles.
GWARNING
If you use RACE START, individual tires may
start to spin and the vehicle could skid.
Depending on the selected ESP®mode,
there is an increased risk of skidding and
having an accident. Make sure that no per-
sons, animals or obstacles are within range
of the vehicle.
RACE START enables optimal accelerationfrom a standing start. For this, a suitably high-grip road surface is required and the vehicleand tires must be in good working order.
iObserve the safety notes on driving safetysystems (Ypage 60).
Be sure to read the safety notes and infor-
mation on ESP®(Ypage 63).
Conditions for activation
You can activate RACE START if:
Rthe doors, hood and the trunk lid are closed.
Rthe engine is running and the transmission,all-wheel drive clutch and the engine are atoperating temperature.
Rthe steering wheel is in the straight-aheadposition.
Rthe vehicle is stationary and the brake pedalis depressed (left foot).
Rthe transmission is in position�[.
Rdrive programS,S+orRACEis selected(Ypage 133)
Activating RACE START
XDepress the brake pedal with your left footand keep it depressed.
XPull and hold both steering wheel paddleshifters.
XTheRACE START Confirm: Paddle UPRACE START Confirm: Paddle UPCancel: Paddle DOWNCancel: Paddle DOWNmessage appears inthe multifunction display.
XRelease both steering wheel paddle shifters.
iIf the activation conditions are no longerfulfilled, RACE START is canceled. TheRACE START Not Possible See Opera‐RACE START Not Possible See Opera‐tor's Manualtor's Manualmessage appears in the mul-tifunction display.
XTo cancel:pull the left steering wheel pad-dle shifter (Ypage 140).
or
XTo confirm:pull the right steering wheelpaddle shifter (Ypage 140).TheRACE START Available DepressRACE START Available Depressgas pedalgas pedalmessage appears in the multi-function display.
iIf you do not depress the accelerator pedalwithin a few seconds, RACE START is can-celed. The multifunction display shows theRACE START CanceledRACE START Canceledmessage.
XFully depress the accelerator pedal.The engine speed is increased.
TheRACE START Release brake toRACE START Release brake tostartstartmessage appears in the multifunctiondisplay.
iIf you do not release the brake pedalwithin a short time, RACE START will be can-celed. The multifunction display shows theRACE START CanceledRACE START Canceledmessage.
XTake your foot off the brake, but keep theaccelerator pedal depressed.The vehicle pulls away at maximum acceler-ation.
TheRACE START ActiveRACE START Activemessage appearsin the multifunction display.
RACE START is deactivated when the vehiclereaches a speed of approximately 50 km/h.
RACE START is deactivated immediately if yourelease the accelerator pedal during RACESTART or if any of the activation conditions areno longer fulfilled. TheRACE START Not Pos‐RACE START Not Pos‐sible See Operator's Manualsible See Operator's ManualorRACERACESTART CanceledSTART Canceledmessage appears in the mul-tifunction display.
Driving systems167
Driving and parking
Z
Page 335 of 346
The maximum transmission output (PEAK) atthe base of the antenna must not exceed thefollowing values:
Frequency bandMaximumtransmissionoutput
Short wave
3 - 54 MHz
100 W
4 m waveband
74 - 88 MHz
30 W
2 m waveband
144 - 174 MHz
50 W
Trunked radio system/Tetra
380 - 460 MHz
10 W
70 cm waveband
400 - 460 MHz
35 W
Mobile communications(2G/3G/4G)10 W
The following can be used in the vehicle with-out restrictions:
RRF transmitters with a maximum transmis-sion output of up to 100 mW
RRF transmitters with transmitter frequenciesin the 380 - 410 MHz frequency band and amaximum transmission output of up to 2 W(trunked radio system/Tetra)
RMobile phones (2G/3G/4G)
There is no restriction for antenna positions onthe outside of the vehicle for the following fre-quency bands:
RTrunked radio system/Tetra
R70 cm waveband
R2G/3G/4G
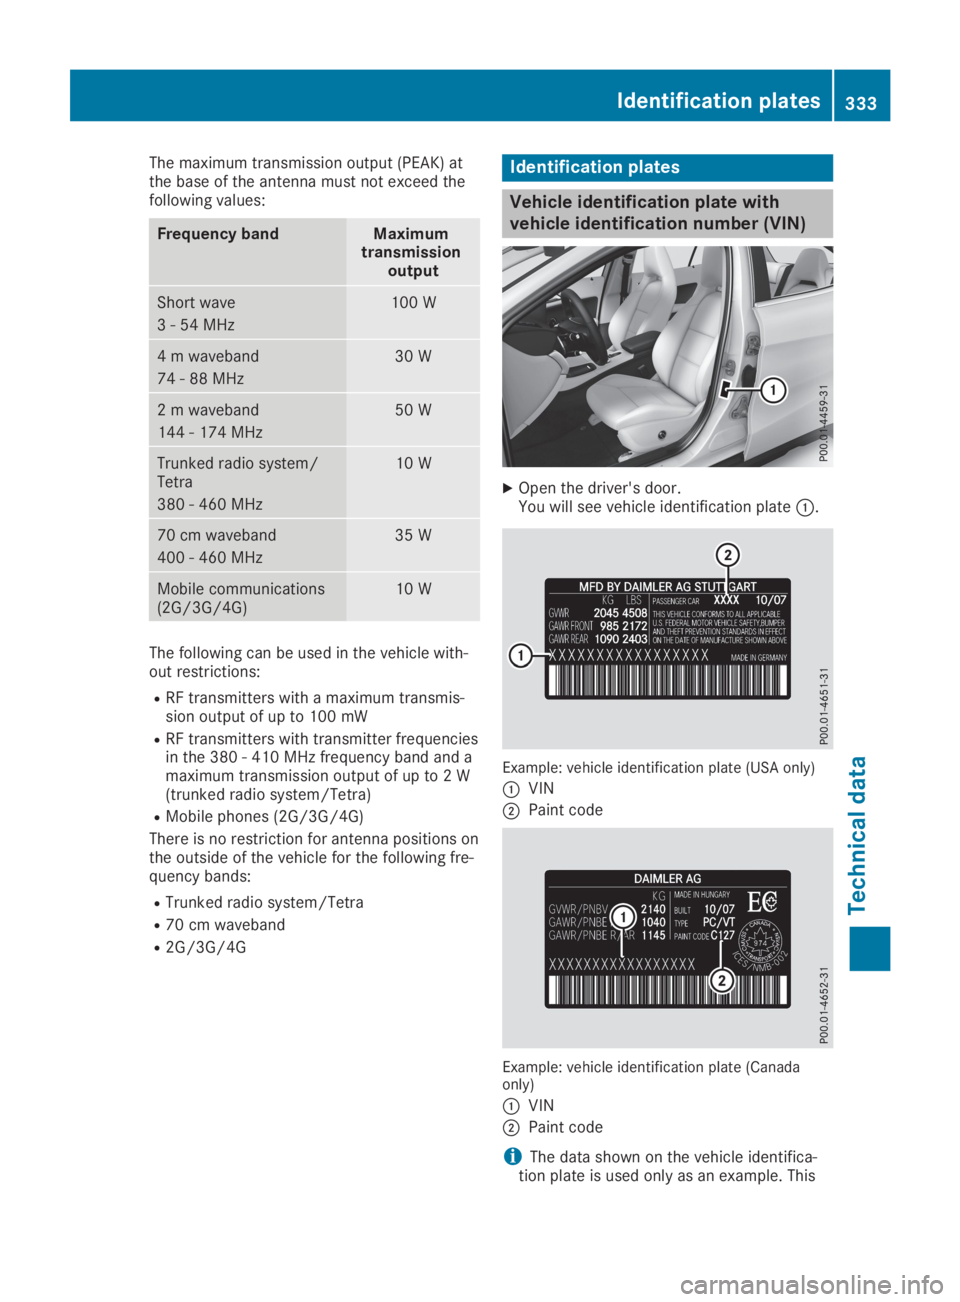
Identification plates
Vehicle identification plate with
vehicle identification number (VIN)
XOpen the driver's door.You will see vehicle identification plate�C.
Example: vehicle identification plate (USA only)
�CVIN
�DPaint code
Example: vehicle identification plate (Canadaonly)
�CVIN
�DPaint code
iThe data shown on the vehicle identifica-tion plate is used only as an example. This
Identification plates333
Technical data
Z