2019 MERCEDES-BENZ GLA reset
[x] Cancel search: resetPage 7 of 346

Alarm system
see ATA (Anti-Theft Alarm system)
AMG
Adaptive sport suspension sys-
tem ................................................ 168
Performance Seat ............................ 96
AMG adaptive sport suspension
system
General Information .......................168
AMG menu (on-board computer)..... 200
AMG Performance exhaust sys-
tem..................................................... 130
Anti-lock braking system
see ABS (Anti-lock Braking System)
Anti-skid chains
see Snow chains
Anti-theft alarm system
see ATA (Anti-Theft Alarm system)
Approach/departure angle.............. 156
Ashtray............................................... 259
Assistance display (on-board
computer).......................................... 197
Assistance menu (on-board com-
puter)..................................................196
ASSYST PLUS
Displaying a service message ........278
Driving abroad ............................... 278
Hiding a service message .............. 277
Information about Service ............. 278
Resetting the service interval dis-
play ................................................ 278
Service message ............................ 277
Special service requirements ......... 278
ATA (Anti-Theft Alarm system)
Activating/deactivating ................... 68
Function ...........................................68
Switching off the alarm .................... 68
ATTENTION ASSIST
Activating/deactivating ................. 198
Display message ............................ 219
Function/notes............................. 183
Audio 20
Driving dynamics display ............... 171
Audio menu (on-board computer).... 194
Audio system
see Digital Operator's Manual
Authorized Mercedes-Benz Center
see Qualified specialist workshop
Authorized workshop
see Qualified specialist workshop
AUTO lights
Display message ............................ 216
see Lights
Automatic car wash (care)............... 279
Automatic engine start (ECO
start/stop function).......................... 129
Automatic engine switch-off (ECO
start/stop function).......................... 129
Automatic headlamp mode.............. 102
Automatic transmission
Accelerator pedal position ............. 137
Changing gear ............................... 137
DIRECT SELECT lever ..................... 134
Drive program ................................ 138
Drive program display .................... 134
Driving tips .................................... 137
DYNAMIC SELECT button (all
vehicles except Mercedes-AMG
vehicles) ........................................ 132
DYNAMIC SELECT controller
(Mercedes-AMG vehicles) .............. 133
Emergency running mode.............. 142
Engaging drive position .................. 136
Engaging neutral ............................ 135
Engaging park position
(Mercedes-AMG vehicles) .............. 136
Engaging park position automati-
cally ............................................... 135
Engaging reverse gear ................... 135
Engaging the park position ............ 134
Holding the vehicle stationary on
uphill gradients .............................. 138
Kickdown ....................................... 138
Manual shifting .............................. 140
Oil temperature (on-board com-
puter, Mercedes-AMG vehicles) ..... 200
Overview ........................................ 134
Problem (malfunction) ................... 142
Pulling away ................................... 128
Selector lever ................................ 136
Starting the engine ........................ 127
Steering wheel paddle shifters ...... 140
Transmission position display ........ 136
Index5
Page 20 of 346
Securing cargo..................................255
Selecting a gear
see Automatic transmission
Selector lever
Cleaning ......................................... 284
Sensors (cleaning instructions)....... 282
Service menu (on-board com-
puter)..................................................198
Service message
see ASSYST PLUS
Service products
Brake fluid ..................................... 337
Coolant (engine) ............................ 337
Engine oil ....................................... 336
Fuel ................................................ 334
Important safety notes .................. 334
Refrigerant (air-conditioning sys-
tem) ............................................... 338
Washer fluid ................................... 338
Setting a speed
see Cruise control
Setting the air distribution...............120
Setting the airflow............................ 120
Setting the date/time format
see also Digital Operator's Man-
ual ..................................................242
Setting the language
see also Digital Operator's Man-
ual ..................................................242
Setting the time
see also Digital Operator's Man-
ual ..................................................242
Settings
Factory (on-board computer) ......... 200
On-board computer ....................... 198
SETUP (on-board computer,
Mercedes-AMG vehicles).................. 201
Side impact air bag.............................46
Side marker lamp (display mes-
sage)................................................... 216
Side windows
Cleaning ......................................... 281
Convenience closing feature ............ 85
Convenience opening feature ..........84
Important safety information ........... 83
Opening/closing .............................. 84
Problem (malfunction) .....................86
Resetting .........................................86
Reversing feature .............................83
SIRIUS services
see also Digital Operator's Man-
ual .................................................. 242
Situation-dependent braking
assistance
Function/notes ................................ 63
Sliding sunroof
see Panorama roof with power
tilt/sliding panel
SmartKey
Changing the battery ....................... 72
Changing the programming .............71
Checking the battery .......................72
Convenience closing feature ............ 85
Convenience opening feature .......... 84
Display message ............................ 229
Door central locking/unlocking .......69
Important safety notes .................... 69
KEYLESS-GO start function .............. 71
Loss .................................................73
Mechanical key ................................ 71
Positions (ignition lock) ................. 125
Problem (malfunction) ..................... 73
Starting the engine ........................ 127
SmartKey positions (ignition
lock)....................................................125
SMS
see also Digital Operator's Man-
ual ..................................................242
Snow chains...................................... 307
Sockets
Center console .............................. 260
General notes ................................ 260
Luggage compartment ................... 260
Rear compartment ......................... 260
Sound
Switching on/off ........................... 243
Special seat belt retractor.................. 54
Specialist workshop............................ 27
Speed, controlling
see Cruise control
Speedometer
Activating/deactivating the addi-
tional speedometer ........................ 199
Digital ............................................ 193
In the Instrument cluster ................. 32
18Index
Page 23 of 346
MOExtended tires .......................... 306
Optional equipment weight (defi-
nition) ............................................ 325
PSI (pounds per square inch)
(definition) .....................................324
Replacing ....................................... 325
Service life ..................................... 305
Sidewall (definition) ....................... 325
Speed rating (definition) ................ 324
Storing ...........................................326
Structure and characteristics
(definition) ..................................... 323
Summer tires ................................. 306
Temperature .................................. 319
TIN (Tire Identification Number)
(definition) ..................................... 325
Tire bead (definition) ......................325
Tire pressure (definition) ................ 324
Tire pressures (recommended) ...... 324
Tire size (data) ............................... 329
Tire size designation, load-bear-
ing capacity, speed rating .............. 320
Tire tread ....................................... 305
Tire tread (definition) ..................... 325
Total load limit (definition) ............. 325
Traction ......................................... 319
Traction (definition) ....................... 325
Tread wear..................................... 319
Uniform Tire Quality Grading
Standards ...................................... 319
Uniform Tire Quality Grading
Standards (definition) .................... 323
Wear indicator (definition) ............. 325
Wheel rim (definition) .................... 324
see Flat tire
Tool
see Vehicle tool kit
Top Tether............................................ 56
Tow-starting
Emergency engine starting ............ 301
Important safety notes .................. 298
Installing the towing eye ................ 299
Removing the towing eye ............... 299
Towing
Permitted towing methods ............ 300
Towing a trailer
ESP®(Electronic Stability Pro-
gram) ............................................... 66
Towing away
Important safety guidelines ........... 298
Installing the towing eye ................ 299
Notes for 4MATIC vehicles ............ 301
Removing the towing eye ............... 299
Transporting the vehicle ................ 300
With both axles on the ground ....... 300
With the front axle raised ............... 299
Towing eye......................................... 287
Traction system
see ETS/4ETS (Electronic Trac-
tion System)
Traffic reports
see also Digital Operator's Man-
ual .................................................. 242
Transmission
see Automatic transmission
Transmission position display
(DIRECT SELECT lever)...................... 134
Transporting the vehicle.................. 300
Traveling uphill
Brow of hill ..................................... 156
Driving downhill ............................. 156
Maximum gradient-climbing
capability ....................................... 156
Trim pieces (cleaning instruc-
tions).................................................. 284
Trip computer (on-board com-
puter).................................................. 192
Trip odometer
Calling up ....................................... 192
Resetting (on-board computer) ...... 193
Trunk
Emergency release button ............... 83
Opening (from outside the vehi-
cle, HANDS-FREE ACCESS) .............. 80
Trunk lid
see Tailgate
Turn signals
Display message ............................ 214
Replacing bulbs (front) ................... 108
Switching on/off........................... 104
Two-way radio
Frequencies ................................... 332
Installation ..................................... 332
Transmission output (maximum) .... 332
Index21
Page 29 of 346

Operating safety
Declarations of conformity
USA:"The wireless devices of this vehiclecomply with Part 15 of the FCC Rules. Opera-tion is subject to the two following two condi-tions: 1) These devices may not cause harmfulinterference, and 2) These devices mustaccept any interference received, includinginterference that may cause undesired opera-tion. Changes or modifications not expresslyapproved by the party responsible for compli-ance could void the user’s authority to operatethe equipment."
Canada:"The wireless devices of this vehiclecomply with Industry Canada license-exemptRSS standard(s). Operation is subject to thefollowing two conditions: (1) These devicesmay not cause interference, and (2) Thesedevices must accept any interference, includ-ing interference that may cause undesiredoperation of the device."
Diagnostic connector
The diagnostics connection is only intendedfor the connection of diagnostic equipment ata qualified specialist workshop.
GWARNING
If you connect equipment to a diagnostics
connection in the vehicle, it may affect the
operation of vehicle systems. As a result,
the operating safety of the vehicle could be
affected. There is a risk of an accident.
Only connect equipment to a diagnostics
connection in the vehicle, which is approved
for your vehicle by Mercedes-Benz.
GWARNING
Objects in the driver's footwell can restrict
the pedal travel or obstruct a depressed
pedal. The operating and road safety of the
vehicle is jeopardized. There is a risk of an
accident.
Make sure that all objects in the vehicle are
stowed correctly, and that they cannot enter
the driver's footwell. Install the floormats
securely and as specified in order to ensure
sufficient clearance for the pedals. Do not
use loose floormats and do not place floor-
mats on top of one another.
!If the engine is switched off and equip-ment on the diagnostics connection is used,the starter battery may discharge.
Connecting equipment to the diagnostics con-nection can lead to emissions monitoringinformation being reset, for example. This maylead to the vehicle failing to meet the require-ments of the next emissions test during themain inspection.
Qualified specialist workshop
An authorized Mercedes-Benz Center is aqualified specialist workshop. It has the neces-sary specialist knowledge, tools and qualifica-tions to correctly carry out the work requiredon your vehicle. This is especially the case forwork relevant to safety.
Observe the notes in the Maintenance Book-let.
Always have the following work carried out atan authorized Mercedes-Benz Center:
Rwork relevant to safety
Rservice and maintenance work
Rrepair work
Ralterations, installation work and modifica-tions
Rwork on electronic components
Correct use
If you remove any warning stickers, you or oth-ers could fail to recognize certain dangers.Leave warning stickers in position.
Observe the following information when driv-ing your vehicle:
Rthe safety notes in this manual
Rtechnical data for the vehicle
Rtraffic rules and regulations
Rlaws and safety standards pertaining tomotor vehicles
Operating safety27
Introduction
Z
Page 88 of 346
XMake sure that all the side windows areclosed.
XMake sure that all the side windows and thepanorama roof with power tilt/sliding panelare closed.
On vehicles with a panorama roof with powertilt/sliding panel:
XTouch recessed sensor surface�Con thedoor handle again until the roller sunblind ofthe panorama roof with power tilt/slidingpanel closes.
XTo interrupt convenience closing:releaserecessed sensor surface�Con the doorhandle.
Resetting the side windows
If a side window can no longer be closed fully,you must reset it.
XClose all the doors.
XTurn the SmartKey to position�Gor�Hinthe ignition lock (Ypage 125).
XPull the corresponding switch on the doorcontrol panel until the side window is com-pletely closed (Ypage 84).
XHold the switch for an additional second.
If the side window opens again slightly:
XImmediately pull the corresponding switchon the door control panel until the side win-dow is completely closed (Ypage 84).
XHold the switch for an additional second.
XIf the respective side window remainsclosed after the button is released, then ithas been set correctly. If this is not thecase, repeat the steps above.
Problems with the side windows
GWARNING
If you close a side window again immediately after it has been blocked or reset, the side win-
dow closes with increased or maximum force. The reversing feature is then not active. Parts of
the body could be trapped in the closing area in the process. This poses an increased risk of
injury or even fatal injury.
Make sure that no parts of the body are in the closing area. To stop the closing process,
release the switch or push the switch again to reopen the side window.
86Side windows
Opening and closing
Page 90 of 346
!Only open the sliding sunroof if it is free ofsnow and ice. Otherwise, malfunctions mayoccur.
Do not allow anything to protrude from thesliding sunroof. Otherwise, the seals couldbe damaged.
!The weather can change abruptly. It couldstart to rain or snow. Make sure that thesliding sunroof is closed when you leave thevehicle. The vehicle electronics can be dam-aged if water enters the vehicle interior.
iResonance noises can occur in addition tothe usual airflow noises when the slidingsunroof is open. They are caused by minorpressure fluctuations in the vehicle interior.Change the position of the sliding sunroof oropen a side window slightly to reduce oreliminate these noises.
Sliding sunroof reversing feature
In the following section, the term "sliding sun-roof" refers to the panorama roof with powertilt/sliding panel.
The sliding sunroof is equipped with an auto-matic reversing feature. If a solid object blocksor restricts the sliding sunroof during the clos-ing process, the sliding sunroof opens againautomatically. However, the automatic revers-ing feature is only an aid and does not relieveyou of the responsibility of paying attentionwhen closing the sliding sunroof.
GWARNING
The reverse function does not react in par-
ticular:
Rto soft, light and thin objects, e.g. fingers
Rover the last 1/6 in (4 mm) of the closing
path
Rwhile adjusting
Rwhen closing the sliding sunroof again
manually immediately after automatic
reversing
This means that the reversing feature can-
not prevent someone being trapped in these
situations. There is a risk of injury.
Make sure that no body parts are in close
proximity during the closing procedure.
If somebody becomes trapped:
Rrelease the button immediately, or
Rbriefly push the button in any direction
during automatic closing.
The closing process is stopped.
GWARNING
If you close the sliding sunroof again imme-
diately after it has been blocked or reset,
the sliding sunroof closes with increased
force.
Parts of the body could be trapped in the
closing area in the process. There is a risk of
injury or becoming trapped.
Make sure that no parts of the body are in
the closing area.
If somebody becomes trapped:
Rrelease the button immediately, or
Rbriefly push the button in any direction
during automatic closing.
The closing process is stopped.
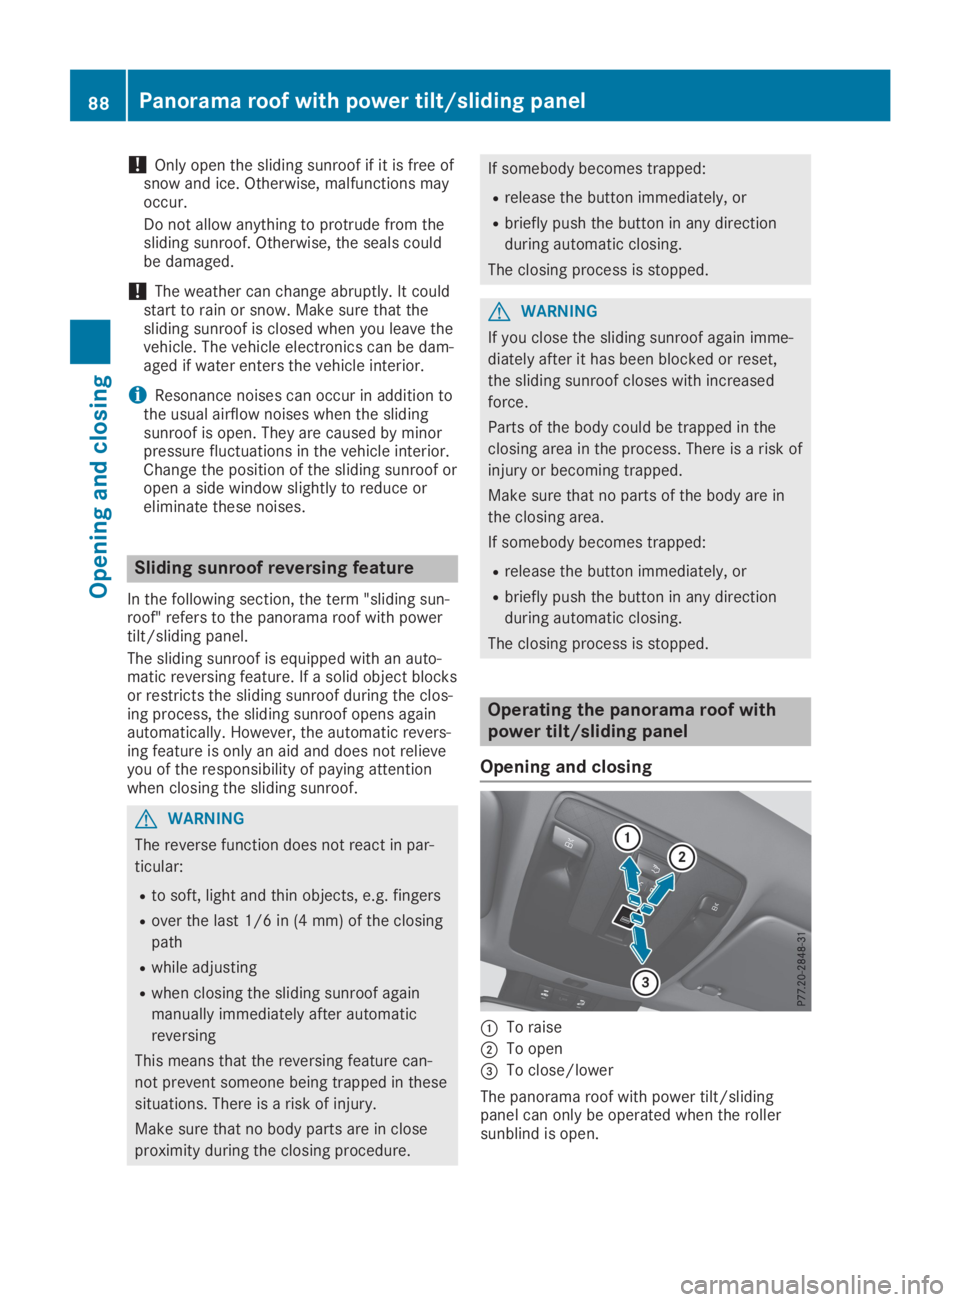
Operating the panorama roof with
power tilt/sliding panel
Opening and closing
�CTo raise
�DTo open
�
Page 93 of 346
Problems with the panorama roof with power tilt/sliding panel
GWARNING
If you do not reset the sliding sunroof after a malfunction or a voltage drop, then the reversing
feature will malfunction or not work. The sliding sunroof closes with increased or maximum
force. Parts of the body could be trapped in the closing area in the process. This poses an
increased risk of injury or even fatal injury.
In such or similar situations always make sure that no parts of the body are in the closing area.
Always reset the sliding sunroof after a malfunction or a voltage drop.
!If the sliding sunroof still cannot be opened or closed as a result of a malfunction, contact aqualified specialist workshop.
ProblemPossible causes/consequences and�P�PSolutions
The panorama roof withpower tilt/sliding panelcannot be closed andyou cannot see thecause.
If the panorama roof with power tilt/sliding panel is obstructed dur-ing closing and reopens again slightly:
XImmediately after it blocks, pull the�Wswitch down again tothe point of resistance until the panorama roof with power tilt/sliding panel is closed.The panorama roof with power tilt/sliding panel is closed withmore force.
If the panorama roof with power tilt/sliding panel is obstructedagain during closing and reopens again slightly:
XImmediately after it blocks, pull the�Wswitch down again tothe point of resistance until the panorama roof with power tilt/sliding panel is closed.The panorama roof with power tilt/sliding panel is closed withoutthe automatic reversing feature.
The panorama roof withpower tilt/sliding panelcannot be opened orclosed using the conve-nience opening/closingfeature.
The SmartKey battery is discharged or nearly discharged.
XCheck the SmartKey battery (Ypage 72) and replace it if neces-sary (Ypage 72).
Panorama roof with power tilt/sliding panel91
Opening and closing
Z
Page 103 of 346
Memory function
Important safety notes
GWARNING
If you use the memory function on the driv-
er's side while driving, you could lose con-
trol of the vehicle as a result of the adjust-
ments being made. There is a risk of an acci-
dent.
Only use the memory function on the driv-
er's side when the vehicle is stationary.
GWARNING
When the memory function adjusts the seat,
you and other vehicle occupants – particu-
larly children – could become trapped. There
is a risk of injury.
While the memory function is making adjust-
ments, make sure that no one has any body
parts in the sweep of the seat. If somebody
becomes trapped, immediately release the
memory function position button. The
adjustment process is stopped.
GWARNING
Children could become trapped if they acti-
vate the memory function, particularly when
unattended. There is a risk of injury.
Never leave children unsupervised in the
vehicle.
When leaving the vehicle, always take the
SmartKey with you and lock the vehicle. This
also applies for the Digital Vehicle Key if the
"Digital Vehicle Key" function is activated via
Mercedes me connect.
The memory function can be used at any time,e.g. even when the SmartKey is not in the igni-tion lock.
Storing settings
With the memory function, you can store up tothree different settings, e.g. for three differentpeople.
The following settings are stored as a singlememory preset:
RSeat and backrest position
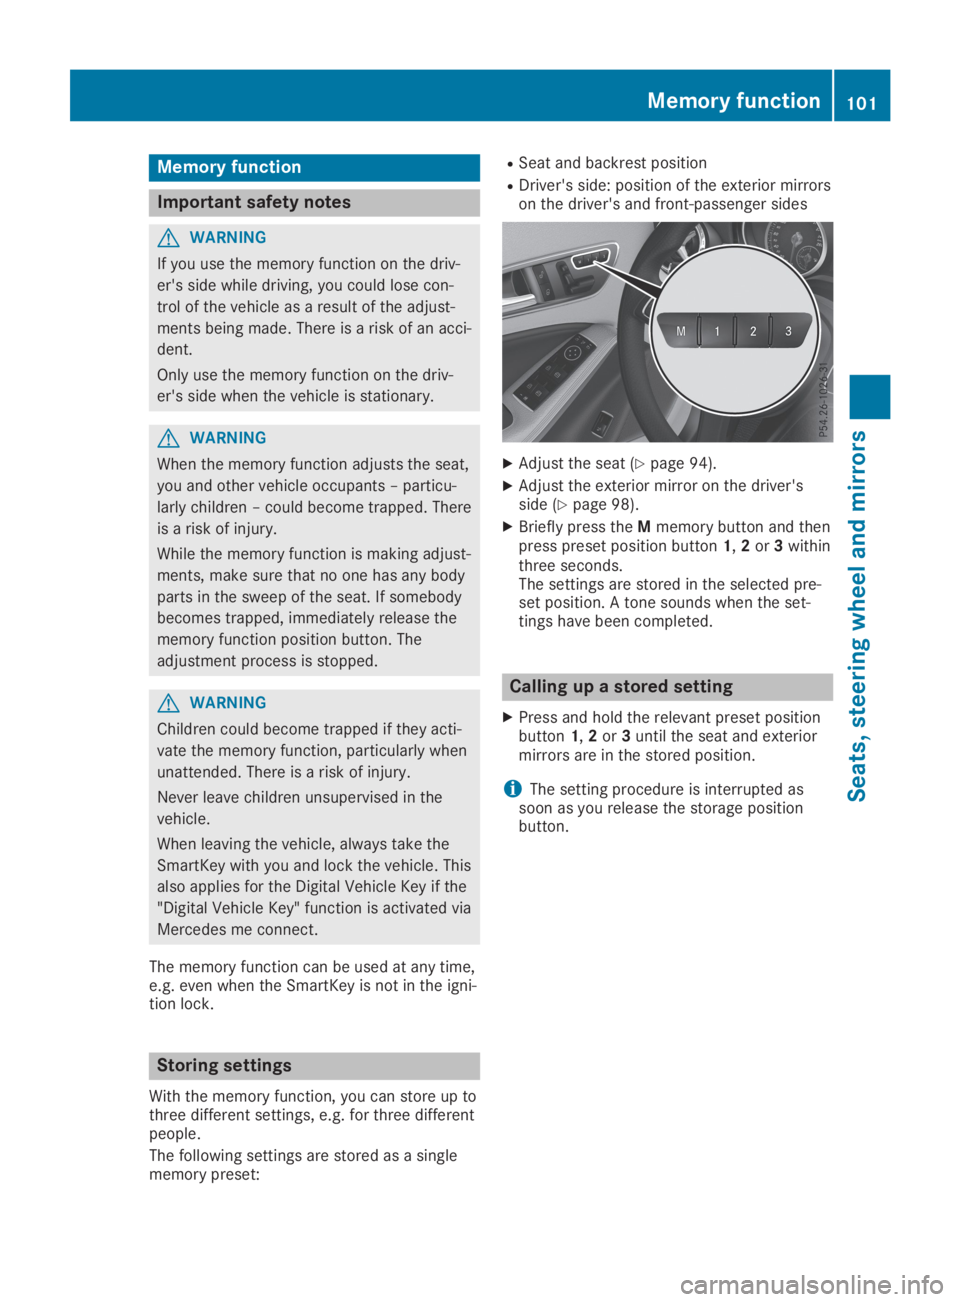
RDriver's side: position of the exterior mirrorson the driver's and front-passenger sides
XAdjust the seat (Ypage 94).
XAdjust the exterior mirror on the driver'sside (Ypage 98).
XBriefly press theMmemory button and thenpress preset position button1,2or3withinthree seconds.The settings are stored in the selected pre-set position. A tone sounds when the set-tings have been completed.
Calling up a stored setting
XPress and hold the relevant preset positionbutton1,2or3until the seat and exteriormirrors are in the stored position.
iThe setting procedure is interrupted assoon as you release the storage positionbutton.
Memory function101
Seats, steering wheel and mirrors
Z