Page 146 of 629

4
° Continuous wiping, slow
5 ¯ Continuous wiping, fast #
Turn the combination switch tothe cor rect
position 1-5. #
Single wipe/washing: pushthe button on
th e combination switch in the direction of
ar row 1.
R í Single wipe
R î Wipes with washer fluid Swit
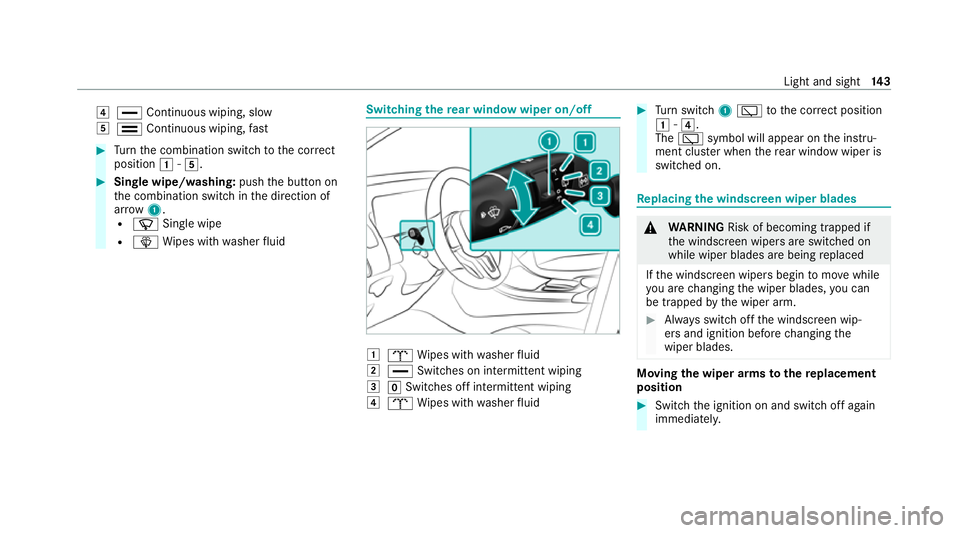
ching there ar window wiper on/off 1
b Wipes with washer fluid
2 ° Switches on intermittent wiping
3 gSwitches off intermittent wiping
4 b Wipes with washer fluid #
Turn switch 1è tothe cor rect position
1 -4.
The è symbol will appear on the instru‐
ment clus ter when there ar wind owwiper is
swit ched on. Re
placing the windsc reen wiper blades &
WARNING Risk of becoming trapped if
th e windscreen wipers are switched on
while wiper blades are being replaced
If th e windscreen wipers begin tomo vewhile
yo u are changing the wiper blades, you can
be trapped bythe wiper arm. #
Alw ays switch off the windscreen wip‐
ers and ignition before changing the
wiper blades. Moving
the wiper arms tothere placement
position #
Switch the ignition on and switch off again
immediatel y. Light and sight
14 3
Page 147 of 629
#
Within around 15seconds, press theî
button on the combination switch for appro x‐
ima tely thre e seconds (/ page142).
The wiper arms will mo veinto there place‐
ment position.
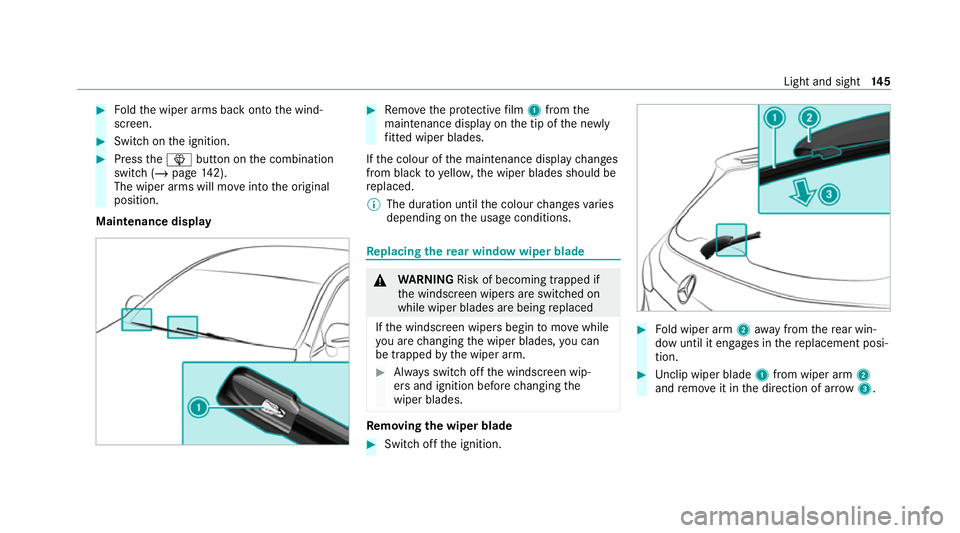
Re moving the wiper blades #
Foldthe wiper arms away from the wind‐
screen. #
Hold the wiper arm with one hand. With the
ot her hand, turn the wiper blade in the direc‐
tion of ar row1away from the wiper arm as
fa r as it will go. #
Slide catch 2inthe direction of ar row 3
until it engages in there mo val position. #
Remo vethe wiper blade from the wiper arm
in the direction of ar row4. Fi
tting the wiper blades #
Inse rtthe new wiper blade into the wiper
arm in the direction of ar row1. #
Slide catch 2inthe direction of ar row 3
until it engages in the locking position. #
Make sure that the wiper blade is seated cor‐
re ctly. 14 4
Light and sight
Page 148 of 629

#
Foldthe wiper arms back onto the wind‐
screen. #
Switch on the ignition. #
Press theî button on the combination
switch (/ page142).
The wiper arms will mo veinto the original
position.
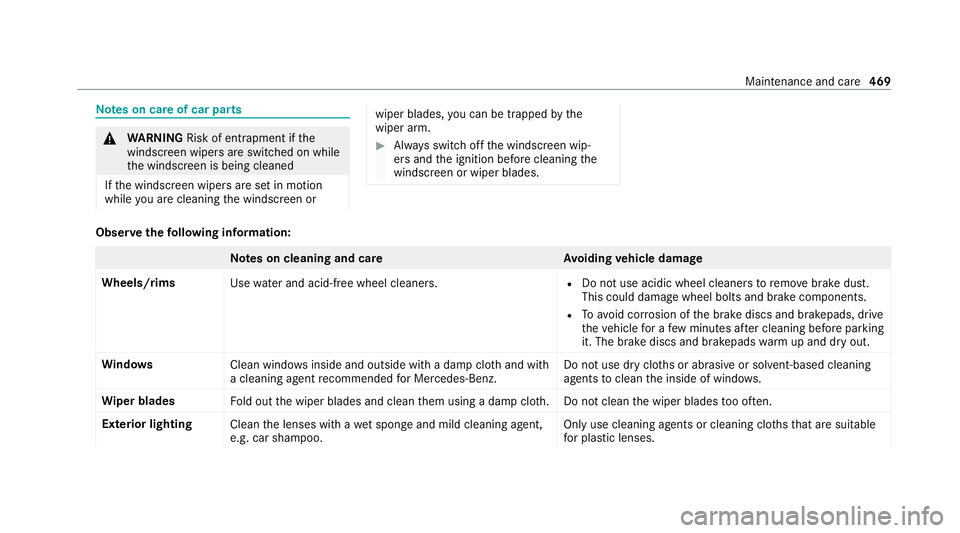
Maintenance display #
Remo vethe pr otective film 1 from the
maintenance display on the tip of the newly
fi tted wiper blades.
If th e colour of the maintenance display changes
from black to yellow, the wiper blades should be
re placed.
% The duration until the colour changes varies
depending on the usage conditions. Re
placing the rear window wiper blade &
WARNING Risk of becoming trapped if
th e windscreen wipers are switched on
while wiper blades are being replaced
If th e windscreen wipers begin tomo vewhile
yo u are changing the wiper blades, you can
be trapped bythe wiper arm. #
Alw ays switch off the windscreen wip‐
ers and ignition before changing the
wiper blades. Re
moving the wiper blade #
Switch off the ignition. #
Fold wiper arm 2away from there ar win‐
dow until it engages in there placement posi‐
tion. #
Unclip wiper blade 1from wiper arm 2
and remo veit in the direction of ar row 3. Light and sight
14 5
Page 472 of 629

Note
s on care of car parts &
WARNING Risk of entrapment if the
windscreen wipers are swit ched on while
th e windscreen is being cleaned
If th e windscreen wipers are set in motion
while you are cleaning the windscreen or wiper blades,
you can be trapped bythe
wiper arm. #
Alw ays switch off the windscreen wip‐
ers and the ignition before cleaning the
windscreen or wiper blades. Obser
vethefo llowing information: Note
s on cleaning and car eA voiding vehicle damage
Wheels/rims Usewate r and acid-free wheel cleaners. R
Do not use acidic wheel cleaners toremo vebrake dust.
This could damage wheel bolts and brake components.
R Toavoid cor rosion of the brake discs and brakepads, drive
th eve hicle for a few minutes af ter cleaning before parking
it. The brake discs and brakepads warm up and dry out.
Wi ndo ws
Clean windowsinside and outside with a damp clo thand with
a cleaning agent recommended for Mercedes-Benz. Do not use dry clo
ths or abrasive or sol vent-based cleaning
agents toclean the inside of windo ws.
Wi per blades
Fold out the wiper blades and clean them using a damp clo th.D o not clean the wiper blades too of ten.
Ex terior lighting
Cleanthe lenses with a wet sponge and mild cleaning agent,
e.g. car sha mpoo. Only use cleaning agents or cleaning clo
thsth at are suitable
fo r plast ic lenses. Maintenance and care
469
Page 624 of 629

Re
starting the tyre pressure monitor‐
ing sy stem ...........................................4 94
Selection ............................................. 498
Snow chains ........................................ 490
St oring .................................................5 01
TIREFIT kit ............................................ 476
Ty re pressure (N otes) .......................... 491
Ty re pressure monitoring sy stem
(function) ............................................. 492
Ty re pressure table .............................. 492
Un usual handling characteristics ........ 490
Wi -Fi .......................................................... 331
Overview .............................................. 331
Setting ................................................ .332
Setting up a hotspot ............................ 333
Setting up an Internet connection ....... 428
Wi ndow airbag ...........................................37
Wi ndo ws
see Side windo ws
Wi ndo ws(Care) ...................................... .469
Wi ndscreen
see Windshield
Wi ndscreen washer fluid ........................ 51 5
No tes ................................................... 51 5Wi
ndscreen washer sy stem
To pping up ...........................................4 62
Wi ndscreen wipers
Changing the wiper blades .................. 14 3
Switching on/off ................................. 14 2
Wi ndshield ............................................... 14 3
Changing the wiper blades .................. 14 3
Wi nter operation
Snow chains ........................................ 490
Wi nter tyres
Setting the permanent speed limita‐
tion ...................................................... 212
Wi per blades
Ca re .................................................... 469
Re placing .............................................1 43
Wire lesscharging
Fu nction/no tes .................................... 131
Mobile phone ....................................... 13 2
Wire lessvehicle comp onents
Declaration of con form ity ...................... 21
Wo rkshop
see Qualified specialist workshop Index
621