2019 MERCEDES-BENZ EQC SUV change wheel
[x] Cancel search: change wheelPage 504 of 629
R
Vehicles with a tyre pressure monitoring
sy stem: allfitted wheels mu stbe equipped
with functioning sensors forth e tyre pres‐
sure monitoring sy stem.
R Attemp eratures below 7 °C, use winter tyres
or all-season tyres mar ked M+S for all
wheels.
Wi nter tyres bearing thei snowflake
symbol in addition tothe M+S marking pro‐
vide the best possible grip in wintry road
conditions.
R For M+S tyres, only use tyres with the same
tread.
R Obser vethe maximum permissible speed for
th e M+S tyres fitted.
If th is is below theve hicle's maximum speed,
th is must be indicated byan appropriate
label in the driver's field of vision.
R Run in new tyres at moderate speeds forthe
fi rs t10 0 km.
R Replace the tyres af ter six years at the latest,
re ga rdless of wear. Fo
r more information on wheels and tyres, con‐
ta ct a qualified specialist workshop.
Be sure toalso obse rveth efo llowing fur ther
re lated subjects:
R Notes on tyre pressure (/ page 491)
R Tyre pressure table (/ page 492)
R Notes on the emer gency spa rewheel
(/ page 508) Note
s on inter changing wheels &
WARNING Risk of inju rythro ugh dif fer‐
ent wheel sizes
Inter changing the front and rear wheels if the
wheels or tyres ha vediffere nt dimensions
may se verely impair the driving characteris‐
tics.
The disk brakes or wheel suspension compo‐
nents may also be damaged. #
Rotate front and rear wheels on lyifthe
wheels and tyres are of the same
dimensions. Inter
changing the front and rear wheels if the
wheels or tyres ha vediffere nt dimensions can
re nder thege neral operating pe rmit in valid.
The wear pat tern s on the front and rear wheels
dif fer:
R Front wheels wear more on the shoulder of
th e tyre
R Rear wheels wear more in the cent reofthe
tyre
On vehicles with the same front and rear wheel
size, you can inter change the wheels every
5,000 to10,000 km, depending on thewe ar.
Ensure the direction of rotation is maintained for
th e wheels.
Obser vethe instructions and saf ety no tes on
"Changing a wheel" when doing so
(/ page 502). Note
s onstoring wheels When
storing wheels, obser vethefo llowing
no tes:
R Afterre moving wheels, store them in a cool,
dry and preferably dark place. Wheels and tyres
501
Page 505 of 629
R
Protect the tyres from conta ct withoil,
grease or fuel. Overview of
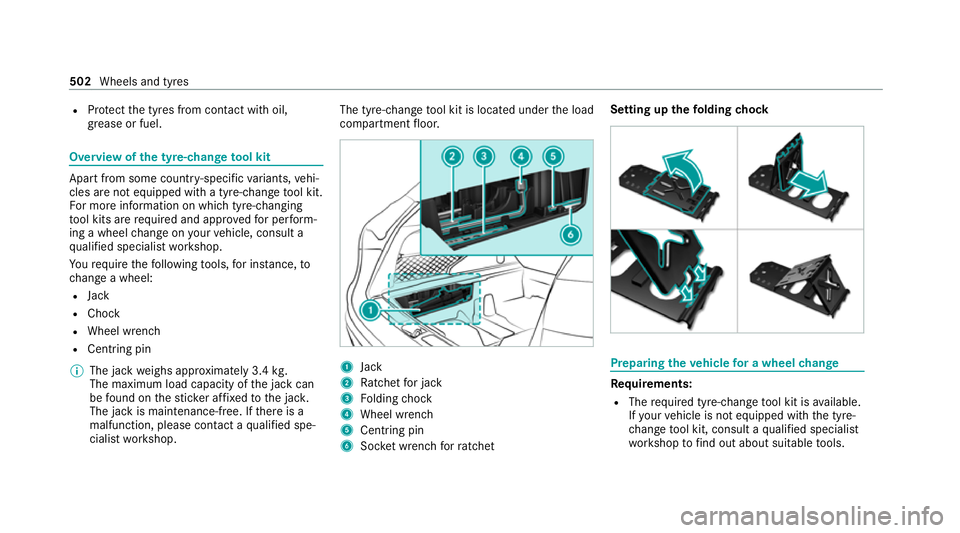
the ty re-change tool kit Apart from some countr
y-specific variants, vehi‐
cles are not equipped with a tyre-change tool kit.
Fo r more information on which tyre-changing
to ol kits are requ ired and appr ovedfo r per form‐
ing a wheel change on your vehicle, consult a
qu alified specialist workshop.
Yo ure qu ire thefo llowing tools, for ins tance, to
ch ange a wheel:
R Jack
R Chock
R Wheel wrench
R Cent ring pin
% The jack weighs appr oximately 3.4 kg.
The maximum load capacity of the jack can
be found on thest icke r af fixe dto the jac k.
The jack is maintenance-free. If there is a
malfunction, please conta ct aqualified spe‐
cialist workshop. The tyre-change
tool kit is located under the load
compartment floor. 1
Jack
2 Ratchet for jack
3 Folding chock
4 Wheel wrench
5 Centring pin
6 Socket wrench forra tchet Setting up the
folding chock Prepa
ring theve hicle for a wheel change Re
quirements:
R The requ ired tyre-change tool kit is available.
If yo ur vehicle is not equipped with the tyre-
ch ange tool kit, consult a qualified specialist
wo rkshop tofind out about suitable tools. 502
Wheels and tyres
Page 506 of 629
R
The vehicle is not on a slope.
R The vehicle is on solid, non-slippery and le vel
ground. #
Apply the electric parking brake manually. #
Movethe front wheels tothest ra ight-ahead
position. #
Shift the transmission toposition j. #
Switch off the drive sy stem. #
Make sure that the drive sy stem cann otbe
st ar ted. #
Place choc ks orother suitable items under
th e front and rear of the wheel that is diago‐
nally opposite the wheel you wish tochange. #
Raise theve hicle (/ page 503). Ra
ising theve hicle when changing a wheel Re
quirements:
R There are no persons in theve hicle.
R The vehicle has been prepared for a wheel
ch ange (/ page 502). Important no
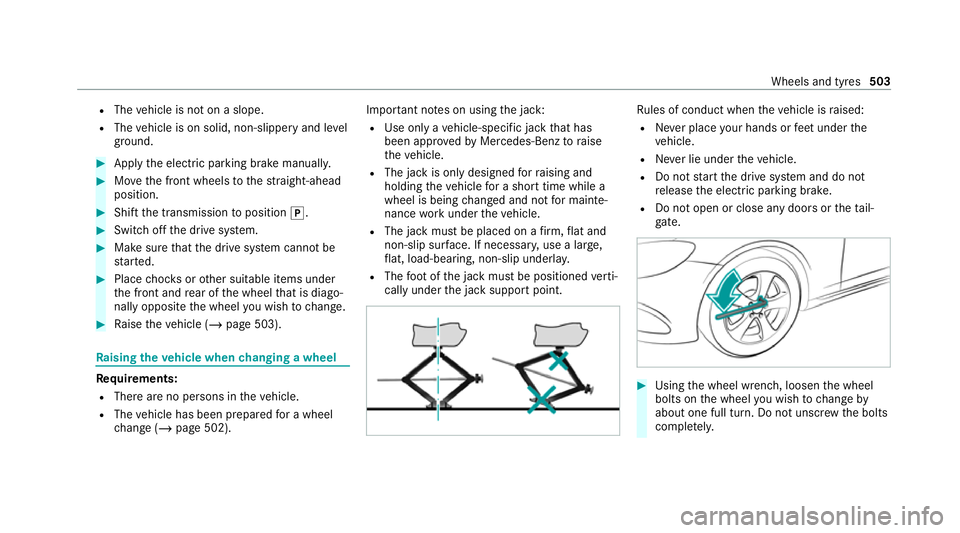
tes on using the jack:
R Use only a vehicle-specific jack that has
been appr ovedby Mercedes-Benz toraise
th eve hicle.
R The jack is only designed forra ising and
holding theve hicle for a short time while a
wheel is being changed and not for mainte‐
nance workunder theve hicle.
R The jack must be placed on a firm ,fl at and
non-slip sur face. If necessar y,use a lar ge,
fl at, load-bearing, non-slip unde rlay.
R The foot ofthe jack must be positioned verti‐
cally under the jack support point. Ru
les of conduct when theve hicle is raised:
R Never place your hands or feet under the
ve hicle.
R Never lie under theve hicle.
R Do not start the drive sy stem and do not
re lease the electric parking brake.
R Do not open or close any doors or theta il‐
gate. #
Using the wheel wrench, loosen the wheel
bolts on the wheel you wish tochange by
about one full turn. Do not unscr ewthe bolts
comple tely. Wheels and tyres
503
Page 508 of 629

#
Insert clip 1into the co ver,as shown in the
illustration, until you hear it en gage inthe
fl oor bush.
Make sure that thefloor bush in theve hicle
is cor rectly aligned tothe co ver. &
WARNING Risk of inju ryfrom incor rect
positioning of the jack
If yo u do not position the jack cor rectly at
th e appropriate jacking point of theve hicle,
th e jack could tip with theve hicle raised. #
Only position the jack at the appropri‐
ate jacking point of theve hicle. The
base of the jack must be positioned ve
rtically under the jacking point of the
ve hicle. *
NO
TEVehicle damage from the jack If
yo u do not position the jack cor rectly at
th e appropriate jack support point of the
ve hicle, the jack could tip over with theve hi‐
cle raised. #
The jack is designed exclusively for
jacking up theve hicle at the jack sup‐
port points. #
Take thera tchet out of the tyre-change tool
kit and place it on the he xagon nut of the
jack so that the letters "AUF" are visible. #
Position jack 5at jack support point 4. #
Turn ratchet 6clockwise until jack 5sits
comple tely on jack support point 4and the
base of the jack lies evenly on the ground. #
Turn ratchet 6until the tyre is raised a max‐
imum of 3 cm from the ground. #
Loosen and remo vethe wheel (/ page 506). Wheels and tyres
505
Page 510 of 629

#
Slide the wheel tobe mounted onto the cen‐
tring pin and push it on. &
WARNING Risk of inju ryfrom tightening
wheel bolts and nuts
If yo u tighten the wheel bolts or wheel nuts
when theve hicle is raised, the jack could tip. #
Only tighten wheel bolts or wheel nuts
when theve hicle is on the ground. #
Be sure toobser vethe instructions and
saf ety no tes on "Changing a wheel"
(/ page 498). #
For saf etyre asons, on lyuse wheel bolts
which ha vebeen appr ovedby Mercedes-
Benz and forth e wheel in question. #
Tighten the wheel bolts evenly in a diagonal
pattern in the order indicated until they are
fi nger-tight. #
Unscr ew the cent ring pin. #
Tighten the last wheel bolt until it is finger-
tight. #
Lowe rth eve hicle (/ page 507). Lo
weri ngtheve hicle af ter a wheel change Re
quirements:
R The new wheel has been fitted
(/ page 506). #
Place thera tchet onto the he xagon nut of the
jack so that the letters "AB" are visible. #
Tolowe r the vehicle: turnthera tchet of the
jack anti-clo ckwise. #
Tighten the wheel bolts evenly in a diagonal
pattern in the order indicated 1to5 with
a maximum of 80 Nm. #
Tighten the wheel bolts evenly in a diagonal
pattern in the order indicated 1to5 to
th e specified tightening torque of 150 Nm. &
WARNING Risk of inju rythro ugh incor‐
re ct tigh tening torque
The wheels could come loose if the wheel
bolts or wheel nuts are not tightened tothe
prescribed tightening torque. #
Makesure the wheel bolts or wheel
nuts are tightened tothe prescribed
tightening torque. #
Ifyo u are not sure, do not mo vethe
ve hicle. Consult a qualified specialist
wo rkshop and ha vethe tightening tor‐
qu ech ecked immediately. #
Check the tyre pressure of the newly moun‐
te d wheel and adjust according ly. #
Vehicles with a tyre pressure monitoring
sy stem: restart the tyre pressure monitoring
sy stem (/ page 494).
Exception: the new wheel is an emer gency
spa rewheel. Wheels and tyres
507
Page 584 of 629
1,
2, 3 ...
12 V battery
see Battery (vehicle)
12 V so cket
see Soc ket (12 V)
230 V so cket
see Soc ket (230 V)
360° Camera ........................................... 235
Ca re .................................................... 469
Fu nction .............................................. 235
Opening the camera co ver (r eve rsing
camera) .............................................. .238
Selecting a view .................................. 238
Setting favo urites ................................ 238
Swit ching automatic operation
on/off (r eversing camera) .................. .238 A
A/C function Activating/deactivating (multimedia
sy stem) ................................................ 151
ABS (Anti-lock Braking Sy stem) ............ .198 Ac
celerator pedal
see Haptic accelerator pedal
Ac cess data
Setting (Blue tooth®
) ............................ 428
Ac cident and breakdown manage‐
ment
Mercedes me connect ........................ .418
Ac oustic locking verification signal
Ac tivating/deactivating ......................... 73
Ac oustic presence indica tor (sound
ge nerator)
No tes ................................................... 15 8
Ac tivating/deactivating automatic
vo lume adjustment
Ad vanced sound sy stem ......................4 58
Burmes ter®
sur round sound sy stem ... 457
Ac tive Blind Spot Assi st......................... 250
Ac tivating/deactivating ...................... .253
Brake application ................................. 252
Fu nction .............................................. 250
Sy stem limitations ...............................2 50
Tr ailer operation .................................. 252 Ac
tive Brake Assi st
Fu nction/no tes ................................... 202
Setting .................................................2 08
Ac tive Di stance Assist DISTRO NIC......... 212
Ac tive Emergency Stop Assist .............2 22
Ac tive Lane Change Assi st................... 221
Calling up a speed ............................... 214
Displ ays in the instrument display .......2 23
Fu nction ............................................... 212
Increasing/decreasing speed .............. 214
Re quirements: .................................... .214
Ro ute-based speed adap tation ........... .217
Selecting .............................................. 214
St eering wheel buttons ........................ 214
St oring a speed .................................... 214
Switching off/deacti vating .................. 214
Switching on/activating ....................... 214
Sy stem limitations ...............................2 12
Ac tive Eme rgency Stop Assist ...............222
Ac tive headlamps .................................... 137
Ac tive Lane Change Assi st..................... 221
Ac tivating/deactivating ...................... .222
Fu nction .............................................. 221 Index
581
Page 588 of 629
St
arting assis tance .............................. 482
Battery charged
see High-voltage on-board electrical sy stem
Belt see Seat belt
Bicycle rack
Tr ailer operation .................................. 260
Blind Spot Assist .................................... .250
Ac tivating/deactivating ...................... .253
Fu nction .............................................. 250
Sy stem limitations ...............................2 50
Blue tooth ®
................................................ 331
Information .......................................... 331
Setting up an Internet connection ....... 428
Switching on/off ................................. 331
Boot lid see Tailgate
Brake Assist Sy stem
see BAS (Brake Assi stSystem)
Brake fluid
No tes ................................................... 514Brake
forc e distribution
EBD (Elect ronic Brake forc e Distribu‐
tion) ..................................................... 201
Brakes ABS (Anti-lock Braking Sy stem) ........... 19 8
Ac tive Brake Assi st.............................. 202
Ad aptive brake lights .......................... .208
BA S (Brake Assi stSystem) .................. 19 8
Driving tips .......................................... 16 5
EBD (Electronic Brake forc e Distribu‐
tion) ..................................................... 201
HOLD function .....................................2 25
Limi ted braking ef fect (salt-trea ted
ro ads) .................................................. 16 5
Re cuperation ........................................ 161
Braking assistance see BAS (Brake Assi stSystem)
Breakdown Overview of the help functions .............. 14
To w- starting ........................................ 486
To wing away ........................................ 483
Tr ansporting theve hicle ......................4 85
Wheel change ...................................... 502 Breakdown
see Flat tyre
Bu rm ester ®
sur round sound sy stem .....4 56
Ad justing the balance/fader ............... 457
Ad justing the sound focus ................... 457
Ad justing treble, mid-range and bass
settings ............................................... 457
Au tomatic volume adjustment ............ .457
Calling up the sound menu .................. 456
Information .......................................... 456
Selecting the sound profile .................. 457
Butto ns
St eering wheel .................................... 263 C
Call list Deleting ............................................... 404
Making a call ....................................... 403
Overview ............................................. 403
Selecting options ................................ 403
Selecting options for suggestions ........ 403
Calling up the sound menu
Adva nced sound sy stem ......................4 58
Burmes ter®
sur round sound sy stem ... 456 Index
585
Page 599 of 629
ENERGIZING seat kinetics
see ENERGIZING COMFORT
Energy flow displ ay
Displ aying ............................................ 16 0
Fu nction/no tes ................................... 16 0
Engine Engine number .................................... .511
St arting (Digital Vehicle Keyst icke r) .... 16 4
St arting (eme rgency operation
mode) .................................................. 16 5
St arting (mobile phone) ...................... .164
St arting (s tart/s top button) .................1 63
St arting assis tance .............................. 482
Switching off (s tart/s top button) ........ 189
Engine bonnet Opening/closing ................................ .460
Engine electronics Notes .................................................. 509
Engine number ......................................... 511
Entering characters ................................ 323
Fu nction/no tes ................................... 323
On theto uchpad ................................ .323
On theto uchsc reen (media display) ....3 26
Setting theke yboard .......................... .329 EQ-o
ptimised route
see Route
ERA-G LONA SS test mode
St arting/ending .................................. 425
ESC (Elect ronic Stability Control)
see ESP ®
(Electronic Stability Prog ram)
ESP ®
Crosswind Assist ................................. 201
Tr ailer stabilisation .............................. 201
ESP ®
(Elect ronic Stability Prog ram) ...... 19 8
Ac tivating/deactivating ...................... .201
Fu nction/no tes ................................... 19 8
EU general operating permit number .....511
Exterior lighting Care .................................................... 469
Exterior lighting see Lights F
Fa tigue de tection
see ATTENTION ASSIST
Fa ult message
see Displ aymessa ge Favo
urites
Ad ding .................................................3 16
Ad ding a destination ............................ 351
Calling up .............................................3 16
Del eting .............................................. .317
Home address .................................... .351
Moving .................................................3 17
Overview ..............................................3 16
Re naming ............................................. 317
Wo rkaddress ...................................... .351
Fi re extinguisher ...................................... 474
Firs t-aid kit (soft sided) ...........................474
Flacon Inserting/removing ............................ .153
Flat towing
see Tow- bar sy stem
Flat tyre ....................................................4 75
No tes ................................................... 475
TIREFIT kit ............................................ 476
Wheel change ...................................... 502
Floor mats ................................................ 13 2
Fo il co vering
Ra dar and ultrasonic sensors .............. 197596
Index