2019 MERCEDES-BENZ CLA trunk release
[x] Cancel search: trunk releasePage 22 of 330
Optional equipment weight (defi-
nition) ............................................ 310
PSI (pounds per square inch) (def-
inition) ...........................................310
Replacing ....................................... 310
Service life ..................................... 291
Sidewall (definition) ....................... 310
Speed rating (definition) ................ 309
Storing ...........................................311
Structure and characteristics
(definition) ..................................... 308
Summer tires ................................. 292
Temperature .................................. 305
TIN (Tire Identification Number)
(definition) ..................................... 310
Tire bead (definition) ......................310
Tire pressure (definition) ................ 310
Tire pressures (recommended) ...... 309
Tire size (data) ............................... 315
Tire size designation, load-bearing
capacity, speed rating .................... 305
Tire tread ....................................... 291
Tire tread (definition) ..................... 310
Total load limit (definition) ............. 310
Traction ......................................... 304
Traction (definition) ....................... 310
Tread wear..................................... 304
Uniform Tire Quality Grading
Standards ...................................... 304
Uniform Tire Quality Grading
Standards (definition) .................... 309
Wear indicator (definition) ............. 310
Wheel rim (definition) .................... 309
see Flat tire
Top Tether............................................ 57
Tow-starting
Emergency engine starting ............ 287
Important safety notes .................. 284
Installing the towing eye ................ 285
Removing the towing eye ............... 286
Towing
Permitted towing methods ............ 287
Towing a trailer
ESP®(Electronic Stability Pro-
gram) ............................................... 67
Towing away
Important safety guidelines ........... 284
Installing the towing eye ................ 285
Notes for 4MATIC vehicles ............ 287
Removing the towing eye ............... 286
Transporting the vehicle ................ 287
With both axles on the ground ....... 286
With the front axle raised ............... 286
Towing eye......................................... 274
Traffic reports
see also Digital Operator's Man-
ual .................................................. 231
Transmission
see Automatic transmission
Transmission position display
(DIRECT SELECT lever)...................... 131
Transporting the vehicle.................. 287
Trim pieces (cleaning instruc-
tions).................................................. 271
Trip computer (on-board com-
puter).................................................. 182
Trip odometer
Calling up ....................................... 182
Resetting (on-board computer) ...... 183
Trunk
Emergency release .......................... 82
Emergency release button ............... 82
Important safety notes .................... 78
Opening (automatically from out-
side) ................................................. 79
Opening (from outside the vehi-
cle, HANDS-FREE ACCESS) .............. 80
Opening automatically from
inside ............................................... 81
Opening/closing (manually from
outside) ............................................ 79
Trunk lid
Display message ............................ 217
see Tailgate
Turn signals
Display message ............................ 204
Replacing bulbs (front) ................... 107
Switching on/off........................... 102
Two-way radio
Frequencies ................................... 317
Installation ..................................... 317
Transmission output (maximum) .... 317
Type identification plate
see Vehicle identification plate
20Index
Page 72 of 330
SmartKey
Important safety notes
GWARNING
If children are left unsupervised in the vehicle,
they could:
Roperate the vehicle's equipment
Additionally, children could set the vehicle in
motion if, for example, they:
Rrelease the parking brake
Rshift the automatic transmission out of park
position�]
Rstart the engine
There is a risk of an accident and injury.
Never leave children or animals unattended in
the vehicle.
When leaving the vehicle, always take the
SmartKey with you and lock the vehicle. This
also applies for the Digital Vehicle Key if the
"Digital Vehicle Key" function is activated via
Mercedes me connect.
GWARNING
If you attach heavy or large objects to the
SmartKey, the SmartKey could be uninten-
tionally turned in the ignition lock. This could
cause the engine to be switched off. There is a
risk of an accident.
Do not attach any heavy or large objects to the
SmartKey. Remove any bulky key rings before
inserting the SmartKey into the ignition lock.
!Keep the SmartKey away from strong mag-netic fields. Otherwise, the remote controlfunction could be affected.
Strong magnetic fields can occur in the vicin-ity of powerful electrical installations.
Do not keep the SmartKey:
Rwith electronic devices, e.g. a mobile phoneor another SmartKey
Rwith metallic objects, e.g. coins or metal foil
Rinside metallic objects, e.g. a metal case
Vehicles with KEYLESS-GO start function:donot keep the SmartKey in the trunk. Otherwise,
the SmartKey may not be detected, e.g. whenstarting the engine using the Start/Stop button.
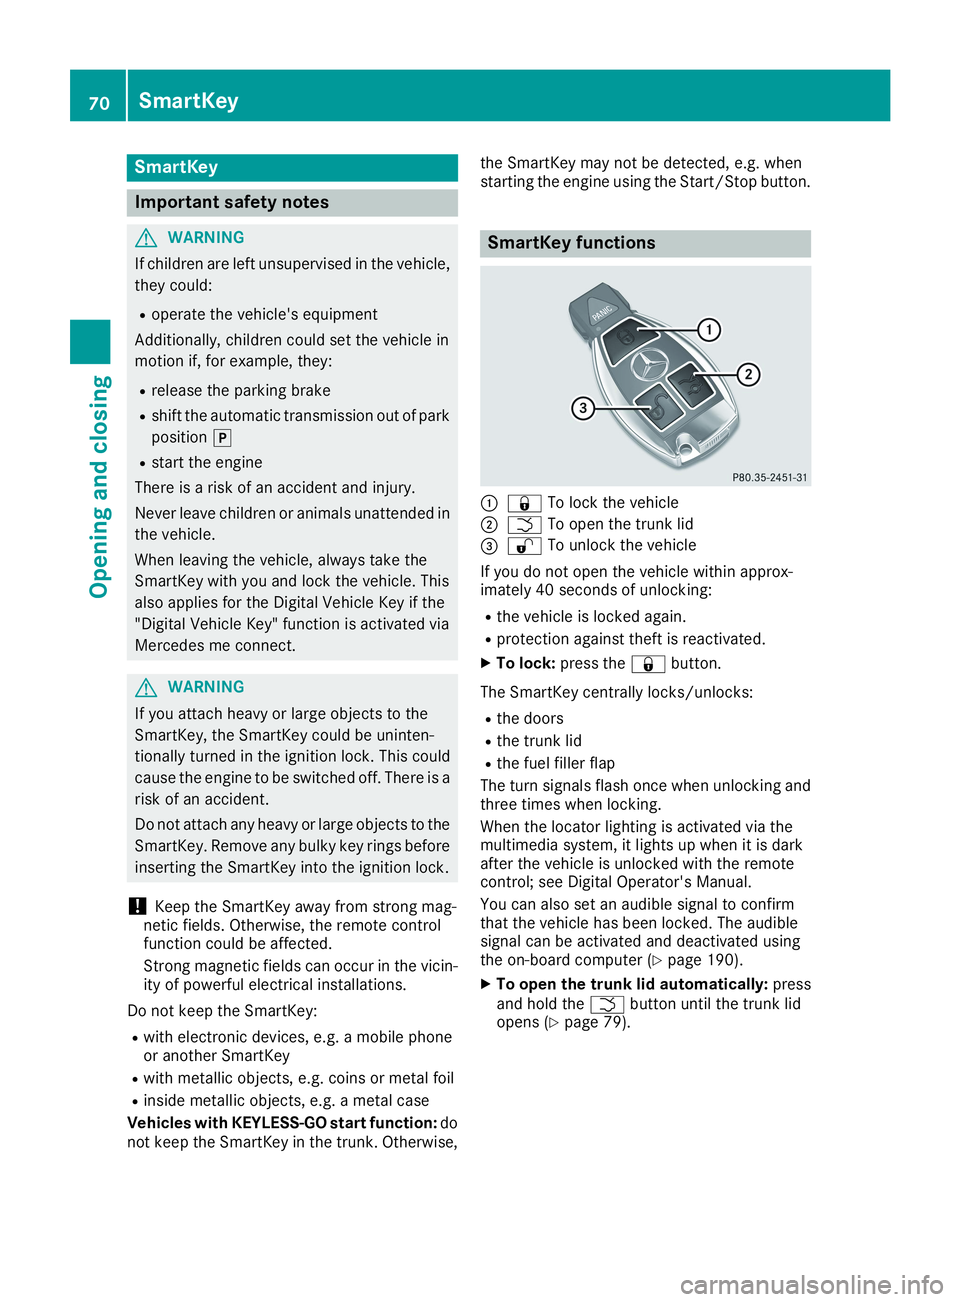
SmartKey functions
�C�7To lock the vehicle
�D�TTo open the trunk lid
�
Page 74 of 330
Changing the settings of the locking
system
You can change the settings of the locking sys-tem. This means that only the driver's door andthe fuel filler flap are unlocked when the vehicleis unlocked. This is useful if you frequently travelon your own.
XTo change the setting:press and hold the�6and�7buttons simultaneously forapproximately six seconds until the batteryindicator lamp flashes twice (Ypage 73).
If the setting of the locking system is changedwithin the signal range of the vehicle, pressingthe�7or�6button:
Rlocks or
Runlocks the vehicle
The SmartKey now functions as follows:
XTo unlock:press the�6button once.
XTo unlock centrally:press the�6buttontwice.
XTo lock centrally:press the�7button.
The KEYLESS-GO function is changed as fol-lows:
XTo unlock the driver's door:touch the innersurface of the door handle on the driver'sdoor.
XTo unlock centrally:touch the inner surfaceof the door handle on the front-passengerdoor or the rear door.
XTo lock centrally:touch the outer sensorsurface on one of the door handles.
XTo restore the factory settings:press andhold the�6and�7buttons simultane-ously for approximately six seconds until thebattery check lamp flashes twice(Ypage 73).
Mechanical key
General notes
If the vehicle can no longer be locked orunlocked with the SmartKey or KEYLESS-GO,use the mechanical key.
If you use the mechanical key to unlock andopen the driver's door or the trunk lid, the anti-theft alarm system will be triggered (Ypage 68).
There are several ways to turn off the alarm:
XTo deactivate the alarm with the key:pressthe�6or�7button on the key.
or
XInsert the SmartKey into the ignition lock.
or
XTo deactivate the alarm with KEYLESS-GO:press the Start/Stop button in the ignitionlock. The SmartKey must be in the vehicle.
or
XLock or unlock the vehicle using KEYLESS-GO. The SmartKey must be outside the vehi-cle.
If you unlock the vehicle using the mechanicalkey, the fuel filler flap will not be unlocked auto-matically.
XTo unlock the fuel filler flap:insert theSmartKey into the ignition lock.
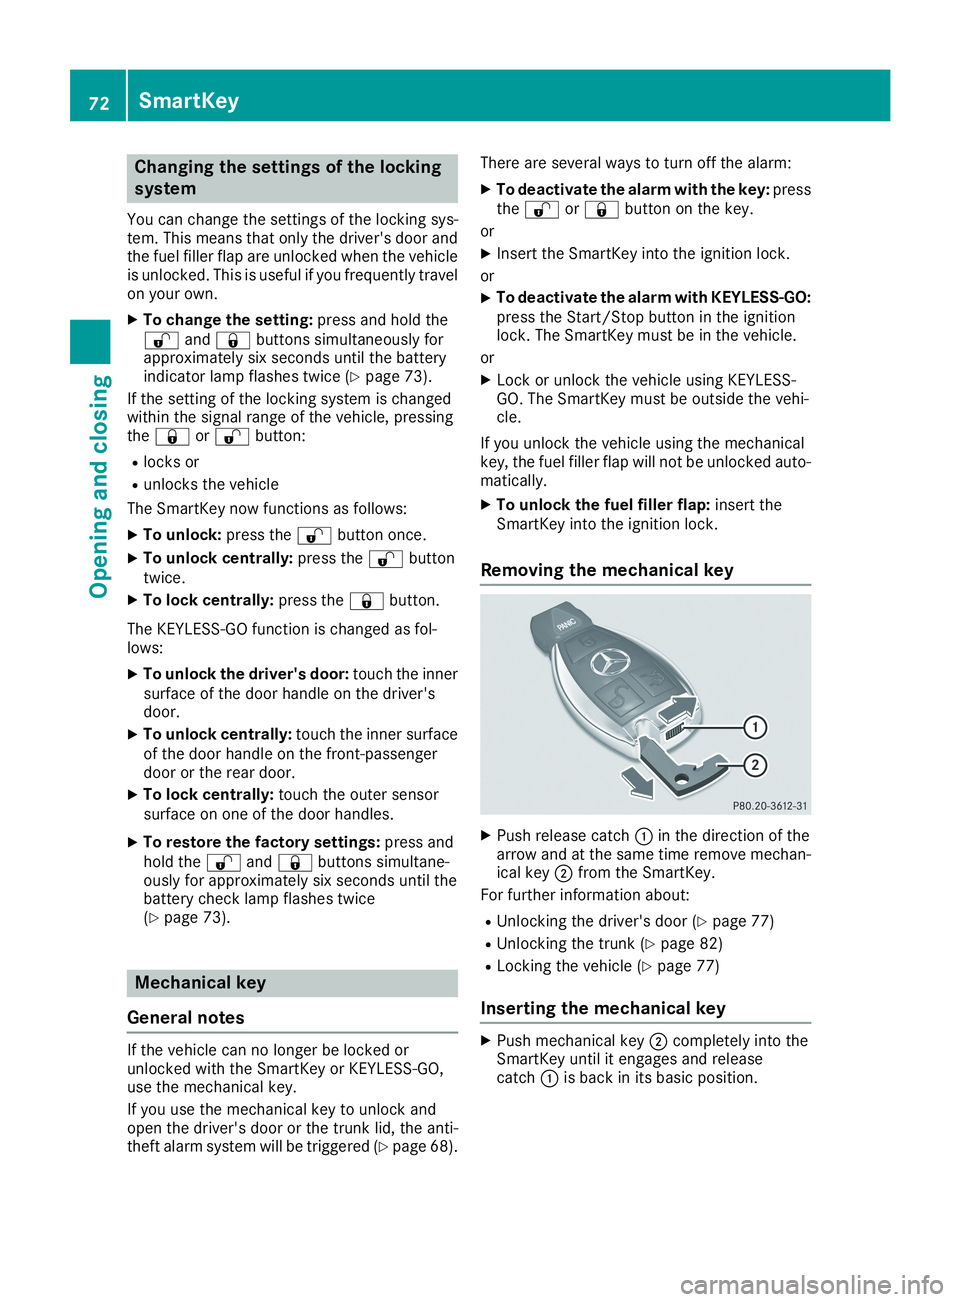
Removing the mechanical key
XPush release catch�Cin the direction of thearrow and at the same time remove mechan-ical key�Dfrom the SmartKey.
For further information about:
RUnlocking the driver's door (Ypage 77)
RUnlocking the trunk (Ypage 82)
RLocking the vehicle (Ypage 77)
Inserting the mechanical key
XPush mechanical key�Dcompletely into theSmartKey until it engages and releasecatch�Cis back in its basic position.
72SmartKey
Opening and closing
Page 78 of 330
Doors
Important safety notes
GWARNING
If children are left unsupervised in the vehicle,
they could:
Roperate the vehicle's equipment
Additionally, children could set the vehicle in
motion if, for example, they:
Rrelease the parking brake
Rshift the automatic transmission out of park
position�]
Rstart the engine
There is a risk of an accident and injury.
Never leave children or animals unattended in
the vehicle.
When leaving the vehicle, always take the
SmartKey with you and lock the vehicle. This
also applies for the Digital Vehicle Key if the
"Digital Vehicle Key" function is activated via
Mercedes me connect.
You should preferably place luggage or loads inthe cargo compartment. Observe the loadingguidelines (Ypage 239).
Unlocking and opening doors from
the inside
!The side windows will not open/close if thebattery is discharged or if the side windowshave iced up. It will then not be possible toclose the door. Do not attempt to force thedoor closed. You could otherwise damage thedoor or the side window.
When a door is opened, the side window on thatside opens slightly. When the door is closed, theside window closes again.
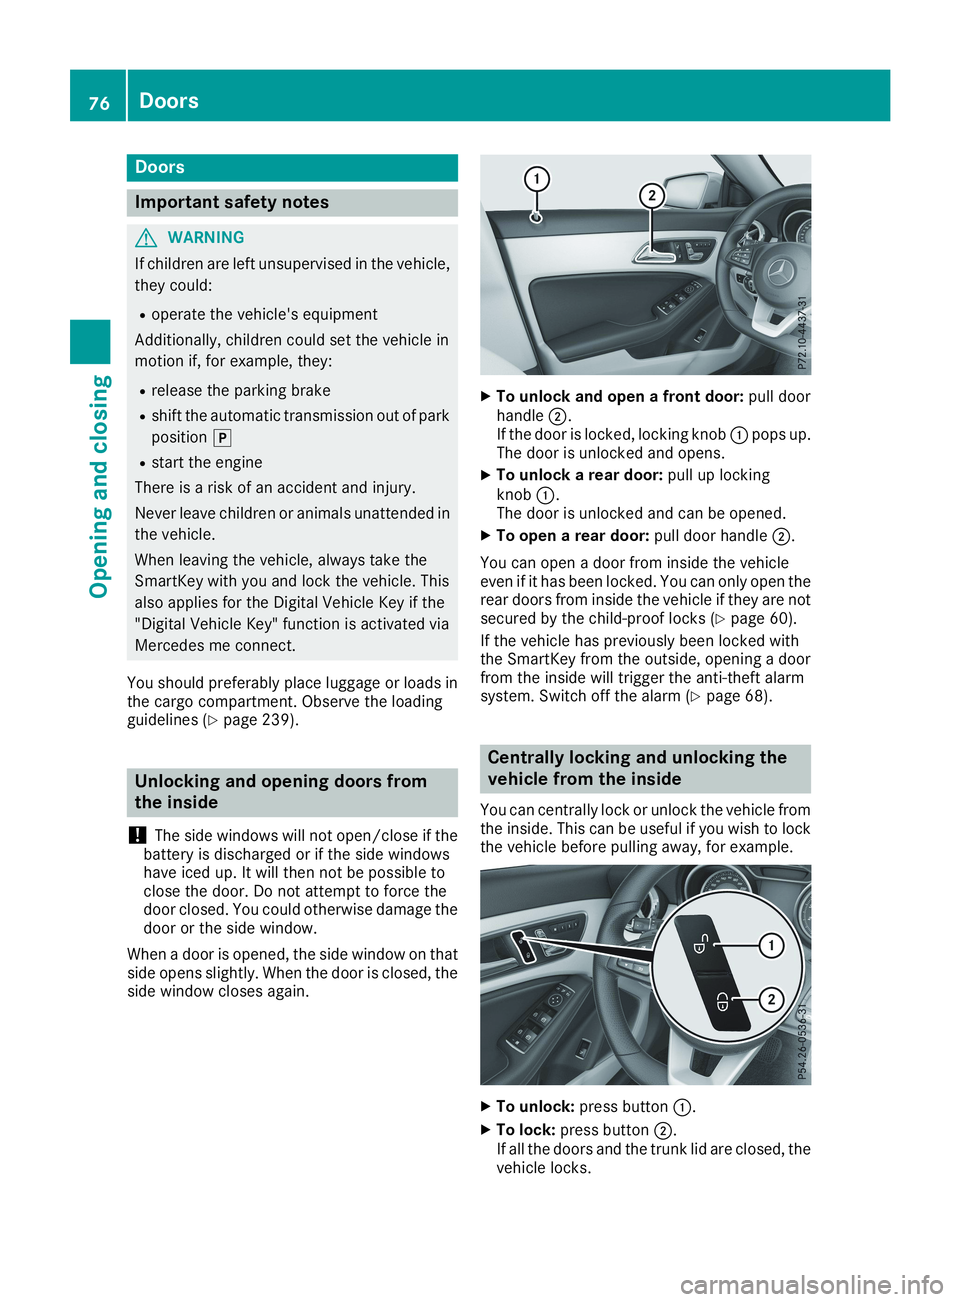
XTo unlock and open a front door:pull doorhandle�D.If the door is locked, locking knob�Cpops up.The door is unlocked and opens.
XTo unlock a rear door:pull up lockingknob�C.The door is unlocked and can be opened.
XTo open a rear door:pull door handle�D.
You can open a door from inside the vehicleeven if it has been locked. You can only open therear doors from inside the vehicle if they are notsecured by the child-proof locks (Ypage 60).
If the vehicle has previously been locked withthe SmartKey from the outside, opening a doorfrom the inside will trigger the anti-theft alarmsystem. Switch off the alarm (Ypage 68).
Centrally locking and unlocking the
vehicle from the inside
You can centrally lock or unlock the vehicle fromthe inside. This can be useful if you wish to lockthe vehicle before pulling away, for example.
XTo unlock:press button�C.
XTo lock:press button�D.If all the doors and the trunk lid are closed, thevehicle locks.
76Doors
Opening and closing
Page 80 of 330
XPress the locking button on the driver’s door(Ypage 76).
XCheck whether the locking knobs on thefront-passenger door and the rear doors arestill visible. Press down the locking knobs byhand, if necessary.
XClose the driver's door.
XTake the mechanical key out of the SmartKey(Ypage 72).
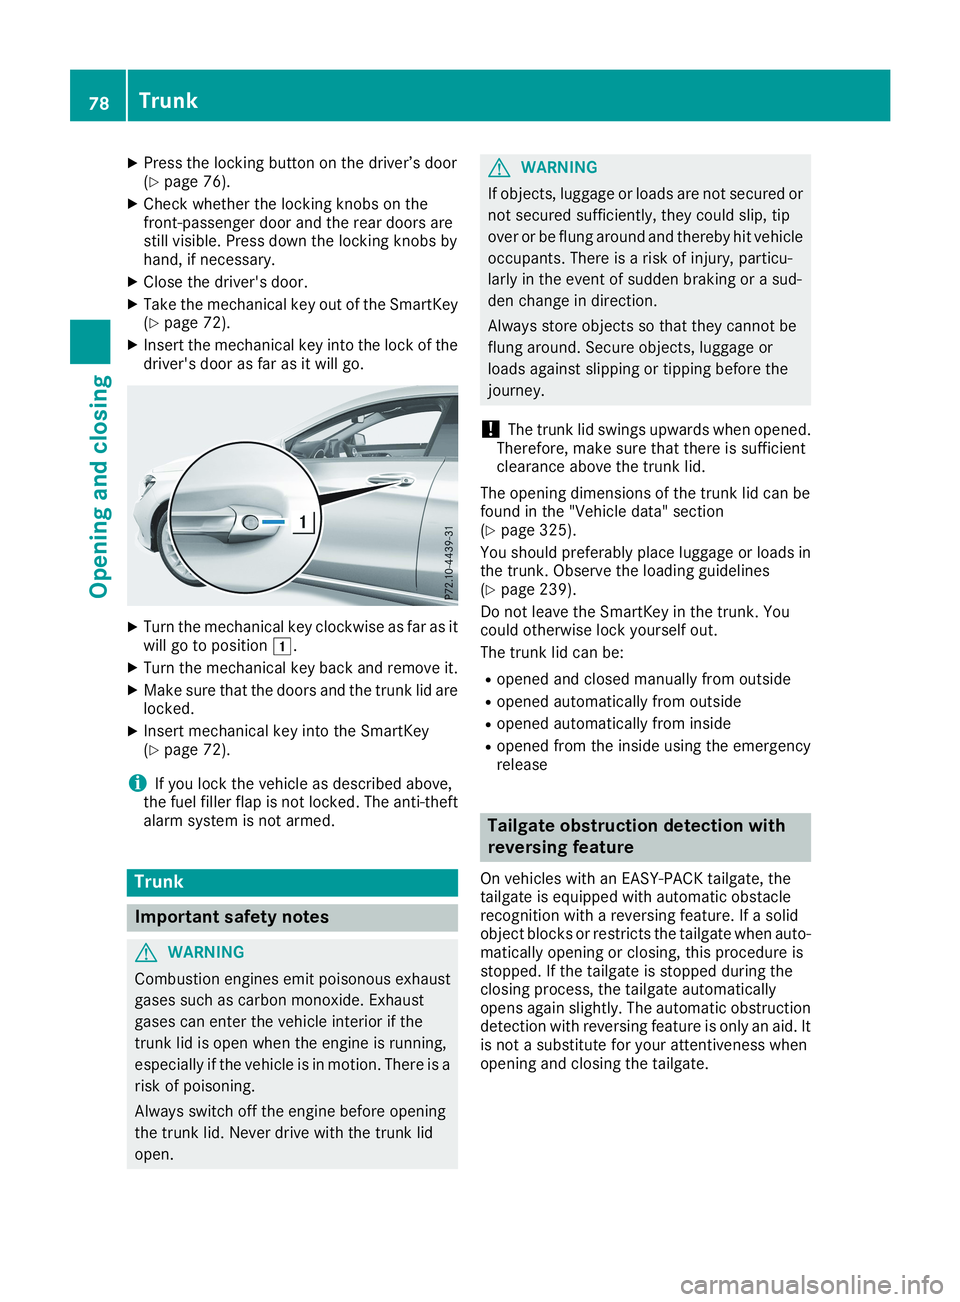
XInsert the mechanical key into the lock of thedriver's door as far as it will go.
XTurn the mechanical key clockwise as far as itwill go to position�G.
XTurn the mechanical key back and remove it.
XMake sure that the doors and the trunk lid arelocked.
XInsert mechanical key into the SmartKey(Ypage 72).
iIf you lock the vehicle as described above,the fuel filler flap is not locked. The anti-theftalarm system is not armed.
Trunk
Important safety notes
GWARNING
Combustion engines emit poisonous exhaust
gases such as carbon monoxide. Exhaust
gases can enter the vehicle interior if the
trunk lid is open when the engine is running,
especially if the vehicle is in motion. There is a
risk of poisoning.
Always switch off the engine before opening
the trunk lid. Never drive with the trunk lid
open.
GWARNING
If objects, luggage or loads are not secured or
not secured sufficiently, they could slip, tip
over or be flung around and thereby hit vehicle
occupants. There is a risk of injury, particu-
larly in the event of sudden braking or a sud-
den change in direction.
Always store objects so that they cannot be
flung around. Secure objects, luggage or
loads against slipping or tipping before the
journey.
!The trunk lid swings upwards when opened.Therefore, make sure that there is sufficientclearance above the trunk lid.
The opening dimensions of the trunk lid can befound in the "Vehicle data" section(Ypage 325).
You should preferably place luggage or loads inthe trunk. Observe the loading guidelines(Ypage 239).
Do not leave the SmartKey in the trunk. Youcould otherwise lock yourself out.
The trunk lid can be:
Ropened and closed manually from outside
Ropened automatically from outside
Ropened automatically from inside
Ropened from the inside using the emergencyrelease
Tailgate obstruction detection with
reversing feature
On vehicles with an EASY-PACK tailgate, thetailgate is equipped with automatic obstaclerecognition with a reversing feature. If a solidobject blocks or restricts the tailgate when auto-matically opening or closing, this procedure isstopped. If the tailgate is stopped during theclosing process, the tailgate automaticallyopens again slightly. The automatic obstructiondetection with reversing feature is only an aid. Itis not a substitute for your attentiveness whenopening and closing the tailgate.
78Trunk
Opening and closing
Page 84 of 330
Deactivating
XPress and hold the closing button on the tail-gate until two short tones sound.
Emergency release for the trunk
General notes
!The trunk lid swings upwards when opened.Therefore, make sure that there is sufficientclearance above the trunk lid.
The opening dimensions of the trunk lid can befound in the "Vehicle data" section(Ypage 325).
If the trunk lid can no longer be unlocked:
Rusing the SmartKey, or
Rusing the remote operating switch in the doorcontrol panel:
Use the emergency release inside the trunk lid.
You can reach the emergency release via thetrunk.
Opening
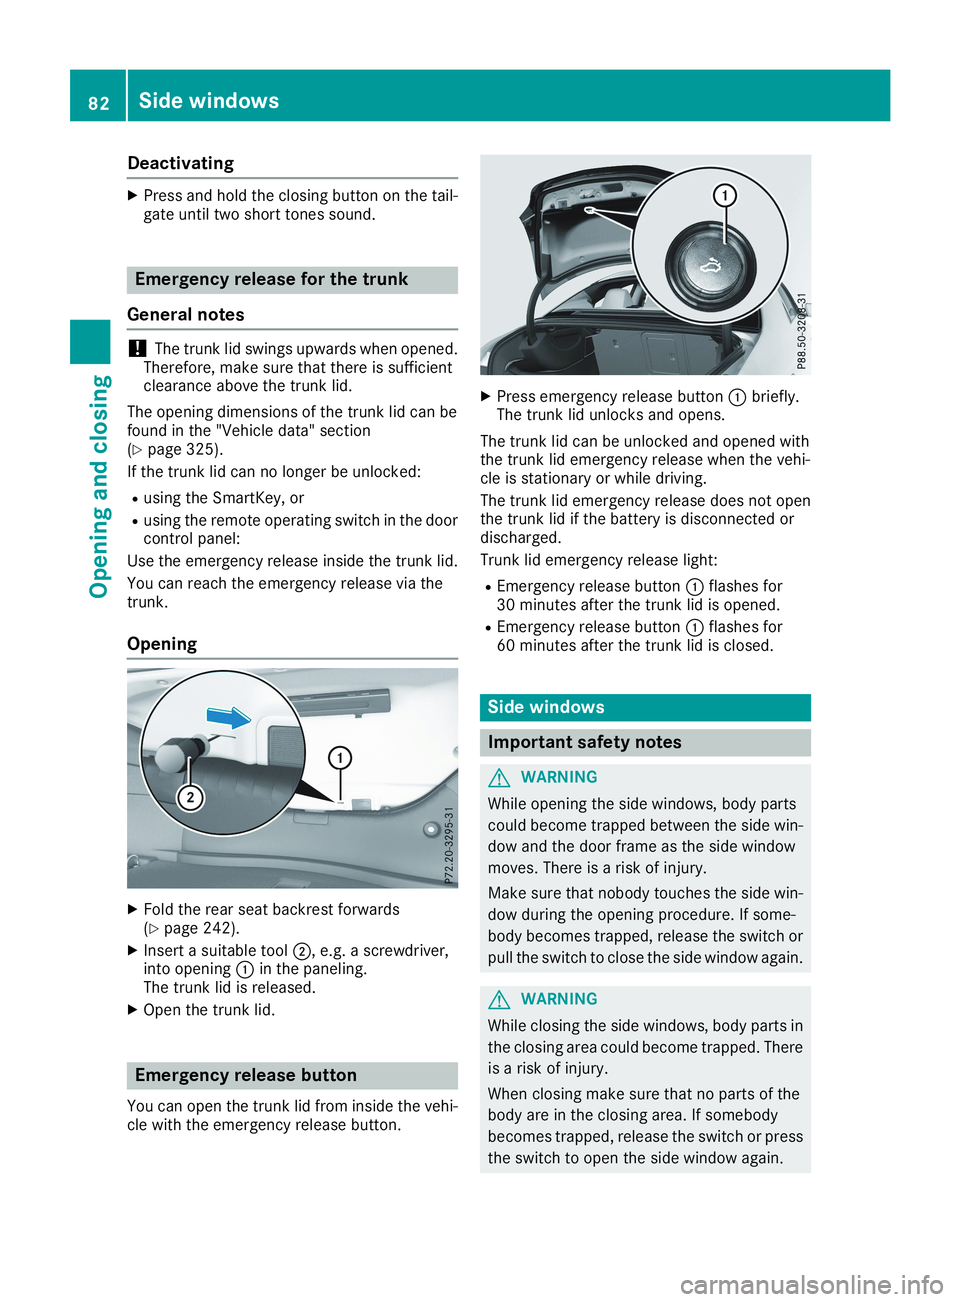
XFold the rear seat backrest forwards(Ypage 242).
XInsert a suitable tool�D, e.g. a screwdriver,into opening�Cin the paneling.The trunk lid is released.
XOpen the trunk lid.
Emergency release button
You can open the trunk lid from inside the vehi-cle with the emergency release button.
XPress emergency release button�Cbriefly.The trunk lid unlocks and opens.
The trunk lid can be unlocked and opened withthe trunk lid emergency release when the vehi-cle is stationary or while driving.
The trunk lid emergency release does not openthe trunk lid if the battery is disconnected ordischarged.
Trunk lid emergency release light:
REmergency release button�Cflashes for30 minutes after the trunk lid is opened.
REmergency release button�Cflashes for60 minutes after the trunk lid is closed.
Side windows
Important safety notes
GWARNING
While opening the side windows, body parts
could become trapped between the side win-
dow and the door frame as the side window
moves. There is a risk of injury.
Make sure that nobody touches the side win-
dow during the opening procedure. If some-
body becomes trapped, release the switch or
pull the switch to close the side window again.
GWARNING
While closing the side windows, body parts in
the closing area could become trapped. There
is a risk of injury.
When closing make sure that no parts of the
body are in the closing area. If somebody
becomes trapped, release the switch or press
the switch to open the side window again.
82Side windows
Opening and closing
Page 109 of 330
XInsert the new bulb into bulb holder�D.
XInsert bulb holder�Dand turn it clockwise.
XPress on housing cover�Cand turn it to theright.
XReplace the cover in the front wheel housing(Ypage 106).
High-beam headlamps/daytime run-
ning lamps/parking lamps and stand-
ing lamps (halogen headlamps)
XSwitch off the lights.
XOpen the hood.
XTurn housing cover�Ccounter-clockwise andremove it.
XTurn bulb holder�Dcounter-clockwise andpull out.
XInsert the new bulb and engage it to the stop.
XPress on housing cover�Cand turn it to theright.
Turn signals (halogen headlamps)
XSwitch off the lights.
XOpen the hood.
XTurn bulb holder�Ccounter-clockwise andpull out.
XTurn the bulb counter-clockwise and pull itout of bulb holder�C.
XInsert the new bulb into bulb holder�C.
XInsert bulb holder�Cand turn it clockwiseuntil it engages.
Replacing rear bulbs
Opening and closing the side trim pan-
els
View of right-hand side trim panel
You must open the side trim panel in the trunkbefore you can replace the bulbs in the taillamps.
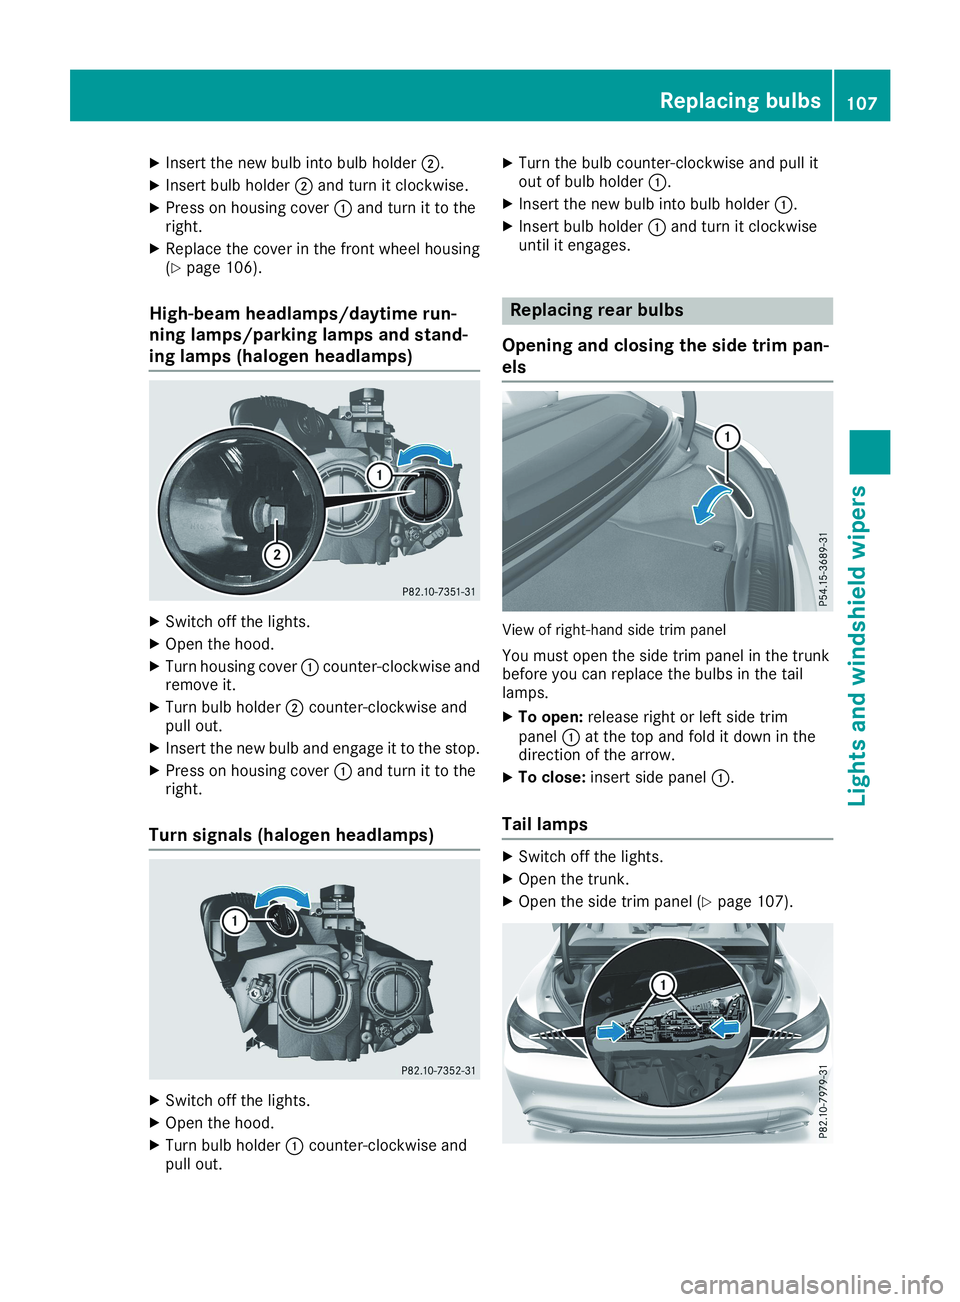
XTo open:release right or left side trimpanel�Cat the top and fold it down in thedirection of the arrow.
XTo close:insert side panel�C.
Tail lamps
XSwitch off the lights.
XOpen the trunk.
XOpen the side trim panel (Ypage 107).
Replacing bulbs107
Lights and windshield wipers
Z
Page 147 of 330
Releasing automatically
Your vehicle's electric parking brake is auto-matically released if all of the following condi-tions are met:
RThe engine is running.
RThe transmission is in position�[or�^andyou depress the accelerator pedal or shiftfrom position�]to�[or�^.
RThe seat belt has been fastened.
If the transmission is in position�^, the trunk lidmust be closed.
If your seat belt is not fastened, the followingconditions must be fulfilled to automaticallyrelease the electric parking brake:
RThe driver's door is closed.
RYou are shifting from transmission position�]or have previously driven at speedsgreater than 2 mph (3 km/h).
Ensure that you do not depress the acceleratorpedal unintentionally. Otherwise, the parkingbrake will be released and the vehicle will startto move.
Emergency braking
The vehicle can also be braked during an emer-gency by using the electric parking brake.
XWhile driving, push handle�Cof the electricparking brake (Ypage 144).The vehicle is braked as long as you keephandle�Cof the electric parking brakepressed. The longer the electric parking brakehandle�Cis depressed, the greater the brak-ing force.
During braking:
Ra warning tone sounds
RtheRelease Parking BrakeRelease Parking Brakemessageappears
Rthe red�I(USA only) or�$(Canadaonly) indicator lamp in the instrument clusterflashes
When the vehicle has been braked to a stand-still, the electric parking brake is applied.
Parking the vehicle for a long period
If you leave the vehicle parked for longer thanfour weeks, the battery may be damaged byexhaustive discharging.
If you leave the vehicle parked for longer than sixweeks, the vehicle may suffer damage as aresult of lack of use.
XVisit a qualified specialist workshop and seekadvice.
iYou can obtain information about tricklechargers from a qualified specialist work-shop.
Driving tips
General notes
Important safety notes
GWARNING
If you switch off the ignition while driving,
safety-relevant functions are only available
with limitations, or not at all. This could affect,
for example, the power steering and the brake
boosting effect. You will require considerably
more effort to steer and brake. There is a risk
of an accident.
Do not switch off the ignition while driving.
GWARNING
If you operate mobile communication equip-
ment when driving, you may be distracted
from the traffic situation. You could also lose
control of the vehicle. There is a risk of an
accident.
Only operate this equipment when the vehicle
is stationary.
Observe the legal requirements for the countryin which you are driving. Some jurisdictions pro-hibit the driver from using a mobile phone whiledriving a vehicle.
If you make a call while driving, always usehands-free mode. Only operate the telephonewhen the traffic situation permits. If you areunsure, pull over to a safe location and stopbefore operating the telephone.
Bear in mind that at a speed of only 30 mph(approximately 50 km/h), the vehicle covers adistance of 44 ft (approximately 14m)per sec-ond.
Driving tips145
Driving and parking
Z