2019 MERCEDES-BENZ CLA brake
[x] Cancel search: brakePage 288 of 330
The towing eye is located with the vehicle toolkit under the cargo compartment floor(Ypage 274).
Vehicles with the TIREFIT kit: the towing eye isbeneath the tire inflation compressor(Ypage 274).
XPress the mark on coverCinwards in thedirection of the arrow.
XTake coverCoff the opening.
XScrew in the towing eye clockwise to the stop.
Removing the towing eye
XUnscrew and remove the towing eye.
XAttach coverCto the bumper and press untilit engages.
XPlace the towing eye in the stowage wellbeneath the cargo compartment floor in thecargo compartment (Ypage 274).
XVehicles with the TIREFIT kit: put back the tireinflation compressor (Ypage 274).
Towing the vehicle with the front axle
raised
Observe the important safety notes when tow-ing your vehicle with the front axle raised(Ypage 284).
Only vehicles without 4MATIC can be towedwith the front axle raised.
!Vehicles with 4MATIC must not be towedwith either the front or the rear axle raised, asdoing so will damage the transmission.
Vehicles with 4MATIC may either be towed awaywith both axles on the ground or be loaded upand transported.
!The ignition must be switched off if the vehi-cle is being towed with the front axle raised.
Otherwise, ESP®may intervene and damagethe brake system.
XOn vehicles with KEYLESS-GO or the KEY-LESS-GO start function:you must use theSmartKey instead of the Start/Stop button(Ypage 124).
XMake sure that the vehicle is stationary.
XTurn the SmartKey to positionHin the igni-tion lock.
XWhen the vehicle is stationary, depress thebrake pedal and keep it depressed.
XShift the automatic transmission to position].
XRelease the brake pedal.
XRelease the electric parking brake.
XSwitch off the automatic locking(Ypage 189).
XSwitch on the hazard warning lamps(Ypage 103).
XTurn the SmartKey in the ignition lock to posi-tionZand leave the SmartKey in the ignitionlock.
Towing a vehicle with both axles on
the ground
It is important that you observe the safetyinstructions when towing away your vehicle(Ypage 284).
XOn vehicles with KEYLESS-GO or the KEY-LESS-GO start function:you must use theSmartKey instead of the Start/Stop button(Ypage 124).
The automatic transmission automatically shiftsto position]when you open the driver's orfront-passenger door or when you remove theSmartKey from the ignition lock. In order toensure that the automatic transmission stays inposition\\when towing away the vehicle, youmust observe the following points:
XMake sure that the vehicle is stationary.
XTurn the SmartKey to positionHin the igni-tion lock.
XDepress and hold the brake pedal.
XShift the automatic transmission to position\\.
XLeave the SmartKey in positionHin the igni-tion lock.
XRelease the brake pedal.
XRelease the electric parking brake.
XSwitch on the hazard warning lamps(Ypage 103).
iIn order to signal a change of direction whentowing the vehicle with the hazard warninglamps switched on, use the combinationswitch as usual. In this case, only the indicatorlamps for the direction of travel flash. Afterresetting the combination switch, the hazardwarning lamp starts flashing again.
286Towing and tow-starting
Breakdown assistance
Page 289 of 330
Permitted towing methods
Mercedes-Benz recommends transporting yourvehicle in the case of a breakdown, rather thantowing it away.
When towing away, use a towing rope or a tow-ing bar with both axles on the ground. Do not useany tow bar systems.
Transporting the vehicle
Vehicles with automatic transmission
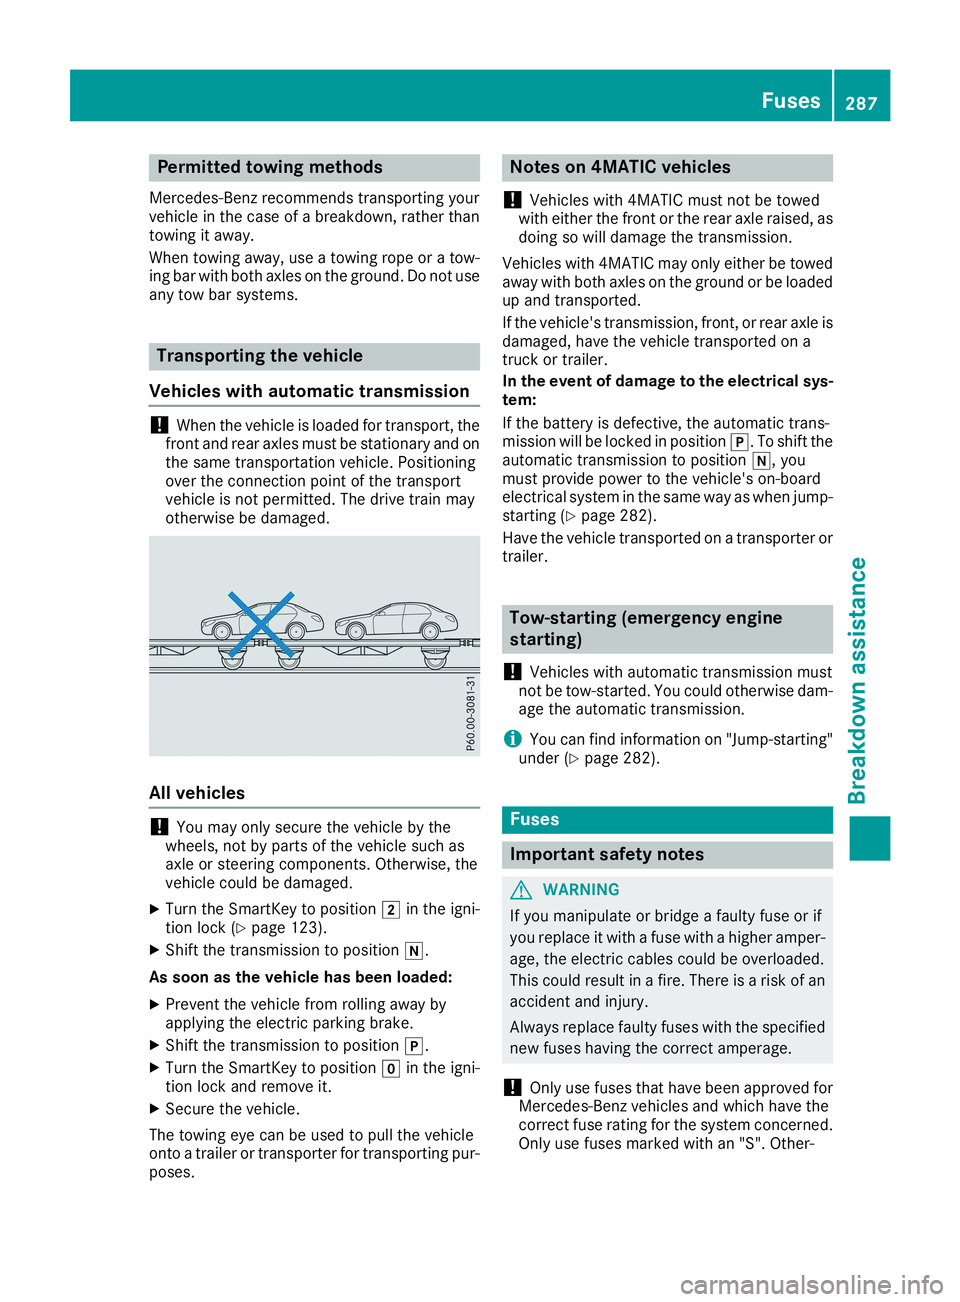
!When the vehicle is loaded for transport, thefront and rear axles must be stationary and onthe same transportation vehicle. Positioningover the connection point of the transportvehicle is not permitted. The drive train mayotherwise be damaged.
All vehicles
!You may only secure the vehicle by thewheels, not by parts of the vehicle such asaxle or steering components. Otherwise, thevehicle could be damaged.
XTurn the SmartKey to positionHin the igni-tion lock (Ypage 123).
XShift the transmission to position\\.
As soon as the vehicle has been loaded:
XPrevent the vehicle from rolling away byapplying the electric parking brake.
XShift the transmission to position].
XTurn the SmartKey to positionZin the igni-tion lock and remove it.
XSecure the vehicle.
The towing eye can be used to pull the vehicleonto a trailer or transporter for transporting pur-poses.
Notes on 4MATIC vehicles
!Vehicles with 4MATIC must not be towedwith either the front or the rear axle raised, asdoing so will damage the transmission.
Vehicles with 4MATIC may only either be towedaway with both axles on the ground or be loadedup and transported.
If the vehicle's transmission, front, or rear axle isdamaged, have the vehicle transported on atruck or trailer.
In the event of damage to the electrical sys-tem:
If the battery is defective, the automatic trans-mission will be locked in position]. To shift theautomatic transmission to position\\, youmust provide power to the vehicle's on-boardelectrical system in the same way as when jump-starting (Ypage 282).
Have the vehicle transported on a transporter ortrailer.
Tow-starting (emergency engine
starting)
!Vehicles with automatic transmission mustnot be tow-started. You could otherwise dam-age the automatic transmission.
iYou can find information on "Jump-starting"under (Ypage 282).
Fuses
Important safety notes
GWARNING
If you manipulate or bridge a faulty fuse or if
you replace it with a fuse with a higher amper-
age, the electric cables could be overloaded.
This could result in a fire. There is a risk of an
accident and injury.
Always replace faulty fuses with the specified
new fuses having the correct amperage.
!Only use fuses that have been approved forMercedes-Benz vehicles and which have thecorrect fuse rating for the system concerned.Only use fuses marked with an "S". Other-
Fuses287
Breakdown assistance
Z
Page 292 of 330
Important safety notes
GWARNING
If wheels and tires of the wrong size are used,
the wheel brakes or suspension components
may be damaged. There is a risk of an acci-
dent.
Always replace wheels and tires with those
that fulfill the specifications of the original
part.
When replacing wheels, make sure to use the
correct:
Rdesignation
Rmodel
When replacing tires, make sure to use the
correct:
Rdesignation
Rmanufacturer
Rmodel
GWARNING
A flat tire severely impairs the driving, steer-
ing and braking characteristics of the vehicle.
There is a risk of accident.
Tires without run-flat characteristics:
Rdo not drive with a flat tire.
Rimmediately replace the flat tire with your
emergency spare wheel or spare wheel, or
consult a qualified specialist workshop.
Tires with run-flat characteristics:
Rpay attention to the information and warn-
ing notices on MOExtended tires (tires with
run-flat characteristics).
Accessories that are not approved for your vehi-cle by Mercedes-Benz or are not being used cor-rectly can impair the operating safety.
Before purchasing and using non-approvedaccessories, visit a qualified specialist work-shop and inquire about:
Rsuitability
Rlegal stipulations
Rfactory recommendations
Further information regarding wheels and tirescan be found under "Wheel/tire combinations"(Ypage 315).
You can ask for information regarding permittedwheel/tire combinations at an authorizedMercedes-Benz Center.
Information on tire pressure can be found:
Ron the Tire and Loading Information placardon the B-pillar on the driver's side(Ypage 301)
Rin the tire pressure table in the fuel filler flap(Ypage 141)
Runder "Tire pressure" (Ypage 293)
Operation
Information on driving
Check the tire pressure when the vehicle isheavily laden and adjust prior to a trip.
While driving, pay attention to vibrations, noisesand unusual handling characteristics, e.g. pull-ing to one side. This may indicate that thewheels or tires are damaged. If you suspect thata tire is defective, reduce your speed immedi-ately. Stop the vehicle as soon as possible tocheck the wheels and tires for damage. Hiddentire damage could also be causing the unusualhandling characteristics. If you find no signs ofdamage, have the tires and wheels checked at aqualified specialist workshop.
When parking your vehicle, make sure that thetires do not get deformed by the curb or otherobstacles. If they cannot be avoided, drive overobstacles such as curbs slowly and at an obtuseangle. Otherwise, you may damage the wheelsor tires.
Regular checking of wheels and tires
GWARNING
Damaged tires can cause tire inflation pres-
sure loss. As a result, you could lose control of
your vehicle. There is a risk of accident.
Check the tires regularly for signs of damage
and replace any damaged tires immediately.
290Operation
Wheels and ti res
Page 303 of 330

CountryRadio type approval number
ne doit pas produire de brouil-lage, et (2) L'autisatuer de l'ap-pareil doit accepter tout brouil-lage radioelectrique subi, memesi le brouillage est susceptibled'en compromettre le fonc-tionnement. WARNING: Changesor modifications not expressivelyapproved by the party responsi-ble for compliance could void theusers authority to operate theequipment. The term "IC:" beforethe radio certification numberonly signifies Canada technicalspecifications were met.
CanadaIC: 2546A-MW2433A
IC:2546A-GG4 This device com-plies with part 15 of the FCCrules and with license exemptRSS standards of Industry Can-ada. Operation is subject to thefollowing conditions. (1) Thisdevice may not cause harmfulinterference, and (2) This devicemust accept any interferencereceived, including interferencethat may cause undesired oper-ation. Le present appareil estconforme d'industrie Canadaapplicables aux appareils radioexempts de license. L'exploita-tion est authorisee aux deux con-ditions suivantes. (1). L'appareilne doit pas produire de brouil-lage, et (2) L'autisateur de l'ap-pareil doit accepter tout brouil-lage radioelectrique subi, memesi le brouillage est susceptibled'en compromettre le fonc-tionnement. WARNING: Changesor modifications not expressivelyapproved by the party responsi-ble for compliance could void theusers authority to operate theequipment. The term "IC:" beforethe radio certification numberonly signifies Canada technicalspecifications were met.
IC: 2546A-MC34MA4
Loading the vehicle
Instruction labels for tires and loads
GWARNING
Overloaded tires can overheat, causing a
blowout. Overloaded tires can also impair the
steering and driving characteristics and lead
to brake failure. There is a risk of accident.
Observe the load rating of the tires. The load
rating must be at least half of the GAWR of
your vehicle. Never overload the tires by
exceeding the maximum load.
Two instruction labels on your vehicle show themaximum possible load.
(1) The Tire and Loading Information placard ison the B-pillar on the driver's side. The Tireand Loading Information placard shows themaximum permissible number of occu-pants and the maximum permissible vehicleload. It also contains details of the tire sizesand corresponding pressures for tiresmounted at the factory.
(2) The vehicle identification plate is on the B-pillar on the driver's side. The vehicle iden-tification plate informs you of the grossvehicle weight rating. It is made up of thevehicle weight, all vehicle occupants, thefuel and the cargo. You can also find infor-mation about the maximum gross axleweight rating on the front and rear axle.
The maximum gross axle weight rating isthe maximum weight that can be carried byone axle (front or rear axle). Never exceedthe maximum load or the maximum grossaxle weight rating for the front or rear axle.
CB-pillar, driver's side
Loading the vehicle301
Wheels and tires
Z
Page 312 of 330
PSI (pounds per square inch)
A standard unit of measure for tire pressure.
Aspect ratio
Relationship between tire height and tire widthin percent.
Tire pressure
This is pressure inside the tire applying an out-ward force to each square inch of the tire's sur-face. The tire pressure is specified in pounds persquare inch (psi), in kilopascal (kPa) or in bar.The tire pressure should only be corrected whenthe tires are cold.
Cold tire pressure
The tires are cold:
Rif the vehicle has been parked with the tiresout of direct sunlight for at least three hoursand
Rif the vehicle has not been driven further than1 mile (1.6 km)
Tread
The part of the tire that comes into contact withthe road.
Bead
The tire bead ensures that the tire sits securelyon the wheel. There are several steel wires in thebead to prevent the tire from coming loose fromthe wheel rim.
Sidewall
The part of the tire between the tread and thebead.
Weight of optional extras
The combined weight of those optional extrasthat weigh more than the replaced standardparts and more than 2.3 kg (5 lbs). Theseoptional extras, such as high-performancebrakes, level control, a roof rack or a high-per-formance battery, are not included in the curbweight and the weight of the accessories.
TIN (Tire Identification Number)
This is a unique identifier which can be used bya tire manufacturer to identify tires, for examplefor a product recall, and thus identify the pur-chasers. The TIN is made up of the manufactur-er's identity code, tire size, tire type code andthe manufacturing date.
Load bearing index
The load bearing index (also load index) is a codethat contains the maximum load bearing capa-city of a tire.
Traction
Traction is the result of friction between the tiresand the road surface.
Treadwear indicators
Narrow bars (tread wear bars) that are distrib-uted over the tire tread. If the tire tread is levelwith the bars, the wear limit of
Page 313 of 330
Tire-mounting tools should not be used nearthe valve. This could damage the electroniccomponents.
Only have tires changed at a qualified spe-cialist workshop.
Observe the instructions and safety notes in the"Changing a wheel" section (Ypage 310).
The wear patterns on the front and rear tiresdiffer, depending on the operating conditions.Rotate the wheels before a clear wear patternhas formed on the tires. Front tires typicallywear more on the shoulders and the rear tires inthe center.
On vehicles that have the same size front andrear wheels, you can rotate the wheels accord-ing to the intervals in the tire manufacturer'swarranty book in your vehicle documents. If nowarranty book is available, the tires should berotated every 3,000 to 6,000 miles (5,000 to10,000 km). Depending on tire wear, this maybe required earlier. Do not change the directionof wheel rotation.
Clean the contact surfaces of the wheel and thebrake disc thoroughly every time a wheel is rota-ted. Check the tire pressure and, if necessary,restart the tire pressure loss warning system(Canada only) or the tire pressure monitor (USAonly).
Direction of rotation
Tires with a specified direction of rotation haveadditional benefits, e.g. if there is a risk of hydro-planing. These advantages can only be gained ifthe tires are installed corresponding to thedirection of rotation.
An arrow on the sidewall of the tire indicates itscorrect direction of rotation.
Storing wheels
Store wheels that are not being used in a cool,dry and preferably dark place. Protect the tiresfrom oil, grease, gasoline and diesel.
Mounting a wheel
Preparing the vehicle
XStop the vehicle on solid, non-slippery andlevel ground.
XApply the electric parking brake manually.
XBring the front wheels into the straight-aheadposition.
XShift the transmission to position].
XSwitch off the engine.
XVehicles without KEYLESS-GO:remove theSmartKey from the ignition lock.
XVehicles with KEYLESS-GO start-functionor KEYLESS-GO:open the driver's door.The vehicle electronics are now in position
Page 324 of 330

Engine oil
General notes
!Do not use engine oil or an oil filter withspecifications deviating from those expresslyrequired for the prescribed service intervals.Do not change the engine oil or oil filter inorder to set replacement intervals longer thanthose prescribed. This could otherwise causedamage to the engine or exhaust gas after-treatment.
Follow the instructions on the service intervaldisplay for changing the engine oil. This couldotherwise cause damage to the engine orexhaust gas aftertreatment.
When handling engine oil, observe the importantsafety notes on service products (Ypage 319).
The engine oils are matched to the performanceof Mercedes-Benz engines and service intervals.You should therefore only use engine oils and oilfilters that are approved for vehicles with main-tenance systems.
For a list of approved engine oils and oil filters,consult an authorized Mercedes-Benz Center.Or visit the websitehttp://bevo.mercedes-benz.com.
The table shows which engine oils have beenapproved for your vehicle.
ModelMB-Freigabe orMB-Approval
All models229.5
Use only SAE 0W-40 or SAE 5W-40 engine oilsfor Mercedes-AMG vehicles.
iMB approval is indicated on the oil contain-ers.
Filling capacities
The following values refer to an engine oilchange, including the oil filter.
ModelCapacity
Mercedes‑AMG vehicles5.8 US qt (5.5 l)
All other models5.9 US qt (5.6 l)
Additives
!Do not use any additives in the engine oil.This could damage the engine.
Brake fluid
GWARNING
The brake fluid constantly absorbs moisture
from the air. This lowers the boiling point of
the brake fluid. If the boiling point of the brake
fluid is too low, vapor pockets may form in the
brake system when the brakes are applied
hard. This would impair braking efficiency.
There is a risk of an accident.
You should have the brake fluid renewed at
the specified intervals.
When handling brake fluid, observe the impor-tant safety notes on service products(Ypage 319).
The brake fluid change intervals can be found inthe Maintenance Booklet.
Only use brake fluid approved by Mercedes-Benz in accordance with MB-Freigabe or MB-Approval 331.0.
Information about approved brake fluid can beobtained at any qualified specialist workshop oron the Internet athttp://bevo.mercedes-benz.com.
iHave the brake fluid regularly replaced at aqualified specialist workshop and the replace-ment confirmed in the Maintenance Booklet.
322Service products and filling capacities
Technical data