2019 MERCEDES-BENZ CLA brake light
[x] Cancel search: brake lightPage 8 of 330

Automatic transmission emer-
gency mode.......................................139
B
Back button....................................... 232
Backup lamp
Display message ............................ 205
BAS (Brake Assist System)................. 61
Battery (SmartKey)
Checking .......................................... 73
Important safety notes .................... 73
Replacing ......................................... 73
Battery (vehicle)
Charging ........................................ 281
Display message ............................ 208
Important safety notes .................. 279
Jump starting ................................. 282
Replacing ....................................... 281
Belt
see Seat belts
Belt warning......................................... 44
Blind Spot Assist
Activating/deactivating (on-
board computer) ............................ 188
Display message ............................ 210
Notes/function .............................. 174
Bluetooth®
Searching for a mobile phone ........235
Searching for a mobile phone
(device manager) ........................... 236
see also Digital Operator's Man-
ual ..................................................231
Telephony ...................................... 235
Brake Assist System
see BAS (Brake Assist System)
Brake fluid
Display message ............................ 199
Notes ............................................. 322
Brake force distribution
see EBD (electronic brake force
distribution)
Brake lamp
Replacing bulbs .............................107
Brake lamps
Display message ............................ 204
Brakes
ABS ..................................................61
BAS .................................................. 61
Brake fluid (notes) ......................... 322
Braking assistance appropriate to
the situation ..................................... 63
Display message............................ 194
EBD .................................................. 67
Hill start assist ............................... 126
HOLD function ............................... 158
Important safety notes .................. 147
Maintenance .................................. 148
Parking brake ................................ 143
Riding tips ...................................... 147
Warning lamp ................................. 221
Braking assistance appropriate to
the situation
Function/notes................................ 63
Breakdown assistance
Where will I find...? ........................ 273
see Flat tire
see Tow-starting
see Towing away
Brightness control (instrument
cluster lighting)................................... 33
Buttons on the steering wheel......... 179
C
California
Important notice for retail cus-
tomers and lessees .......................... 25
Calling up a malfunction
see Display messages
Car
see Vehicle
Care
Car wash ........................................ 265
Carpets .......................................... 272
Display ........................................... 270
Exhaust pipe .................................. 270
Exterior lights ................................ 269
Gear or selector lever .................... 271
Interior ........................................... 270
Matte finish ................................... 267
Notes ............................................. 265
Paint .............................................. 267
Plastic trim .................................... 270
Power washer................................ 266
Rear view camera .......................... 269
6Index
Page 16 of 330
N
Navigation
Entering a destination .................... 233
Menu (on-board computer) ............ 183
see also Digital Operator's Man-
ual.................................................. 231
Notes on breaking-in a new vehi-
cle....................................................... 122
O
Occupant Classification System
(OCS)
Conditions ....................................... 48
Faults ............................................... 51
Operation ......................................... 48
System self-test ............................... 50
Occupant safety
Air bags ........................................... 45
Automatic measures after an acci-
dent ................................................. 54
Belt warning ..................................... 44
Children in the vehicle ..................... 54
Important safety notes .................... 40
Introduction to the restraint sys-
tem .................................................. 40
Occupant Classification System
(OCS) ............................................... 47
PASSENGER AIR BAG indicator
lamps ............................................... 41
Pets in the vehicle ........................... 60
Restraint system warning lamp ........ 41
Seat belt .......................................... 41
Odometer........................................... 182
On-board computer
AMG menu ..................................... 190
Assistance graphic menu ............... 187
Assistance menu ........................... 186
Audio menu ................................... 184
Convenience submenu .................. 190
Display messages .......................... 193
Displaying a service message ........ 264
Factory settings ............................. 190
Important safety notes .................. 178
Instrument cluster submenu .......... 188
Lighting submenu .......................... 189
Menu overview .............................. 181
Message memory .......................... 193
Navigation menu ............................ 183
Operation ....................................... 179
RACETIMER ................................... 191
Service menu ................................. 188
Settings menu ............................... 188
Standard display ............................ 182
Telephone menu ............................ 185
Trip menu ...................................... 182
Vehicle submenu ........................... 189
Video DVD operation ..................... 185
Opening and closing the side trim
panels................................................. 107
Operating safety
Declaration of conformity ................ 27
Important safety notes .................... 27
Operating system
see On-board computer
Operation
Digital Operator's Manual................ 23
Operator's Manual
Vehicle equipment ........................... 25
Outside temperature display........... 178
Overhead control panel...................... 39
Override feature
Rear side windows........................... 60
P
Paint code number............................ 318
Paintwork (cleaning instructions)... 267
Panic alarm.......................................... 40
Panorama roof with power tilt/
sliding panel
Important safety notes .................... 86
Operating ......................................... 87
Operating the roller sunblinds for
the sliding sunroof ........................... 88
Problem (malfunction) ..................... 89
Reversing feature ............................. 87
Parking
Important safety notes .................. 142
Parking brake ................................ 143
Parking position for the exterior
mirror on the front-passenger
side .................................................. 99
Rear view camera .......................... 169
14Index
Page 17 of 330
Parking aid
see Exterior mirrors
see Rear view camera
Parking Assist PARKTRONIC
Deactivating/activating ................. 164
Driving system ...............................162
Function/notes .............................162
Important safety notes .................. 162
Problems (malfunctions) ................ 165
Sensor range ................................. 163
Warning display............................. 164
Parking assistance
see Parking Assist PARKTRONIC
Parking brake
Applying automatically................... 144
Applying or releasing manually ...... 144
Display message ............................ 196
Electric parking brake .................... 143
Emergency braking ........................ 145
General notes ................................ 143
Releasing automatically................. 145
Warning lamp ................................. 226
Parking lamps
Switching on/off........................... 102
PASSENGER AIR BAG
Display message ............................ 202
Indicator lamps ................................ 41
Problem (malfunction) ................... 202
Pets in the vehicle............................... 60
Phone book
see also Digital Operator's Man-
ual .................................................. 231
Plastic trim (cleaning instruc-
tions).................................................. 270
Power washers.................................. 266
Power windows
see Side windows
Protection against theft
ATA (Anti-Theft Alarm system) ......... 68
Immobilizer ...................................... 68
Protection of the environment
General notes .................................. 24
Pulling away
Automatic transmission ................. 126
General notes ................................ 126
Hill start assist ............................... 126
Q
QR code
Mercedes-Benz Guide App ................. 1
Rescue card ..................................... 29
Qualified specialist workshop........... 28
R
RACE START
Important safety notes .................. 160
RACE START (Mercedes-AMG vehi-
cles).................................................... 160
RACE TIMER (on-board computer,
Mercedes-AMG vehicles).................. 191
Radio
Selecting a station ......................... 184
see Digital Operator's Manual
Radio mode
see also Digital Operator's Man-
ual .................................................. 231
Radio-wave reception/transmis-
sion in the vehicle
Declaration of conformity ................ 27
Rain closing feature (panorama
roof with power tilt/sliding panel).... 88
Reading lamp..................................... 104
Rear compartment
Setting the air vents ...................... 121
Rear fog lamp
Display message ............................ 205
Replacing bulbs............................. 107
Switching on/off........................... 102
Rear lamps
see Lights
Rear seats
Folding the backrest forwards/
back ............................................... 242
Rear view camera
"Reverse parking" function ............ 171
Cleaning instructions ..................... 269
Display in the multimedia system .. 170
Function/notes............................. 169
General notes ................................ 169
Switching on/off........................... 170
Rear window defroster
Problem (malfunction) ................... 120
Switching on/off........................... 120
Index15
Page 31 of 330
The following text is reproduced as required ofall manufacturers under Title 49, Code of U.S.Federal Regulations, Part 575 pursuant to theNational Traffic and Motor Vehicle Safety Act of1966.
If you believe that your vehicle has a defectwhich could cause a crash or could cause injuryor death, you should immediately inform theNational Highway Traffic Safety Administration(NHTSA) in addition to notifying Mercedes-BenzUSA, LLC.
If NHTSA receives similar complaints, it mayopen an investigation, and if it finds that a safetydefect exists in a group of vehicles, it may ordera recall and remedy campaign. However, NHTSAcannot become involved in individual problemsbetween you, your dealer, or Mercedes-BenzUSA, LLC.
To contact NHTSA, you may call the VehicleSafety Hotline toll-free at 1-888-327-4236(TTY: 1-800-424-9153);go tohttp://www.safercar.gov; or write to: Administrator,NHTSA, 400 Seventh Street, SW., Washington,DC 20590.
You can also obtain other information aboutmotor vehicle safety from
http://www.safercar.gov
Limited Warranty
!Observe the notes in this Operator's Manualregarding the correct operation of your vehi-cle and possible damage to the vehicle. Dam-age to the vehicle which is caused by violationof these notes is not covered by theMercedes-Benz implied warranty or the newor used-vehicle warranty.
QR code for rescue card
The QR codes are secured in the fuel filler flapand on the opposite side on the B-pillar. In theevent of an accident, rescue services can usethe QR code to quickly find the appropriate res-cue card for your vehicle. The current rescuecard contains the most important informationabout your vehicle in a compact form, e.g. therouting of the electric cables.
You can find more information underwww.mercedes-benz.de/qr-code.
Data storage
Data storage
A wide range of electronic components in yourvehicle contain data memories.
These data memories temporarily or perma-nently store technical information about:
Rthe vehicle's operating state
Rincidents
Rmalfunctions
In general, this technical information docu-ments the state of a component, a module, asystem or the surroundings.
These include, for example:
Roperating conditions of system components.For example, fluid levels
Rthe vehicle's status messages and those of itsindividual components, e.g. number of wheelrevolutions/speed, deceleration in move-ment, lateral acceleration, accelerator pedalposition
Rmalfunctions and defects in important systemcomponents, e.g. lights, brakes
Rvehicle reactions and operating conditions inspecial driving situations, e.g. air bag deploy-ment, intervention of stability control sys-tems
Rambient conditions, e.g. outside temperature
This data is of an exclusively technical natureand can be used to:
Rassist in recognizing and rectifying malfunc-tions and defects
Ranalyze vehicle functions, e.g. after an acci-dent
Roptimize vehicle functions
The data cannot be used to trace the vehicle'smovements.
When your vehicle is serviced, technical infor-mation can be read from the event data memoryand malfunction data memory.
Services include, for example:
Rrepair services
Rservice processes
Rwarranties
Rquality assurance
The vehicle is read out by employees of the ser-vice network (including the manufacturer) usingspecial diagnostic testers. More detailed infor-mation is obtained from it, if required.
Data storage29
Introduction
Z
Page 57 of 330
GWARNING
If you leave children unsupervised in the vehi-
cle, they could set it in motion by, for example:
Rrelease the parking brake.
Rshift the automatic transmission out of the
parking positionP.
Rstart the engine.
In addition, they may operate vehicle equip-
ment and become trapped. There is a risk of
an accident and injury.
When leaving the vehicle, always take the
SmartKey with you and lock the vehicle. Never
leave children unsupervised in the vehicle.
GWARNING
If persons, particularly children are subjected
to prolonged exposure to extreme heat or
cold, there is a risk of injury, possibly even
fatal. Never leave children unattended in the
vehicle.
GWARNING
If the child restraint system is subjected to
direct sunlight, parts may get very hot. Chil-
dren may burn themselves on these parts,
particularly on the metal parts of the child
restraint system. There is a risk of injury.
If you leave the vehicle, taking the child with
you, always ensure that the child restraint
system is not exposed to direct sunlight. Pro-
tect it with a blanket, for example. If the child
restraint system has been exposed to direct
sunlight, let it cool down before securing the
child in it. Never leave children unattended in
the vehicle.
Always ensure that all vehicle occupants havetheir seat belts fastened correctly and are sittingproperly. Particular attention must be paid tochildren.
Observe the safety notes on the seat belt(Ypage 42) and the notes on correct use of seatbelts (Ypage 43).
A booster seat may be necessary to achieveproper seat belt positioning for children over40 lbs (18 kg) until they reach a height where a
three-point seat belt can be properly fastenedwithout a booster seat.
Special seatbelt retractor
GWARNING
If the seat belt is released while driving, the
child restraint system will no longer be
secured properly. The special seat belt retrac-
tor is disabled and the inertia real draws in a
portion of the seat belt. The seat belt cannot
be immediately refastened. There is an
increased risk of injury, possibly even fatal.
Stop the vehicle immediately, paying atten-
tion to road and traffic conditions. Reactivate
the special seat belt retractor and secure the
child restraint system properly.
All seat belts in the vehicle, except the driver'sseat belt, are equipped with a special seat beltretractor. When activated, the special seat beltretractor ensures that the seat belt cannotslacken once the child seat is secured.
Installing a child restraint system:
XMake sure you observe the child restraintsystem manufacturer's installation instruc-tions.
XPull the seat belt smoothly from the belt out-let.
XEngage seat belt tongue in belt buckle.
Activating the special seat belt retractor:
XPull the seat belt out fully and let the inertiareel retract it again.While the seat belt is retracting, you shouldhear a ratcheting sound. The special seat beltretractor is enabled.
XPush the child restraint system down so thatthe seat belt is tight and does not loosen.
Removing the child restraint system and deac-tivating the special seat belt retractor:
XMake sure you observe the child restraintsystem manufacturer's installation instruc-tions.
XPress the release button of the seat beltbuckle and guide the seat belt tongue backtowards the belt sash guide.The special seat belt retractor is deactivated.
Children in the vehicle55
Safety
Z
Page 63 of 330

Driving safety systems
Overview of driving safety systems
In this section, you will find information aboutthe following driving safety systems:
RABS (Anti-lockBrakingSystem)(Ypage 61)
RBAS (BrakeAssistSystem) (Ypage 61)
RActive Brake Assist (Ypage 62)
RESP®(ElectronicStabilityProgram)(Ypage 64)
REBD (ElectronicBrake forceDistribution)(Ypage 67)
RADAPTIVE BRAKE (Ypage 68)
RSTEER CONTROL (Ypage 68)
Important safety notes
If you fail to adapt your driving style or if you areinattentive, the driving safety systems can nei-ther reduce the risk of an accident nor overridethe laws of physics. Driving safety systems aremerely aids designed to assist driving.
You are responsible for maintaining the distanceto the vehicle in front, for vehicle speed, forbraking in good time, and for staying in lane.Always adapt your driving style to suit the pre-vailing road and weather conditions and main-tain a safe distance from the vehicle in front.Drive carefully.
The driving safety systems described only workas effectively as possible when there is ade-quate contact between the tires and the roadsurface. Please pay special attention to thenotes on tires, recommended minimum tiretread depths, etc. (Ypage 291).
In wintry driving conditions, always use wintertires (M+S tires)and if necessary, snow chains.Only in this way will the driving safety systemsdescribed in this section work as effectively aspossible.
ABS (Anti-lock Braking System)
General information
ABS regulates brake pressure in such a way thatthe wheels do not lock when you brake. Thisallows you to continue steering the vehicle whenbraking.
The�%ABS warning lamp in the instrumentcluster lights up when the ignition is switchedon. It goes out when the engine is running.
ABS works from a speed of about 5 mph(8 km/h), regardless of road-surface conditions.ABS works on slippery surfaces, even when youonly brake gently.
Important safety notes
iObserve the "Important safety notes" sec-tion (Ypage 61).
GWARNING
If ABS is malfunctioning, the wheels could
lock when braking. The steerability and brak-
ing characteristics would be severely affec-
ted. There is an increased danger of skidding
and accidents.
Drive on carefully. Have ABS checked imme-
diately at a qualified specialist workshop.
When ABS is malfunctioning, other systems,including driving safety systems, will alsobecome inoperative. Observe the informationon the ABS warning lamp (Ypage 222)and dis-play messages which may be shown in theinstrument cluster (Ypage 194).
Braking
XIf ABS intervenes:continue to depress thebrake pedal vigorously until the braking sit-uation is over.
XTo make a full brake application:depressthe brake pedal with full force.
If ABS intervenes when braking, you will feel apulsing in the brake pedal.
The pulsating brake pedal can be an indicationof hazardous road conditions, and functions as areminder to take extra care while driving.
BAS (Brake Assist System)
General information
BAS operates in emergency braking situations.If you depress the brake pedal quickly, BASautomatically boosts the braking force, thusshortening the stopping distance.
Driving safety systems61
Safety
Z
Page 78 of 330
Doors
Important safety notes
GWARNING
If children are left unsupervised in the vehicle,
they could:
Roperate the vehicle's equipment
Additionally, children could set the vehicle in
motion if, for example, they:
Rrelease the parking brake
Rshift the automatic transmission out of park
position�]
Rstart the engine
There is a risk of an accident and injury.
Never leave children or animals unattended in
the vehicle.
When leaving the vehicle, always take the
SmartKey with you and lock the vehicle. This
also applies for the Digital Vehicle Key if the
"Digital Vehicle Key" function is activated via
Mercedes me connect.
You should preferably place luggage or loads inthe cargo compartment. Observe the loadingguidelines (Ypage 239).
Unlocking and opening doors from
the inside
!The side windows will not open/close if thebattery is discharged or if the side windowshave iced up. It will then not be possible toclose the door. Do not attempt to force thedoor closed. You could otherwise damage thedoor or the side window.
When a door is opened, the side window on thatside opens slightly. When the door is closed, theside window closes again.
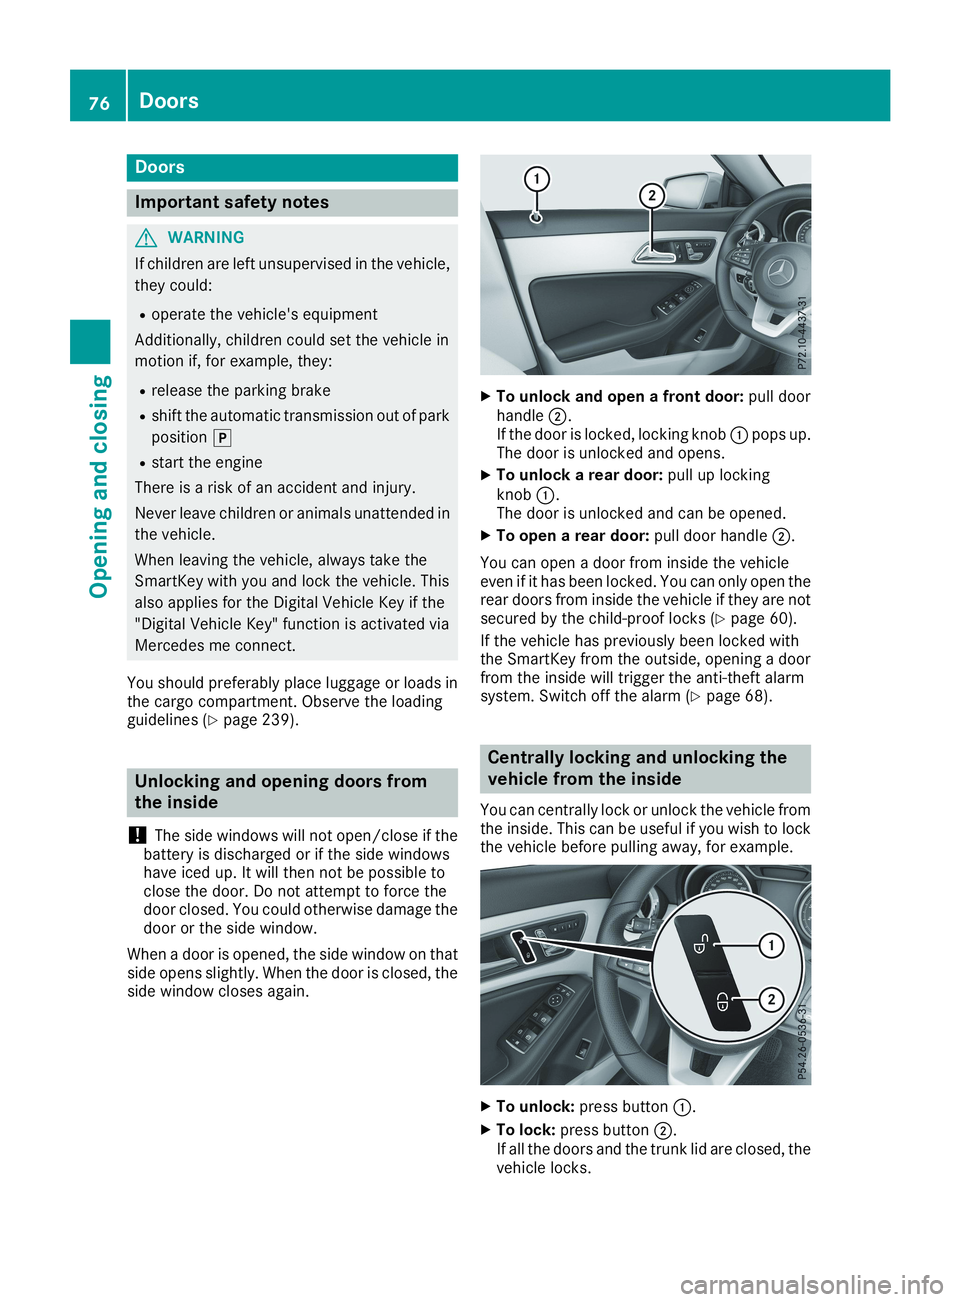
XTo unlock and open a front door:pull doorhandle�D.If the door is locked, locking knob�Cpops up.The door is unlocked and opens.
XTo unlock a rear door:pull up lockingknob�C.The door is unlocked and can be opened.
XTo open a rear door:pull door handle�D.
You can open a door from inside the vehicleeven if it has been locked. You can only open therear doors from inside the vehicle if they are notsecured by the child-proof locks (Ypage 60).
If the vehicle has previously been locked withthe SmartKey from the outside, opening a doorfrom the inside will trigger the anti-theft alarmsystem. Switch off the alarm (Ypage 68).
Centrally locking and unlocking the
vehicle from the inside
You can centrally lock or unlock the vehicle fromthe inside. This can be useful if you wish to lockthe vehicle before pulling away, for example.
XTo unlock:press button�C.
XTo lock:press button�D.If all the doors and the trunk lid are closed, thevehicle locks.
76Doors
Opening and closing
Page 104 of 330
take precedence over the daytime runninglamps.
USA only:
The daytime running lamps improve the visibilityof your vehicle during the day. To do this, thedaytime running lamps function must beswitched on using the on-board computer(Ypage 189).
If the engine is running and you turn the lightswitch to the�`or�Xposition, the manualsettings take precedence over the daytime run-ning lamps.
Low-beam headlamps
Even if the light sensor does not detect that it isdark, the parking lamps and low-beam head-lamps switch on when the ignition is switched onand the light switch is set to the�Xposition.This is a particularly useful function in the eventof rain and fog.
XTo switch on the low-beam headlamps:turn the SmartKey to position�Hin the igni-tion lock or start the engine.
XTurn the light switch to�X.The green�Xindicator lamp in the instru-ment cluster lights up.
Rear fog lamp
The rear fog lamp improves visibility of yourvehicle for the traffic behind in the event of thickfog. Please take note of the country-specificregulations for the use of rear fog lamps.
XTo switch on the rear fog lamp:turn theSmartKey in the ignition lock to position�Horstart the engine.
XTurn the light switch to�Xor�X.
XPress the�^button.The yellow�^indicator lamp in the instru-ment cluster lights up.
XTo switch off the rear fog lamp:press the�^button.The yellow�^indicator lamp in the instru-ment cluster goes out.
iWhen the rear fog lamp is switched on, thecenter brake lamp in the tail lamp switches offdue to a legal requirement.
Parking lamps
!If the battery charge is very low, the parkinglamps or standing lamps are automaticallyswitched off to enable the next engine start.Always park your vehicle safely and in a well lit
area, in accordance with the relevant legalstipulations. Avoid using the�`parkinglamps over a period of several hours. If pos-sible, switch on the right-hand�dor left-hand�cstanding lamps.
XTo switch on:turn the light switch to�`.The green�`indicator lamp in the instru-ment cluster lights up.
Standing lamps
Switching on the standing lamps ensures thecorresponding side of the vehicle is illuminated.
XTo switch on the standing lamps:theSmartKey is not in the ignition lock or it is inposition�Zin the ignition lock.
XTurn the light switch to�c(left-hand side ofthe vehicle) or�d(right-hand side of thevehicle).
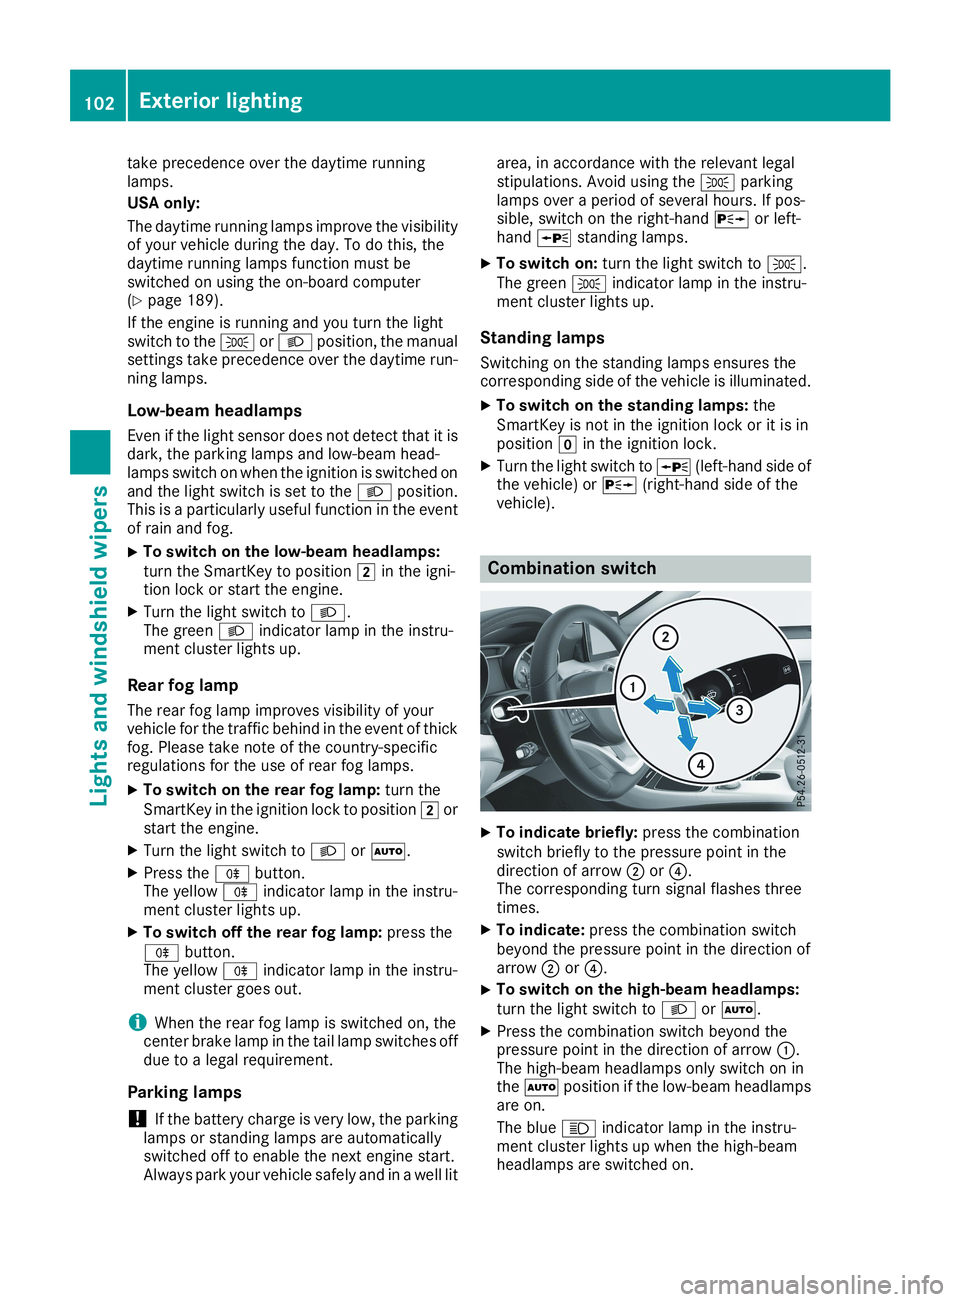
Combination switch
XTo indicate briefly:press the combinationswitch briefly to the pressure point in thedirection of arrow�Dor�