2019 MERCEDES-BENZ CLA COUPE change time
[x] Cancel search: change timePage 4 of 645
We
lcome totheworl d of Mercedes-Benz
Before youfirs t drive off, read this Owner's Man‐
ual carefully and familiarise yourself with your
ve hicle. Foryo ur ow n sa fety and a longer operat‐
ing li fespan, follow the instructions and warning
notices in this Owner's Manual. Disregarding
th em may lead todamage totheve hicle or per‐
sonal injur y.
The equipment or model designation of your
ve hicle may vary according to:
R Model
R order
R national version
R availability
The illustrations in this Owner's Manual show a
left-hand drive vehicle. On right-hand-drive vehi‐
cles, the la yout of co mponents and contro l ele‐
ments dif fers accordin gly.
Mercedes-Benz is cons tantly de veloping its vehi‐
cles fur ther. Mercedes-Benz
therefore reser vesth eright to
int roduce changes in thefo llowing areas:
R design
R equipment
R tech nical features
The equipment in your vehicle may therefore dif‐
fe r from that shown in the descriptions and illus‐
trations.
The following are integral parts of theve hicle:
R Digital Owner's Manual
R Printed Owner's Manual
R service booklet
R equipment-dependent Supplements
Ke ep these documents in theve hicle at all
times. If you sell theve hicle, alw ays pass all of
th e documents on tothe new owner.
1185849100Z102
1185849100Z102
Page 6 of 645
Climate control
........................................ 14 6
Overview of climate contro l systems ..........1 46
Operating the climate control sy stem ......... 147 Driving and pa
rking ................................. 15 6
Driving ........................................................ 15 6
DY NA MIC SELECT switch ............................1 66
Manual transmission .................................. 16 8
Au tomatic transmission .............................. 17 0
Fu nction of the 4MATIC .............................. 175
Re fuelling .................................................... 175
Pa rking ........................................................ 181
Driving and driving sa fety sy stems .............. 191
Tr ailer hit ch................................................ 252
Bicycle rack function .................................. 255
Ve hicle towing instructions ........................ .257 Instrument Display and on-board
compu ter.................................................. 258
Instrument display overview ...................... .258
Overview of the buttons on thesteering
wheel ..........................................................2 59
Operates the on-board computer ............... 260 Ad
justing the design of the instrument
display ........................................................ 261
Showing display conte nt onthe instru‐
ment clus ter ............................................... 262
Overview of displa yson the multifunc‐
tion display .................................................2 63
Ad justing the instrument lighting ............... 264
Menus and submenus ................................ 264
Head-up Display .......................................... 271 LINGU
ATRO NIC ......................................... 272
No tes on operating saf ety .......................... .272
Operation ................................................... 272
Using LINGU ATRO NIC ef fectively ................ 275
Essential voice commands .......................... 276 MBUX multimedia sy
stem ...................... 290
Overview and operation .............................. 290
Sy stem settings .......................................... 326
Fit & Healt hy............................................... 336
Na vigation ................................................... 341
Te lephone .................................................. .386
Online and Internet functions ..................... 421
Media ........................................................ .430 Ra
dio .......................................................... 438
Sound .........................................................4 41 Maintenance and care
.............................445
ASS YST PLUS service inter val display ........ 445
Engine compartment .................................. 446
Cleaning and care ...................................... .452 Breakdown assi
stance ............................ 462
Emergency ................................................. .462
Flat tyre ...................................................... 464
Battery (vehicle) ......................................... 470
To w- starting or towing away ....................... 476
Electrical fuses ........................................... 482 Wheels and tyres
..................................... 485
No tes on noise or unusual handling char‐
acteristics .................................................. .485
No tes on regular lyinspecting wheels and
tyres .......................................................... .485
No tes on snow chains ................................ 485
Ty re pressure .............................................. 486
Wheel change ............................................ .495 Contents
3
Page 24 of 645
Pr
otection of the environment
+ ENVIRONMENTAL
NOTEEnvironmental
dama gedue tooperating conditions and
personal driving style The pollutant emission of
your vehicle is
directly related tothewa yyo u operate your
ve hicle.
Help toprotect the environment byoperating
yo ur vehicle in an environmentally responsi‐
ble manner. Please obser vethefo llowing rec‐
ommendations on ope rating conditions and
pe rsonal driving style.
Operating conditions: #
Make sure that the tyre pressure is cor‐
re ct. #
Do not car ryany unnecessary weight
(e.g. roof luggage rack s once you no
lon ger need them). #
Adhere tothe service inter vals.
A regularly serviced vehicle will contri b‐
ute toenvironmen tal pr otection. #
Alw ays ha vemaintenance workcar ried
out at a qualified specialist workshop.
Pe rsonal driving style: #
Do not depress the accelera tor pedal
when starting the engine. #
Do not warm upthe engine while the
ve hicle is stationar y. #
Drive carefully and maintain a suitable
di st ance from theve hicle in front. #
Avoid frequent, sudden acceleration
and braking. #
Change gear in good time and use each
ge ar on lyup toÔ of its maximum
engine speed. #
Switch off the engine in stationary traf‐
fi c, e.g. byusing the ECO start/ stop
function. #
Drive fuel-ef ficiently. Obser vethe ECO
display for a fuel-ef ficient driving style. Ta
ke -back of end-of-life vehicles
EU countries onl y:
Mercedes-Benz will take back your end-of-life
ve hicle for environment-friendly disposal in
accordance with the European Union(EU) End-
of-Life Vehicles Directive.
A network of vehicle take -ba ckpoints and dis‐
mantlers has been es tablished foryo uto return
yo ur vehicle. You can lea veit at any of these
points free of charge . This makes an impor tant
contribution toclosing there cycling circle and
conse rving resources.
Fo r fur ther information about there cycling and
disposal of end-of-li fevehicles, and theta ke-
back conditions, please visit the national
Mercedes-Benz website foryo ur count ry. Gene
ral no tes 21
Page 35 of 645
or MP3 pla
yer). If this data is stored in theve hi‐
cle, you can dele teit at any time. This data is
sent tothird parties only at your requ est, partic‐
ularly when you use online services in accord‐
ance with the settings that you ha veselected.
Yo u can store or change con venience settings/
individualisations in theve hicle at any time.
Depending on the equipment, this includes, for
ex ample:
R settings forth e seat and steering wheel posi‐
tions
R suspension and climate control settings
R customisations such as interior lighting
If yo ur vehicle is accordingly equipped, you can
connect your smartphone or ano ther mobile end
device totheve hicle. You can cont rolth is by
means of the control elements integrated in the
ve hicle. Images and audio from the smartphone
can be output via the multimedia sy stem. Cer‐
tai n information is simultaneously trans ferred to
yo ur smartphone. Depending on
the type of integration, this can
include:
R general vehicle data
R position data
This allo wsyouto use selected apps on your
smartphone, such as navigation or music play‐
bac k.There is no fur ther interaction between the
smartphone and theve hicle; in particular, vehi‐
cle data is not directly accessible. Which type of
fur ther data processing occurs is de term ined by
th e pr ovider of the specific app used. Which set‐
tings you can make, if an y,depends on the spe‐
cific app and the operating sy stem of your
smartphone. Online services
Wire
less network connection
If yo ur vehicle has a wireless network connec‐
tion, it enables data tobe exc hanged between
yo ur vehicle and additional sy stems. The wire‐
less network connection is enabled via theve hi‐
cle's transmission and reception unit or via con‐
nected mobile end devices (e.g. sma rtphones). Online functions can be used via
the wireless
network connection. This includes online serv‐
ices and applications/apps pr ovided bythe man‐
ufacturer or other pr oviders.
Manu factu rer's se rvices
Re garding online services of the manufacturer,
th e individual functions are described bythe
manufacturer in a suita ble place (e.g. Owner's
Manual, website of the manufacturer) along with
th ere leva nt da taprotection information. Per‐
sonal data may be used forth e pr ovision of
online services. Data is exchanged via a secure
connection, e.g. the manufacturer's designated
IT sy stems. Personal data is collected, pro‐
cessed and used via the pr ovision of services
exc lusively on the basis of legal permissions or
with prior consent.
The services and functions (sometimes subject
to afe e) can usually be activated or deactivated.
In some cases, this also applies tothe entire
ve hicle's data connection. This excludes, in par‐
ticular, legally prescribed functions and services. 32
General no tes
Page 133 of 645
#
Turn the headlamp range adjus terto the
position that cor responds tothe load condi‐
tion of your vehicle. Operating
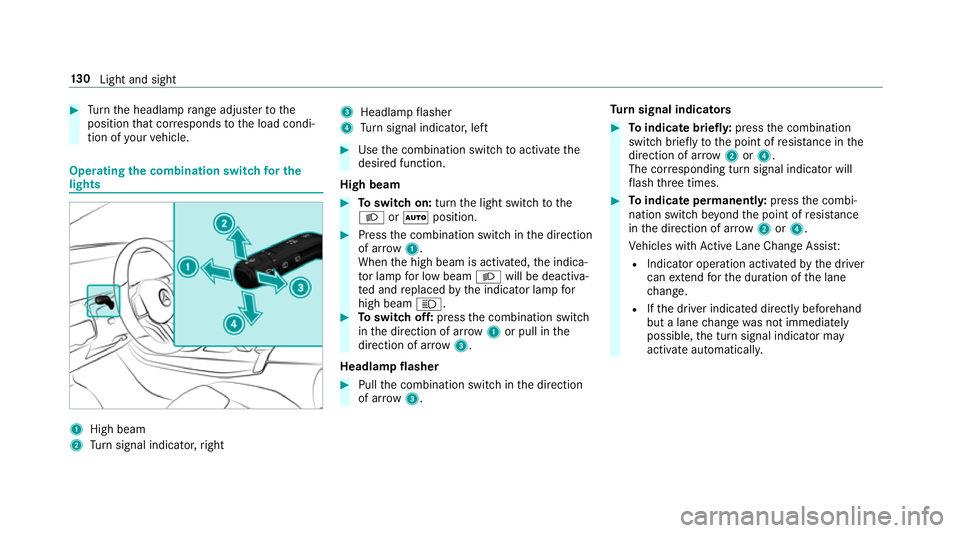
the combination switch for the
lights 1
High beam
2 Turn signal indicator, right 3
Headlamp flasher
4 Turn signal indicator, left #
Use the combination switch toactivate the
desired function.
High beam #
Toswitch on: turnthe light switch tothe
L orà position. #
Press the combination switch in the direction
of ar row1.
When the high beam is activated, the indica‐
to r lamp for low beam Lwill be deactiva‐
te d and replaced bythe indicator lamp for
high beam K. #
Toswitch off: pressthe combination switch
in the direction of ar row1or pull in the
direction of ar row3.
Headlamp flasher #
Pull the combination switch in the direction
of ar row3. Tu
rn signal indicators #
Toindicate briefl y:press the combination
switch briefly tothe point of resis tance in the
direction of ar row2or4.
The cor responding turn signal indicator will
fl ash thre e times. #
Toindicate permanentl y:press the combi‐
nation switch be yond the point of resis tance
in the direction of ar row2or4.
Ve hicles with Active Lane Change Assi st:
R Indicator operation activated bythe driver
can extend forth e duration of the lane
ch ange.
R Ifth e driver indicated directly beforehand
but a lane change was not immediately
possible, the turn signal indicator may
activate automaticall y.13 0
Light and sight
Page 140 of 645
Ad
justing the brightness #
Select Brightness . #
Adjust the brightness.
Ac tivating the brightness for zones #
Select Brightness . #
Select Brightness zones . #
Activate or deacti vate the function.
The EMPHASIS, AMBIENTandVENTS zones
can be set separatel y.
Ac tivating multi-coloured lighting #
Select Colour. #
Select Multi-colour.
The reare ten preset colour combinations
av ailable. #
Select a colour combination.
Ac tivating multi-coloured animation #
Select Colour. #
Select Multi-colour animat..
The chosen colour combination will change
at predefined inter vals. Ac
tivating welcome lighting #
Select Colour. #
Select Welcome.
When theve hicle is unloc ked, a special ambi‐
ent lighting sequence will run.
Ac tivating dependency on air conditioning
settings #
Select Colour. #
Select Climate.
If ch anges are made tothete mp erature set‐
ting in theve hicle, the colour of the ambient
lighting will change brief ly. Switching
the interior lighting switch-off
delay time on/off Multimedia sy
stem:
4 © 5
Settings 5
Lights
5 Int. light. del. sw. off #
Switch the lighting switch-off delay time on
or off.
When this function is active, the interior light‐
ing is lit up for short time af terth eve hicle
has been loc ked. Changing bulbs (only
forve hicles with halo‐
ge n headla mps) Note
s onchanging bulbs &
WARNING Risk of bu rns from hot com‐
ponent parts whilst replacing a bulb
Bulbs, lamps and plugs can become very hot
during operation.
When replacing a bulb, you could burn your‐
self on these component parts. Light and sight
137
Page 152 of 645
Ac
tivating/deactivating the climate control
syn chro nisation function via the control
panel Climate control can be set centrally using
the
synchronisation function. The temp erature and
air distribution setting forth e driver side is adop‐
te d automatically forth e front passenger side. #
Press the 0 button.
The synchronisation function is deactivated if
th e settings for one of theot her climate zones
are changed. Ac
tivating/deactivating the climate control
syn chro nisation function using the multime‐
dia sy stem Climate control can be set centrally using
the
synchronisation function. The driver's settings
fo rte mp erature, air quantity and air distribution
are adop ted automatically for all clima tezones. #
Call up the air conditioning menu
(/ page 148). #
Select First row of seats. #
Select SYNC.
Depending on the pr evious status, the func‐
tion is activated or deactivated. Demisting
the windo ws Wi
ndo wsmis ted up on the inside #
Press theà button. #
Ifth e windo wscontinue tomist up: press the
¬ button.
Wi ndo wsmis ted up on the outside #
Switch on the windscreen wipers. #
Press theà button. Switching air-recirculation mode on/off
#
Press theg button.
The interior air will be recirculated.
Air-reci rculation mode automatically swit ches to
fresh air mode af ter some time.
% If air-recirculation mode is switched on, the
windo wsmay mist up more quickl y.Switch
on ai r-re circulation mode only brie fly. Switches
there sidual heat on/off Re
quirements:
R The vehicle is par ked.
It is possible tomake use of there sidual heat
from the engine tocontinue heating or ventilat‐
ing the front compartment of theve hicle for
appr oximately 30 minutes, depending on the
te mp erature set. #
Toswitch on: presstheÁ button.
Re sidual heat is switched off automaticall y. St
ationary heater/ventilation St
ationary heater/stationary ventilation
function R The air inside theve hicle is heated or ventila‐
te dto the set temp erature.
R The air inside theve hicle cannot be cooled
down totemp eratures below the outside
te mp erature.
R Ifth e outside temp erature changes, ventila‐
tion mode au tomatical lyswitches toheating Climate control
14 9
Page 155 of 645
Setting
the departu retime #
Brie fly press theu switch. #
Press the, or. button repeatedly
until the time tobe changed appears on the
displa y. #
Press theu and^ buttons simultane‐
ousl y.
The Îsymbol will flash on there mo tecon‐
trol displ ay. #
Press the, and. buttons toset the
desired departure time. #
Press theu and^ buttons simultane‐
ousl y.
The new departure time will be stored.
Up tothre e departure times can be stored. #
Toactivate the departu retime: select the
desired departure time and press and hold
th eu button.
The Ísymbol, the departure time and,
depending on the selected departure time,
th e letter A, BorCwill appear on the displa y. #
Todeactivate the departure time: select
th e desired departure time and press and
hold the^ button.
OFF will appear on the displa y. #
Tocheck thest atus of thest ationary
heater: briefly press theu button.
Switching off immediately #
Press and hold the^ button.
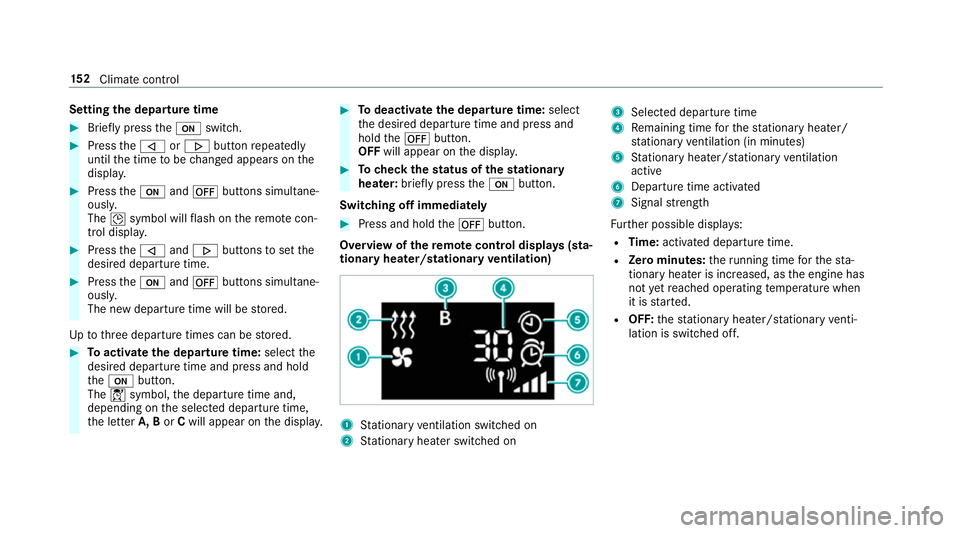
Overview of there mo tecont rol displa ys(sta‐
tiona ryheater/stationary ventilation) 1
Stationary ventilation switched on
2 Stationary heater swit ched on 3
Selected departure time
4 Remaining time forth est ationary heater/
st ationary ventilation (in minu tes)
5 Stationary heater/ stationary ventilation
acti ve
6 Departure time acti vated
7 Signal stre ngth
Fu rther possible displa ys:
R Time: activated departure time.
R Zero minutes: theru nning time forth est a‐
tionary heater is inc reased, as the engine has
not yetre ached operating temp erature when
it is star ted.
R OFF: thest ationary heater/ stationary venti‐
lation is switched off. 15 2
Climate cont rol