2019 MERCEDES-BENZ CLA COUPE warning light
[x] Cancel search: warning lightPage 263 of 330
X
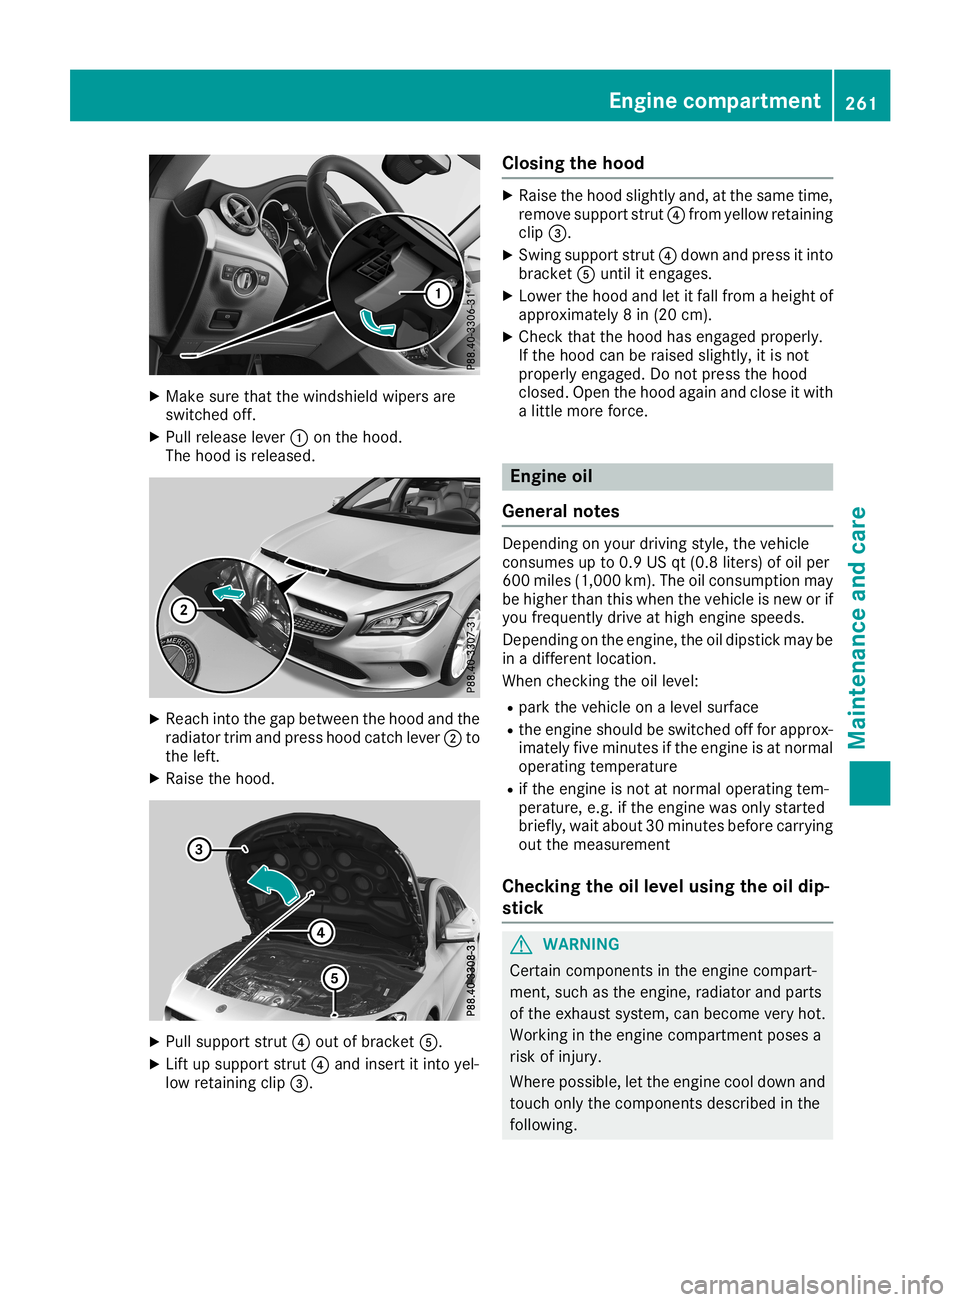
Make surethatthewindshield wipersare
switched off.
X Pull release lever0043onthe hood.
The hood isreleased. X
Reach intothegap between thehood andthe
radiator trimandpress hoodcatch lever0044to
the left.
X Raise thehood. X
Pull support strut0085out ofbracket 0083.
X Lift upsupport strut0085and insert itinto yel-
low retaining clip0087. Closi
ngthe hood X
Raise thehood slightly and,atthe same time,
remove support strut0085from yellow retaining
clip 0087.
X Swing support strut0085down andpress itinto
bracket 0083until itengages.
X Lower thehood andletitfall from aheight of
approximately 8in (20 cm).
X Check thatthehood hasengaged properly.
If the hood canberaised slightly, itis not
properly engaged. Donot press thehood
closed. Openthehood again andclose itwith
a little more force. Engine
oil
General notes Depending
onyour driving style,thevehicle
consumes upto0.9 USqt(0.8 liters) ofoil per
600 miles (1,000 km).Theoilconsumption may
be higher thanthiswhen thevehicle isnew orif
you frequently driveathigh engine speeds.
Depending onthe engine, theoildipstick maybe
in adifferent location.
When checkingthe oillevel:
R park thevehicle onalevel surface
R the engine shouldbeswitched offfor approx-
imately fiveminutes ifthe engine isat normal
operating temperature
R ifthe engine isnot atnormal operating tem-
perature, e.g.ifthe engine wasonly started
briefly, waitabout 30minutes beforecarrying
out themeasurement
Checking theoillevel using theoildip-
stick G
WARNING
Certain componen tsinthe engine compart-
ment, suchasthe engine, radiator andparts
of the exhaust system,canbecome veryhot.
Working inthe engine compartmen tposes a
risk ofinjury.
Where possible, letthe engine cooldown and
touch onlythecomponen tsdescribed inthe
following. Engi
necompar tment
261Maintenance andcare Z
Page 272 of 330
X
Make surethatthevehicle isat astandstill
and theSmartK eyisin position 0048inthe igni-
tion lock.
X Open thecamera coverforcleaning viathe
multimedia system(seeDigital Operator's
Manual).
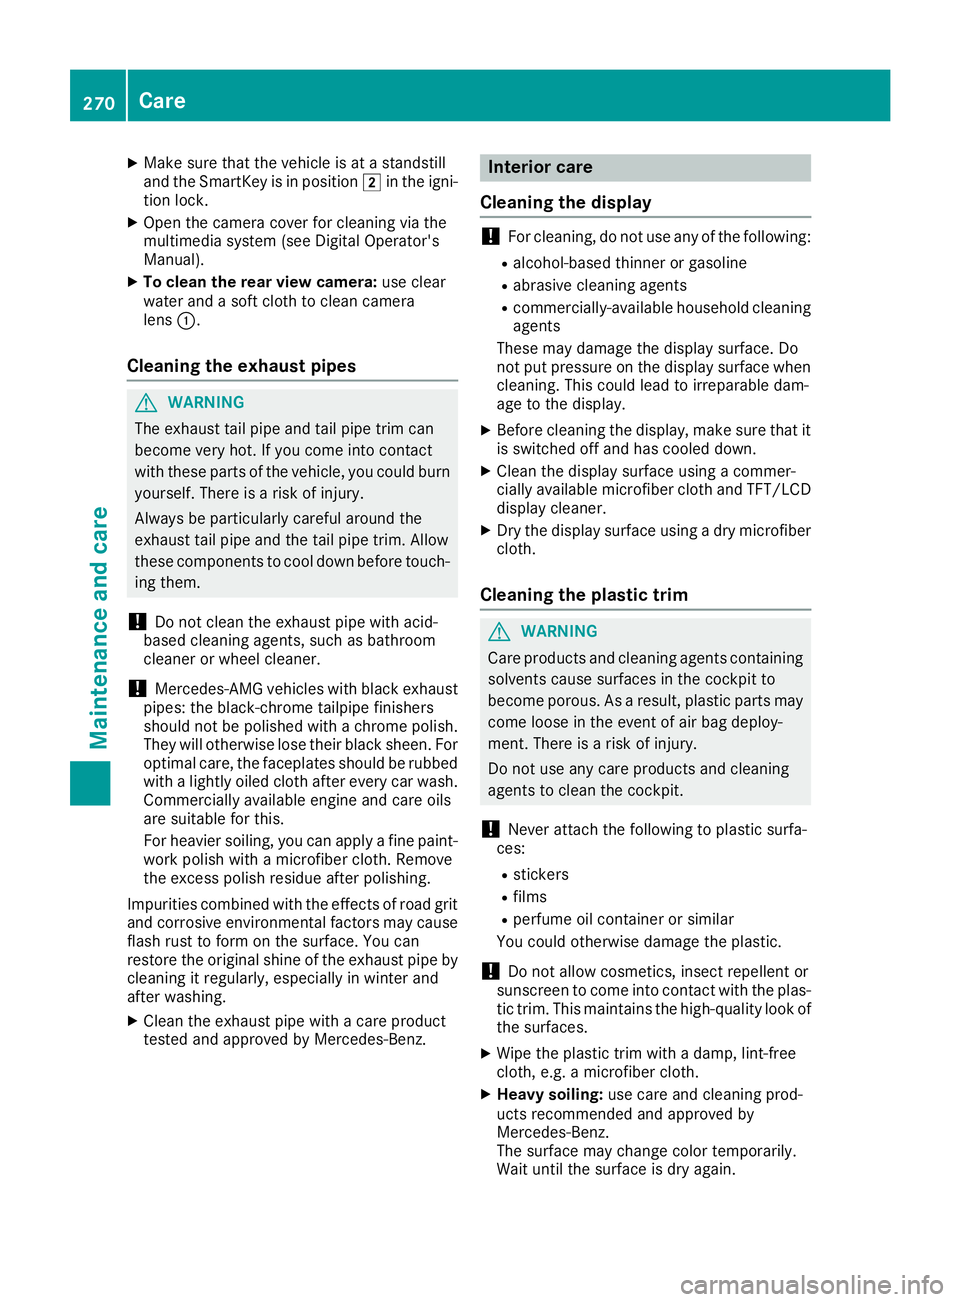
X To clean therear view camera: useclear
water andasoft cloth toclean camera
lens 0043.
Cleanin gthe exhaust pipes G
WARNING
The exhaust tailpipe andtailpipe trimcan
become veryhot.Ifyou come intocontact
with these partsofthe vehicle, youcould burn
yourself. Thereisarisk ofinjury.
Always beparticularly carefularound the
exhaust tailpipe andthetailpipe trim. Allow
these componen tsto cool down before touch-
ing them.
! Do
not clean theexhaust pipewithacid-
based cleaning agents,suchasbathroom
cleaner orwheel cleaner.
! Mercedes-AMG
vehicleswithblack exhaust
pipes: theblack-chr ometailpipe finishers
should notbepolished withachrome polish.
They willotherwise losetheir black sheen. For
optimal care,thefaceplates shouldberubbed
with alightly oiledcloth afterevery carwash.
Commercially availableengine andcare oils
are suitable forthis.
For heavier soiling,youcan apply afine paint-
work polish withamicrofiber cloth.Remove
the excess polishresidue afterpolishing.
Impurities combinedwiththeeffect sof road grit
and corrosive environmentalfactors maycause
flash rusttoform onthe surface. Youcan
restore theoriginal shineofthe exhaust pipeby
cleaning itregularly ,especially inwinter and
after washing.
X Clean theexhaust pipewithacare product
tested andapproved byMercedes-Ben z. Interior
care
Cleanin gthe display !
For
cleaning, donot use anyofthe following:
R alcohol-based thinneror gasoline
R abrasive cleaningagents
R commerc ially-availabl ehousehold cleaning
agents
These maydamage thedisplay surface. Do
not putpressure onthe display surface when
cleaning. Thiscould leadtoirreparable dam-
age tothe display .
X Before cleaning thedisplay ,make surethatit
is switched offand hascooled down.
X Clean thedisplay surface usingacommer-
cially availa blemicrofiber clothandTFT/LCD
display cleaner.
X Dry thedisplay surface usingadry microfiber
cloth.
Cleanin gthe plastic trim G
WARNING
Care products andcleaning agentscontaining
solvents causesurfaces inthe cock pitto
become porous.Asaresult, plastic partsmay
come looseinthe event ofair bag deploy -
ment. Thereisarisk ofinjury.
Do not use anycare products andcleaning
agents toclean thecock pit.
! Never
attach thefollowing toplastic surfa-
ces:
R stick ers
R films
R perfume oilcont ainer orsimilar
You could otherwise damagetheplastic.
! Do
not allow cosmetic s,insect repellent or
sunscreen tocome intocont actwith theplas-
tic trim. Thismaintains thehigh-quali tylook of
the surfaces.
X Wipe theplastic trimwith adamp, lint-free
cloth, e.g.amicrofiber cloth.
X Heavy soiling:use care andcleaning prod-
ucts recommen dedandapproved by
Mercedes-Ben z.
The surface maychange colortemporarily.
Wait untilthesurface isdry again. 270
CareMaintenance
andcare
Page 283 of 330
Only
replace abattery withabattery thathas
been recommended byMercedes-Benz .
Remove theSmartKey ifyou park thevehicle
and donot require anyelectrical consumers.
The vehicle willthen usevery little energy, thus
conserving batterypower.
If the power supply hasbeen interrupted, e.g.if
you reconnec tthe battery, youwillhave to:
R set the clock using themultimedia system
(see theDigital Operator's Manual)
R reset thefunction forfolding theexterior mir-
rors in/out automaticall y,by folding themir-
rors outonce (Ypage 98) Charging
thebatter y G
WARNING
During charging andjump-startin g,explosive
gases canescape fromthebattery. Thereisa
risk ofan explosion.
Particularl yavoid fire,open flames, creating
sparks andsmoking. Ensurethereissufficient
ventilation whilecharging andjump-startin g.
Do not lean over abattery. G
WARNING
Battery acidiscaustic. Thereisarisk ofinjury.
Avoid contactwith skin, eyesorclothing. Do
not inhale anybattery gases.Donot lean over
the battery. Keepchildren awayfrom batter-
ies. Wash awaybattery acidimmediately with
plenty ofclean water andseek medical atten-
tion. G
WARNING
A discharged batterycanfreeze attempera-
tures below freezing point.Whenjump-start-
ing the vehicle orcharging thebattery, gases
can escape fromthebattery. Thereisarisk of
an explosion.
Allow thefrozen battery tothaw outbefore
charging itor jump-startin g.
! Only
usebattery chargers withamaximum
charging voltageof14.8 V.
! Only
charge thebattery usingthejump-
starting connectionpoint. The
jump-startin gconnec tionpoint isin the
engine compartment (Ypage 282).
X Open thehood.
X Connect thebattery charger tothe positive
terminal andground pointinthe same order
as when connec tingthedonor battery inthe
jump-startin gprocedure (Ypage 282).
If the <004C00510047004C004600440057005200550012005A004400550051004C0051
004A[ lampsdonot light upin
the instrument clusteratlow temperatures, itis
very likely thatthedischarged batteryhasfro-
zen. Inthis case youmay neither jump-start the
vehicle norcharge thebattery. Theservice lifeof
a thawed-out batterymaybeshorter. Thestart-
ing characteristics canbeimpaired ,particularl y
at low temperatures. Havethethawed-out bat-
tery checked ataqual ified speciali stworkshop.
Only charge theinstalled batterywithabattery
charger whichhasbeen tested andapproved by
Mercedes-Benz .A battery charger unitspeciall y
adap tedforMercedes-Benz vehiclesandtested
and approved byMercedes-Benz isavail able as
an accessory. Itpermits thecharging ofthe bat-
tery inits installed position. Contactanauthor-
ized Mercedes-Benz Centerforfurther informa-
tion andavail ability. Read thebattery charger's
operating instructionsbefore charging thebat-
tery. Replacing
the12Vbatter y
Observe thenotes onthe 12Vbattery
(Y page 279).
Mercedes-Benz recommendsthatyouhave the
12 Vbattery replaced ataqual ified speciali st
workshop, e.g.atan authorized Mercedes-Benz
Center.
If you want toreplace thebattery yourself,
observe thefollowi ngnotes:
R Alway sreplace adefective batterywithabat-
tery which meets thespecific requirements of
the vehicle.
The vehicle isequip pedwith abattery using
AGM (absorbe ntglass mat)technology ora
battery usingEFB(enhanced floodedbattery)
technology. Fullvehicle functionality isguar-
anteed onlywith anAGM orEFB battery. If
replacement isnecessary, alwaysuse thebat-
tery technology originallyinstalled. Switching
between thebattery technologies isnot per-
mitted. Forsafety reasons, Mercedes-Benz
recommends thatyouonly usebatteries Bat
tery (vehic le)
281Breakdown assistance Z
Page 297 of 330
If
the tire pressu reshave been settothe lowe r
valu esfor lighter loadsand/or lowerroad
speed s,the pressu resshoul dbe reset tothe
higher values:
R ifyou want todrive withanincreased load
and/or
R ifyou want todrive athigher speeds
i The
tirepressu resforincreased loadsand/
or higher roadspeed s,shown inthe tire pres-
sure table, mayhave anegative effectondriv-
ing comfort.
If the tire pressu reisnot setcorrectly, thiscan
lea dto an excessive build-up ofheat andasud-
den loss ofpressu re.
For more information, contactaqua lifiedspe-
ciali stworkshop. Important
notesontire pressure G
WARNING
If the tire pressu redrops repeatedly,the
wheel ,valve ortire may bedama ged.Tire
pressu rethat istoo low may resul tin atire
blow -out. There isarisk ofan accident.
R Check thetire forforeign objects.
R Check whether thewheel islosing airorthe
valve islea king.
If you areunabl eto rectify thedama ge,con-
tact aqua lifiedspecia listworkshop. G
WARNING
If you fitunsui table accessorie sonto tire
valves ,the tire valves maybeoverloa dedand
malfu nction, whichcancause tirepressu re
loss. Duetotheir desig n,retrofitted tirepres-
sure monitors keepthetire valve open. This
can also resul tin tire pressu reloss. There isa
risk ofan accident.
Only screw thestandard valvecaporother
valve capsappro vedbyMercedes-Benz for
you rvehicle ontothetire valve.
Use asuita blepressu regau getocheck thetire
pressu re.The outer appearance ofatire does
not permit anyrelia bleconclusion aboutthe tire
pressu re.On vehicle sequi pped withtheelec-
tronic tirepressu remonitor, thetire pressu re
can bechecked inthe on-board computer. The
tiretemperature andpressu reincrease
when thevehicle isin motion. Thisisdepende nt
on the driving speedandtheload .
Therefore, youshoul donly correct tirepres-
sures whenthetires arecold.
The tires arecold:
R ifthe vehicle hasbeen parked withthetires
out ofdirect sunlightfor atlea stthree hours
and
R ifthe vehicle hasbeen driven lessthan 1mile
(1.6 km)
The tiretemperature changesdependingon the
outsid etemperature ,the vehicle speedandthe
tire load .If the tire temperature changesby
18 ‡(10 †), thetire pressu rechanges by
appro ximately 10kPa (0.1 bar/ 1.5psi).Take
this into account whenchecking thepressu reof
warm tires.Onlycorrect thetire pressu reifit is
too low forthe current operatingconditions. If
you check thetire pressu rewhen thetires are
warm, theresul tingvaluewil lbe highe rthan if
the tires were cold.Thisisnormal. Donot
reduce thetire pressu reto the valu especifie d
for cold tires. Thetirepressu rewou ldotherwise
be too low.
Observe therecommended tirepressu resfor
cold tires:
R on the Tire andLoadi ngInformation placard
on the B-pilla ron the driver's side
R in the tire pressu retable inthe fuel fillerflap
(Y page 141) Underinfl
atedoroverin flated tires
Underinfl atedtires G
WARNING
Tires withpressu rethat istoo low can over-
heat andburst asaconsequence. Inaddi tion,
they alsosuffer fromexcessive and/orirreg-
ula rwea r,which canseverel yimpa irthe brak-
ing propertie sand thedriving characteristics.
There isarisk ofan accident.
Avoid tirepressu resthat aretoo low inall the
tires, includi ngthe spare wheel.
Underinfla tedtires may:
R overhea t,lea ding totire defects
R adverse lyaffect handling Tire
pressure
295Wheelsand tires Z
Page 300 of 330
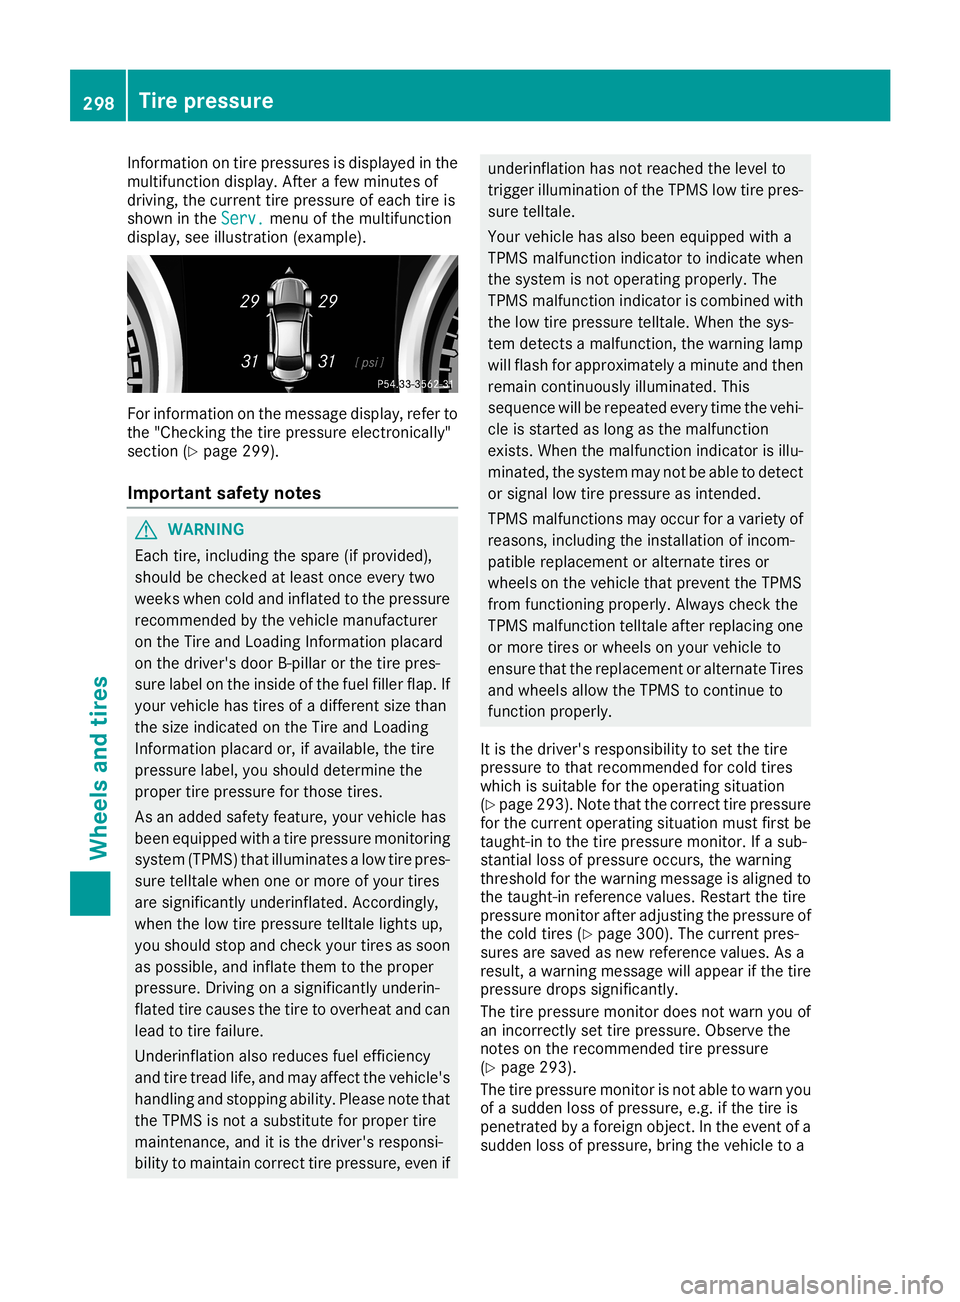
Information
ontire pressu resisdispl ayedin the
multifu nctiondisplay.After afew minutes of
driving, thecurrent tirepressu reofeach tireis
shown inthe Serv. Serv.
menuofthe multifu nction
displ ay,see illustration (example). For
information onthe message display,refer to
the "Checking thetire pressu reelectronical ly"
section (Ypage 299).
Important safetynotes G
WARNING
Each tire,includi ngthe spare (ifprovide d),
shoul dbe checked atlea stonce every two
weeks whencoldandinflated tothe pressu re
recommended bythe vehicle manufacture r
on the Tire andLoadi ngInformation placard
on the driver's doorB-pilla ror the tire pres-
sure labelon the inside ofthe fuel fillerflap. If
you rvehicle hastires ofadifferent sizethan
the size indicated onthe Tire andLoadi ng
Information placard or,ifavai lable,the tire
pressu relab el,you shoul ddetermine the
proper tirepressu refor those tires.
As anadde dsafety feature, yourvehicle has
been equipped withatire pressu remonitoring
system (TPMS)thatilluminates alow tirepres-
sure telltal ewhen oneormore ofyou rtires
are significa ntlyunderinfla ted.Accordingly,
when thelow tirepressu retelltal elights up,
you shoul dstop andcheck yourtires assoon
as possib le,and inflate themtothe proper
pressu re.Driving onasignifica ntlyunderin-
flated tirecause sthe tire tooverhea tand can
lea dto tire failure.
Underinfla tionalso reduces fuelefficiency
and tiretread life,and may affect thevehicle 's
handli ngand stopping ability. Plea senote that
the TPMS isnot asubstitu tefor proper tire
maintenance, anditis the driver's responsi-
bili tyto maintain correcttirepressu re,even if underinfla
tionhasnotreached thelevel to
trigger illuminatio nof the TPMS lowtirepres-
sure telltal e.
Your vehicle hasalso been equipped witha
TPMS malfunction indicator toindicate when
the system isnot opera tingproperl y.The
TPMS malfunction indicator iscombined with
the low tirepressu retelltal e.When thesys-
tem detects amalfu nction, thewarning lamp
wil lflash forappro ximately aminute andthen
remain continuously illuminated .This
sequ ence willbe repea tedevery timethevehi-
cle isstarted aslong asthe malfu nction
exists. Whenthemalfu nction indicator isillu-
minated, thesystem maynotbeabl eto detect
or signal lowtirepressu reas intended.
TPMS malfunctions mayoccur foravariety of
reasons, includingthe installa tionofincom-
patibl erepla cement oralternate tiresor
wheel son the vehicle thatprevent theTPMS
from functioning properly.Alway scheck the
TPMS malfunction telltaleafter replacingone
or more tiresorwheel son you rvehicle to
ensure thattherepla cement oralternate Tires
and wheel sall ow the TPMS tocontinue to
function properly.
It is the driver's responsib ility to set the tire
pressu reto that recommended forcold tires
which issuita bleforthe opera tingsitua tion
(Y page 293). Notethatthecorrect tirepressu re
for the current operatingsitua tionmust firstbe
taught-in tothe tire pressu remonitor. Ifasub-
stantial lossofpressu reoccurs, thewarning
threshold forthe warning messageis ali gned to
the taught-in reference values.Restart thetire
pressu remonitor afteradjusting thepressu reof
the cold tires (Ypage 300). Thecurrent pres-
sures aresaved asnew reference values.Asa
resul t,awarning messagewil lappe arifthe tire
pressu redrops significa ntly.
The tirepressu remonitor doesnotwarn youof
an incorrectly settire pressu re.Observe the
notes onthe recommended tirepressu re
(Y page 293).
The tirepressu remonitor isnot ableto warn you
of asudd enloss ofpressu re,e.g. ifthe tire is
penetrated byaforeign object.Inthe event ofa
sudd enloss ofpressu re,bring thevehicle toa 298
Tire
pressureWheel sand tires
Page 301 of 330

halt
bybraking carefully. Avoidabrupt steering
movement s.
The tirepressure monitorhasayellow warning
lamp inthe instrumen tcluster forindicating
pressure lossoramalfunction. Whetherthe
warning lampflashes orlights upindicates
whether atire pressure istoo low orthe tire
pressure monitorismalfunctionin g:
R ifthe warning lampislit cont inuously ,the tire
pressure onone ormore tiresissignificantly
too low. Thetirepressure monitorisnot mal-
funct ioning.
R ifthe warning lampflashes foraround a
minute andthen remains litconst antly, the
tire pressure monitorismalfunctionin g.
In addition tothe warning lamp,amessage
appea rsinthe multifunction display.Observe
the information ondisplay messages
(Y page 213).
It may take uptoten minutes foramalfunction
of the tire pressure monitortobe indicated. A
malfunction willbeindicated bythe tire pres-
sure warning lampflashing forapproximately
one minute andthen remaining lit.When the
malfunction hasbeen rectified, thetire pressure
warning lampgoesoutafter afew minutes of
driving.
The tirepressure valuesindicated bythe on-
board computer maydiffer fromthose meas-
ured atagas station withapressure gauge.The
tire pressures shownbythe on-board computer
refer tothose measured atsea level. Athigh
altitudes, thetire pressure valuesindicated bya
pressure gaugearehigher thanthose shown by
the on-board computer. Inthis case, donot
reduce thetire pressures.
The operation ofthe tire pressure monitorcan
be affected byinterfer encefromradio transmit -
ting equipment (e.g.radio headphones, two-way
radios) thatmay bebeing operated inor near the
vehicle.
Checking thetire pressur eelec troni-
cally X
Make surethattheSmartKey isin position 0048
in the ignition lock(Ypage 123).
X Press 0059or0065 onthe steering wheelto
select theServ. Serv.
menu. X
Press the0063 or0064 button toselect
Tire Pressure Tire
Pressure.
X Press the0076 button.
The current tirepressure ofeach tireisshown
in the multifunction display.
If the vehicle wasparked forlonger than
20 minutes, theTire pressure willbe Tire
pressure willbe
displayed afterdriving afew minutes displayed
afterdriving afew minutes
message isshown.
Aft erateach-in process, thetire pressure mon-
itor automatically detectsnewwheels ornew
sensors. Aslong asaclear allocation ofthe tire
pressure valuetothe individua lwheels isnot
possible, theTire Tire
Pressure Pressure
Monitor Monitor
Active Active
message isshown instead ofthe tire pressure
display .The tirepressures arealready being
monitored.
If an emergency sparewheel ismounted, the
system maycontinue toshow thetire pressure
of the wheel thathasbeen removed forafew
minutes. Ifthis occurs, notethatthevalue dis-
play edfor the position wherethespare wheel is
fitted isnot thesame asthe current tirepres-
sure ofthe emergency sparewheel.
Tire pressur emonitor warning mes-
sages If
the tire pressure monitordetectsapressure
loss inone ormore tires,awarning message is
shown inthe multifunction display.The yellow
tire pressure warninglampthenlights up.
R Ifthe Please Correct TirePressure Please
Correct TirePressure
message appearsinthe multifunction display,
the tire pressure inat least onetireistoo low.
The tirepressure mustbecorrect edwhen the
opportunity arises.
R Ifthe Check TirePressure Check
TirePressure message
appea rsinthe multifunction display,the tire
pressure inone ormore tireshasdropped
significantly. Thetires must becheck ed.
R Ifthe Tire Tire
Pressure Pressure
Warning Warning
Tire Tire
Fail‐ Fail‐
ure ure
message appears,the tire pressure inone
or more tireshasdropped suddenly. Thetires
must becheck ed.
Observe theinstruct ionsandsafety notesinthe
display messages inthe "Tires" section
(Y page 213).
If the wheel positions onthe vehicle arerotated,
the tire pressures maybedisplay edfor the
wrong positions forashort time.Thisisrectified
after afew minutes ofdriving, andthetire pres-
sures aredisplay edfor the correct positions. Tire
pressure
299Wheelsandtires Z
Page 312 of 330
PSI
(pounds persquar einch)
A standard unitofmeasure fortire pressure.
Aspect ratio
Relationship betweentireheight andtirewidth
in percent .
Tire pressur e
This ispressure insidethetire apply inganout-
ward force toeach square inchofthe tire's sur-
face. Thetirepressure isspecified inpounds per
square inch(psi), inkilopascal (kPa)orinbar.
The tirepressure shouldonlybecorrect edwhen
the tires arecold.
Cold tirepressur e
The tires arecold:
R ifthe vehicle hasbeen parked withthetires
out ofdirect sunlight foratleast three hours
and
R ifthe vehicle hasnotbeen driven further than
1 mile (1.6km)
Tread
The part ofthe tire that comes intocont actwith
the road.
Bead The tirebead ensures thatthetire sits securely
on the wheel. Thereareseveral steelwires inthe
bead toprevent thetire from coming loosefrom
the wheel rim.
Sidewall The part ofthe tire between thetread andthe
bead.
Weight ofoptional extras
The combined weightofthose optional extras
that weigh morethanthereplaced standard
parts andmore than2.3kg(5lbs). These
optional extras,such ashigh-performanc e
brakes, levelcontrol,aroof rack orahigh-per-
formanc ebattery, arenot included inthe curb
weight andtheweight ofthe accessories.
TIN (Tire Identification Number)
This isaunique identifier whichcanbeused by
a tire manufacturer toidentify tires,forexample
for aproduct recall,andthus identify thepur-
chasers. TheTINismade upofthe manufactur-
er's identity code,tiresize, tiretype code and
the manufacturing date. Load
bearing index
The load bearing index(alsoloadindex) isacode
that contains themaximum loadbearing capa-
city ofatire.
Tra ction
Traction isthe result offrict ionbetween thetires
and theroad surface.
Tread wearindicators
Narrow bars(tread wearbars) thataredistrib-
uted overthetire tread. Ifthe tire tread islevel
with thebars, thewear limitof00CD in(1.6 mm)
has been reached.
Occupant distribution
The distribution ofoccupants inavehicle attheir
designated seatingpositions.
Total loadlimit
Nominal loadandluggage loadplus68kg
(15 0lbs )multiplied bythe number ofseats in
the vehicle. Changing
awheel Flat
tire
The "Breakdown assistance"section
(Y page 274)contains information andnotes on
how todeal with aflat tire. Inform ationondriv-
ing with MOExt ended tiresinthe event ofaflat
tire can befound under "MOExt endedtires(tires
with run-flat characterist ics"(Ypage 275). Rotat
ingthe wheels G
WARNING
Int erchanging thefront andrear wheels may
severely impairthedriving characterist icsif
the wheels ortires have different dimensions.
The wheel brakes orsuspension components
may alsobedamaged. Thereisarisk ofacci-
dent.
Rotate frontandrear wheels onlyifthe wheels
and tires areofthe same dimensions.
! On
vehicles equippedwith atire pressure
monitor ,electron iccomponen tsare located
in the wheel. 310
Changing
awheelWheels andtires