2019 MERCEDES-BENZ CLA COUPE tow
[x] Cancel search: towPage 261 of 330
South
America Floo
rmats G
WARNING
Object sin the driver's footwell canrestrict the
pedal travel orobstruct adepressed pedal.
The operating androad safety ofthe vehicle is
jeopardized. Thereisarisk ofan accident.
Make surethatallobject sin the vehicle are
stowed correctly,and that they cannot enter
the driver's footwell. Installthe floormats
securely andasspecified inorder toensure
sufficient clearance forthe pedals. Donot use
loose floormats anddonot place floormats on
top ofone another. X
Slide theseat back.
X To install: placethefloormat inthe footwell. X
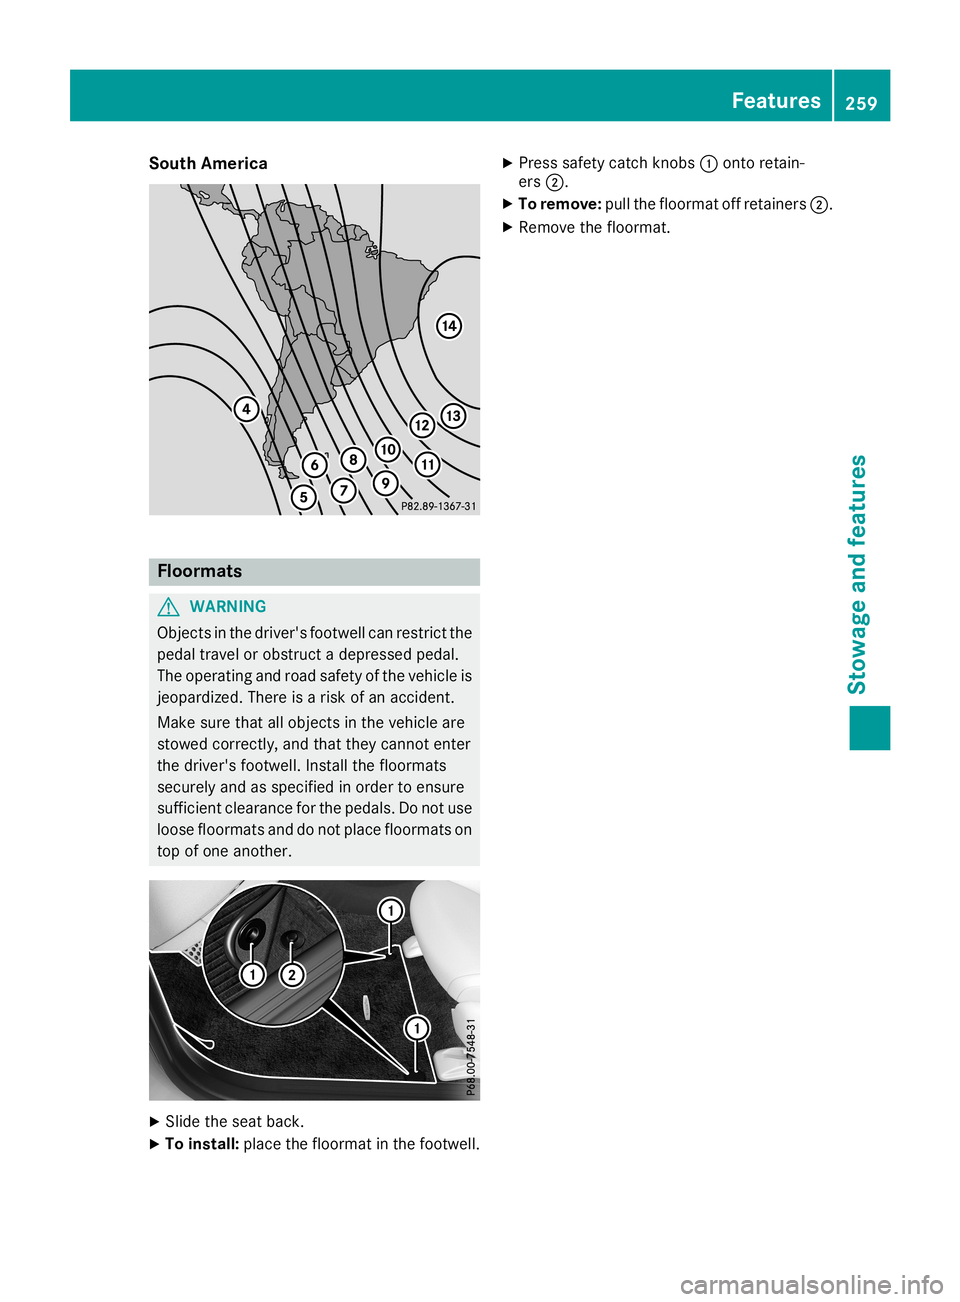
Press safety catchknobs 0043onto retain-
ers 0044.
X To remove: pullthefloormat offretainers 0044.
X Remove thefloormat. Features
259Stowageandfeatu res Z
Page 264 of 330
G
WARNING
Functions relevant tosafety arerestricted or
no longer available if:
R the engine isnot running
R the brake system orthe pow ersteering is
malfu nctioning
R there isamalfu nction inthe pow ersup ply
or the vehicl e'selectrica lsystem
When yourvehicl eis towed awayor towed
started, youmay requireconside rablymore
effort tosteer andbrake. Thereisarisk ofan
accide nt.
In such cases, useatow bar. Before being
towed awayor tow started, makesurethe
steering movesfreely. X
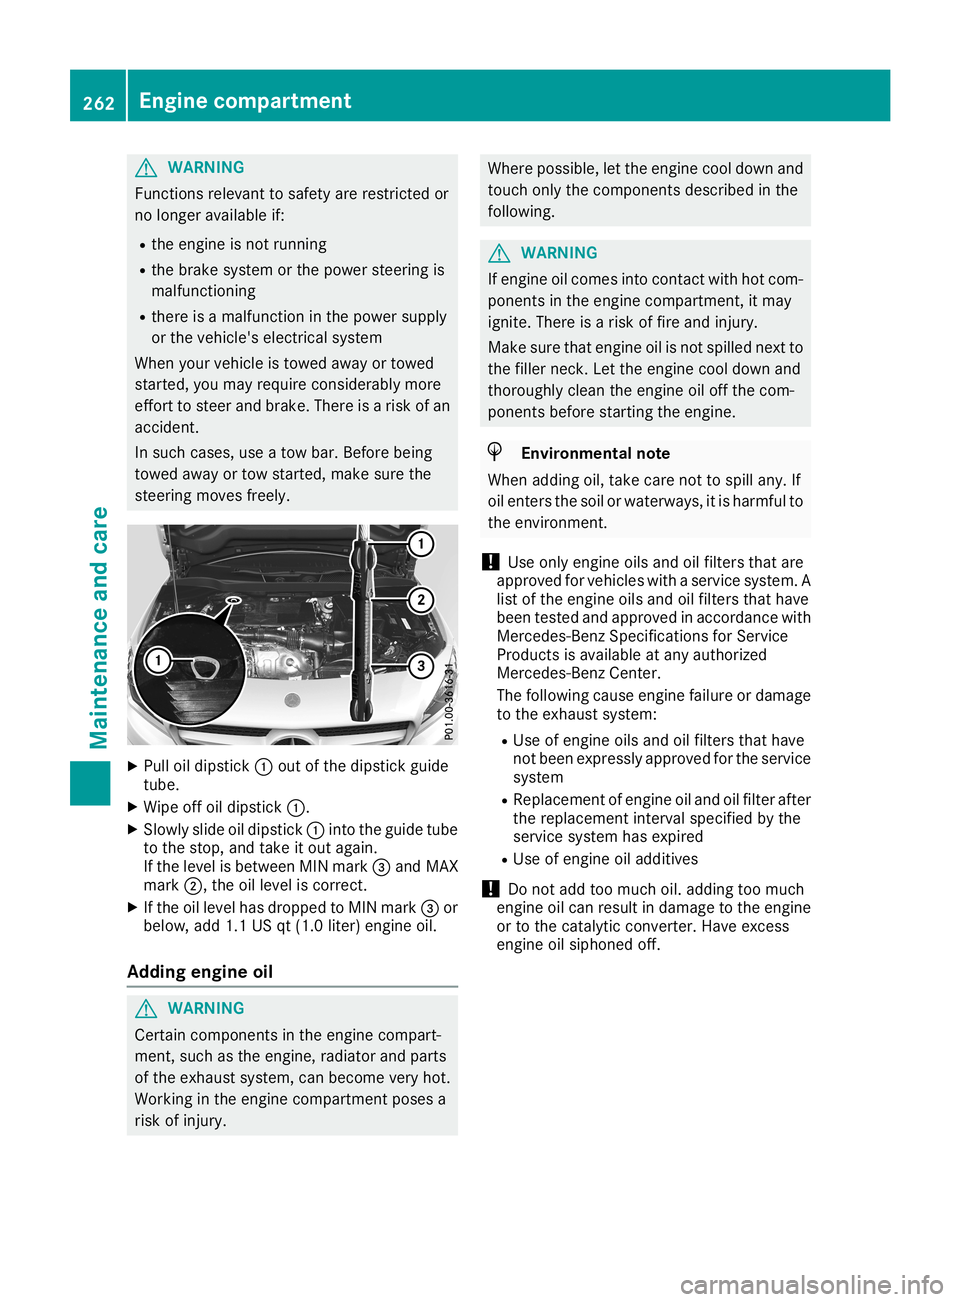
Pul loil dip stick 0043out ofthe dipstick guide
tube.
X Wip eoff oildip stick 0043.
X Slowl yslid eoil dip stick 0043into theguidetube
to the stop, andtake itout again.
If the leve lis betwe enMIN mark 0087and MAX
mark 0044,theoilleve lis correct.
X Ifthe oilleve lhas dropp edtoMIN mark 0087or
bel ow, add 1.1USqt(1.0 liter)engine oil.
Adding engineoil G
WARNING
Certa incomponents inthe engine compart-
ment, suchasthe engine, radiator andparts
of the exhau stsystem, canbecome veryhot.
Working inthe engine compartment posesa
risk ofinjury . Where
possible,let the engine cooldownand
touch onlythecomponents describedinthe
foll owi ng. G
WARNING
If engine oilcomes intocontact withhotcom-
ponents inthe engine compartment, itmay
ignite. Thereisarisk offire and injury .
Make surethatengine oilisnot spilled next to
the filler neck. Letthe engine cooldownand
thoroug hlyclea nthe engine oiloff the com-
ponents beforestarting theengine. H
Envi
ronmental note
When addingoil,take carenottospil lany. If
oil enters thesoil orwater ways,itis harmfu lto
the environment.
! Use
only engine oilsand oilfilters thatare
app roved forvehicl eswith aservice system. A
list ofthe engine oilsand oilfilters thathave
been tested andapproved inaccorda ncewith
Mercede s-BenzSpecifications forService
Produ ctsisava ilable atany authorized
Mercede s-BenzCenter.
The followi ngcaus eengine failure ordama ge
to the exhau stsystem:
R Use ofengine oilsand oilfilters thathave
not been express lyapp roved forthe service
system
R Rep lace ment ofengine oiland oilfilter after
the replacement intervalspecifiedbythe
service system hasexpire d
R Use ofengine oiladd itives
! Do
not add toomuch oil.add ingtoo much
engine oilcan resu ltin dama getothe engine
or tothe catal yticconverter. Haveexcess
engine oilsiph oned off. 262
Eng
inecompar tmentMainten anceandcare
Page 268 of 330
To
avoid damage tothe vehicle, deactivate
Act ive Distan ceAssist DISTRONIC andthe
HOLD functioninthe following orsimilar sit-
uations:
R when towing thevehicle
R in the carwash
! Never
cleanyourvehicle inaTouchless
Automat icCar Wash asthese usespecial
cleaning agents.Thesecleaning agentscan
damage thepaintwork orplastic parts.
! Make
surethattheautomatic transmission
is in trans mission position 005Cwhen washing
your vehicle inatow-t hrough carwash. The
vehicle maybedamaged inanother transmis-
sion position.
! Make
surethat:
R the side windows andthesliding sunroof
are fully closed
R the blower isswitched off
R the windshield wiperswitch isat position
0092
The vehicle mayotherwise bedamaged.
You canclean thevehicle atan automatic car
wash fromthevery start.
Preferably cleanthevehicle atautomatic car
washes thatusetextilewashing elements with-
out brushes. Thiswillprevent finescratc hesto
the paintwork ordecorative films.
If the vehicle isvery dirty, pre-wash itbefore
cleaning itin an automatic carwash.
Aft erusing anautomatic carwash, wipeoffwax
from thewindshield andthewiper blades. This
will prevent smearsandreduce wipingnoises
caused byresidue onthe windshield.
i Vehicles
withdecorative film:select awash
program withouthotwax atthe automatic car
wash.
Washing byhand In
some countries,washing byhand isonly
allowed atspecially equipped washingbays.
Observe thelegal requirement sin each count ry.
X Do not use hotwater anddonot wash the
vehicle indirect sunlight.
X Use asoft sponge toclean.
X Use amild cleaning agent,suchasacar
shampoo approved byMercedes- Benz. X
Thoroughly hosedown thevehicle withagen-
tle jet ofwater.
X Do not point thewater jetdirectly towards the
air inlet orthe edges ofdecorative foils.
X Use plenty ofwater andrinse outthesponge
frequent ly.
X Rinse thevehicle withclean water anddry
thoroughly withachamois.
X Do not letthe cleaning agentdryonthe paint-
work orthe decorative foils.
Carefully removealldeposits ofroad saltas
soon aspossible whendriving inwinter.
Power washers G
WARNIN
G
The water jetfrom acircular jetnozz le(dirt
blasters) cancause invisible exteriordamage
to the tires orchassis compon ents.Compo-
nent sdamaged inthis way may failunexpect -
edly. There isarisk ofan accident .
Do not use power washers withcircular jet
nozz lestoclean thevehicle. Havedamaged
tires orchassis compon entsreplaced imme-
diately.
! Vehicles
withdecorative film:parts ofyour
vehicle arecovered withdecorative film.
Maintain adistance ofat least 27.5in(70cm)
between thefilm-c overed partsofthe vehicle
and thenozz leof the power washer.
Infor mation aboutthecorrec tdistance is
availab lefrom theequipment manufacturer.
Move thepower washer nozzlearound when
cleaning yourvehicle.
The water temperat ureofthe power washer
must notexceed 140‡(60 †).
! Always
maintain adistance ofat least 12in
(30 cm) between thevehicle andthepower
washer nozzle.Infor mation aboutthecorrec t
distance isavailabl efrom theequipment
manufact urer.
Move thepower washer nozzlearound when
cleaning yourvehicle.
Do not aim directly atany ofthe following:
R Tires
R Door gaps, roofgaps, joints,etc.
R Elect ricalcompon ents
R Batt ery 266
CareMaintenance
andcare
Page 273 of 330
Clean
ingthest eeri ngwheel andgear or
select orlever X
Thor oughl ywipe withadamp clothor use
leat her careagen tsthat have been recom-
men dedandappro vedbyMer cedes-Ben z.
Clean inggenu inewood andtrim ele-
men ts !
Do
notuse solvent-based cleanin gagen ts
suc has tar rem over,wheel cleane rs,polis hes
or waxe s.Ther eis other wise aris kof damag -
ing thesurf ace.
! Do
notuse chrom epolis hon trim piec es.
The trim piec eshave ach rom elook butare
mos tlymade ofano dized alumin umand can
lose their shin eif ch rom epolis his used. Use
a damp, lint-fr ee clothins tead when cleanin g
th etrim piec es.
If th ech rom e-plat edtrim piec esare very
dirt y,you can useach rom epolis h.Ifyou are
uns ure astowhet herthetrim piec esare
ch rom e-plat edornot,con sult anauth orized
Mer cedes-Ben zCen ter.
X Wipe thewoode ntrim and trim piec eswit ha
damp, lint-fr ee cloth,e.g .a mic rofiber cloth.
X Hea vysoilin g:use careand cleanin gpro d-
uct srec omm ended andappro vedby
Mer cedes-Ben z.
Clean ingtheseat cover s Gener
alnot es
! Do
notuse amic rofiber clothto cle ancov ers
made outofreal leather,art ific ialleat her or
DI NA MICA .If used often,th ese can damag e
th ecov er.
Not eth at reg ular careis ess ential toensure that
th eappear anceand comfortof thecov ers is
ret aine dove rtim e. Genu
ineleat her seat cover s
! To
retain thenat ural appear anceof the
leat her,obse rveth efoll owin gcle anin g
ins truct ions:
R Clean genuine leather covers carefull ywit h
a damp clothand then wipe thecov ers
down withadry cloth.
R Mak esure that theleat her does not
bec ome soaked.Itmay other wise become
roug hand crack ed.
R On lyuse leather careagen tsthat have
been tested and appro vedbyMer cedes-
Ben z.You canobtain these from aqualif ied
spec ialist workshop.
Leat herisanat ural product .
It ex hibit snat ural surface charac teris tic s,for
ex ample :
R diff ere nces inthete xture
R mar kscaus edbygro wth and injury
R sligh tnuan cesofcol or
Thes eare charac teris tic sof leat her and not
mat erial defects.
Seat cover sof oth erma terials
! Obse
rveth efoll owin gwhen cleanin g:
R cle an artific ialleat her covers withaclo th
mois tene dwit hasolut ioncontain ing1%
det ergent(e. g.dish washin gliquid).
R cle an clothcov ers withamic rofiber cloth
mois tene dwit hasolut ioncontain ing1%
det ergent(e. g.dish washin gliquid). Rub
car efull yand always wipeentireseat sec-
tio ns toavoid leavingvisible lines. Leav e
th eseat todry afterwar ds.Clean ingresults
depen don thetype ofdirt and how longit
has been there .
R cle an DINA MICA covers withadamp cloth.
Mak esure that you wipe entireseat sec-
tio ns toavoid leavingvisible lines.
Clean ingtheseat belts G
WAR
NING
Seat beltscan become severelyweak ened if
bleac hedordyed. Thiscouldcaus eth eseat
belt sto tear or fail, forinstan ce, intheeve ntof
an acc iden t.This pose san increas edriskof
inj ury orfatalinj ury.
Nev erbleac hor dye theseat belts. Car
e
271Maintenance andcare Z
Page 275 of 330
Where
willIfind...? Refle
ctive safety jacket
Removi ng/replac ingthe refle ctive
safety jacket The
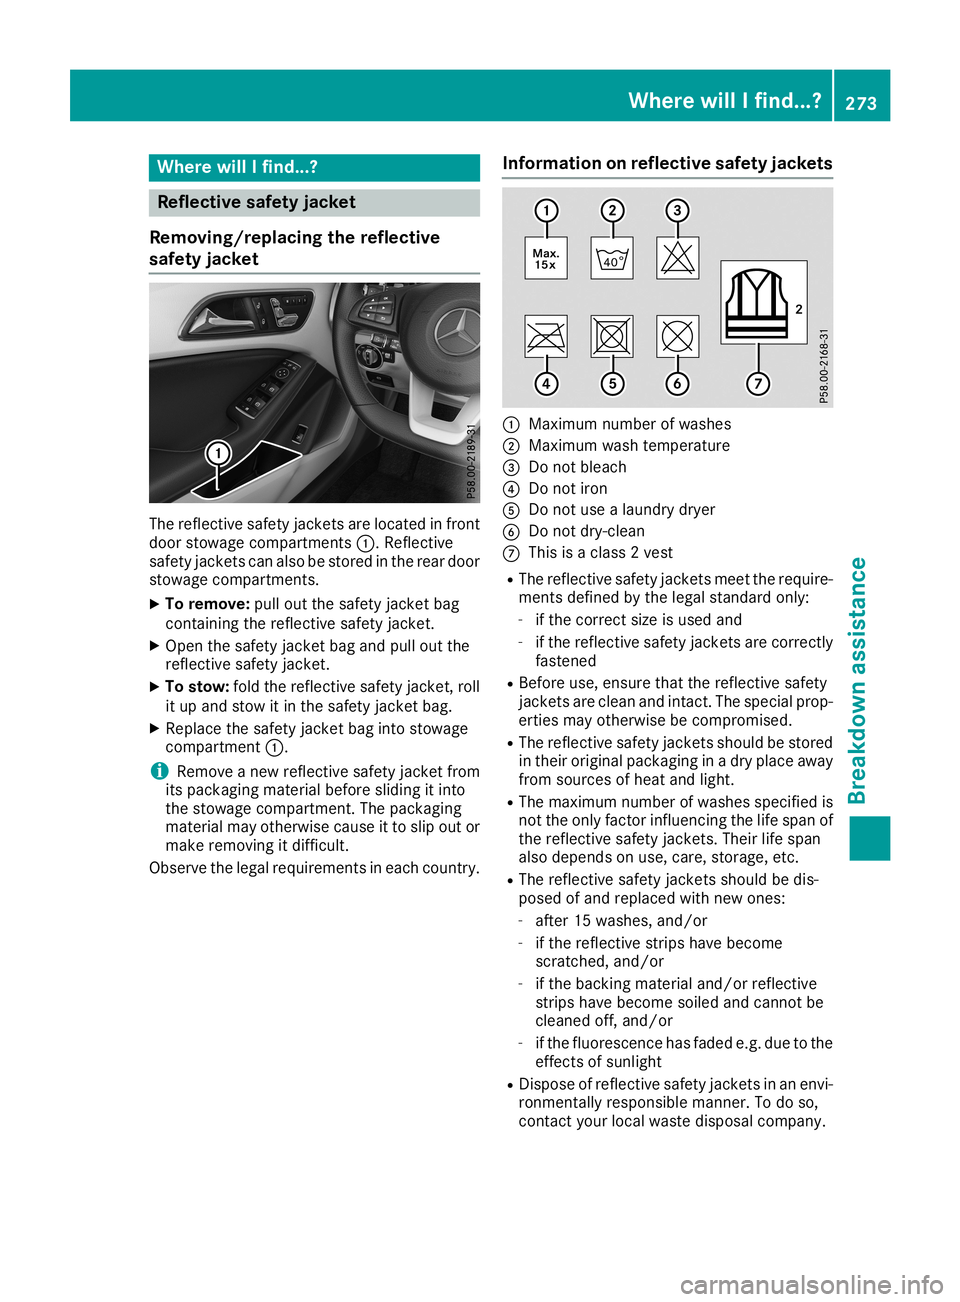
refle ctive safetyjackets areloca tedinfront
door stowa gecompa rtments 0043.Reflective
safe tyjackets canalsobe stored inthe rear door
stowa gecompa rtments.
X To remove :pul lout thesafe tyjacket bag
containing therefle ctive safetyjacket.
X Open thesafe tyjacket bagand pullout the
refle ctive safetyjacket.
X To stow :fold therefle ctive safetyjacket, roll
it up and stow itin the safe tyjacket bag.
X Rep lace thesafe tyjacket baginto stowa ge
compa rtment 0043.
i Remo
veanew reflective safetyjacket from
its packa gingmateri albefore sliding itinto
the stowa gecompa rtment. Thepacka ging
materi almay otherw isecaus eit to slipout or
make removi ngitdiffi cult.
Obser vethe lega lrequ ireme ntsineach country. Info
rmation onrefle ctive safety jackets 0043
Maxim umnumbe rof wa shes
0044 Maxim umwash tempera ture
0087 Donot bleach
0085 Donot iron
0083 Donot use alau ndry dryer
0084 Donot dry-cl ean
006B This isaclas s2 vest
R The refle ctive safetyjackets meettherequ ire-
ments defined bythe lega lstanda rdonly :
- ifthe correct sizeisuse dand
- ifthe refle ctive safetyjackets arecorrectly
fastened
R Before use,ensure thattherefle ctive safety
jackets areclea nand intact. Thespeci alprop-
erties mayotherw isebecompromi sed.
R The refle ctive safetyjackets shouldbe stored
in their originalpacka ginginadry placeaway
from sourcesofhea tand light.
R The maximu mnumbe rof wa shes speci fiedis
not theonly factor influencing thelifespa nof
the refle ctive safetyjackets. Theirlife span
als odepe ndsonuse ,care, storage ,etc.
R The refle ctive safetyjackets shouldbe dis-
pose dof and replaced withnewones:
- after 15washes, and/or
- ifthe refle ctive strips havebecome
scratched ,and/or
- ifthe backing materialand/or reflective
strips havebecome soiledand cannot be
clea ned off,and/or
- ifthe fluo rescence hasfade de.g. due tothe
effects ofsunli ght
R Dispos eof refle ctive safetyjackets inan envi-
ronmentall yrespo nsiblemanner. Todo so,
contact yourloca lwa ste disp osal compa ny. Where
willIfind...?
273Breakdown assistance
Page 276 of 330
Vehi
cle too lkit
Gen eral notes Veh
icles with aTIR EFIT kit:the TIREFIT kitis
lo cate din the stow agewe llund erthe trunk
flo or.
Veh icles with atire -cha nge tool kit:the tire-
cha nge tool kitisin the stow agewe llund erthe
trunk floor.
Apa rtfrom certaincou ntry -spe cificvar iatio ns,
the vehicles are not equipp ed with atire -cha nge
tool kit.Some toolsfor cha nging awh eelare
spe cificto the vehicle. For more informa tionon
wh ich tire changing tool sare required and
ap pro ved toperfor mawh eelcha nge onyour
veh icle, consu ltaqu alifi ed spe cialist wo rksh op.
Too lsreq uired forcha nging awh eelmay
incl ude,for exa mpl e:
R Jack
R Whe elchoc k
R Lu gwre nch
R Ali gnme ntbolt
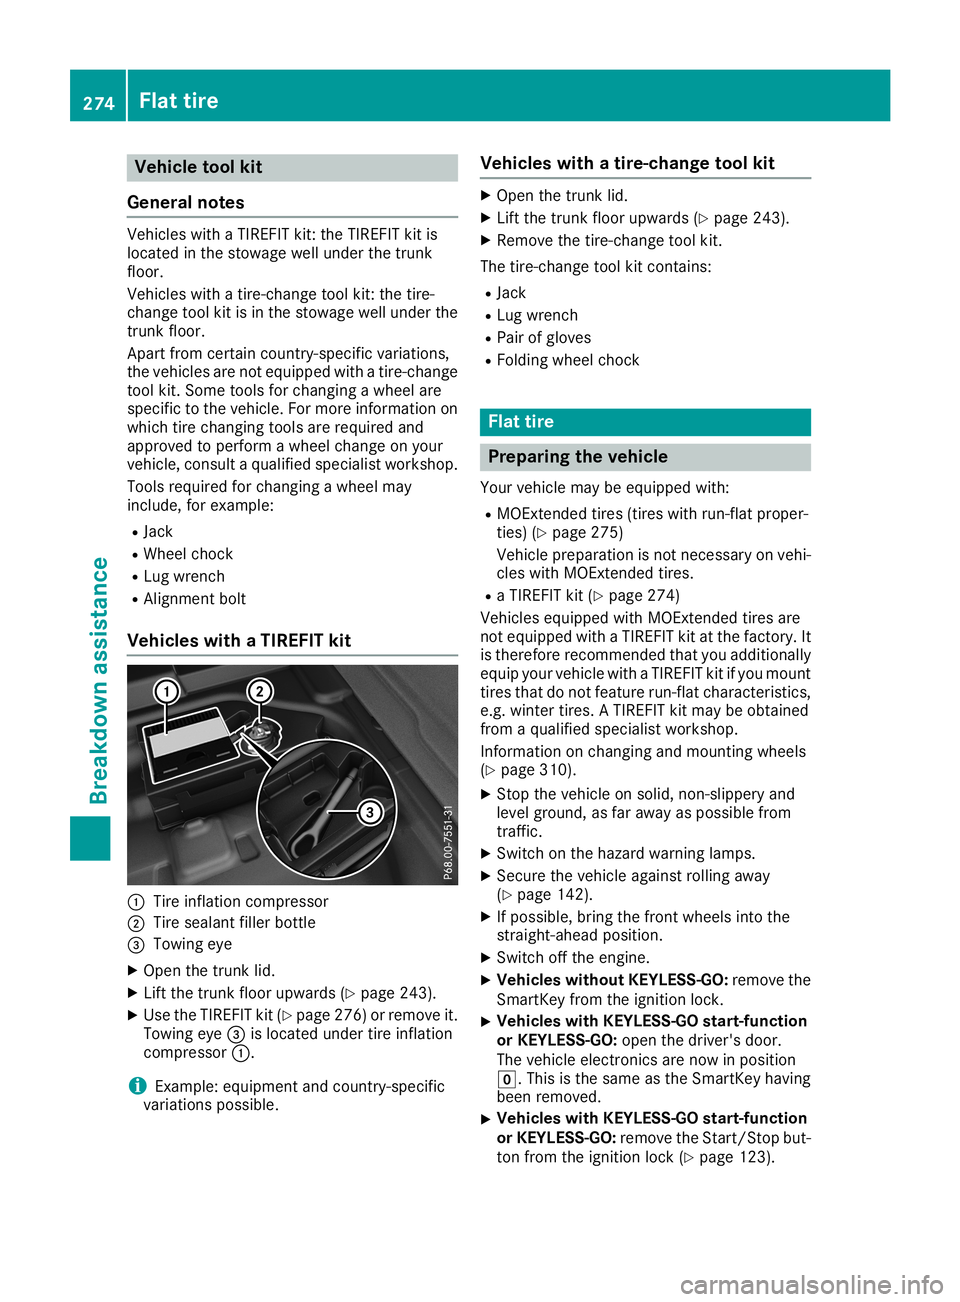
Vehi cles with aTIRE FITkit 0043
Tire infl ation comp ressor
0044 Tire sea lant fillerbo ttle
0087 Tow ingeye
X Ope nthe trunk lid.
X Lif tthe trunk floor upwa rds (Ypage 243) .
X Use theTIREFIT kit(Ypage 276 )orremove it.
Towi ngeye 0087islocated undertireinfla tion
compresso r0043.
i Example:
equipment andcountry-spe cific
varia tions possible. Vehic
leswith atire-chang etool kit X
Open thetrunk lid.
X Lift the trunk floorupwards (Ypag e243).
X Remo vethe tire-change toolkit.
The tire-change toolkitcontains:
R Jack
R Lug wrench
R Pai rof glove s
R Foldi ngwhee lchock Flat
tire Preparing
thevehic le
You rvehicl emay beequ ipped with:
R MOExtended tires(tires withrun-flat proper-
ties) (Ypag e275)
Vehicl eprepa ration isnot necessary onvehi-
cles with MOExtended tires.
R aTIREFIT kit(Ypag e274)
Vehicl esequ ipped with MOExtended tiresare
not equippedwith aTIREFIT kitatthe factory. It
is therefore recommended thatyouadditional ly
equ ipyou rvehicl ewith aTIREFIT kitifyou mount
tires thatdonot feature run-flat characteristics,
e.g. winter tires.ATIREFIT kitmay beobtai ned
from aqua lified specia listworkshop .
Information onchanging andmounting wheels
(Y pag e310).
X Stop thevehicl eon soli d,non-slipp eryand
level ground ,as far awa yas possi blefrom
traffic.
X Switch onthe hazard warninglamp s.
X Secure thevehicl eaga inst rolling awa y
(Y pag e142) .
X Ifpossi ble,bring thefront wheelsinto the
straigh t-ahead position.
X Switch offthe engine.
X Vehic leswitho utKE YLESS-GO :remove the
SmartKey fromtheignitio nlock.
X Vehic
leswith KEYLESS-GO start-function
or KEYLESS-GO :open thedriver' sdoor.
The vehicl eelectronics arenow inposi tion
005A. This isthe same asthe SmartKey having
been removed .
X Vehic
leswith KEYLESS-GO start-function
or KE YLESS-GO :remove theStart/Stop but-
ton from theignitio nlock (Ypag e123). 274
Fl
at tireBreakdown assistance
Page 278 of 330

TIRE
FITkit
Impo rtant safety notes TIR
EFIT isatire sealant.
Fo rUS Aon ly:Yo ucan useTIR EFIT tosea lpu nc-
tur es ofup to0.16 in(4 mm ),pa rtic ular ly thos e
in the tire trea d.Yo ucan useTIR EFIT atoutside
temp eratures down to00F84 ‡(00F820 †). G
WA
RNING
In the followi ng situa tions, the tire sealant is
una bleto pro videsu fficie ntbre akd ownas sis-
tance ,as itis una bleto sea lthe tire properly:
R the rearecuts orpu nctur esinthe tire large r
tha nthos ementi onedab ove .
R the wheelrim isda ma ged.
R youha ve driven atver ylo w tire pressu res or
on afla ttire .
The reisaris kof an acc ident.
Do not drive the vehicle. Co ntact aqu alifi ed
sp eci alistwo rksh op. G
WA
RNING
The tiresealant isha rmfu land causes irrita -
tio n.Itmu stnot come intoconta ctwith your
ski n,eyes orclo thing orbe swallo we d.Do not
inh ale TIR EFIT fumes .Kee ptire sealant aw ay
fro mchi ldren. Thereisaris kof inju ry.
If yo ucome intoconta ctwith the tire sealant,
ob ser vethe followi ng:
R Rinse offthe tire sealant fro myour ski n
imm ediatel ywi th wa ter.
R Ifthe tire sealant come sinto conta ctwith
yo ur eyes, imm ediatel yrin se the mthor -
ou ghl ywi th cle an water.
R Iftire sealant issw allo we d,imm ediatel y
rin se your mou thoutthor oughl yand drink
pl enty ofwa ter. Donot induce vom iting,
and seekmed icalatte ntionimm ediatel y.
R Imme diate lycha nge outof clo thing which
ha scome intoconta ctwith tire sealant.
R Ifan alle rgi crea ctio noccu rs,see kmed ical
atte ntionimm ediatel y. !
Re
sidu efro mthe tire sealant ma ycome out
of the fillerhos eaf ter use. Thi scou ldcau se
sta ins.
The refore ,pl ace thefillerhos ein the plas tic
ba gwh ich conta inedthe TIREFIT kit. H
En
viron men talnote
Hav ethe used tire sealant bottle disp ose dof
pro fessiona lly, e.g .at aqu alifi ed speci alist
wo rksh op.
! Do
not opera tethe tire inflation comp ressor
for longe rtha nten minutesat atime withou t
a bre ak. Itma yothe rwise ove rheat.
The tireinflation comp ressor can beopera ted
ag ain once itha scoo led do wn.
Co mpl ywi th the manuf actu rer’ssafety instruc-
tio ns on the sticker onthe tire inflation com-
pre sso r.
Us ingthe TIRE FITkit X
Do not rem oveanyforeign objects which have
pe netra tedthetire,e.g .scre wsornai ls.
X US Aon ly:Re mov ethe tire sealant bo ttle ,the
acc omp anying TIREFIT sticker andthetire
infl ation comp ressor fromthe stow agesp ace
und erthe trunk floor (Y page 274 ).
X Affi xpa rt0043 ofthe TIREFIT sticker tothe
ins trument cluster withi nthe driver 'sfie ldof
vis ion.
X Affi xpa rt0044 ofthe TIREFIT sticker nearthe
va lve onthe wheelwi th the defecti vetire . 27
6 Fl
at tireBreak downass istanc e
Page 280 of 330
Tire
pres sure reached G
WA
RNING
A tire temp orarilysea led wi th tire sealant
imp airs the drivin gcha racteri stics and isnot
su ita ble for highe rsp ee ds.The reisaris kof
acc ident.
Yo usho uld the refore adaptyo ur drivin gsty le
acc ordinglyand drive car efully. Do not exce ed
the speci fiedma xim um spee dwi th atire that
ha sbe en rep aired using tire sealant.
US Aon ly:The maxim um permi ssiblesp ee dfor
a tire sealed wi th tire sealant is50 mph
(80 km/h ).The upperpa rtof the TIREFIT sticker
mu stbe affixe dto the instrument cluster inthe
dri ver 'sfie ldof vis ion.
If atire pressu reof200 kPa(2.0 bar/2 9ps i)ha s
be en atta inedaf ter ten minutes:
X Swi tch offthe tire inflation comp ressor .
X Unsc rewthefillerhos efro mthe valve ofthe
fa ulty tire .
Note thattire sealant ma yesc apewh en you
uns crew thefillerhos e.
X US Aon ly:Stow thetire sealant bo ttle and the
tire inflation comp ressor .
X Pul law ayimme diately.
X Stop after drivin gfor appro xim atelyten
min utesand checkthe tire pressu rewith the
tire inflation comp ressor .
The tirepressu remu stnow beatleas t
130 kPa(1.3 bar/19 psi). G
WA
RNING
If the required tire pressu reisnot reached
afte rdri ving forasho rtper iod,the tire istoo
ba dlyda mag ed.The tiresealant cannot repair
the tire inthis insta nce. Dama gedtiresand a
tire pressu rethat istoo low can signifi cantl y
imp airthe vehi cle'sbra king anddriving char-
acter istics. The reisaris kof acci dent.
Do not continu edri ving .Co ntact aqu alifi ed
spe cialist wo rksho p.
i USA
only: Incase ssu ch asthe one men-
tione dab ove, contact anauthori zed
Merce des-Benz Center. Orcall
1-800-FOR -MERCedes(in the USA) or
1-800-38 7-0100(in Ca nad a). X
USA only: Corre ctthe tire pressu reifit is stil l
at leas t130 kPa(1.3 bar/19 psi) .See theTire
and Load ingInformati onplacard onthe driv-
er's side B-pill aror the tire press uretablein
the fuel filler flapfor values .
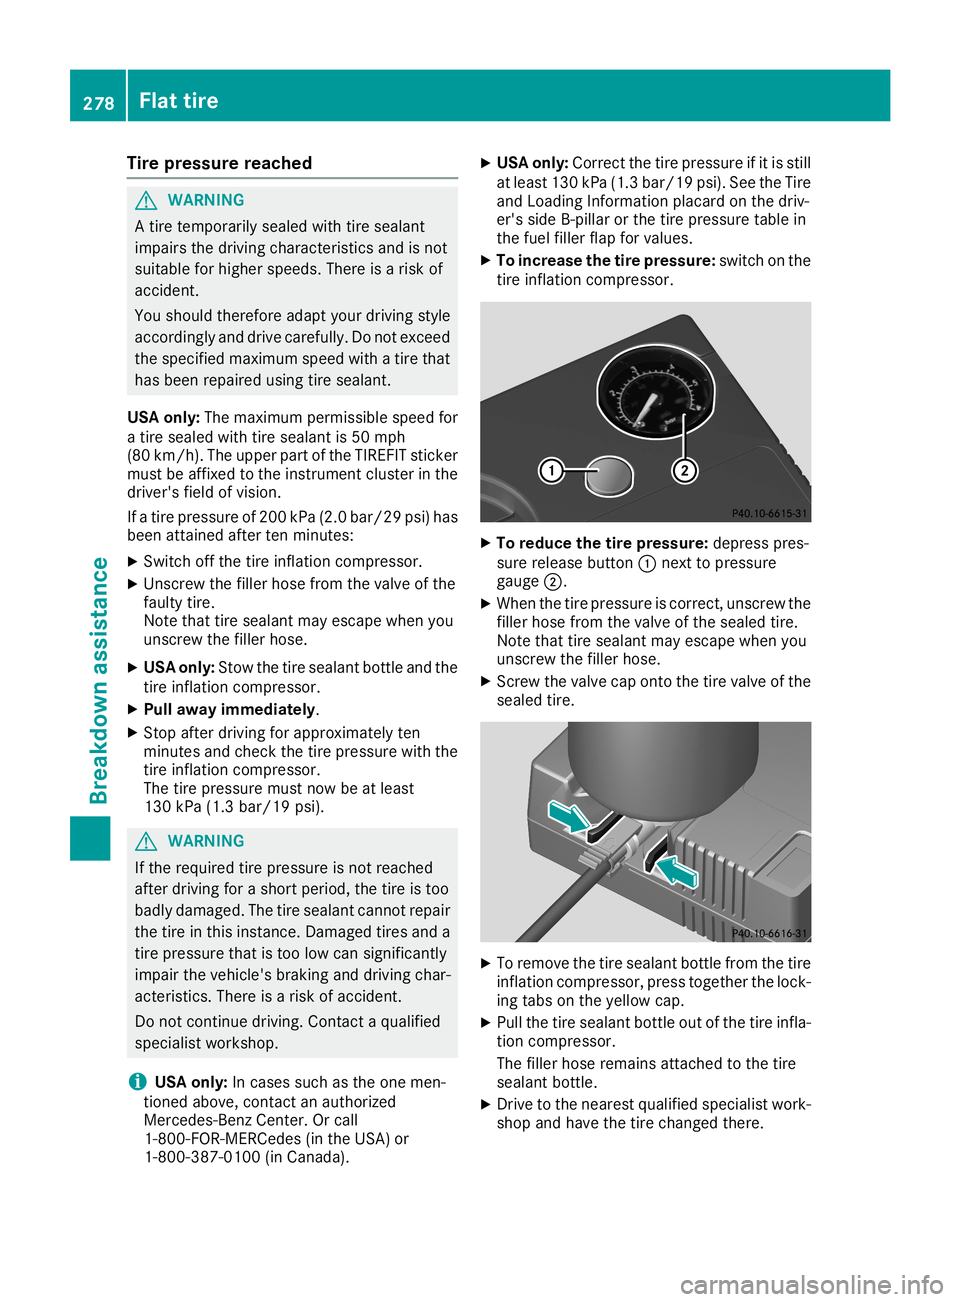
X To inc rease thetire pressure :swi tch onthe
tire infla tion compres sor. X
To reduce thetire pressure :dep ress pres-
sure release button 0043next topress ure
gau ge0044.
X When thetire press ureiscorrect, unscrew the
fill er hose fromthevalve ofthe sealed tire.
Note thattiresealant may escap ewhe nyou
unscrew thefiller hose .
X Screw thevalve cap onto thetire valve ofthe
sea led tire. X
To remove thetire sealant bottle fromthetire
infla tion compres sor,press together thelock-
ing tabs onthe yellow cap.
X Pul lthe tire sealant bottle outofthe tire infla -
tion compres sor.
The filler hose remai nsattache dto the tire
sea lant bottle.
X Drive tothe neare stqua lified speci alist work-
shop andhave thetire change dthere. 278
Fl
at tireBreakdow nassi stanc e