2019 MERCEDES-BENZ CLA COUPE stop start
[x] Cancel search: stop startPage 276 of 330
Vehi
cle too lkit
Gen eral notes Veh
icles with aTIR EFIT kit:the TIREFIT kitis
lo cate din the stow agewe llund erthe trunk
flo or.
Veh icles with atire -cha nge tool kit:the tire-
cha nge tool kitisin the stow agewe llund erthe
trunk floor.
Apa rtfrom certaincou ntry -spe cificvar iatio ns,
the vehicles are not equipp ed with atire -cha nge
tool kit.Some toolsfor cha nging awh eelare
spe cificto the vehicle. For more informa tionon
wh ich tire changing tool sare required and
ap pro ved toperfor mawh eelcha nge onyour
veh icle, consu ltaqu alifi ed spe cialist wo rksh op.
Too lsreq uired forcha nging awh eelmay
incl ude,for exa mpl e:
R Jack
R Whe elchoc k
R Lu gwre nch
R Ali gnme ntbolt
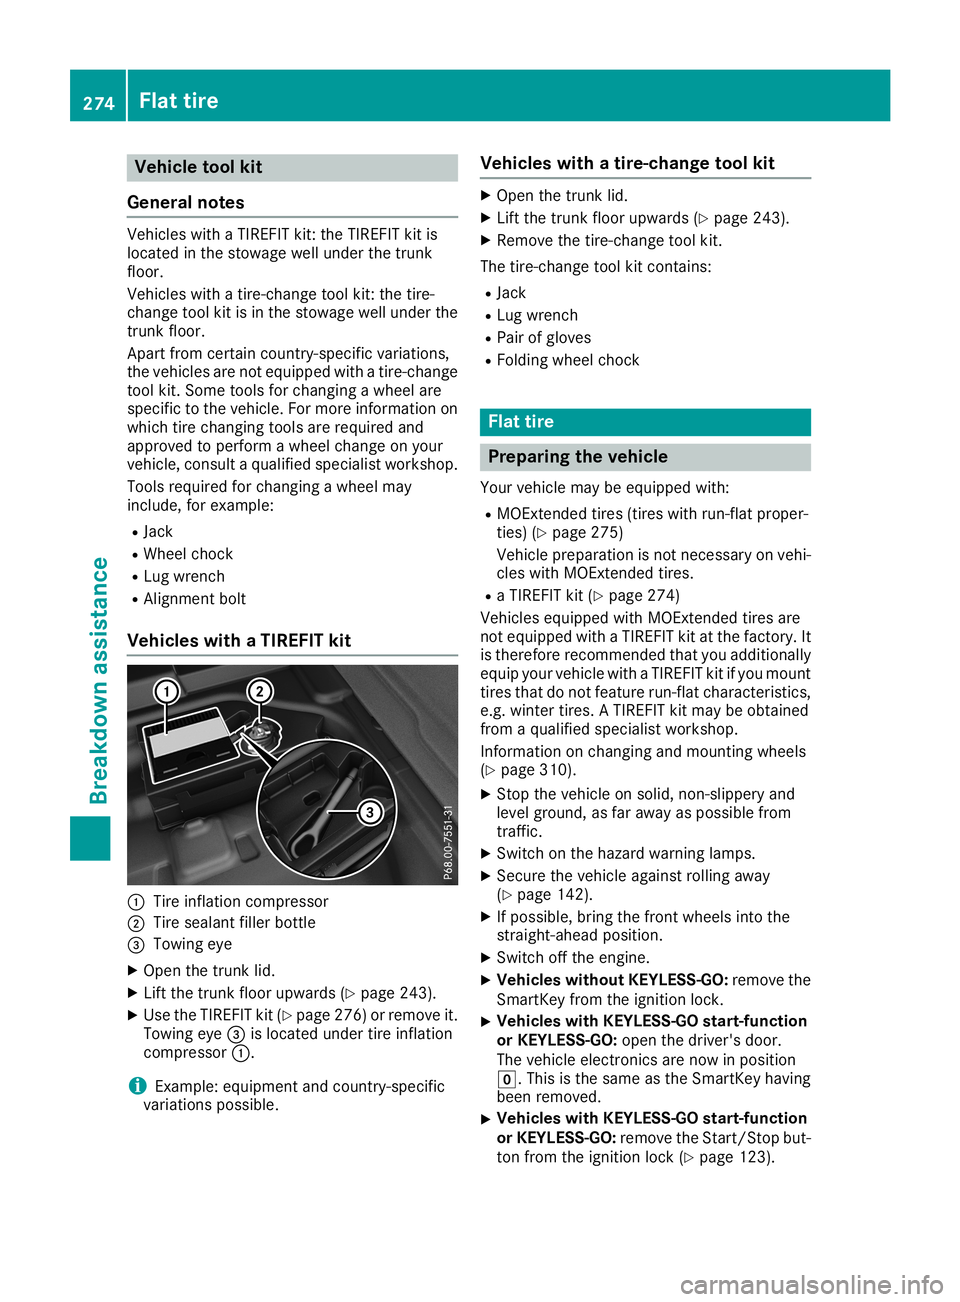
Vehi cles with aTIRE FITkit 0043
Tire infl ation comp ressor
0044 Tire sea lant fillerbo ttle
0087 Tow ingeye
X Ope nthe trunk lid.
X Lif tthe trunk floor upwa rds (Ypage 243) .
X Use theTIREFIT kit(Ypage 276 )orremove it.
Towi ngeye 0087islocated undertireinfla tion
compresso r0043.
i Example:
equipment andcountry-spe cific
varia tions possible. Vehic
leswith atire-chang etool kit X
Open thetrunk lid.
X Lift the trunk floorupwards (Ypag e243).
X Remo vethe tire-change toolkit.
The tire-change toolkitcontains:
R Jack
R Lug wrench
R Pai rof glove s
R Foldi ngwhee lchock Flat
tire Preparing
thevehic le
You rvehicl emay beequ ipped with:
R MOExtended tires(tires withrun-flat proper-
ties) (Ypag e275)
Vehicl eprepa ration isnot necessary onvehi-
cles with MOExtended tires.
R aTIREFIT kit(Ypag e274)
Vehicl esequ ipped with MOExtended tiresare
not equippedwith aTIREFIT kitatthe factory. It
is therefore recommended thatyouadditional ly
equ ipyou rvehicl ewith aTIREFIT kitifyou mount
tires thatdonot feature run-flat characteristics,
e.g. winter tires.ATIREFIT kitmay beobtai ned
from aqua lified specia listworkshop .
Information onchanging andmounting wheels
(Y pag e310).
X Stop thevehicl eon soli d,non-slipp eryand
level ground ,as far awa yas possi blefrom
traffic.
X Switch onthe hazard warninglamp s.
X Secure thevehicl eaga inst rolling awa y
(Y pag e142) .
X Ifpossi ble,bring thefront wheelsinto the
straigh t-ahead position.
X Switch offthe engine.
X Vehic leswitho utKE YLESS-GO :remove the
SmartKey fromtheignitio nlock.
X Vehic
leswith KEYLESS-GO start-function
or KEYLESS-GO :open thedriver' sdoor.
The vehicl eelectronics arenow inposi tion
005A. This isthe same asthe SmartKey having
been removed .
X Vehic
leswith KEYLESS-GO start-function
or KE YLESS-GO :remove theStart/Stop but-
ton from theignitio nlock (Ypag e123). 274
Fl
at tireBreakdown assistance
Page 277 of 330
X
Make surethattheengine cannot bestarted
via your smartphone (Ypage 124).
X Make surethatthepassengers arenot endan-
gered asthey doso. Make surethatnoone is
near thedanger areawhile awheel isbeing
changed. Anyonewhoisnot directly assisting
in the wheel change should,forexample,
stand behind thebarrier.
X Get outofthe vehicle. Payattent iontotraffic
condition swhen doing so.
X Close thedriver's door. MOExtended
tires(tires withrun-flat
proper ties)
General notes With
MOExt ended tires(tires withrunflatchar-
acteristics ),you can cont inue todrive yourvehi-
cle even ifthere isatotal lossofpressure inone
or more tires.Theaffected tiremust notshow
any clearly visibledamage.
You canrecogniz eaMOExt ended tirebythe
MOExt ended marking whichappears onthe
sidewa llof the tire. Youwillfind thismarking
next tothe tire size designation, theload-bear-
ing capacity andthespeed index(Ypage 305).
MOExt ended tiresmaybeused onlyinconj unc-
tion with anactivated tirepressure losswarning
system (Canada only)ortire pressure monitor
(USA only).
If apressur eloss warning message appears
in the multifu nctiondisplay:
R observe theinstruct ionsinthe display mes-
sages (Ypage 213).
R check thetire fordamage
R ifdriving on,observe thefollowing notes
The driving distance possibleinrun-flat modeis
approximately 50miles (80km) when thevehi-
cle ispartially laden.Whenthevehicle isfully
laden itis approximately 19miles (30km).
In addition tothe vehicle load,thedriving dis-
tance possible depends upon:
R vehicle speed
R road condition
R outside temperature
The driving distance possibleinrun-flat mode
may bereduced byextrem edriving condition s
or maneuvers, oritcan beincreased througha
moderate styleofdriving. The
driving distance possibleinrun-flat modeis
counted fromthemoment thetire pressure loss
warning appears inthe multifunction display.
You must notexceed amaximum speedof
50 mph (80km/h).
When replacing oneorall tires, please observe
the following specifications foryour vehicle's
tires:
R size
R type and
R the "MOExt ended" marking
If atire has gone flatand cannot bereplaced
with aMOExt ended tire,astandard tiremay be
used asatemporary measure.Makesurethat
you usetheproper sizeandtype (summer or
winter tire).
Vehicles equippedwith MOExt ended tiresare
not equipp edwith aTIREFIT kitatthe factory. It
is therefore recommen dedthat youadditionally
equip yourvehicle withaTIREFIT kitifyou mount
tires thatdonot feature run-flat properties, e.g.
winter tires.ATIREFIT kitmay beobtained from
a qual ified specialist workshop.
Import antsafety notes G
WARNING
When driving inemergency mode,thedriving
characterist icsdeteriorate, e.g.when corner-
ing, accelerating quicklyandwhen braking.
There isarisk ofan accident.
Do not exceed thestated maximum speed.
Avoid abrupt steering anddriving maneuvers,
and driving overobstacles (curbs,potholes,
off-road). Thisappli esinparticular toaladen
vehicle.
Stop driving inemergency modeif:
R you hear banging noises.
R the vehicle startstoshake.
R you seesmoke andsmell rubber.
R ESP ®
is interven ingconst antly.
R there aretears inthe sidewa llsofthe tire.
Aft erdriving inemergency mode,havethe
wheel rimscheck edataqual ified specialist
workshop withregard totheir further use.The
defective tiremust bereplaced inevery case. Flat
tire
275Breakdown assistance Z
Page 287 of 330
!
When
Active Brake Assist, Active Distance
Assist DISTRONIC orthe HOLD function is
activated, thevehicle brakesautomaticall yin
certain situations.
To avoid damage tothe vehicle, deactivate
these systems inthe followi ngorsimila rsit-
uations:
R when towing thevehicle
R in the carwash
! Make
surethattheelectric parking brakeis
released .If the electric parking brakeisfaulty,
visit aqual ified speciali stworkshop.
! Only
secure thetow rope ortow baratthe
towing eyes.Otherwise, thevehicle couldbe
damage d.
! Do
not use thetowing eyesforrecovery pur-
poses asthis could damage thevehicle. Ifin
doubt, recover thevehicle withacrane.
! When
towing, pullawayslowly and
smoothly. Ifthe tractive poweristoo high, the
vehicles couldbedamage d.
! The
vehicle canbetowed amaximum of
30 miles (50km). Thetowing speedof30 mph
(50km/h) mustnotbeexceeded.
If the vehicle hastobe towed morethan
30 miles (50km), thefront axlemust beraised
or the entire vehicle raisedandtransported.
! Do
not tow with sling-type equipment. This
could damage thevehicle.
! When
towing awayvehicles withKEYLES S-
GO, usethekey instead ofthe Start/ Stop
button. Theautomatic transmission mayoth-
erwise shifttoposition 005Dwhen youopen the
driver's orfront -passenger door,which could
damage thetransmission.
! Vehicles
withautomatic transmission must
not bestarted bytow-start ing.This could oth-
erwise damage thetransmission.
It is better tohave thevehicle transported than
to have ittowed away.
If the vehicle cannolonger bedriven because of
an accident orbreakdown, youhave thefollow-
ing options:
R Transporting thevehicle.
As arule, youshould havethevehicle trans-
ported.
R Towing thevehicle withatow rope ortow bar. Only
towthevehicle inexceptional cases.
The battery mustbeconnec tedand charged.
Otherwise, you:
R cannot turntheSmartKey toposition 0048in
the ignition lock.
R cannot release theelectric parking brake.
R cannot shiftthetransmission toposition 005C.
The function ofthe electric parking brakeand
the parking lockisdependent onthe on-board
voltage.
If the on-board voltageislow orifthere isasys-
tem malfunction:
R the electric parking brakemaynotbeappli ed
in certain circumstances, or
R itmay nolonger bepossible toshift thetrans-
mission toposition 005D
Switch offnon- essential consumers, e.g.the
radio.
Deactivate theautomatic lockingfeaturebefore
the vehicle istowed (Ypage 189). Youcould
otherwise belocked outwhen pushing ortowing
the vehicle. Installin
g/removing thetowing eye
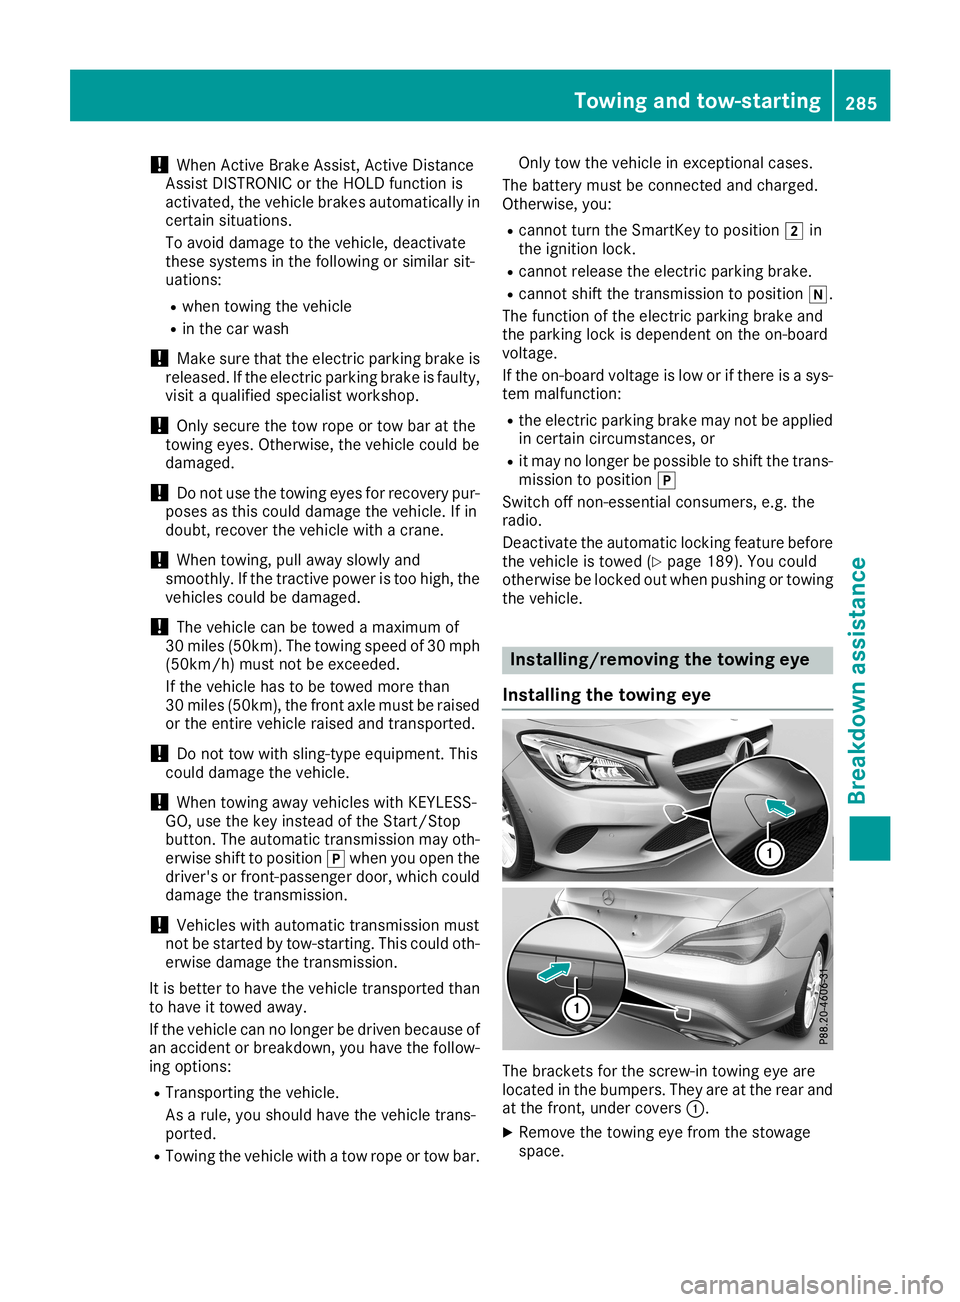
Installin gthe towing eye The
brackets forthe screw-in towingeyeare
located inthe bumpers. Theyareatthe rear and
at the front ,under covers 0043.
X Remove thetowing eyefrom thestowage
space. Towing
andtow-start ing
285Breakdown assistance Z
Page 288 of 330
The
towing eyeislocated withthevehicle tool
kit under thecargo compart mentfloor
(Y page 274).
Vehicles withtheTIREFIT kit:the towing eyeis
beneath thetire inflation compressor
(Y page 274).
X Press themark oncover 0043inwards inthe
direction ofthe arrow.
X Take cover 0043offthe opening.
X Scr ewinthe towing eyeclock wisetothe stop.
Removing thetowing eye X
Unsc rewand remove thetowing eye.
X Attach cover 0043tothe bumper andpress until
it engages.
X Place thetowing eyeinthe stowage well
beneath thecargo compart mentfloorinthe
cargo compart ment(Ypage 274).
X Vehicles withtheTIREFIT kit:put back thetire
inflation compressor (Ypage 274). Towing
thevehicle withthefront axle
raised
Observe theimportant safetynoteswhen tow-
ing your vehicle withthefront axleraised
(Y page 284).
Only vehicles without4MATICcanbetowed
with thefront axleraised.
! Vehicles
with4MATI Cmust notbetowed
with either thefront orthe rear axle raised, as
doing sowill damage thetrans mission.
Vehicles with4MATI Cmay either betowed away
with both axles onthe ground orbe loaded up
and trans ported.
! The
ignition mustbeswitched offifthe vehi-
cle isbeing towed withthefront axleraised.
Otherwise, ESP®
may intervene anddamage
the brake system.
X On
vehicles withKEYL ESS-GO orthe KEY-
LESS-GO startfunction: youmust usethe
Smart Keyinstead ofthe Start /Stopbutton
(Y page 124).
X Make surethatthevehicle isstation ary.
X Turn theSmart Keytoposition 0048inthe igni-
tion lock.
X When thevehicle isstation ary,depress the
brake pedalandkeep itdepressed. X
Shift theautomatic transmission toposition
005D.
X Release thebrake pedal.
X Release theelectric parking brake.
X Switch offthe automatic locking
(Y page 189).
X Switch onthe hazard warning lamps
(Y page 103).
X Turn theSmart Keyinthe ignition locktoposi-
tion 005Aand leave theSmart Keyinthe ignition
lock. Towing
avehicle withboth axles on
the ground
It is important thatyouobserve thesafety
instr uctions whentowing awayyourvehicle
(Y page 284).
X On
vehicles withKEYL ESS-GO orthe KEY-
LESS-GO startfunction: youmust usethe
Smart Keyinstead ofthe Start /Stopbutton
(Y page 124).
The automatic transmission automatically shifts
to position 005Dwhen youopen thedriver's or
front -passenger doororwhen youremove the
Smart Keyfrom theignition lock.Inorder to
ensure thattheautomatic transmission staysin
position 005Cwhen towing awaythevehicle, you
must observe thefollowing points:
X Make surethatthevehicle isstation ary.
X Turn theSmart Keytoposition 0048inthe igni-
tion lock.
X Depress andhold thebrake pedal.
X Shift theautomatic transmission toposition
005C.
X Leave theSmart Keyinposition 0048inthe igni-
tion lock.
X Release thebrake pedal.
X Release theelectric parking brake.
X Switch onthe hazard warning lamps
(Y page 103).
i In
order tosignal achange ofdirection when
towing thevehicle withthehazard warning
lamps switched on,use thecombinat ion
switch asusual. Inthis case, onlytheindicator
lamps forthe direction oftravel flash.After
resett ingthe combinat ionswitch, thehazard
warning lampstartsflashing again. 286
Towing
andtow-sta rtingBr eakdown assistance
Page 300 of 330
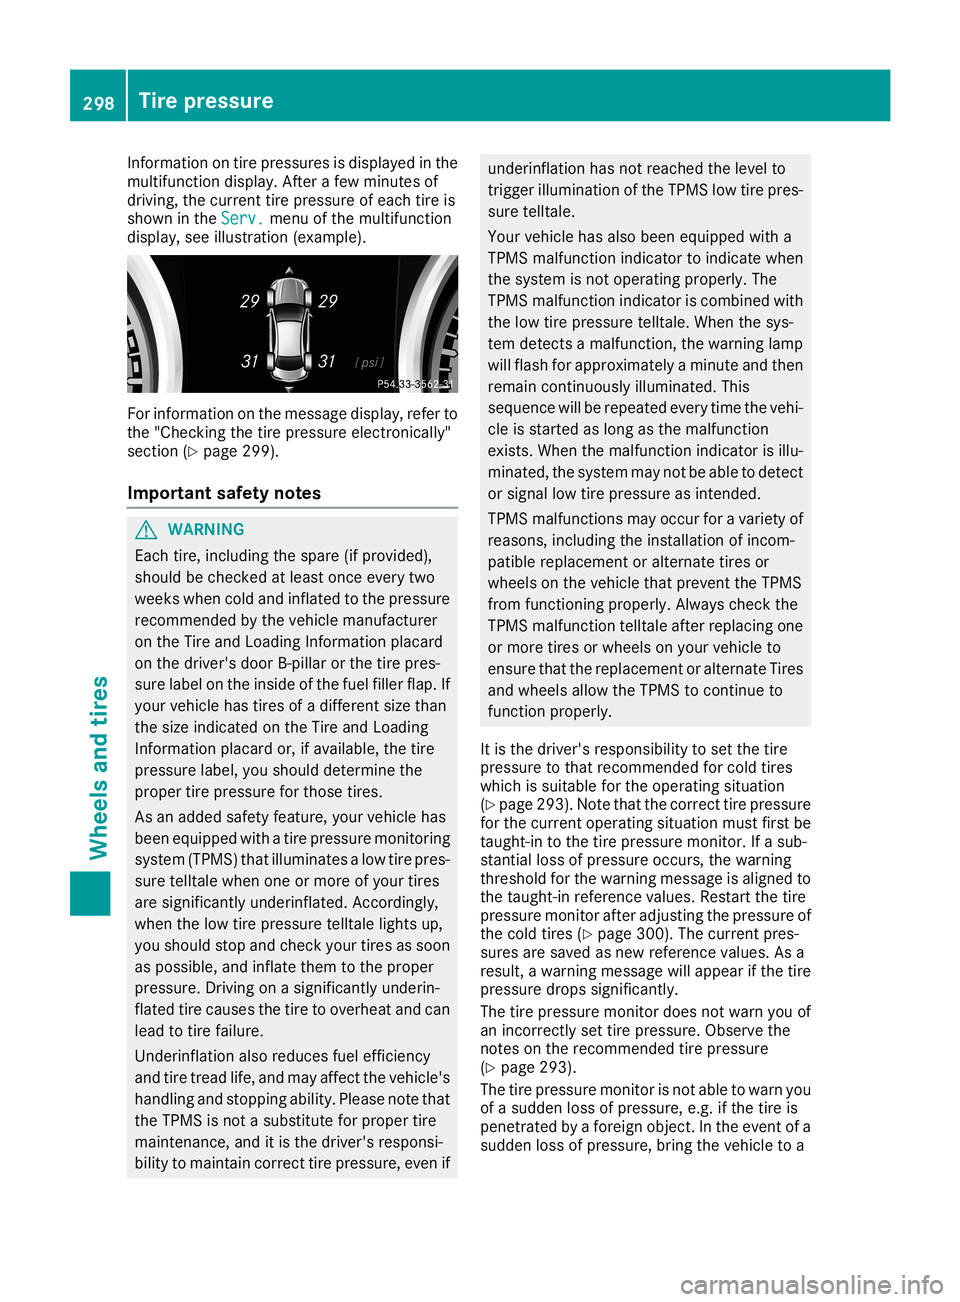
Information
ontire pressu resisdispl ayedin the
multifu nctiondisplay.After afew minutes of
driving, thecurrent tirepressu reofeach tireis
shown inthe Serv. Serv.
menuofthe multifu nction
displ ay,see illustration (example). For
information onthe message display,refer to
the "Checking thetire pressu reelectronical ly"
section (Ypage 299).
Important safetynotes G
WARNING
Each tire,includi ngthe spare (ifprovide d),
shoul dbe checked atlea stonce every two
weeks whencoldandinflated tothe pressu re
recommended bythe vehicle manufacture r
on the Tire andLoadi ngInformation placard
on the driver's doorB-pilla ror the tire pres-
sure labelon the inside ofthe fuel fillerflap. If
you rvehicle hastires ofadifferent sizethan
the size indicated onthe Tire andLoadi ng
Information placard or,ifavai lable,the tire
pressu relab el,you shoul ddetermine the
proper tirepressu refor those tires.
As anadde dsafety feature, yourvehicle has
been equipped withatire pressu remonitoring
system (TPMS)thatilluminates alow tirepres-
sure telltal ewhen oneormore ofyou rtires
are significa ntlyunderinfla ted.Accordingly,
when thelow tirepressu retelltal elights up,
you shoul dstop andcheck yourtires assoon
as possib le,and inflate themtothe proper
pressu re.Driving onasignifica ntlyunderin-
flated tirecause sthe tire tooverhea tand can
lea dto tire failure.
Underinfla tionalso reduces fuelefficiency
and tiretread life,and may affect thevehicle 's
handli ngand stopping ability. Plea senote that
the TPMS isnot asubstitu tefor proper tire
maintenance, anditis the driver's responsi-
bili tyto maintain correcttirepressu re,even if underinfla
tionhasnotreached thelevel to
trigger illuminatio nof the TPMS lowtirepres-
sure telltal e.
Your vehicle hasalso been equipped witha
TPMS malfunction indicator toindicate when
the system isnot opera tingproperl y.The
TPMS malfunction indicator iscombined with
the low tirepressu retelltal e.When thesys-
tem detects amalfu nction, thewarning lamp
wil lflash forappro ximately aminute andthen
remain continuously illuminated .This
sequ ence willbe repea tedevery timethevehi-
cle isstarted aslong asthe malfu nction
exists. Whenthemalfu nction indicator isillu-
minated, thesystem maynotbeabl eto detect
or signal lowtirepressu reas intended.
TPMS malfunctions mayoccur foravariety of
reasons, includingthe installa tionofincom-
patibl erepla cement oralternate tiresor
wheel son the vehicle thatprevent theTPMS
from functioning properly.Alway scheck the
TPMS malfunction telltaleafter replacingone
or more tiresorwheel son you rvehicle to
ensure thattherepla cement oralternate Tires
and wheel sall ow the TPMS tocontinue to
function properly.
It is the driver's responsib ility to set the tire
pressu reto that recommended forcold tires
which issuita bleforthe opera tingsitua tion
(Y page 293). Notethatthecorrect tirepressu re
for the current operatingsitua tionmust firstbe
taught-in tothe tire pressu remonitor. Ifasub-
stantial lossofpressu reoccurs, thewarning
threshold forthe warning messageis ali gned to
the taught-in reference values.Restart thetire
pressu remonitor afteradjusting thepressu reof
the cold tires (Ypage 300). Thecurrent pres-
sures aresaved asnew reference values.Asa
resul t,awarning messagewil lappe arifthe tire
pressu redrops significa ntly.
The tirepressu remonitor doesnotwarn youof
an incorrectly settire pressu re.Observe the
notes onthe recommended tirepressu re
(Y page 293).
The tirepressu remonitor isnot ableto warn you
of asudd enloss ofpressu re,e.g. ifthe tire is
penetrated byaforeign object.Inthe event ofa
sudd enloss ofpressu re,bring thevehicle toa 298
Tire
pressureWheel sand tires
Page 313 of 330

Tire-mount
ingtools should notbeused near
the valve. Thiscould damage theelectron ic
compon ents.
Only have tireschanged ataqualified spe-
cialist workshop.
Observe theinstr uctions andsafety notesinthe
"Changing awheel" section (Ypage 310).
The wear pattern son the front andrear tires
differ, depending onthe operating conditions.
Rotate thewheels beforeaclear wearpattern
has formed onthe tires. Fronttires typically
wear more onthe shoulders andtherear tires in
the cent er.
On vehicles thathave thesame sizefront and
rear wheels, youcan rotat ethe wheels accord-
ing tothe inter valsinthe tire manufact urer's
warranty bookinyour vehicle document s.Ifno
warranty bookisavailabl e,the tires should be
rotat edevery 3,000 to6,000 miles(5,000 to
10,00 0km ).Dependin gon tire wear, thismay
be required earlier.Donot change thedirection
of wheel rotation.
Clean thecont actsurfaces ofthe wheel andthe
brake discthoroughly everytimeawheel isrota-
ted. Check thetire pressure and,ifnecessary,
restart thetire pressure losswarning system
(Canada only)orthe tire pressure monitor(USA
only). Direction
ofrota tion
Tires withaspecified directionofrotat ionhave
additional benefits,e.g. ifthere isarisk ofhydro-
planing. Theseadvantages canonly begained if
the tires areinstalled correspon dingtothe
direction ofrotat ion.
An arrow onthe sidewall ofthe tire indicates its
correc tdirection ofrotat ion. Storing
wheels
Stor ewheels thatarenot being usedinacool,
dry and preferably darkplace. Protectthe tires
from oil,grease, gasoline anddiesel. Mounting
awheel
Prepa ringthevehicle X
Stop thevehicle onsolid, non-slippery and
level ground.
X Apply theelectric parking brakemanually.
X Bring thefront wheels intothestraight- ahead
position.
X Shift thetrans mission toposition 005D.
X Switch offthe engine.
X Vehicles withoutKEYLESS-GO: removethe
Smart Keyfrom theignition lock.
X Vehicles
withKEYL ESS-GO start-function
or KEYL ESS-GO: openthedriver's door.
The vehicle electron icsare now inposition
0092. This isthe same as“key removed”.
X Vehicles
withKEYL ESS-GO start-function
or KEYL ESS-GO: removetheStart /Stopbut-
ton from theignition lock(Ypage 123).
X Make surethattheengine cannotbe start ed
via your smartphon e(Y page 83).
X Ifincluded inthe vehicle equipment, remove
the tire- change toolkitfrom thevehicle.
X Safeguard thevehicle against rollingaway
(Y page 142).
i Apart
fromcertaincount ry-specific varia-
tions, thevehicles arenot equipped witha
tire- change toolkit.Some toolsforchanging a
wheel arespecific tothe vehicle. Formore
inform ationonwhich toolsarerequired to
perform awheel change onyour vehicle, con-
sult aqualified specialist workshop.
Necessary tire-changing toolscaninclude, for
example:
R Jack
R Wheel chock
R Lug wrench Changing
awheel
311Wheels andtires Z