2019 MERCEDES-BENZ CLA COUPE oil
[x] Cancel search: oilPage 268 of 330
To
avoid damage tothe vehicle, deactivate
Act ive Distan ceAssist DISTRONIC andthe
HOLD functioninthe following orsimilar sit-
uations:
R when towing thevehicle
R in the carwash
! Never
cleanyourvehicle inaTouchless
Automat icCar Wash asthese usespecial
cleaning agents.Thesecleaning agentscan
damage thepaintwork orplastic parts.
! Make
surethattheautomatic transmission
is in trans mission position 005Cwhen washing
your vehicle inatow-t hrough carwash. The
vehicle maybedamaged inanother transmis-
sion position.
! Make
surethat:
R the side windows andthesliding sunroof
are fully closed
R the blower isswitched off
R the windshield wiperswitch isat position
0092
The vehicle mayotherwise bedamaged.
You canclean thevehicle atan automatic car
wash fromthevery start.
Preferably cleanthevehicle atautomatic car
washes thatusetextilewashing elements with-
out brushes. Thiswillprevent finescratc hesto
the paintwork ordecorative films.
If the vehicle isvery dirty, pre-wash itbefore
cleaning itin an automatic carwash.
Aft erusing anautomatic carwash, wipeoffwax
from thewindshield andthewiper blades. This
will prevent smearsandreduce wipingnoises
caused byresidue onthe windshield.
i Vehicles
withdecorative film:select awash
program withouthotwax atthe automatic car
wash.
Washing byhand In
some countries,washing byhand isonly
allowed atspecially equipped washingbays.
Observe thelegal requirement sin each count ry.
X Do not use hotwater anddonot wash the
vehicle indirect sunlight.
X Use asoft sponge toclean.
X Use amild cleaning agent,suchasacar
shampoo approved byMercedes- Benz. X
Thoroughly hosedown thevehicle withagen-
tle jet ofwater.
X Do not point thewater jetdirectly towards the
air inlet orthe edges ofdecorative foils.
X Use plenty ofwater andrinse outthesponge
frequent ly.
X Rinse thevehicle withclean water anddry
thoroughly withachamois.
X Do not letthe cleaning agentdryonthe paint-
work orthe decorative foils.
Carefully removealldeposits ofroad saltas
soon aspossible whendriving inwinter.
Power washers G
WARNIN
G
The water jetfrom acircular jetnozz le(dirt
blasters) cancause invisible exteriordamage
to the tires orchassis compon ents.Compo-
nent sdamaged inthis way may failunexpect -
edly. There isarisk ofan accident .
Do not use power washers withcircular jet
nozz lestoclean thevehicle. Havedamaged
tires orchassis compon entsreplaced imme-
diately.
! Vehicles
withdecorative film:parts ofyour
vehicle arecovered withdecorative film.
Maintain adistance ofat least 27.5in(70cm)
between thefilm-c overed partsofthe vehicle
and thenozz leof the power washer.
Infor mation aboutthecorrec tdistance is
availab lefrom theequipment manufacturer.
Move thepower washer nozzlearound when
cleaning yourvehicle.
The water temperat ureofthe power washer
must notexceed 140‡(60 †).
! Always
maintain adistance ofat least 12in
(30 cm) between thevehicle andthepower
washer nozzle.Infor mation aboutthecorrec t
distance isavailabl efrom theequipment
manufact urer.
Move thepower washer nozzlearound when
cleaning yourvehicle.
Do not aim directly atany ofthe following:
R Tires
R Door gaps, roofgaps, joints,etc.
R Elect ricalcompon ents
R Batt ery 266
CareMaintenance
andcare
Page 269 of 330
R
Plug-type couplings
R Light bulbs
R Seals
R Trim elements
R Vent ilation slots
Damaged sealsorelectric alcompon entscan
lead toleaks orfailures.
Cleaning thepaint work !
Do
not affix:
R stick ers
R films
R magnetic platesorsimilar items
to painted surfaces. Youcould otherwise
damage thepaintwork .
Scr atches, corrosivedeposits, areasaffectedby
corros ionand damage causedbyinadequate
care cannotalway sbe completely repaired.In
such cases, visitaqualified specialist workshop.
X Remove dirtimmediately, wherepossible,
while avoiding rubbingtoohard.
X Soak insect remains withinsect remover and
rinse offthe treat edareas afterwards.
X Soak birddroppings withwater andrinse off
the treat edareas afterwards.
X Remove treeresin, oils,fuels andgreases by
rubbing gentlywith acloth soaked inpetro-
leum ether orlighter fluid
X Remove coolantandbrake fluidwithamoist
cloth andclear water.
X Use tarremover toremove tarstains.
X Use silicone remover toremove wax.
If water nolonger forms"beads" onthe paint
surface, usethepaint careproducts recommen-
ded andapproved byMercedes- Benz.This isthe
case approximately everythreetofive mont hs,
depending onthe climate conditionsandthe
care product used.
If dirt has penetr atedthepaint surface orifthe
paint hasbecome dull,thepaint cleaner recom-
mended andapproved byMercedes- Benz
should beused.
Do not use these careproducts inthe sun oron
the hood while thehood ishot.
X Use asuitable touch-upstick ,e.g. MBTouch-
Up Stic k,to repair slightdamage tothe paint-
work quickly andprovisionally. Mat
tefinish care !
Never
polish thevehicle orthe light alloy
wheels. Polishing causesthefinish toshine.
! The
following cangive thepaint aglossy
appearance andthus reduce thematt effect :
R Rubbing hardwithunsuitable agents
R Washing thevehicle indirect sunlight
! Never
usepaint cleaner, buffingorpolishing
products, orgloss preserver, e.g.wax, forthe
purpose ofpaintwork care.These products
are only suitable forhigh-gloss surfaces.Their
use onvehicles withmattepaintwork leadsto
cons iderable surfacedamage or,more spe-
cifically, toshiny, spottedareas.
Always havepaintwork repairscarried outata
qualified specialist workshop.
! Only
useautomatic carwashes whichcor-
respond tothe latest technological stand-
ards. Never usewash programs whichfinish
by treat ingthe vehicle withhotwax.
Observe thesenotesifyour vehicle hasaclear
matt efinish. Thiswillhelp youtoavoid damage
to the paintwork duetoincor recttreat ment .
These notesalso apply tolight alloy wheels with
a clear mattefinish.
Use only insect remover andcarshampoo from
the range ofcare products approved by
Mercedes- Benz.
Cleaning thedecorat ivefilm !
The
following mayhave aneffect onthe ser-
vice lifeand color ofdecorative film:
R sunlight
R temperat ure,e.g.hot-airfan
R weather conditions
R ston eimpacts anddirt
R chemical cleaningagents
R greasy substanc es
! Do
not use anytypes ofpolish onmatt dec-
orative film.Polishing surfacescoveredwith
film gives itashiny finish.
! Do
not treat mattorstruc tured decorative
film with wax. Thismay lead tomarks that
cann otbe removed.
Observe thenotesinthe sect iononthe care and
treat ment ofmatt epaintwork (Ypage 267),
these notesalso apply tomatt edecorative film. Care
267Maintenance andcare Z
Page 272 of 330
X
Make surethatthevehicle isat astandstill
and theSmartK eyisin position 0048inthe igni-
tion lock.
X Open thecamera coverforcleaning viathe
multimedia system(seeDigital Operator's
Manual).
X To clean therear view camera: useclear
water andasoft cloth toclean camera
lens 0043.
Cleanin gthe exhaust pipes G
WARNING
The exhaust tailpipe andtailpipe trimcan
become veryhot.Ifyou come intocontact
with these partsofthe vehicle, youcould burn
yourself. Thereisarisk ofinjury.
Always beparticularly carefularound the
exhaust tailpipe andthetailpipe trim. Allow
these componen tsto cool down before touch-
ing them.
! Do
not clean theexhaust pipewithacid-
based cleaning agents,suchasbathroom
cleaner orwheel cleaner.
! Mercedes-AMG
vehicleswithblack exhaust
pipes: theblack-chr ometailpipe finishers
should notbepolished withachrome polish.
They willotherwise losetheir black sheen. For
optimal care,thefaceplates shouldberubbed
with alightly oiledcloth afterevery carwash.
Commercially availableengine andcare oils
are suitable forthis.
For heavier soiling,youcan apply afine paint-
work polish withamicrofiber cloth.Remove
the excess polishresidue afterpolishing.
Impurities combinedwiththeeffect sof road grit
and corrosive environmentalfactors maycause
flash rusttoform onthe surface. Youcan
restore theoriginal shineofthe exhaust pipeby
cleaning itregularly ,especially inwinter and
after washing.
X Clean theexhaust pipewithacare product
tested andapproved byMercedes-Ben z. Interior
care
Cleanin gthe display !
For
cleaning, donot use anyofthe following:
R alcohol-based thinneror gasoline
R abrasive cleaningagents
R commerc ially-availabl ehousehold cleaning
agents
These maydamage thedisplay surface. Do
not putpressure onthe display surface when
cleaning. Thiscould leadtoirreparable dam-
age tothe display .
X Before cleaning thedisplay ,make surethatit
is switched offand hascooled down.
X Clean thedisplay surface usingacommer-
cially availa blemicrofiber clothandTFT/LCD
display cleaner.
X Dry thedisplay surface usingadry microfiber
cloth.
Cleanin gthe plastic trim G
WARNING
Care products andcleaning agentscontaining
solvents causesurfaces inthe cock pitto
become porous.Asaresult, plastic partsmay
come looseinthe event ofair bag deploy -
ment. Thereisarisk ofinjury.
Do not use anycare products andcleaning
agents toclean thecock pit.
! Never
attach thefollowing toplastic surfa-
ces:
R stick ers
R films
R perfume oilcont ainer orsimilar
You could otherwise damagetheplastic.
! Do
not allow cosmetic s,insect repellent or
sunscreen tocome intocont actwith theplas-
tic trim. Thismaintains thehigh-quali tylook of
the surfaces.
X Wipe theplastic trimwith adamp, lint-free
cloth, e.g.amicrofiber cloth.
X Heavy soiling:use care andcleaning prod-
ucts recommen dedandapproved by
Mercedes-Ben z.
The surface maychange colortemporarily.
Wait untilthesurface isdry again. 270
CareMaintenance
andcare
Page 273 of 330
Clean
ingthest eeri ngwheel andgear or
select orlever X
Thor oughl ywipe withadamp clothor use
leat her careagen tsthat have been recom-
men dedandappro vedbyMer cedes-Ben z.
Clean inggenu inewood andtrim ele-
men ts !
Do
notuse solvent-based cleanin gagen ts
suc has tar rem over,wheel cleane rs,polis hes
or waxe s.Ther eis other wise aris kof damag -
ing thesurf ace.
! Do
notuse chrom epolis hon trim piec es.
The trim piec eshave ach rom elook butare
mos tlymade ofano dized alumin umand can
lose their shin eif ch rom epolis his used. Use
a damp, lint-fr ee clothins tead when cleanin g
th etrim piec es.
If th ech rom e-plat edtrim piec esare very
dirt y,you can useach rom epolis h.Ifyou are
uns ure astowhet herthetrim piec esare
ch rom e-plat edornot,con sult anauth orized
Mer cedes-Ben zCen ter.
X Wipe thewoode ntrim and trim piec eswit ha
damp, lint-fr ee cloth,e.g .a mic rofiber cloth.
X Hea vysoilin g:use careand cleanin gpro d-
uct srec omm ended andappro vedby
Mer cedes-Ben z.
Clean ingtheseat cover s Gener
alnot es
! Do
notuse amic rofiber clothto cle ancov ers
made outofreal leather,art ific ialleat her or
DI NA MICA .If used often,th ese can damag e
th ecov er.
Not eth at reg ular careis ess ential toensure that
th eappear anceand comfortof thecov ers is
ret aine dove rtim e. Genu
ineleat her seat cover s
! To
retain thenat ural appear anceof the
leat her,obse rveth efoll owin gcle anin g
ins truct ions:
R Clean genuine leather covers carefull ywit h
a damp clothand then wipe thecov ers
down withadry cloth.
R Mak esure that theleat her does not
bec ome soaked.Itmay other wise become
roug hand crack ed.
R On lyuse leather careagen tsthat have
been tested and appro vedbyMer cedes-
Ben z.You canobtain these from aqualif ied
spec ialist workshop.
Leat herisanat ural product .
It ex hibit snat ural surface charac teris tic s,for
ex ample :
R diff ere nces inthete xture
R mar kscaus edbygro wth and injury
R sligh tnuan cesofcol or
Thes eare charac teris tic sof leat her and not
mat erial defects.
Seat cover sof oth erma terials
! Obse
rveth efoll owin gwhen cleanin g:
R cle an artific ialleat her covers withaclo th
mois tene dwit hasolut ioncontain ing1%
det ergent(e. g.dish washin gliquid).
R cle an clothcov ers withamic rofiber cloth
mois tene dwit hasolut ioncontain ing1%
det ergent(e. g.dish washin gliquid). Rub
car efull yand always wipeentireseat sec-
tio ns toavoid leavingvisible lines. Leav e
th eseat todry afterwar ds.Clean ingresults
depen don thetype ofdirt and how longit
has been there .
R cle an DINA MICA covers withadamp cloth.
Mak esure that you wipe entireseat sec-
tio ns toavoid leavingvisible lines.
Clean ingtheseat belts G
WAR
NING
Seat beltscan become severelyweak ened if
bleac hedordyed. Thiscouldcaus eth eseat
belt sto tear or fail, forinstan ce, intheeve ntof
an acc iden t.This pose san increas edriskof
inj ury orfatalinj ury.
Nev erbleac hor dye theseat belts. Car
e
271Maintenance andcare Z
Page 275 of 330
Where
willIfind...? Refle
ctive safety jacket
Removi ng/replac ingthe refle ctive
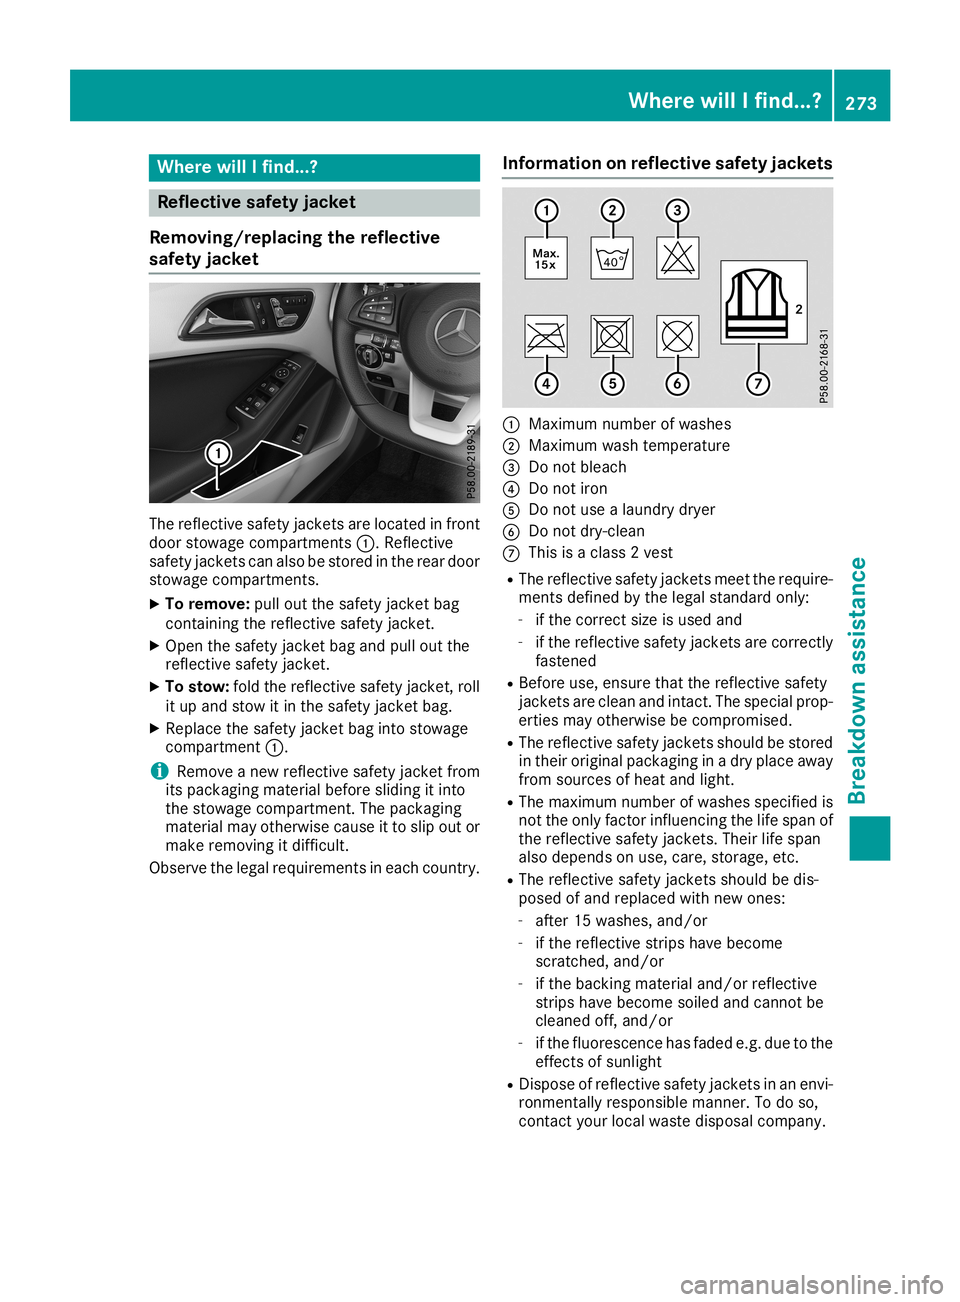
safety jacket The
refle ctive safetyjackets areloca tedinfront
door stowa gecompa rtments 0043.Reflective
safe tyjackets canalsobe stored inthe rear door
stowa gecompa rtments.
X To remove :pul lout thesafe tyjacket bag
containing therefle ctive safetyjacket.
X Open thesafe tyjacket bagand pullout the
refle ctive safetyjacket.
X To stow :fold therefle ctive safetyjacket, roll
it up and stow itin the safe tyjacket bag.
X Rep lace thesafe tyjacket baginto stowa ge
compa rtment 0043.
i Remo
veanew reflective safetyjacket from
its packa gingmateri albefore sliding itinto
the stowa gecompa rtment. Thepacka ging
materi almay otherw isecaus eit to slipout or
make removi ngitdiffi cult.
Obser vethe lega lrequ ireme ntsineach country. Info
rmation onrefle ctive safety jackets 0043
Maxim umnumbe rof wa shes
0044 Maxim umwash tempera ture
0087 Donot bleach
0085 Donot iron
0083 Donot use alau ndry dryer
0084 Donot dry-cl ean
006B This isaclas s2 vest
R The refle ctive safetyjackets meettherequ ire-
ments defined bythe lega lstanda rdonly :
- ifthe correct sizeisuse dand
- ifthe refle ctive safetyjackets arecorrectly
fastened
R Before use,ensure thattherefle ctive safety
jackets areclea nand intact. Thespeci alprop-
erties mayotherw isebecompromi sed.
R The refle ctive safetyjackets shouldbe stored
in their originalpacka ginginadry placeaway
from sourcesofhea tand light.
R The maximu mnumbe rof wa shes speci fiedis
not theonly factor influencing thelifespa nof
the refle ctive safetyjackets. Theirlife span
als odepe ndsonuse ,care, storage ,etc.
R The refle ctive safetyjackets shouldbe dis-
pose dof and replaced withnewones:
- after 15washes, and/or
- ifthe refle ctive strips havebecome
scratched ,and/or
- ifthe backing materialand/or reflective
strips havebecome soiledand cannot be
clea ned off,and/or
- ifthe fluo rescence hasfade de.g. due tothe
effects ofsunli ght
R Dispos eof refle ctive safetyjackets inan envi-
ronmentall yrespo nsiblemanner. Todo so,
contact yourloca lwa ste disp osal compa ny. Where
willIfind...?
273Breakdown assistance
Page 311 of 330
Uniform
TireQualit yGra ding Standar ds
A unifor mstan dard tograde thequality oftires
with regards totread quality, tiretraction and
tempe rature charac teristics.The quality grad-
ing assessmen tis made bythe manufac turer
following specificationsfrom theU.S.govern -
ment .The ratin gsare molded intothe sidewall of
the tire.
Recomm endedtirepr essures
The recom mended tirepressure appliestothe
tires mount edatthe factory.
The Tire andLoading Informat ionplacard con-
tains therecom mended tirepressures forcold
tires onafully loaded vehicle andforthe maxi-
mum permissible vehiclespeed.
The tirepressure tablecontains therecom men-
ded pressures forcold tires forvarious operat-
ing con dition s,i.e. differin gload andspeed con-
dition s.
Increased vehicleweightduetooptiona l
equip ment
The combin edweight ofall stan dard and
option alequipment availableforthe vehicle,
regardless ofwhether itis actually installed on
the vehicle ornot .
Rim
This isthe part ofthe wheel onwhich thetire is
mount ed.
GAWR (Gross AxleWeight Rating)
The GAWR isthe maximum grossaxleweight
ratin g.The actual loadonanaxle must never
exc eed thegross axleweight rating.The gross
axle weight ratingcan befound onthe vehicle
ident ificationplate onthe B-pillar onthe driver' s
side.
Speed rating
The speed ratingis part ofthe tire ident ification.
It specifies thespeed rangeforwhich thetire is
approved.
GVW (Gross Vehicle Weight)
The gross vehicle weightincludes theweight of
the vehicle includin gfuel, tools, thespare wheel,
access oriesinstalled, occupants, luggage and
the drawbar noseweight ,if applicable. Thegross
vehicle weightmustnotexceed thegross vehi-
cle weight ratingGVWR asspecified onthe vehi-
cle ident ificationplate onthe B-pillar onthe
driver' sside. GVW
R(Gross Vehicle WeightRating)
The GVWR isthe maximum permissible gross
weight ofafully loaded vehicle (theweight ofthe
vehicle includin gall acces sories, occupants,
fuel, luggage andthedrawbar noseweight ,if
applicable). Thegross vehicle weightratingis
specified onthe vehicle identificationplate on
the B-pillar onthe driver' sside.
Maxim umloaded vehicle weight
The maximum weightisthe sum of:
R the curb weight ofthe vehicle
R the weight ofthe acces sories
R the load limit
R the weight ofthe factoryinstalled option al
equipment
Kilopascal (kPa)
Metr icunit fortire pressure. 6.9kPa corre-
sponds to1psi. Another unitfortire pressure is
bar. 100 kilopasc als(kPa) arethe equivalent of
1 bar.
Load index
In addition tothe load-bearin gindex ,the load
index mayalsobeimprin tedonthe sidewall of
the tire. This specifies theload-bearin gcapacit y
more precise ly.
Curb weight
The weight ofavehicle withstandard equipment
includin gthe maximum capacityof fuel, oiland
coolant .It also includes theair-c ondit ioningsys-
tem andoption alequipment ifthese areinstal-
led inthe vehicle, butdoes notinclude passen-
gers orluggage.
Maxim umload rating
The maximum tireload isthe maximum permis-
sible weight inkilogram sor lbs forwhich atire is
approved.
Maxim umperm issible tirepr essure
Maximum permissible tirepressure forone tire.
Maxim umload onone tire
Maximum loadonone tire. This iscalculated by
dividing themaximum axleload ofone axle by
two. All
about wheels andtires
309Wheels andtires Z
Page 313 of 330

Tire-mount
ingtools should notbeused near
the valve. Thiscould damage theelectron ic
compon ents.
Only have tireschanged ataqualified spe-
cialist workshop.
Observe theinstr uctions andsafety notesinthe
"Changing awheel" section (Ypage 310).
The wear pattern son the front andrear tires
differ, depending onthe operating conditions.
Rotate thewheels beforeaclear wearpattern
has formed onthe tires. Fronttires typically
wear more onthe shoulders andtherear tires in
the cent er.
On vehicles thathave thesame sizefront and
rear wheels, youcan rotat ethe wheels accord-
ing tothe inter valsinthe tire manufact urer's
warranty bookinyour vehicle document s.Ifno
warranty bookisavailabl e,the tires should be
rotat edevery 3,000 to6,000 miles(5,000 to
10,00 0km ).Dependin gon tire wear, thismay
be required earlier.Donot change thedirection
of wheel rotation.
Clean thecont actsurfaces ofthe wheel andthe
brake discthoroughly everytimeawheel isrota-
ted. Check thetire pressure and,ifnecessary,
restart thetire pressure losswarning system
(Canada only)orthe tire pressure monitor(USA
only). Direction
ofrota tion
Tires withaspecified directionofrotat ionhave
additional benefits,e.g. ifthere isarisk ofhydro-
planing. Theseadvantages canonly begained if
the tires areinstalled correspon dingtothe
direction ofrotat ion.
An arrow onthe sidewall ofthe tire indicates its
correc tdirection ofrotat ion. Storing
wheels
Stor ewheels thatarenot being usedinacool,
dry and preferably darkplace. Protectthe tires
from oil,grease, gasoline anddiesel. Mounting
awheel
Prepa ringthevehicle X
Stop thevehicle onsolid, non-slippery and
level ground.
X Apply theelectric parking brakemanually.
X Bring thefront wheels intothestraight- ahead
position.
X Shift thetrans mission toposition 005D.
X Switch offthe engine.
X Vehicles withoutKEYLESS-GO: removethe
Smart Keyfrom theignition lock.
X Vehicles
withKEYL ESS-GO start-function
or KEYL ESS-GO: openthedriver's door.
The vehicle electron icsare now inposition
0092. This isthe same as“key removed”.
X Vehicles
withKEYL ESS-GO start-function
or KEYL ESS-GO: removetheStart /Stopbut-
ton from theignition lock(Ypage 123).
X Make surethattheengine cannotbe start ed
via your smartphon e(Y page 83).
X Ifincluded inthe vehicle equipment, remove
the tire- change toolkitfrom thevehicle.
X Safeguard thevehicle against rollingaway
(Y page 142).
i Apart
fromcertaincount ry-specific varia-
tions, thevehicles arenot equipped witha
tire- change toolkit.Some toolsforchanging a
wheel arespecific tothe vehicle. Formore
inform ationonwhich toolsarerequired to
perform awheel change onyour vehicle, con-
sult aqualified specialist workshop.
Necessary tire-changing toolscaninclude, for
example:
R Jack
R Wheel chock
R Lug wrench Changing
awheel
311Wheels andtires Z
Page 315 of 330

X
Using lugwrench 0043,loosen thebolts onthe
wheel youwish tochange byabou tone full
turn. Donot unscrew thebolts completely. Jacking
points
The jacking pointsarelocated justbehind the
front wheel housings andjust infront ofthe rear
wheel housings (arrows).
Mercedes-AMG vehiclesand vehicl eswith
AMG Line: toprotect thevehicle body,thevehi-
cle has covers installed nexttothe jacking
points onthe outer sills. Covers,
front(example: vehicleswithAMG Line)
X Mercedes-AMG
vehiclesand vehicl es
with AMG Line: foldcover 0044upwa rds. X
Take ratchet wrench 0083out ofthe vehicle tool
kit and place iton the hexagon nutofjack 0085
so that theletters AUFarevisible.
X Position jack0085atjacking point0087. X
Make surethefoot ofthe jack isdirectly
beneath thejacking point.
X Turn ratchet wrench 0083until jack0085sits
completely onjacking point0087and thebase
of the jack liesevenly onthe ground.
X Turn ratchet wrench 0083until thetire israised
a maximum of1.2 in(3 cm )from theground.
Removing awhee l !
Do
not place wheel boltsinsand oron adirty
surface. Thebolt andwheel hubthreads could
otherwise bedamage dwhen youscrew them
in.
X Unscrew thewheel bolts.
X Remove thewheel.
Mounting anew whee l G
WARNING
Oiled orgreased wheelboltsordamage d
wheel bolts/hub threadscancause thewheel Changing
awhee l
313Wheels andtires
Z