2019 MERCEDES-BENZ CLA COUPE check engine
[x] Cancel search: check enginePage 263 of 330
X
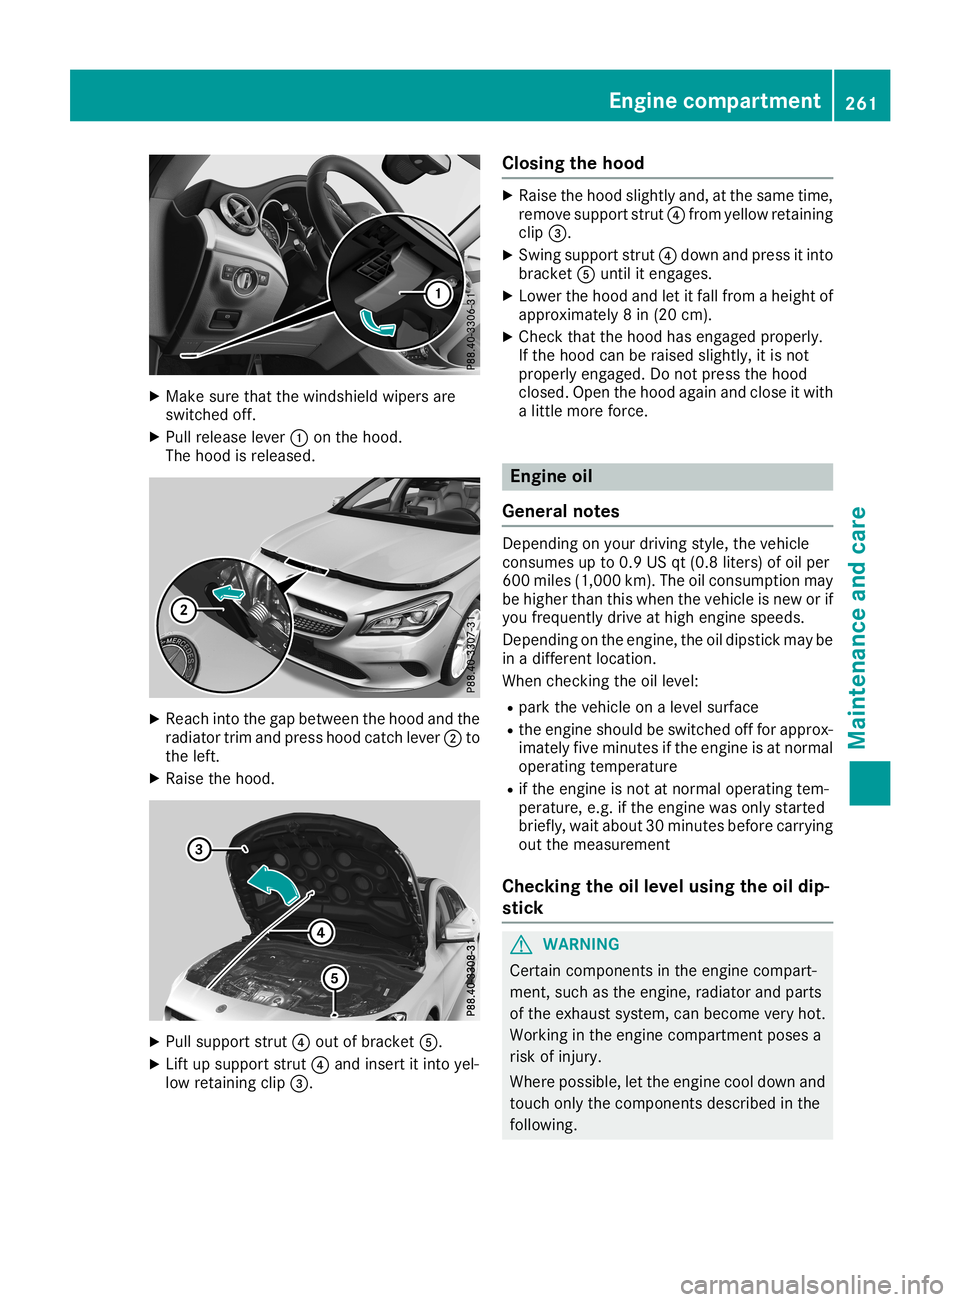
Make surethatthewindshield wipersare
switched off.
X Pull release lever0043onthe hood.
The hood isreleased. X
Reach intothegap between thehood andthe
radiator trimandpress hoodcatch lever0044to
the left.
X Raise thehood. X
Pull support strut0085out ofbracket 0083.
X Lift upsupport strut0085and insert itinto yel-
low retaining clip0087. Closi
ngthe hood X
Raise thehood slightly and,atthe same time,
remove support strut0085from yellow retaining
clip 0087.
X Swing support strut0085down andpress itinto
bracket 0083until itengages.
X Lower thehood andletitfall from aheight of
approximately 8in (20 cm).
X Check thatthehood hasengaged properly.
If the hood canberaised slightly, itis not
properly engaged. Donot press thehood
closed. Openthehood again andclose itwith
a little more force. Engine
oil
General notes Depending
onyour driving style,thevehicle
consumes upto0.9 USqt(0.8 liters) ofoil per
600 miles (1,000 km).Theoilconsumption may
be higher thanthiswhen thevehicle isnew orif
you frequently driveathigh engine speeds.
Depending onthe engine, theoildipstick maybe
in adifferent location.
When checkingthe oillevel:
R park thevehicle onalevel surface
R the engine shouldbeswitched offfor approx-
imately fiveminutes ifthe engine isat normal
operating temperature
R ifthe engine isnot atnormal operating tem-
perature, e.g.ifthe engine wasonly started
briefly, waitabout 30minutes beforecarrying
out themeasurement
Checking theoillevel using theoildip-
stick G
WARNING
Certain componen tsinthe engine compart-
ment, suchasthe engine, radiator andparts
of the exhaust system,canbecome veryhot.
Working inthe engine compartmen tposes a
risk ofinjury.
Where possible, letthe engine cooldown and
touch onlythecomponen tsdescribed inthe
following. Engi
necompar tment
261Maintenance andcare Z
Page 265 of 330
Exam
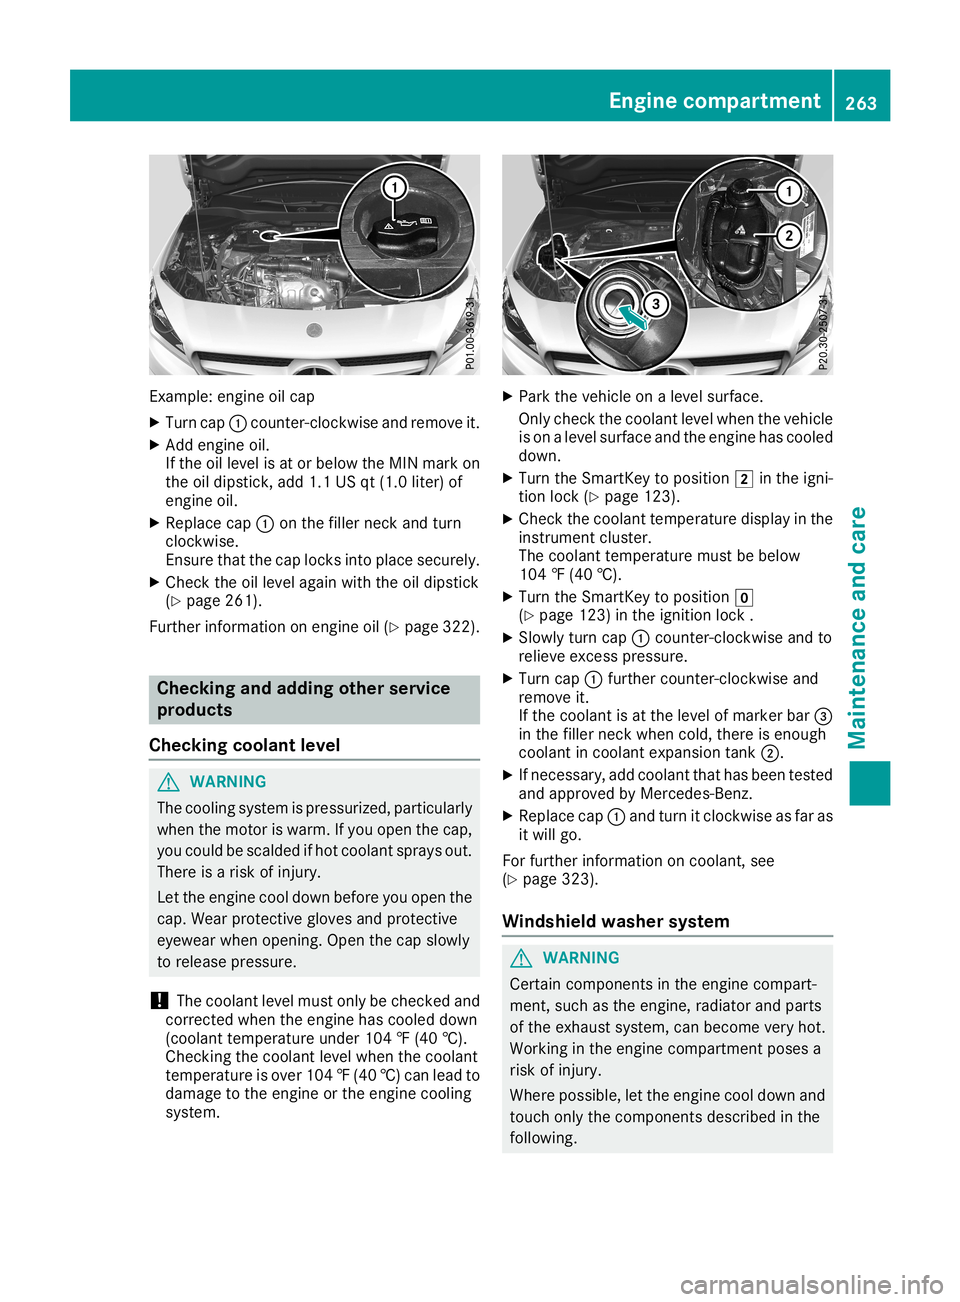
ple: eng ineoilcap
X Tu rn cap 0043cou nter-c lockwi seand remove it.
X Add engineoil.
If the oille vel isat or below the MIN markon
the oildi ps tick, add1.1 USqt(1.0 liter) of
eng ineoil.
X Re place cap 0043onthe fillerneck andturn
clo ckwi se.
Ensu retha tthe cap locks into place securely.
X Ch eck theoille vel again wi th the oildi ps tick
(Y page 261 ).
Fur therinfo rma tionon eng ineoil(Y page 322 ). Ch
eckin gand addi ngoth erservi ce
produ cts
Ch eckin gco olant leve l G
WA
RNING
The cooling system ispre ssu rize d,pa rtic ular ly
wh en the moto ris wa rm. Ifyo uop en the cap,
yo ucou ldbe sca lded ifhot coolant sprays out.
The reisaris kof inju ry.
Let the enginecoo ldo wn befor eyo uop en the
cap .We arpro tecti veglove sand protecti ve
ey ew earwh en openi ng. Open the cap slow ly
to release pre ssu re.
! The
coolant level mustonl ybe che cked and
corr ecte dwh en the enginehascoo led do wn
(co olant temp eratureund er104 ‡(40 †).
Ch ecki ngthe coolant level when the coolant
temp eratureis ove r104 ‡(40 †) can leadto
dama getothe engine orthe engine cooling
sys tem. X
Park thevehi cleonaleve lsurfa ce.
Only check thecoola ntleve lwhe nthe vehi cle
is on aleve lsurfa ceand theengine hascoole d
dow n.
X Turn theSmartKey toposi tion 0048inthe igni-
tion lock (Ypag e123).
X Che ckthe coola nttempera turedisplayin the
instrume ntclus ter.
The coola nttempera turemust bebelow
104 ‡(40 †).
X Turn theSmartKey toposi tion 005A
(Y pag e123) inthe igniti onlock .
X Slow lyturn cap0043counter-clo ckwiseandto
reli eve excess pressure.
X Turn cap0043further counter-clo ckwiseand
remove it.
If the coola ntisat the leve lof marker bar0087
in the filler neck whencold, there isenoug h
coola ntincoola ntexpa nsion tank0044.
X Ifnecessa ry,add coola ntthat hasbeentested
and approved byMerced es-Benz.
X Rep lace cap 0043and turn itclockwi seasfar as
it wil lgo.
For further informa tiononcoola nt,see
(Y pag e323) .
Windshi eldwashe rsyste m G
WARNING
Certa incomponents inthe engine compart-
ment, suchasthe engine, radiator andparts
of the exhau stsys tem, canbecome veryhot.
Working inthe engine compartment posesa
risk ofinjury .
Where possible,let the engine cooldownand
touch onlythecomponents describedinthe
foll owi ng. Eng
inecompar tment
263Maintenanceand care Z
Page 277 of 330
X
Make surethattheengine cannot bestarted
via your smartphone (Ypage 124).
X Make surethatthepassengers arenot endan-
gered asthey doso. Make surethatnoone is
near thedanger areawhile awheel isbeing
changed. Anyonewhoisnot directly assisting
in the wheel change should,forexample,
stand behind thebarrier.
X Get outofthe vehicle. Payattent iontotraffic
condition swhen doing so.
X Close thedriver's door. MOExtended
tires(tires withrun-flat
proper ties)
General notes With
MOExt ended tires(tires withrunflatchar-
acteristics ),you can cont inue todrive yourvehi-
cle even ifthere isatotal lossofpressure inone
or more tires.Theaffected tiremust notshow
any clearly visibledamage.
You canrecogniz eaMOExt ended tirebythe
MOExt ended marking whichappears onthe
sidewa llof the tire. Youwillfind thismarking
next tothe tire size designation, theload-bear-
ing capacity andthespeed index(Ypage 305).
MOExt ended tiresmaybeused onlyinconj unc-
tion with anactivated tirepressure losswarning
system (Canada only)ortire pressure monitor
(USA only).
If apressur eloss warning message appears
in the multifu nctiondisplay:
R observe theinstruct ionsinthe display mes-
sages (Ypage 213).
R check thetire fordamage
R ifdriving on,observe thefollowing notes
The driving distance possibleinrun-flat modeis
approximately 50miles (80km) when thevehi-
cle ispartially laden.Whenthevehicle isfully
laden itis approximately 19miles (30km).
In addition tothe vehicle load,thedriving dis-
tance possible depends upon:
R vehicle speed
R road condition
R outside temperature
The driving distance possibleinrun-flat mode
may bereduced byextrem edriving condition s
or maneuvers, oritcan beincreased througha
moderate styleofdriving. The
driving distance possibleinrun-flat modeis
counted fromthemoment thetire pressure loss
warning appears inthe multifunction display.
You must notexceed amaximum speedof
50 mph (80km/h).
When replacing oneorall tires, please observe
the following specifications foryour vehicle's
tires:
R size
R type and
R the "MOExt ended" marking
If atire has gone flatand cannot bereplaced
with aMOExt ended tire,astandard tiremay be
used asatemporary measure.Makesurethat
you usetheproper sizeandtype (summer or
winter tire).
Vehicles equippedwith MOExt ended tiresare
not equipp edwith aTIREFIT kitatthe factory. It
is therefore recommen dedthat youadditionally
equip yourvehicle withaTIREFIT kitifyou mount
tires thatdonot feature run-flat properties, e.g.
winter tires.ATIREFIT kitmay beobtained from
a qual ified specialist workshop.
Import antsafety notes G
WARNING
When driving inemergency mode,thedriving
characterist icsdeteriorate, e.g.when corner-
ing, accelerating quicklyandwhen braking.
There isarisk ofan accident.
Do not exceed thestated maximum speed.
Avoid abrupt steering anddriving maneuvers,
and driving overobstacles (curbs,potholes,
off-road). Thisappli esinparticular toaladen
vehicle.
Stop driving inemergency modeif:
R you hear banging noises.
R the vehicle startstoshake.
R you seesmoke andsmell rubber.
R ESP ®
is interven ingconst antly.
R there aretears inthe sidewa llsofthe tire.
Aft erdriving inemergency mode,havethe
wheel rimscheck edataqual ified specialist
workshop withregard totheir further use.The
defective tiremust bereplaced inevery case. Flat
tire
275Breakdown assistance Z
Page 283 of 330
Only
replace abattery withabattery thathas
been recommended byMercedes-Benz .
Remove theSmartKey ifyou park thevehicle
and donot require anyelectrical consumers.
The vehicle willthen usevery little energy, thus
conserving batterypower.
If the power supply hasbeen interrupted, e.g.if
you reconnec tthe battery, youwillhave to:
R set the clock using themultimedia system
(see theDigital Operator's Manual)
R reset thefunction forfolding theexterior mir-
rors in/out automaticall y,by folding themir-
rors outonce (Ypage 98) Charging
thebatter y G
WARNING
During charging andjump-startin g,explosive
gases canescape fromthebattery. Thereisa
risk ofan explosion.
Particularl yavoid fire,open flames, creating
sparks andsmoking. Ensurethereissufficient
ventilation whilecharging andjump-startin g.
Do not lean over abattery. G
WARNING
Battery acidiscaustic. Thereisarisk ofinjury.
Avoid contactwith skin, eyesorclothing. Do
not inhale anybattery gases.Donot lean over
the battery. Keepchildren awayfrom batter-
ies. Wash awaybattery acidimmediately with
plenty ofclean water andseek medical atten-
tion. G
WARNING
A discharged batterycanfreeze attempera-
tures below freezing point.Whenjump-start-
ing the vehicle orcharging thebattery, gases
can escape fromthebattery. Thereisarisk of
an explosion.
Allow thefrozen battery tothaw outbefore
charging itor jump-startin g.
! Only
usebattery chargers withamaximum
charging voltageof14.8 V.
! Only
charge thebattery usingthejump-
starting connectionpoint. The
jump-startin gconnec tionpoint isin the
engine compartment (Ypage 282).
X Open thehood.
X Connect thebattery charger tothe positive
terminal andground pointinthe same order
as when connec tingthedonor battery inthe
jump-startin gprocedure (Ypage 282).
If the <004C00510047004C004600440057005200550012005A004400550051004C0051
004A[ lampsdonot light upin
the instrument clusteratlow temperatures, itis
very likely thatthedischarged batteryhasfro-
zen. Inthis case youmay neither jump-start the
vehicle norcharge thebattery. Theservice lifeof
a thawed-out batterymaybeshorter. Thestart-
ing characteristics canbeimpaired ,particularl y
at low temperatures. Havethethawed-out bat-
tery checked ataqual ified speciali stworkshop.
Only charge theinstalled batterywithabattery
charger whichhasbeen tested andapproved by
Mercedes-Benz .A battery charger unitspeciall y
adap tedforMercedes-Benz vehiclesandtested
and approved byMercedes-Benz isavail able as
an accessory. Itpermits thecharging ofthe bat-
tery inits installed position. Contactanauthor-
ized Mercedes-Benz Centerforfurther informa-
tion andavail ability. Read thebattery charger's
operating instructionsbefore charging thebat-
tery. Replacing
the12Vbatter y
Observe thenotes onthe 12Vbattery
(Y page 279).
Mercedes-Benz recommendsthatyouhave the
12 Vbattery replaced ataqual ified speciali st
workshop, e.g.atan authorized Mercedes-Benz
Center.
If you want toreplace thebattery yourself,
observe thefollowi ngnotes:
R Alway sreplace adefective batterywithabat-
tery which meets thespecific requirements of
the vehicle.
The vehicle isequip pedwith abattery using
AGM (absorbe ntglass mat)technology ora
battery usingEFB(enhanced floodedbattery)
technology. Fullvehicle functionality isguar-
anteed onlywith anAGM orEFB battery. If
replacement isnecessary, alwaysuse thebat-
tery technology originallyinstalled. Switching
between thebattery technologies isnot per-
mitted. Forsafety reasons, Mercedes-Benz
recommends thatyouonly usebatteries Bat
tery (vehic le)
281Breakdown assistance Z
Page 285 of 330
If
the indicator/wa rninglampsdo not light upinthe instrument clusteratlow temperature s,itis very
likely thatthedischa rgedbattery hasfrozen. Inthis case youmay neither jump-start thevehicle nor
charge thebattery. Letthe battery thawfirst.Theservice lifeofathawed -outbattery maybeshorter.
The starting characteristics canbeimpa ired,particul arlyatlow temperature s.Have thethawed -out
battery checked ataqua lifiedspecia listworkshop.
Do not start thevehicle usingarapi dcharging device.Ifyou rvehicle 'sbattery isdischa rged,the
engine canbejump-started fromanother vehicleorfrom asecond batteryusingjumper cables.
Observe thefollow ingpoints:
R The battery isnot accessib lein all vehicle s.Ifthe other vehicle 'sbattery isnot accessib le,jump-
start thevehicle usingasecond batteryorajump-starting device.
R You may onlyjump-start thevehicle whentheengine andexhau stsystem arecold.
R Do not start theengine ifthe battery isfrozen. Letthe battery thawfirst.
R Only jump-start frombatteries witha12 Vvoltage rating.
R Only usejumper cablesthat arenot dama gedand have asufficie ntcross-section andinsula ted
terminal clamps.
R Make surethatthetwo vehicle sdo not touch.
Make surethat:
R The jumper cablesare not dama ged.
R Non-insula tedparts ofthe terminal clampsdonot come intocontact withother metal partswhile
the jumper cablesare connected tothe battery.
R The jumper cablescannot comeintocontact withparts thatcanmove whentheengine isrunning,
such asthe V-belt pulley orthe fan.
X Secure thevehicle byappl ying theelectric parking brake.
X Shift thetransmission topositio n005D.
X Turn theSmartKey topositio n005A inthe ignition lockandremove it.
X Switch offallelectrical consumers, e.g.rear window defroster, lighting,etc.
X Open thehood. Jump-st
arting
283Breakd ownassis tance Z
Page 286 of 330
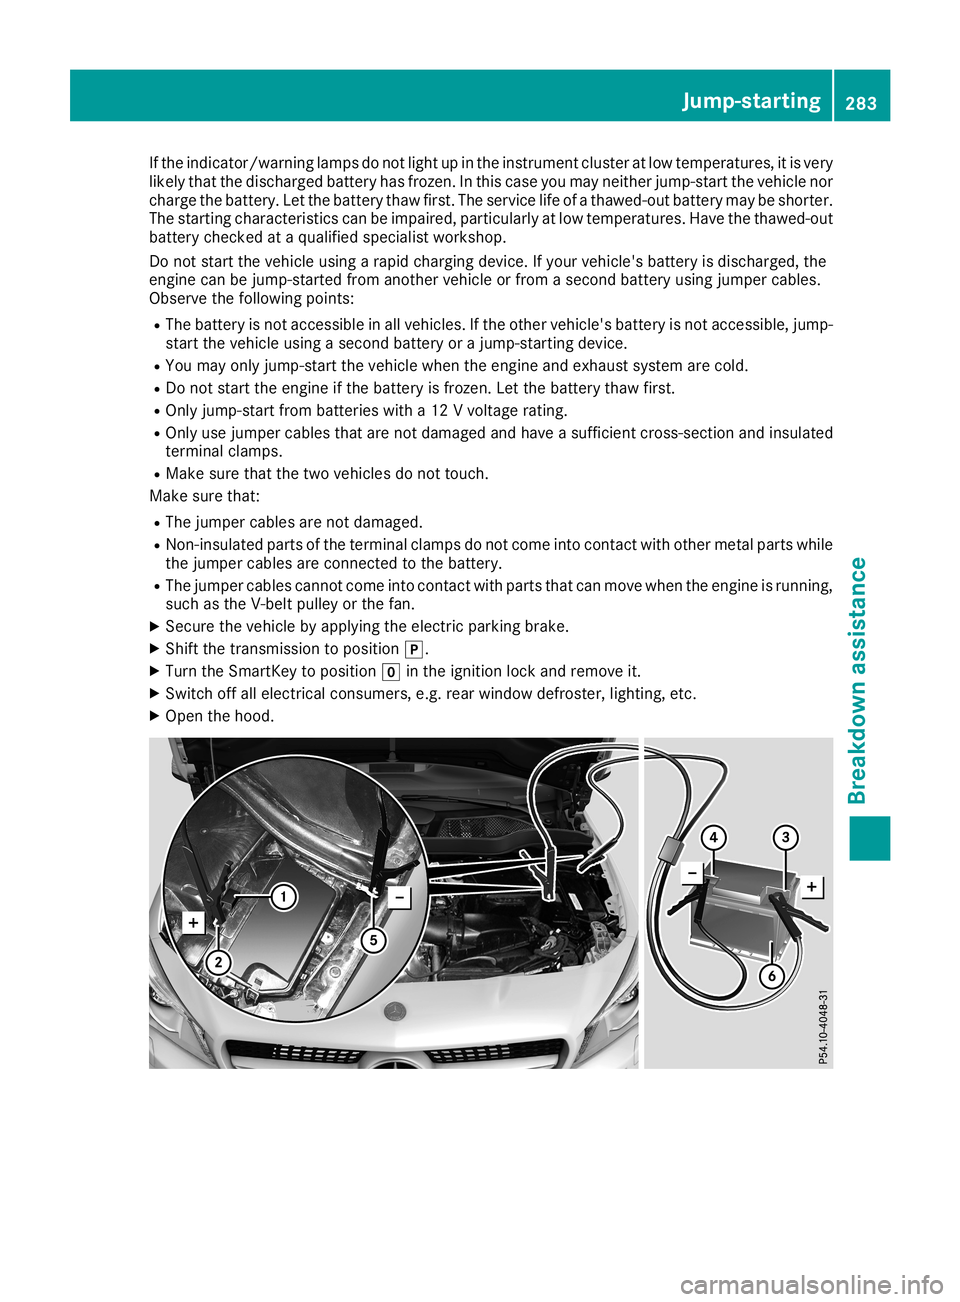
Position
number0084identifies thecharged batteryofthe other vehicle oran equivalent jump-starting
device.
X Press togethercover 0043ofpositive clamp0044and slide itback.
X Connec tpositive terminal0044 onyour vehicle topositive terminal0087 ofdonor battery 0084using the
jumper cable,beginnin gwith your ownbattery.
X Start theengine ofthe donor vehicle andrunitat idling speed.
X Connec tnegative terminal0085 ofdonor battery 0084toground point0083ofyour vehicle usingthe
jumper cable,connectin gthe jumper cabletobattery ofother vehicle 0084first.
X Ifthe battery isfully discharged, leavethebattery thatisbeing usedtojump-st artconn ected for
a few minutes beforeattemptingtostart .This charges thebattery slightly.
X Start theengine.
X Before disconn ectingthe jumper cables,letthe engine runforseveral minutes.
X First ,remove thejumper cablesfromground point0083and negative terminal0085, then from pos-
itive termin al0044 and positive terminal0087. Begin eachtimeatthe cont acts onyour ownvehicle
first.
X Close cover0043ofpositive terminal0044 after removin gthe jumper cables.
X Close thehood.
X Have thebattery checkedataqualified specialist workshop.
i Jump-start
ingisnot cons idered tobe anormal operating condition.
i Jumper
cablesandfurther informationregarding jump-startingcanbeobtained atany qualified
specialist workshop. Towing
andtow-sta rting Impor
tantsafety notes G
WARNIN
G
Funct ionsrelevant tosafety arerestr icted or
no longer availabl eif:
R the engine isnot runnin g
R the brake system orthe power steerin gis
malfunct ioning
R there isamalfunct ioninthe power supply
or the vehicle's electricalsystem
When yourvehicle istowed awayortowed
start ed,you may require considerably more
effort tosteer andbrake. Thereisarisk ofan
accident .
In such cases, useatow bar. Before being
towed awayortow start ed,make surethe
steerin gmoves freely. G
WARNIN
G
You cannolonger steerthevehicle ifthe
steerin gwheel lockhasbeen engaged. There
is arisk ofan accident .
Always switchoffthe ignition whentowing the
vehicle withatow cable oratow bar. G
WARNIN
G
When towing ortow-st arting another vehicle
and itsweight isgreater thanthepermissible
gross weight ofyour vehicle, the:
R the towing eyecould detach itself
R the vehicle/t railercombinat ioncould roll-
over.
There isarisk ofan accident .
When towing ortow-st arting another vehicle,
its weight should notbegreater thantheper-
missible grossweight ofyour vehicle.
Det ails onthe permissible grossvehicle weight
of your vehicle canbefound onthe vehicle iden-
tificat ionplate (Ypage 318). 284
Towing
andtow-sta rtingBr eakdown assistance
Page 290 of 330
wise,
componentsor syst ems could bedam-
aged.
! Make
surethat no mois turecan enterthe
fuse boxwhen thecov erisopen .
! When
closingthecov er,mak esure that itis
lying correctlyon thefuse box.Moist ureseep-
ing inor dirt could otherwise impairtheoper -
ation ofthefuses .
The fuses inyour vehic leserv eto clos edown
fault ycir cuit s.Ifafuse blows, allthecom po-
nen tson thecir cuit andtheir fun ctions stop
oper ating.
Blown fusesmustbereplac edwith fuses ofthe
same rating, which youcan recogn izebythe
colo rand value. Thefuse ratings arelistedinthe
fuse allocat ionchar t.
The fuse allocat ionchar tis in thefuse boxinthe
fro nt-pas senger foot well (Ypage 289).
If anewly inserted fuse alsoblows, havethe
cause traced andrectified ataqualified special-
ist work shop, e.g.an autho rized Merc edes- Benz
Cent er. Bef
ore chan ging afus e
X Sec ure thevehic leagains trollin gaway
(Y page 142).
X Swit choff allelec trical consumer s.
X Veh icles withoutKEYLESS-G O:rem ove the
Sm artKey fromtheigni tionlock .
X Veh
icles withKEYLESS-G Osta rt-fu nction
or KEYLESS-G O:open thedriv er's door .
The vehic leelec tronic sare now inposit ion
005A. This corresp ondsto theSm artKey being
rem oved fromtheigni tion.
The fuses arelocat edinvario usfuse boxes:
R Fuse boxintheeng inecom partmen ton the
left -han dside ofthevehic le,when viewed in
th edirec tionof travel
R Fuse boxinthefro nt-pas senger foot well
The fuse allocat ionchar tis on thefuse boxinthe
fro nt-pas senger foot well (Ypage 289). Fuse
boxintheengine compartm ent G
WAR
NING
When thehood isopen andthewinds hield
wipers aresetinmot ion, youcan beinjured by
th ewiper linkage. Thereis arisk ofinjury.
Always switchoff thewinds hieldwipers and
th eigni tionbefo reopen ingthehood. X
Open thehood.
X Use adry clothto rem ove anymois turefro m
th efuse box.
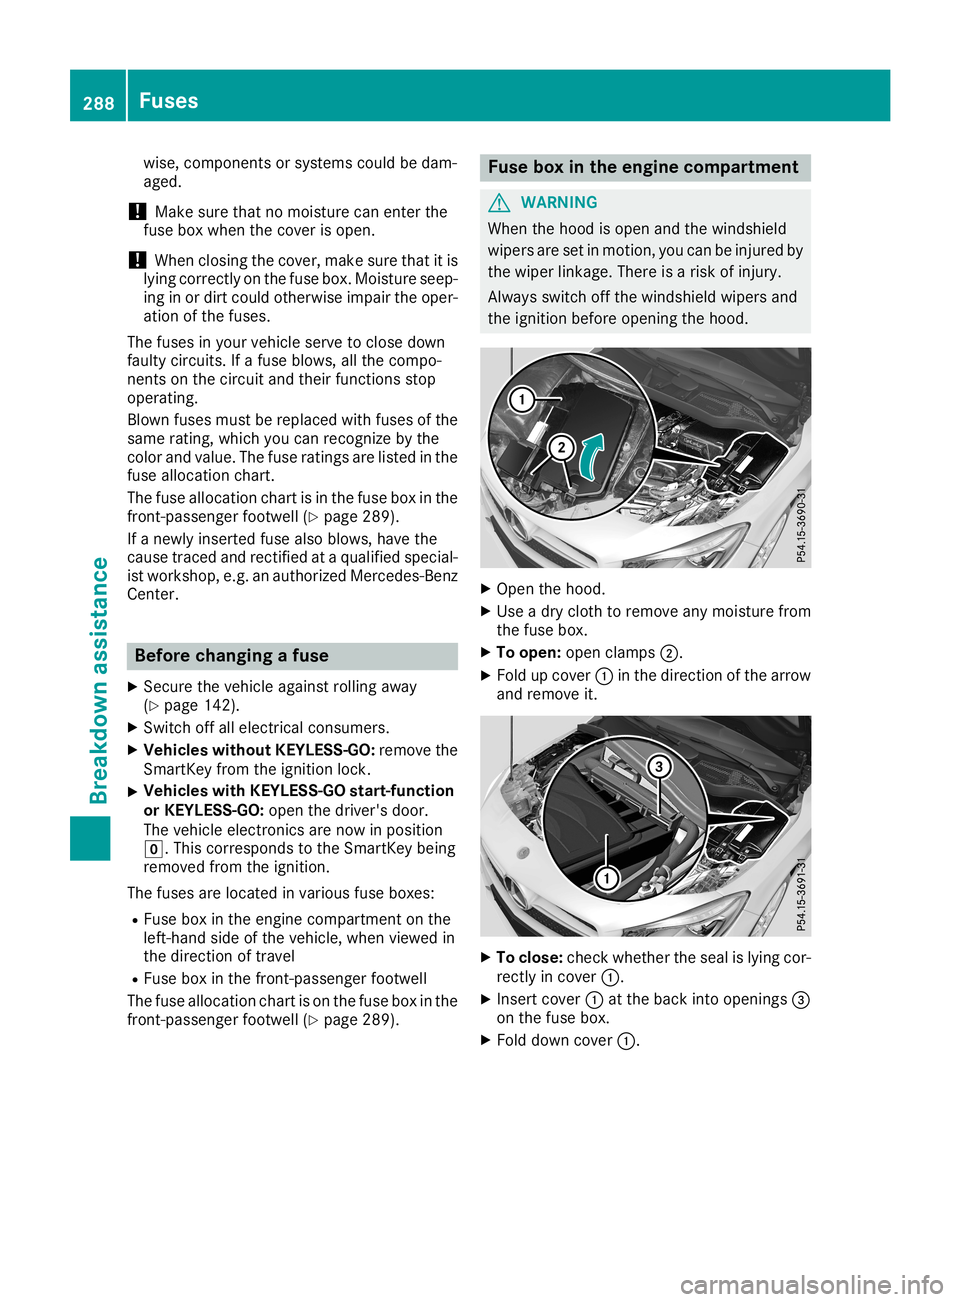
X To open: openclamps0044.
X Fold upcov er0043 inthedirec tionof thearro w
and remove it. X
To close: checkwhet hertheseal islying cor-
rec tlyincov er0043.
X Insert cover0043 attheback intoopen ings0087
on thefuse box.
X Fold down cover0043. 288
FusesBr
eakd ownassis tance
Page 313 of 330

Tire-mount
ingtools should notbeused near
the valve. Thiscould damage theelectron ic
compon ents.
Only have tireschanged ataqualified spe-
cialist workshop.
Observe theinstr uctions andsafety notesinthe
"Changing awheel" section (Ypage 310).
The wear pattern son the front andrear tires
differ, depending onthe operating conditions.
Rotate thewheels beforeaclear wearpattern
has formed onthe tires. Fronttires typically
wear more onthe shoulders andtherear tires in
the cent er.
On vehicles thathave thesame sizefront and
rear wheels, youcan rotat ethe wheels accord-
ing tothe inter valsinthe tire manufact urer's
warranty bookinyour vehicle document s.Ifno
warranty bookisavailabl e,the tires should be
rotat edevery 3,000 to6,000 miles(5,000 to
10,00 0km ).Dependin gon tire wear, thismay
be required earlier.Donot change thedirection
of wheel rotation.
Clean thecont actsurfaces ofthe wheel andthe
brake discthoroughly everytimeawheel isrota-
ted. Check thetire pressure and,ifnecessary,
restart thetire pressure losswarning system
(Canada only)orthe tire pressure monitor(USA
only). Direction
ofrota tion
Tires withaspecified directionofrotat ionhave
additional benefits,e.g. ifthere isarisk ofhydro-
planing. Theseadvantages canonly begained if
the tires areinstalled correspon dingtothe
direction ofrotat ion.
An arrow onthe sidewall ofthe tire indicates its
correc tdirection ofrotat ion. Storing
wheels
Stor ewheels thatarenot being usedinacool,
dry and preferably darkplace. Protectthe tires
from oil,grease, gasoline anddiesel. Mounting
awheel
Prepa ringthevehicle X
Stop thevehicle onsolid, non-slippery and
level ground.
X Apply theelectric parking brakemanually.
X Bring thefront wheels intothestraight- ahead
position.
X Shift thetrans mission toposition 005D.
X Switch offthe engine.
X Vehicles withoutKEYLESS-GO: removethe
Smart Keyfrom theignition lock.
X Vehicles
withKEYL ESS-GO start-function
or KEYL ESS-GO: openthedriver's door.
The vehicle electron icsare now inposition
0092. This isthe same as“key removed”.
X Vehicles
withKEYL ESS-GO start-function
or KEYL ESS-GO: removetheStart /Stopbut-
ton from theignition lock(Ypage 123).
X Make surethattheengine cannotbe start ed
via your smartphon e(Y page 83).
X Ifincluded inthe vehicle equipment, remove
the tire- change toolkitfrom thevehicle.
X Safeguard thevehicle against rollingaway
(Y page 142).
i Apart
fromcertaincount ry-specific varia-
tions, thevehicles arenot equipped witha
tire- change toolkit.Some toolsforchanging a
wheel arespecific tothe vehicle. Formore
inform ationonwhich toolsarerequired to
perform awheel change onyour vehicle, con-
sult aqualified specialist workshop.
Necessary tire-changing toolscaninclude, for
example:
R Jack
R Wheel chock
R Lug wrench Changing
awheel
311Wheels andtires Z