2019 MERCEDES-BENZ CLA COUPE change wheel
[x] Cancel search: change wheelPage 277 of 330
X
Make surethattheengine cannot bestarted
via your smartphone (Ypage 124).
X Make surethatthepassengers arenot endan-
gered asthey doso. Make surethatnoone is
near thedanger areawhile awheel isbeing
changed. Anyonewhoisnot directly assisting
in the wheel change should,forexample,
stand behind thebarrier.
X Get outofthe vehicle. Payattent iontotraffic
condition swhen doing so.
X Close thedriver's door. MOExtended
tires(tires withrun-flat
proper ties)
General notes With
MOExt ended tires(tires withrunflatchar-
acteristics ),you can cont inue todrive yourvehi-
cle even ifthere isatotal lossofpressure inone
or more tires.Theaffected tiremust notshow
any clearly visibledamage.
You canrecogniz eaMOExt ended tirebythe
MOExt ended marking whichappears onthe
sidewa llof the tire. Youwillfind thismarking
next tothe tire size designation, theload-bear-
ing capacity andthespeed index(Ypage 305).
MOExt ended tiresmaybeused onlyinconj unc-
tion with anactivated tirepressure losswarning
system (Canada only)ortire pressure monitor
(USA only).
If apressur eloss warning message appears
in the multifu nctiondisplay:
R observe theinstruct ionsinthe display mes-
sages (Ypage 213).
R check thetire fordamage
R ifdriving on,observe thefollowing notes
The driving distance possibleinrun-flat modeis
approximately 50miles (80km) when thevehi-
cle ispartially laden.Whenthevehicle isfully
laden itis approximately 19miles (30km).
In addition tothe vehicle load,thedriving dis-
tance possible depends upon:
R vehicle speed
R road condition
R outside temperature
The driving distance possibleinrun-flat mode
may bereduced byextrem edriving condition s
or maneuvers, oritcan beincreased througha
moderate styleofdriving. The
driving distance possibleinrun-flat modeis
counted fromthemoment thetire pressure loss
warning appears inthe multifunction display.
You must notexceed amaximum speedof
50 mph (80km/h).
When replacing oneorall tires, please observe
the following specifications foryour vehicle's
tires:
R size
R type and
R the "MOExt ended" marking
If atire has gone flatand cannot bereplaced
with aMOExt ended tire,astandard tiremay be
used asatemporary measure.Makesurethat
you usetheproper sizeandtype (summer or
winter tire).
Vehicles equippedwith MOExt ended tiresare
not equipp edwith aTIREFIT kitatthe factory. It
is therefore recommen dedthat youadditionally
equip yourvehicle withaTIREFIT kitifyou mount
tires thatdonot feature run-flat properties, e.g.
winter tires.ATIREFIT kitmay beobtained from
a qual ified specialist workshop.
Import antsafety notes G
WARNING
When driving inemergency mode,thedriving
characterist icsdeteriorate, e.g.when corner-
ing, accelerating quicklyandwhen braking.
There isarisk ofan accident.
Do not exceed thestated maximum speed.
Avoid abrupt steering anddriving maneuvers,
and driving overobstacles (curbs,potholes,
off-road). Thisappli esinparticular toaladen
vehicle.
Stop driving inemergency modeif:
R you hear banging noises.
R the vehicle startstoshake.
R you seesmoke andsmell rubber.
R ESP ®
is interven ingconst antly.
R there aretears inthe sidewa llsofthe tire.
Aft erdriving inemergency mode,havethe
wheel rimscheck edataqual ified specialist
workshop withregard totheir further use.The
defective tiremust bereplaced inevery case. Flat
tire
275Breakdown assistance Z
Page 295 of 330
When
youhave mount edthe M+S tires:
X Check thetire pressures (Ypage 293).
X Restart thetire pressure monitor(USA only)
(Y page 300).
X Restart thetire pressure losswarning system
(Canada) (Ypage 297) Snow
chains G
WARNIN
G
If snow chains aremount edon the rear
wheels, thesnow chains couldcause abrasion
to the vehicle bodyortochassis compon ents.
This could cause damage tothe vehicle orthe
tires. There isarisk ofan accident .
To avoid hazardous situations:
R never mount snowchains onthe rear
wheels
R only mount snowchains inpairs onthe
fron twheels.
! On
some tiresizes there isnot enough space
for snow chains. Toavoid damage tothe vehi-
cle ortires, observe the"Wheel andtirecom-
bination s"sect ionunder "Tiresandwheels".
For safety reasons, Mercedes- Benzrecom-
mends thatyouonly usesnow chains thathave
been specially approved foryour vehicle by
Mercedes- Benz,or are ofacorr esponding
standard ofquality. Formore inform ation,
please contactaqualified specialist workshop.
If you inten dto mount snowchains, pleasebear
the following pointsinmind:
R Sno wchains maynotbemount edon all
wheel/tire combinations.Permissible wheel-
tire combin ations(Ypage 315).
R Only usesnow chains whendriving onroads
complet elycovered bysnow. Remove the
snow chains assoon aspossible whenyou
come toaroad thatisnot snow-c overed.
R Local regulations mayrestr ictthe use ofsnow
chains. Observe theappropriate regulationsif
you wish tomount snowchains.
R Do not exceed themaximum permissible
speed of30mph (50km/ h).
R Ifsnow chains areinstalled, youcann otuse
Act ive Parking Assist(Ypage 167). You
may wish todeactivat eES P®
when pulling
away withsnow chains installed .This allows the
wheels tospin inacont rolled manner,achieving
incr eased propulsive force(cutt ingaction ).
R Deact ivateESP®
(all vehicles except
Mercedes- AMGvehicles) (Ypage 65)
R Deact ivateESP®
(Mercedes- AMGvehicles)
(Y page 66)
Inf ormation aboutdriving withanemergen cy
spare wheel (Ypage 315). Tir
epr essure Tir
epr essure specifications
Impor tantsafety notes G
WARNIN
G
Underin flatedoroverinf latedtirespose the
following risks:
R the tires mayburst, especially asthe load
and vehicle speedincrease.
R the tires maywear exces sively and/or
unevenly, whichmaygreatly impairtire
trac tion.
R the driving charact eristics,as well assteer-
ing and braking, maybegreatly impaired.
There isarisk ofan accident .
Follow recomm endedtireinflation pressures
and check thepressure ofall the tires includ-
ing the spare wheel:
R mont hly,atleast
R ifthe load changes
R before beginnin galong journ ey
R under differen toperating conditions,e.g.
off- road driving
If neces sary,correctthe tire pressure.
i The
data onthe Tire andLoading Informa-
tion placard andtirepressure tableshown
here areexamples. Tirepressure specifica-
tions arevehicle-s pecificandmay deviate
from thedata shown here.Thetirepressure
specificat ionsthatarevalid foryour vehicle
can befound onthe Tire andLoading Infor-
mation placard andtirepressure tableonthe
vehicle. Tir
epr essure
293Wheelsandtires Z
Page 297 of 330
If
the tire pressu reshave been settothe lowe r
valu esfor lighter loadsand/or lowerroad
speed s,the pressu resshoul dbe reset tothe
higher values:
R ifyou want todrive withanincreased load
and/or
R ifyou want todrive athigher speeds
i The
tirepressu resforincreased loadsand/
or higher roadspeed s,shown inthe tire pres-
sure table, mayhave anegative effectondriv-
ing comfort.
If the tire pressu reisnot setcorrectly, thiscan
lea dto an excessive build-up ofheat andasud-
den loss ofpressu re.
For more information, contactaqua lifiedspe-
ciali stworkshop. Important
notesontire pressure G
WARNING
If the tire pressu redrops repeatedly,the
wheel ,valve ortire may bedama ged.Tire
pressu rethat istoo low may resul tin atire
blow -out. There isarisk ofan accident.
R Check thetire forforeign objects.
R Check whether thewheel islosing airorthe
valve islea king.
If you areunabl eto rectify thedama ge,con-
tact aqua lifiedspecia listworkshop. G
WARNING
If you fitunsui table accessorie sonto tire
valves ,the tire valves maybeoverloa dedand
malfu nction, whichcancause tirepressu re
loss. Duetotheir desig n,retrofitted tirepres-
sure monitors keepthetire valve open. This
can also resul tin tire pressu reloss. There isa
risk ofan accident.
Only screw thestandard valvecaporother
valve capsappro vedbyMercedes-Benz for
you rvehicle ontothetire valve.
Use asuita blepressu regau getocheck thetire
pressu re.The outer appearance ofatire does
not permit anyrelia bleconclusion aboutthe tire
pressu re.On vehicle sequi pped withtheelec-
tronic tirepressu remonitor, thetire pressu re
can bechecked inthe on-board computer. The
tiretemperature andpressu reincrease
when thevehicle isin motion. Thisisdepende nt
on the driving speedandtheload .
Therefore, youshoul donly correct tirepres-
sures whenthetires arecold.
The tires arecold:
R ifthe vehicle hasbeen parked withthetires
out ofdirect sunlightfor atlea stthree hours
and
R ifthe vehicle hasbeen driven lessthan 1mile
(1.6 km)
The tiretemperature changesdependingon the
outsid etemperature ,the vehicle speedandthe
tire load .If the tire temperature changesby
18 ‡(10 †), thetire pressu rechanges by
appro ximately 10kPa (0.1 bar/ 1.5psi).Take
this into account whenchecking thepressu reof
warm tires.Onlycorrect thetire pressu reifit is
too low forthe current operatingconditions. If
you check thetire pressu rewhen thetires are
warm, theresul tingvaluewil lbe highe rthan if
the tires were cold.Thisisnormal. Donot
reduce thetire pressu reto the valu especifie d
for cold tires. Thetirepressu rewou ldotherwise
be too low.
Observe therecommended tirepressu resfor
cold tires:
R on the Tire andLoadi ngInformation placard
on the B-pilla ron the driver's side
R in the tire pressu retable inthe fuel fillerflap
(Y page 141) Underinfl
atedoroverin flated tires
Underinfl atedtires G
WARNING
Tires withpressu rethat istoo low can over-
heat andburst asaconsequence. Inaddi tion,
they alsosuffer fromexcessive and/orirreg-
ula rwea r,which canseverel yimpa irthe brak-
ing propertie sand thedriving characteristics.
There isarisk ofan accident.
Avoid tirepressu resthat aretoo low inall the
tires, includi ngthe spare wheel.
Underinfla tedtires may:
R overhea t,lea ding totire defects
R adverse lyaffect handling Tire
pressure
295Wheelsand tires Z
Page 298 of 330
R
wear excessiv elyand/ orunev enly
R have anadver seeffect onfuel consumpt ion
Over inflatedtires G
WAR
NING
Tires withexcessiv elyhigh pressure canburst
becaus eth ey are damaged moreeasily by
road debris ,pot holes etc.In addit ion,they
also sufferfro mirre gular wear, which can
seve relyimpair thebrak ingprope rties and the
driv ingchar acterist ics.Ther eis arisk ofan
acc iden t.
Av oid tirepres sures that are too high inall the
tir es, including thespare wheel.
Over inflated tires may:
R inc rease thebrak ingdist ance
R adver selyaffecthand ling
R wear excessiv elyand/ orunev enly
R have anadver seeffect onride comfort
R be mor esusc eptible todamage
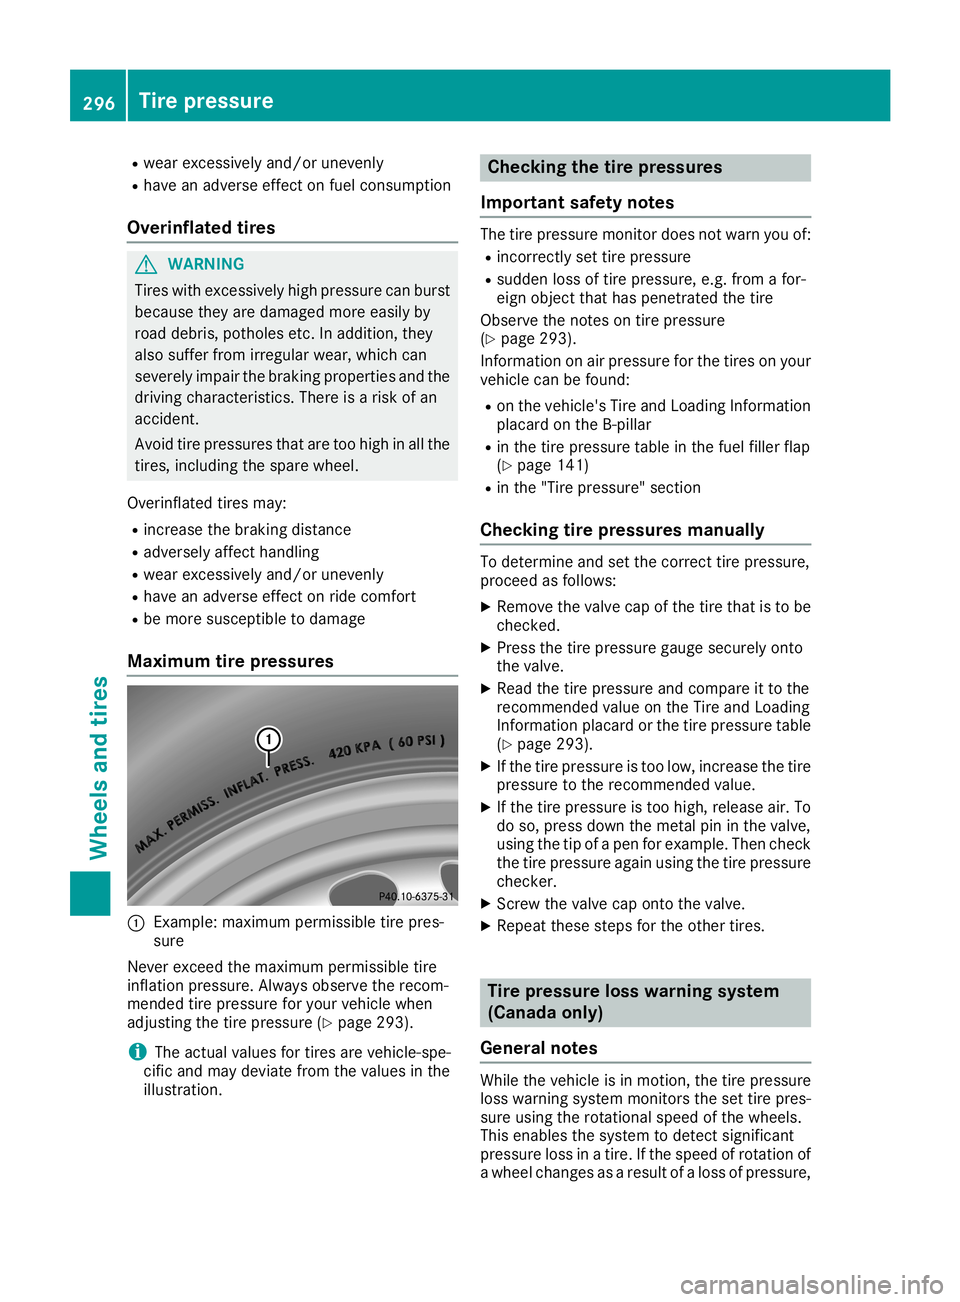
Max imumtirepr essur es 0043
Example: maximum permissible tirepres -
sure
Nev erexc eed themax imum permissible tire
inf latio npres sure. Always observetherec om-
men dedtirepres sure foryour vehic lewhen
adjus tingth etir epres sure (Ypage 293).
i The
actual values fortires are vehic le-spe-
cif icand may deviat efro mthevalues inthe
illust ration. Checking
thetir epr essur es
Imp ortant safety notes The
tirepres sure monitordoes notwarn youof:
R inc orrect lyset tirepres sure
R sudden lossoftirepres sure, e.g.fro mafor -
eign object that has penetrated thetir e
Obser vethenot eson tirepres sure
(Y page 293).
In for mat iononair pres sure forthetir es on your
vehic lecan befoun d:
R on thevehic le'sTire andLoadin gIn for mat ion
placar don theB- pillar
R in thetir epres sure table inthefuel filler flap
(Y page 141)
R in the"Tire pressure" section
Checking tirepr essur esma nua lly To
det erm ineand setthecor recttir epres sure,
proc eedasfollo ws:
X Remov eth evalve capofthetir eth at isto be
che cked.
X Pres sth etir epres sure gauge securely onto
th evalve .
X Read thetir epres sure andcompare itto the
rec omm endedvalue ontheTire andLoadin g
In for mat ionplacar dor thetir epres sure table
(Y page 293).
X Ifth etir epres sure istoo low, increase thetir e
pres sure totherec omm endedvalue.
X Ifth etir epres sure istoo high, releas eair. To
do so, pres sdown themet alpin inthevalve ,
using thetip ofapen forexam ple.Then check
th etir epres sure again usingthetir epres sure
che cker.
X Sc rew thevalve capontoth evalve .
X Repeat these steps fortheoth ertires. Tir
epr essur eloss warning system
(Cana daonly)
Gener alnotes While
thevehic leisin mot ion, thetir epres sure
loss warn ingsyst emmon itorstheset tirepres -
sure using therot ation alspeed ofthewheels.
This enabl esthesyst emtodet ect sign ificant
pres sure lossinatir e. Ifth espeed ofrot ation of
a wheel changesasaresult ofaloss ofpres sure, 296
Tir
epr essur eWheels andtires
Page 313 of 330

Tire-mount
ingtools should notbeused near
the valve. Thiscould damage theelectron ic
compon ents.
Only have tireschanged ataqualified spe-
cialist workshop.
Observe theinstr uctions andsafety notesinthe
"Changing awheel" section (Ypage 310).
The wear pattern son the front andrear tires
differ, depending onthe operating conditions.
Rotate thewheels beforeaclear wearpattern
has formed onthe tires. Fronttires typically
wear more onthe shoulders andtherear tires in
the cent er.
On vehicles thathave thesame sizefront and
rear wheels, youcan rotat ethe wheels accord-
ing tothe inter valsinthe tire manufact urer's
warranty bookinyour vehicle document s.Ifno
warranty bookisavailabl e,the tires should be
rotat edevery 3,000 to6,000 miles(5,000 to
10,00 0km ).Dependin gon tire wear, thismay
be required earlier.Donot change thedirection
of wheel rotation.
Clean thecont actsurfaces ofthe wheel andthe
brake discthoroughly everytimeawheel isrota-
ted. Check thetire pressure and,ifnecessary,
restart thetire pressure losswarning system
(Canada only)orthe tire pressure monitor(USA
only). Direction
ofrota tion
Tires withaspecified directionofrotat ionhave
additional benefits,e.g. ifthere isarisk ofhydro-
planing. Theseadvantages canonly begained if
the tires areinstalled correspon dingtothe
direction ofrotat ion.
An arrow onthe sidewall ofthe tire indicates its
correc tdirection ofrotat ion. Storing
wheels
Stor ewheels thatarenot being usedinacool,
dry and preferably darkplace. Protectthe tires
from oil,grease, gasoline anddiesel. Mounting
awheel
Prepa ringthevehicle X
Stop thevehicle onsolid, non-slippery and
level ground.
X Apply theelectric parking brakemanually.
X Bring thefront wheels intothestraight- ahead
position.
X Shift thetrans mission toposition 005D.
X Switch offthe engine.
X Vehicles withoutKEYLESS-GO: removethe
Smart Keyfrom theignition lock.
X Vehicles
withKEYL ESS-GO start-function
or KEYL ESS-GO: openthedriver's door.
The vehicle electron icsare now inposition
0092. This isthe same as“key removed”.
X Vehicles
withKEYL ESS-GO start-function
or KEYL ESS-GO: removetheStart /Stopbut-
ton from theignition lock(Ypage 123).
X Make surethattheengine cannotbe start ed
via your smartphon e(Y page 83).
X Ifincluded inthe vehicle equipment, remove
the tire- change toolkitfrom thevehicle.
X Safeguard thevehicle against rollingaway
(Y page 142).
i Apart
fromcertaincount ry-specific varia-
tions, thevehicles arenot equipped witha
tire- change toolkit.Some toolsforchanging a
wheel arespecific tothe vehicle. Formore
inform ationonwhich toolsarerequired to
perform awheel change onyour vehicle, con-
sult aqualified specialist workshop.
Necessary tire-changing toolscaninclude, for
example:
R Jack
R Wheel chock
R Lug wrench Changing
awheel
311Wheels andtires Z
Page 314 of 330
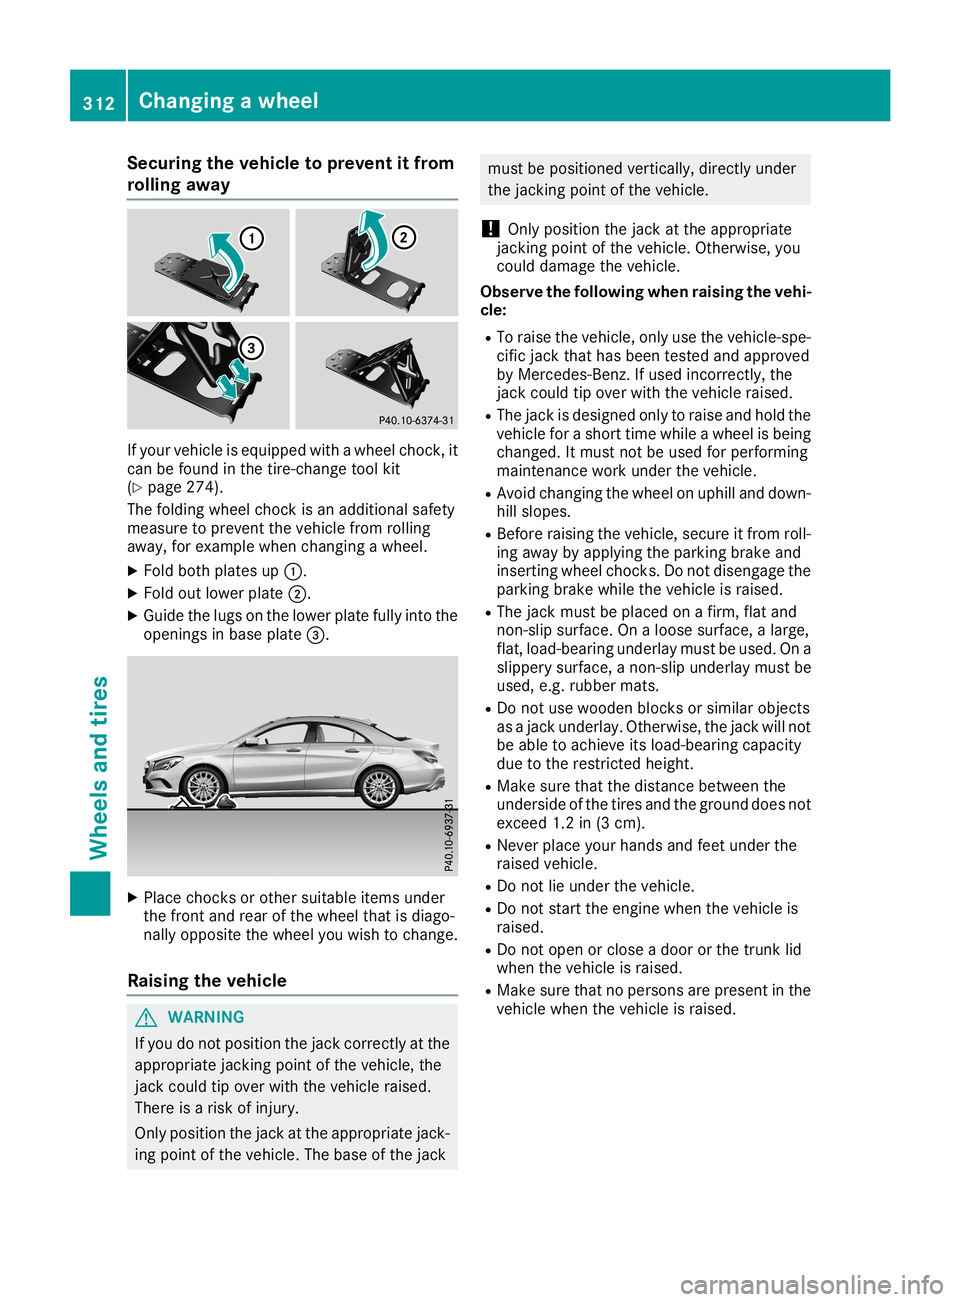
Securing
thevehicle toprevent itfrom
rolling away If
your vehicle isequippe dwith awheel chock,it
can befound inthe tire-c hange toolkit
(Y page 274).
The folding wheelchock isan additional safety
measure toprevent thevehicle fromrolling
away ,for example whenchanging awheel.
X Fold both plates up0043.
X Fold outlower plate0044.
X Guide thelugs onthe lower platefullyintothe
openings inbase plate 0087. X
Place chocksor other suitable itemsunder
the front andrear ofthe wheel thatisdiago-
nally opposite thewheel youwish tochange.
Raising thevehicle G
WARNING
If you donot position thejack correct lyat the
appropriate jackingpoint ofthe vehicle, the
jack could tipover withthevehicle raised.
There isarisk ofinjury.
Only position thejack atthe appropriate jack-
ing point ofthe vehicle. Thebase ofthe jack must
bepositioned vertically,directlyunder
the jackin gpoint ofthe vehicle.
! Only
position thejack atthe appropriate
jackin gpoint ofthe vehicle. Otherwise, you
could damage thevehicle.
Observe thefollow ingwhen raising thevehi-
cle:
R To raise thevehicle, onlyusethevehicle-spe-
cific jack thathasbeen tested andapproved
by Mercedes-B enz.Ifused incorrec tly,the
jack could tipover withthevehicle raised.
R The jack isdesigned onlytoraise andhold the
vehicle forashort timewhile awheel isbeing
changed. Itmust notbeused forperforming
maintenan cework under thevehicle.
R Avoid changing thewheel onuphill anddown-
hill slopes.
R Before raising thevehicle, secureitfrom roll-
ing away byapply ingthe parking brakeand
insertin gwheel chocks.Do not disengage the
parking brakewhilethevehicle israised.
R The jack must beplaced onafirm, flatand
non- slipsurface. Onaloose surface, alarge,
flat, load-bearing underlaymustbeused. Ona
slippery surface, anon- slipunderlay mustbe
used, e.g.rubber mats.
R Do not use wooden blocksorsimilar objects
as ajack underlay. Otherwise, thejack willnot
be able toachieve itsload-bearing capacity
due tothe restrict edheight.
R Make surethatthedistance between the
underside ofthe tires andtheground doesnot
exceed 1.2in(3 cm).
R Never placeyourhands andfeet under the
raised vehicle.
R Do not lieunder thevehicle.
R Do not start theengine whenthevehicle is
raised.
R Do not open orclose adoor orthe trunk lid
when thevehicle israised.
R Make surethatnopersons arepresent inthe
vehicle whenthevehicle israised. 312
Changing
awheelWheels andtires
Page 315 of 330

X
Using lugwrench 0043,loosen thebolts onthe
wheel youwish tochange byabou tone full
turn. Donot unscrew thebolts completely. Jacking
points
The jacking pointsarelocated justbehind the
front wheel housings andjust infront ofthe rear
wheel housings (arrows).
Mercedes-AMG vehiclesand vehicl eswith
AMG Line: toprotect thevehicle body,thevehi-
cle has covers installed nexttothe jacking
points onthe outer sills. Covers,
front(example: vehicleswithAMG Line)
X Mercedes-AMG
vehiclesand vehicl es
with AMG Line: foldcover 0044upwa rds. X
Take ratchet wrench 0083out ofthe vehicle tool
kit and place iton the hexagon nutofjack 0085
so that theletters AUFarevisible.
X Position jack0085atjacking point0087. X
Make surethefoot ofthe jack isdirectly
beneath thejacking point.
X Turn ratchet wrench 0083until jack0085sits
completely onjacking point0087and thebase
of the jack liesevenly onthe ground.
X Turn ratchet wrench 0083until thetire israised
a maximum of1.2 in(3 cm )from theground.
Removing awhee l !
Do
not place wheel boltsinsand oron adirty
surface. Thebolt andwheel hubthreads could
otherwise bedamage dwhen youscrew them
in.
X Unscrew thewheel bolts.
X Remove thewheel.
Mounting anew whee l G
WARNING
Oiled orgreased wheelboltsordamage d
wheel bolts/hub threadscancause thewheel Changing
awhee l
313Wheels andtires
Z