2019 MERCEDES-BENZ AMG GT ROADSTER ignition
[x] Cancel search: ignitionPage 75 of 298
If a locked door is opened from the inside, the
previous unlock status of the vehicle will be
taken into consideration if:
R the vehicle was locked using the locking but-
ton for the central locking, or
R locked automatically
The vehicle will be fully unlocked if it had previ-
ously been fully unlocked. If only the driver's
door had been previously unlocked, only the
door which has been opened from the inside is
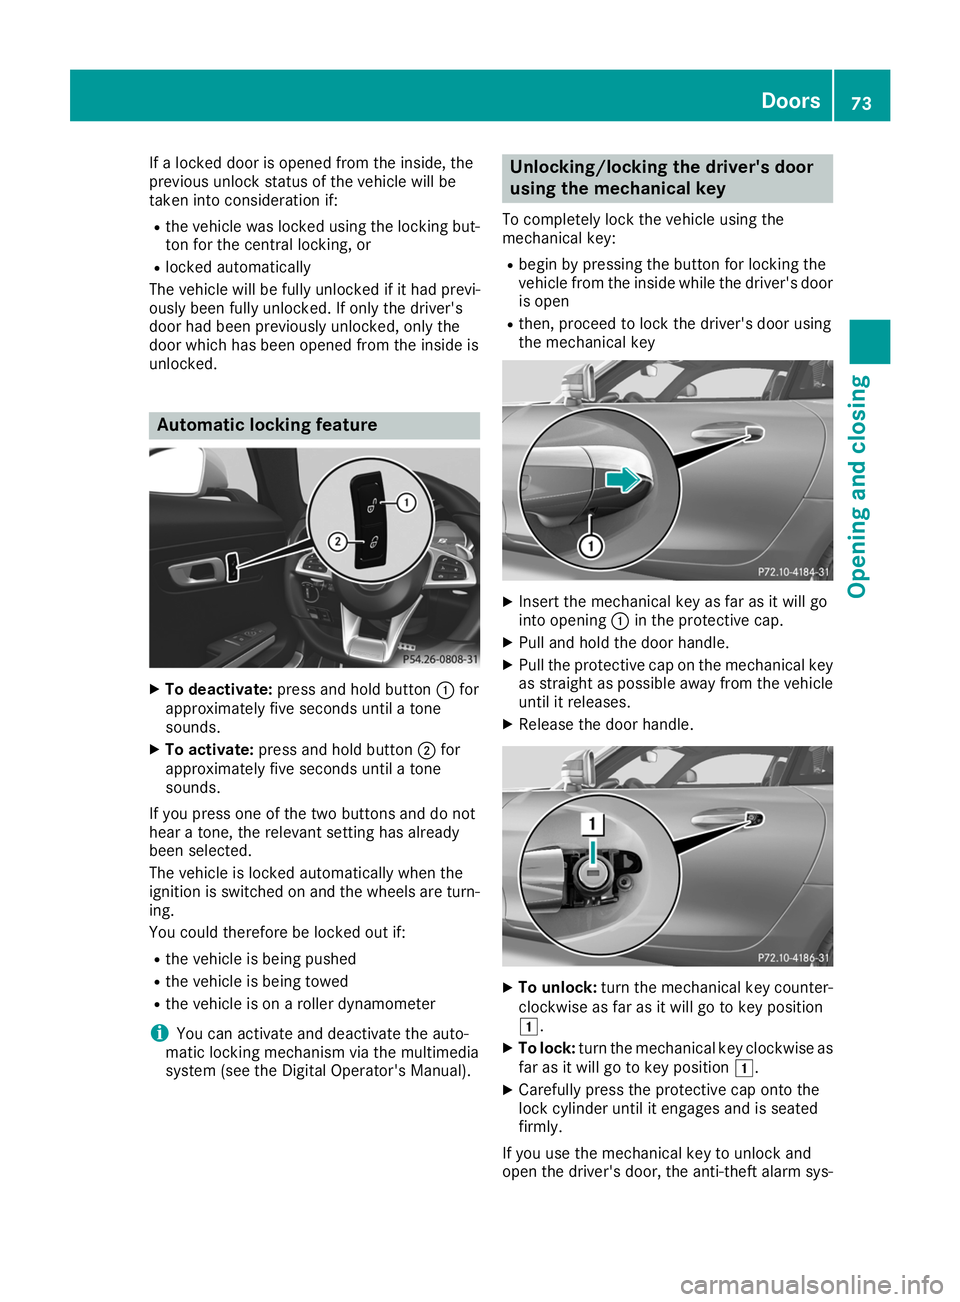
unlocked. Automatic locking feature
X
To deactivate: press and hold button 0043for
approximately five seconds until a tone
sounds.
X To activate: press and hold button 0044for
approximately five seconds until a tone
sounds.
If you press one of the two buttons and do not
hear a tone, the relevant setting has already
been selected.
The vehicle is locked automatically when the
ignition is switched on and the wheels are turn-
ing.
You could therefore be locked out if:
R the vehicle is being pushed
R the vehicle is being towed
R the vehicle is on a roller dynamometer
i You can activate and deactivate the auto-
matic locking mechanism via the multimedia
system (see the Digital Operator's Manual). Unlocking/locking the driver's door
using the mechanical key
To completely lock the vehicle using the
mechanical key: R begin by pressing the button for locking the
vehicle from the inside while the driver's door
is open
R then, proceed to lock the driver's door using
the mechanical key X
Insert the mechanical key as far as it will go
into opening 0043in the protective cap.
X Pull and hold the door handle.
X Pull the protective cap on the mechanical key
as straight as possible away from the vehicleuntil it releases.
X Release the door handle. X
To unlock: turn the mechanical key counter-
clockwise as far as it will go to key position
0047.
X To lock: turn the mechanical key clockwise as
far as it will go to key position 0047.
X Carefully press the protective cap onto the
lock cylinder until it engages and is seated
firmly.
If you use the mechanical key to unlock and
open the driver's door, the anti-theft alarm sys- Doors
73Opening and closing Z
Page 79 of 298
Make sure that nobody touches the side win-
dow during the opening procedure. If some-
body becomes trapped, release the switch or pull the switch to close the side window again. G
WARNING
While closing the side windows, body parts in the closing area could become trapped. There is a risk of injury.
When closing make sure that no parts of the
body are in the closing area. If somebody
becomes trapped, release the switch or press
the switch to open the side window again. G
WARNING
If children operate the side windows they
could become trapped, particularly if they are left unsupervised. There is a risk of injury.
When leaving the vehicle, always take the
SmartKey with you and lock the vehicle. Never
leave children unsupervised in the vehicle. Side window reversing feature
The side windows are equipped with an auto-
matic reversing feature. If a solid object blocks
or restricts a side window from traveling
upwards during the automatic closing process,
the side window opens again automatically. Dur-
ing the manual closing process, the side window only opens again automatically after the corre-
sponding switch is released. The automatic
reversing feature is only an aid and does not
relieve you of the responsibility to pay attention
when closing a side window. G
WARNING
The reversing feature does not react:
R to soft, light and thin objects, e.g. small fin-
gers
R while adjusting
This means that the reversing feature cannot
prevent someone being trapped in these sit-
uations. There is a risk of injury.
Make sure that no body parts are in close
proximity during the closing procedure. If someone becomes trapped, press the
0062
button to open the side window again. Opening and closing the side win-
dows
The switches for all side windows are located on
the driver's door. There is also a switch on the
front-passenger door for the corresponding side
window.
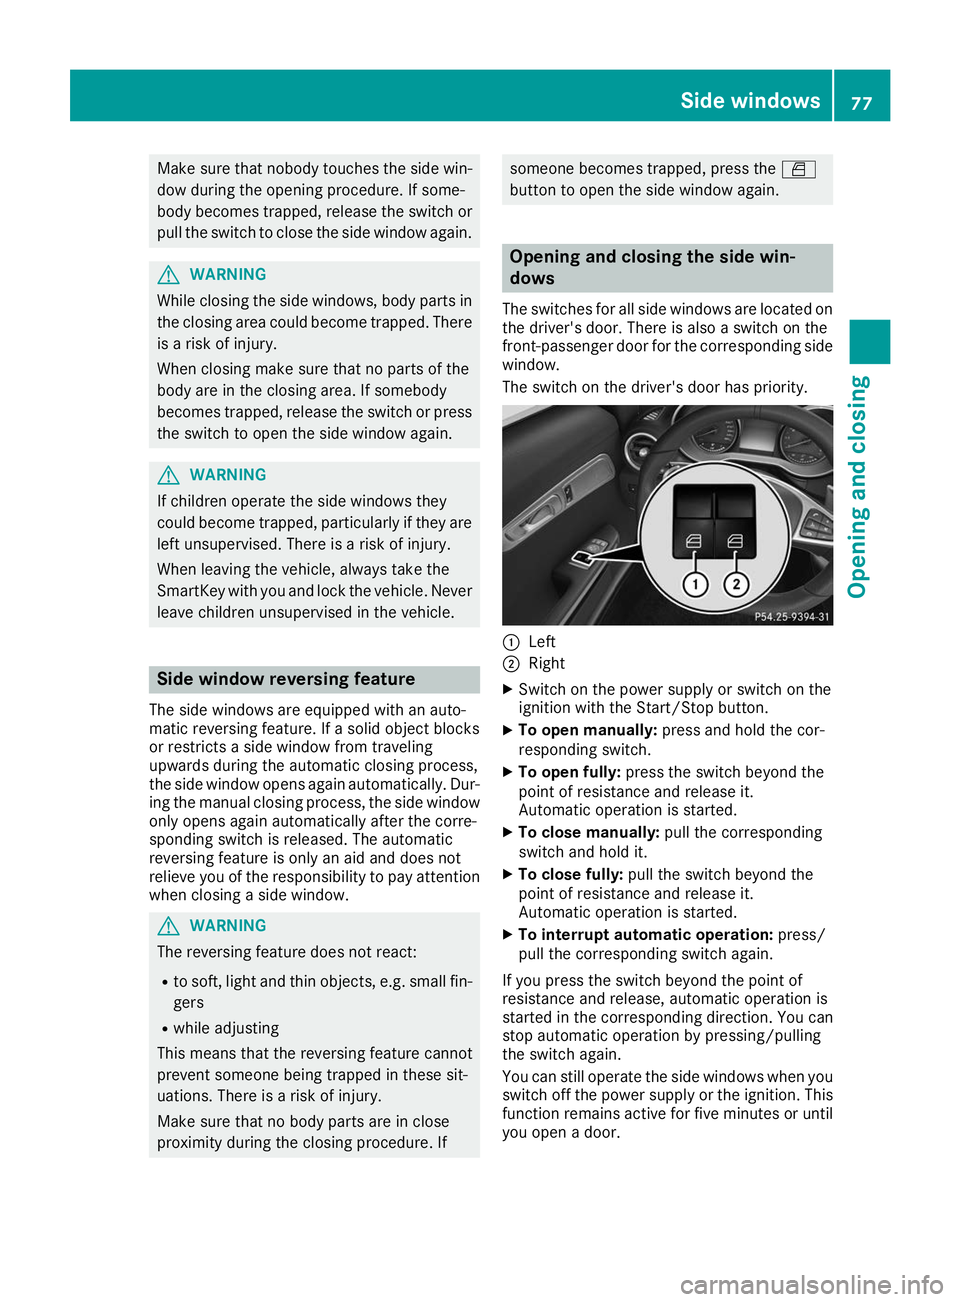
The switch on the driver's door has priority. 0043
Left
0044 Right
X Switch on the power supply or switch on the
ignition with the Start/Stop button.
X To open manually: press and hold the cor-
responding switch.
X To open fully: press the switch beyond the
point of resistance and release it.
Automatic operation is started.
X To close manually: pull the corresponding
switch and hold it.
X To close fully: pull the switch beyond the
point of resistance and release it.
Automatic operation is started.
X To interrupt automatic operation: press/
pull the corresponding switch again.
If you press the switch beyond the point of
resistance and release, automatic operation is
started in the corresponding direction. You can
stop automatic operation by pressing/pulling
the switch again.
You can still operate the side windows when you switch off the power supply or the ignition. This
function remains active for five minutes or until
you open a door. Side windows
77Opening and closing Z
Page 80 of 298
Convenience opening
General notes You can ventilate the vehicle before you start
driving.
If the SmartKey is in close proximity to the vehi-
cle, the convenience opening function is availa- ble.
To do so, open the side windows using the
SmartKey.
The "convenience opening" feature is also avail-
able when the vehicle is unlocked.
Convenience opening X
After unlocking the vehicle, press and hold
the 0036 button on the SmartKey until the
side windows begin to open.
or
X When the vehicle is unlocked, press and hold
the 0036 button until the side windows have
reached the desired position.
X To interrupt convenience opening: release
the 0036 button. Convenience closing feature
Important safety notes G
WARNING
When using the convenience closing feature,
parts of the body could be trapped in the clos- ing area when a side window is being closed. There is a risk of injury.
Observe the complete closing procedure
when the convenience closing feature is oper-
ating. Make sure that no body parts are in
close proximity during the closing procedure.
When you lock the vehicle, you can close the
windows at the same time. Using the SmartKey X
Press and hold the 0037button until the side
windows are fully closed.
X Make sure that all the side windows are
closed.
X To interrupt convenience closing: release
the 0037 button.
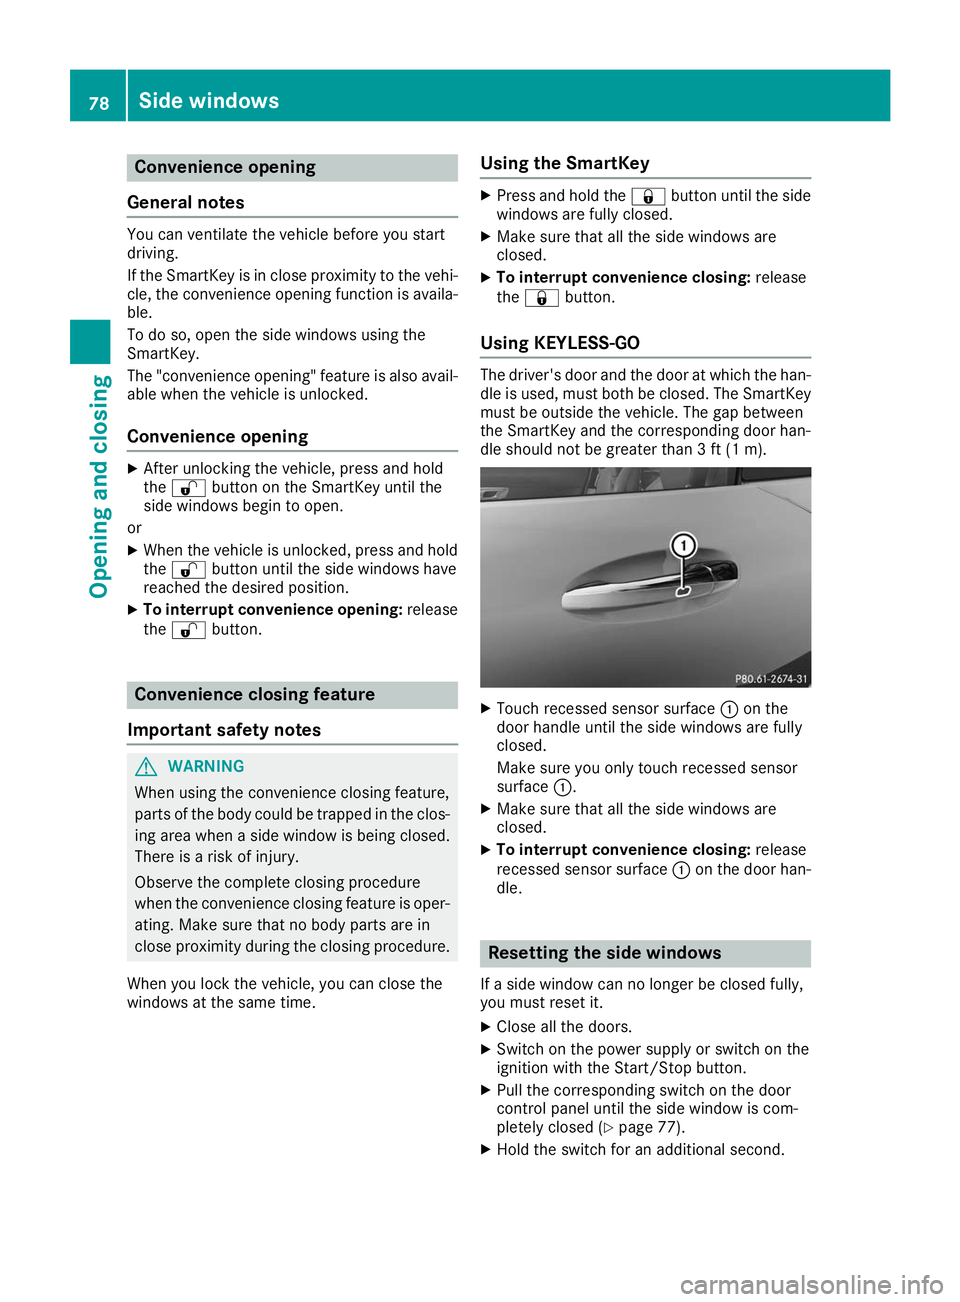
Using KEYLESS-GO The driver's door and the door at which the han-
dle is used, must both be closed. The SmartKey
must be outside the vehicle. The gap between
the SmartKey and the corresponding door han-
dle should not be greater than 3 ft (1 m). X
Touch recessed sensor surface 0043on the
door handle until the side windows are fully
closed.
Make sure you only touch recessed sensor
surface 0043.
X Make sure that all the side windows are
closed.
X To interrupt convenience closing: release
recessed sensor surface 0043on the door han-
dle. Resetting the side windows
If a side window can no longer be closed fully,
you must reset it.
X Close all the doors.
X Switch on the power supply or switch on the
ignition with the Start/Stop button.
X Pull the corresponding switch on the door
control panel until the side window is com-
pletely closed (Y page 77).
X Hold the switch for an additional second. 78
Side windowsOpening and closing
Page 82 of 298
Soft top (Roadster)
Important safety notes
G
WARNING
If you do not fully open/close the soft top, the soft-top hydraulics depressurize after a short
time. This causes the soft top to lower unex-
pectedly and may cause you or others to be
trapped. There is a risk of injury.
Always open or close the soft top completely.
! Never sit on the soft top or store heavy
objects on it. You will otherwise damage the
vehicle soft top and soft-top covers.
! When opening and closing the soft top,
make sure that:
R there is sufficient clearance above it, as the
soft top swings upwards
R there are no objects on the soft top or the
soft-top covers to the side
R the fabric is not dirty, wet or frozen
R the outside temperature is above -10 †
You could otherwise damage the soft top as
well as other parts of the vehicle.
Take the height of the vehicle into account when
opening and closing the soft top (Y page 293).
Make sure that the soft top is dry and clean
before opening or closing it. Otherwise, water or
dirt could enter the vehicle interior or trunk.
You can open or close the soft top:
R when the vehicle is stationary or
R when you do not exceed a speed of 31 mph
(50 km/h) (Max. 37 mph (60 km/h), to avoid
interrupting the closing process while slightly exceeding this speed)
If there is a strong head wind, it may not be pos- sible to close the soft top fully. In order to close
the soft top fully, reduce your speed or stop the
vehicle in accordance with the traffic condi-
tions.
For safety reasons, Mercedes-Benz recom-
mends that you only open or close the soft top
when the vehicle is stationary.
If the soft top does not open or close fully, the
soft-top hydraulics are depressurized and the
soft top is lowered: R
after approximately 7 minutes when the igni-
tion is switched on
R after about
20 seconds if the ignition is switched off Opening/closing with the soft top
switch
Important safety notes G
WARNING
When opening or closing the soft top, there is a risk that parts of the body could become
trapped by moving parts such as the roof
mechanism, the trunk lid, or the side win-
dows. There is a risk of injury.
When opening or closing the roof, make sure
that no parts of the body are in the vicinity of
moving parts. Release the switch if somebody
becomes trapped. G
WARNING
If the vehicle speed exceeds 37 mph
(60 km/h), the soft top stops during the open- ing or closing procedure. This impairs your
view to the rear. There is a risk of an accident.
Reduce your speed to below 37 mph
(60 km/h) or stop the vehicle in accordance
with the traffic conditions. Press or pull the
soft-top switch again in order to open or close the soft top fully.
Opening and closing X
Select SmartKey position 0048with the Start/
Stop button (Y page 110).
X When the vehicle is stationary, depress the
brake pedal and keep it depressed. 80
Soft top (Roadster)Opening and closing
Page 85 of 298
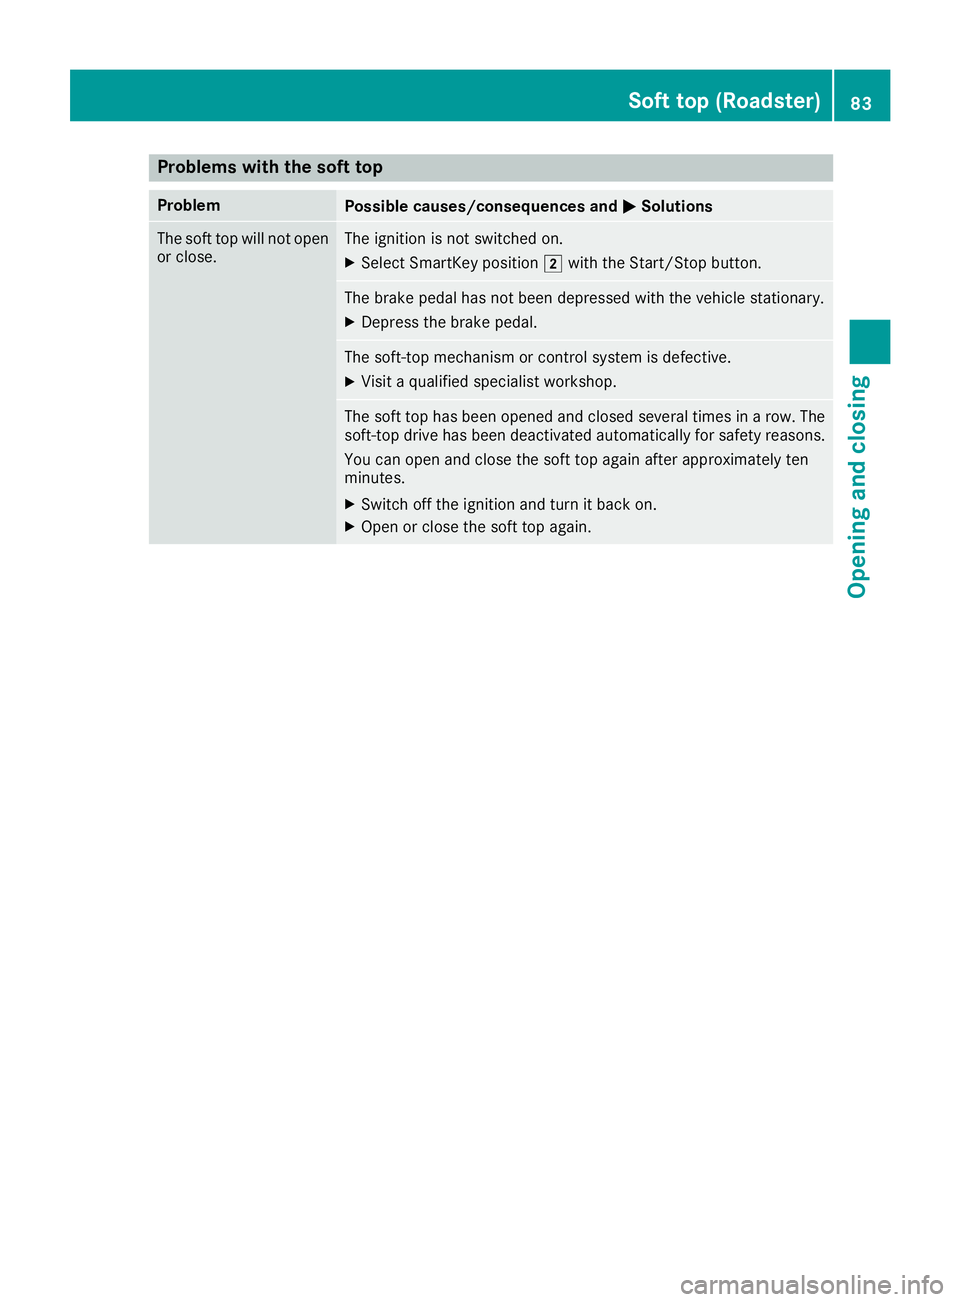
Problems with the soft top
Problem
Possible causes/consequences and
0050
0050Solutions The soft top will not open
or close. The ignition is not switched on.
X Select SmartKey position 0048with the Start/Stop button. The brake pedal has not been depressed with the vehicle stationary.
X Depress the brake pedal. The soft-top mechanism or control system is defective.
X Visit a qualified specialist workshop. The soft top has been opened and closed several times in a row. The
soft-top drive has been deactivated automatically for safety reasons.
You can open and close the soft top again after approximately ten
minutes.
X Switch off the ignition and turn it back on.
X Open or close the soft top again. Soft top (Roadster)
83Opening and closing Z
Page 86 of 298
Correct driver's seat position
G
WARNING
You could lose control of your vehicle if you do the following while driving:
R adjust the driver's seat, head restraint,
steering wheel or mirrors
R fasten the seat belt
There is a risk of an accident.
Adjust the driver's seat, head restraint, steer-
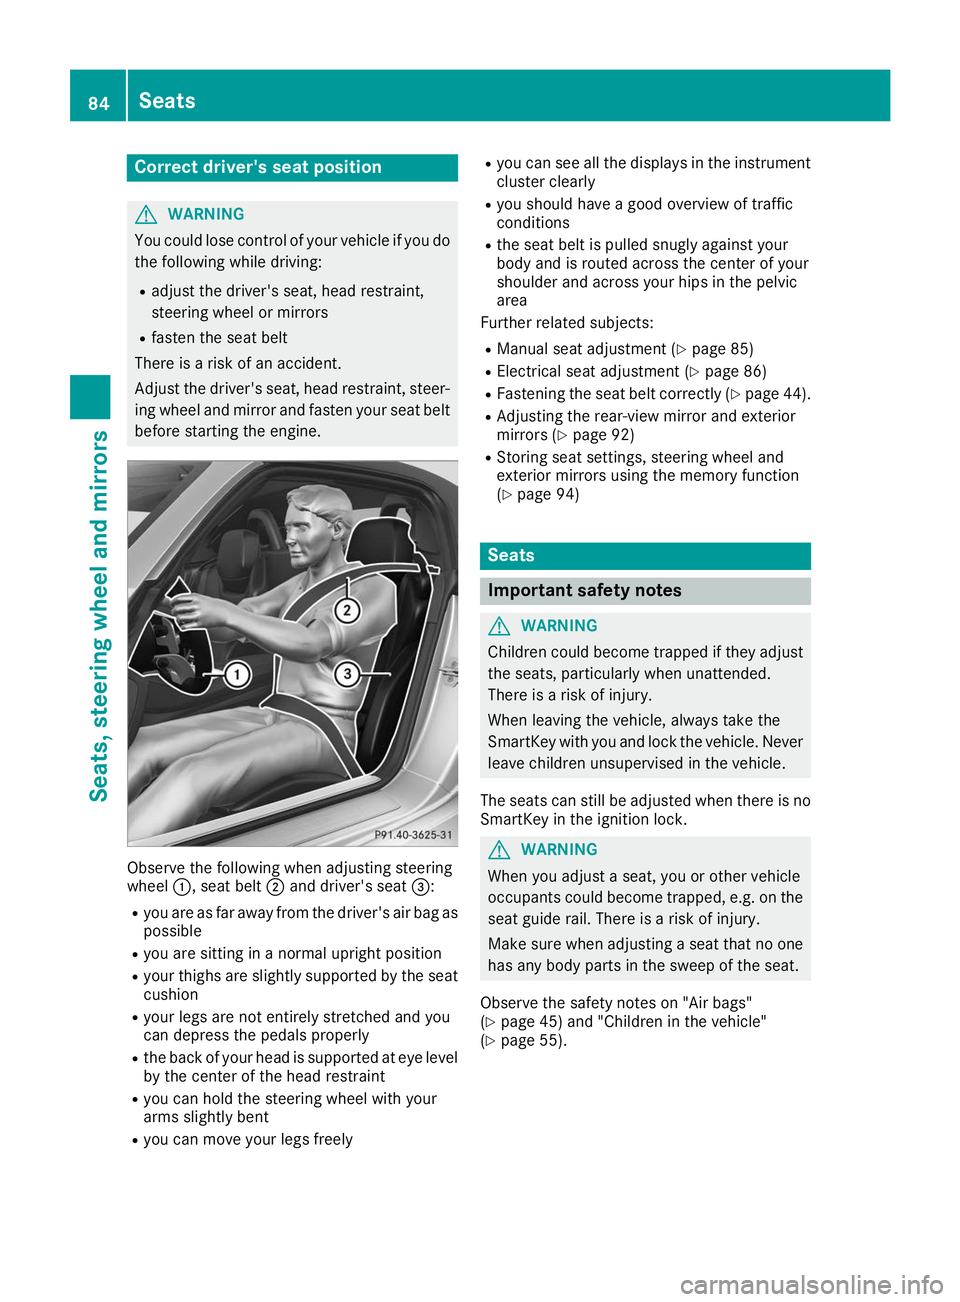
ing wheel and mirror and fasten your seat belt before starting the engine. Observe the following when adjusting steering
wheel
0043, seat belt 0044and driver's seat 0087:
R you are as far away from the driver's air bag as
possible
R you are sitting in a normal upright position
R your thighs are slightly supported by the seat
cushion
R your legs are not entirely stretched and you
can depress the pedals properly
R the back of your head is supported at eye level
by the center of the head restraint
R you can hold the steering wheel with your
arms slightly bent
R you can move your legs freely R
you can see all the displays in the instrument
cluster clearly
R you should have a good overview of traffic
conditions
R the seat belt is pulled snugly against your
body and is routed across the center of your
shoulder and across your hips in the pelvic
area
Further related subjects:
R Manual seat adjustment (Y page 85)
R Electrical seat adjustment (Y page 86)
R Fastening the seat belt correctly (Y page 44).
R Adjusting the rear-view mirror and exterior
mirrors (Y page 92)
R Storing seat settings, steering wheel and
exterior mirrors using the memory function
(Y page 94) Seats
Important safety notes
G
WARNING
Children could become trapped if they adjust the seats, particularly when unattended.
There is a risk of injury.
When leaving the vehicle, always take the
SmartKey with you and lock the vehicle. Neverleave children unsupervised in the vehicle.
The seats can still be adjusted when there is no
SmartKey in the ignition lock. G
WARNING
When you adjust a seat, you or other vehicle
occupants could become trapped, e.g. on the seat guide rail. There is a risk of injury.
Make sure when adjusting a seat that no one
has any body parts in the sweep of the seat.
Observe the safety notes on "Air bags"
(Y page 45) and "Children in the vehicle"
(Y page 55). 84
SeatsSeats, steering wheel and
mirrors
Page 90 of 298
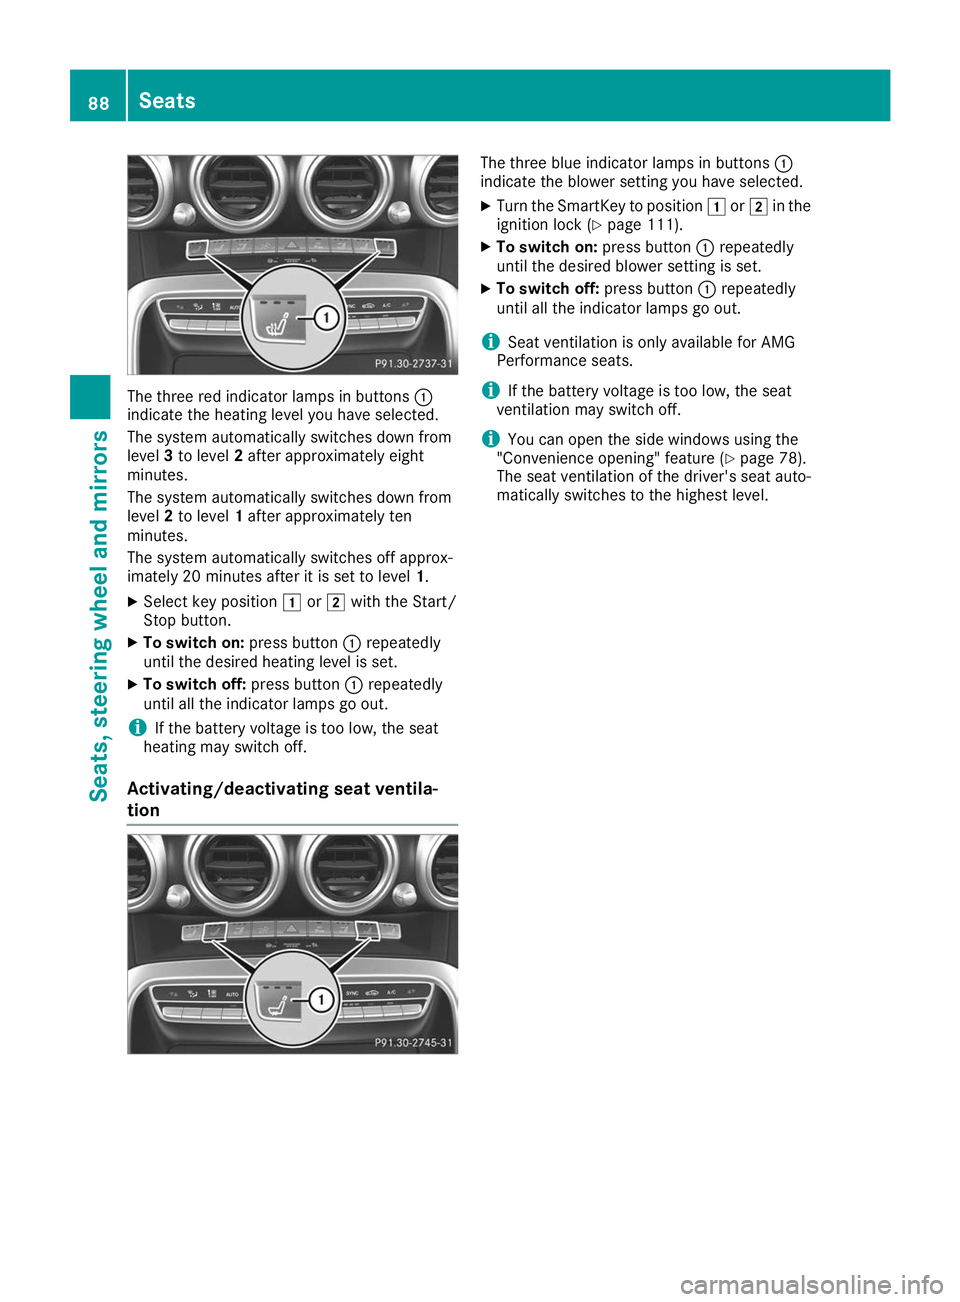
The three red indicator lamps in buttons
0043
indicate the heating level you have selected.
The system automatically switches down from
level 3to level 2after approximately eight
minutes.
The system automatically switches down from
level 2to level 1after approximately ten
minutes.
The system automatically switches off approx-
imately 20 minutes after it is set to level 1.
X Select key position 0047or0048 with the Start/
Stop button.
X To switch on: press button0043repeatedly
until the desired heating level is set.
X To switch off: press button0043repeatedly
until all the indicator lamps go out.
i If the battery voltage is too low, the seat
heating may switch off.
Activating/deactivating seat ventila-
tion The three blue indicator lamps in buttons
0043
indicate the blower setting you have selected.
X Turn the SmartKey to position 0047or0048 in the
ignition lock (Y page 111).
X To switch on: press button0043repeatedly
until the desired blower setting is set.
X To switch off: press button0043repeatedly
until all the indicator lamps go out.
i Seat ventilation is only available for AMG
Performance seats.
i If the battery voltage is too low, the seat
ventilation may switch off.
i You can open the side windows using the
"Convenience opening" feature (Y page 78).
The seat ventilation of the driver's seat auto-
matically switches to the highest level. 88
SeatsSeats, steering wheel and mirrors
Page 91 of 298
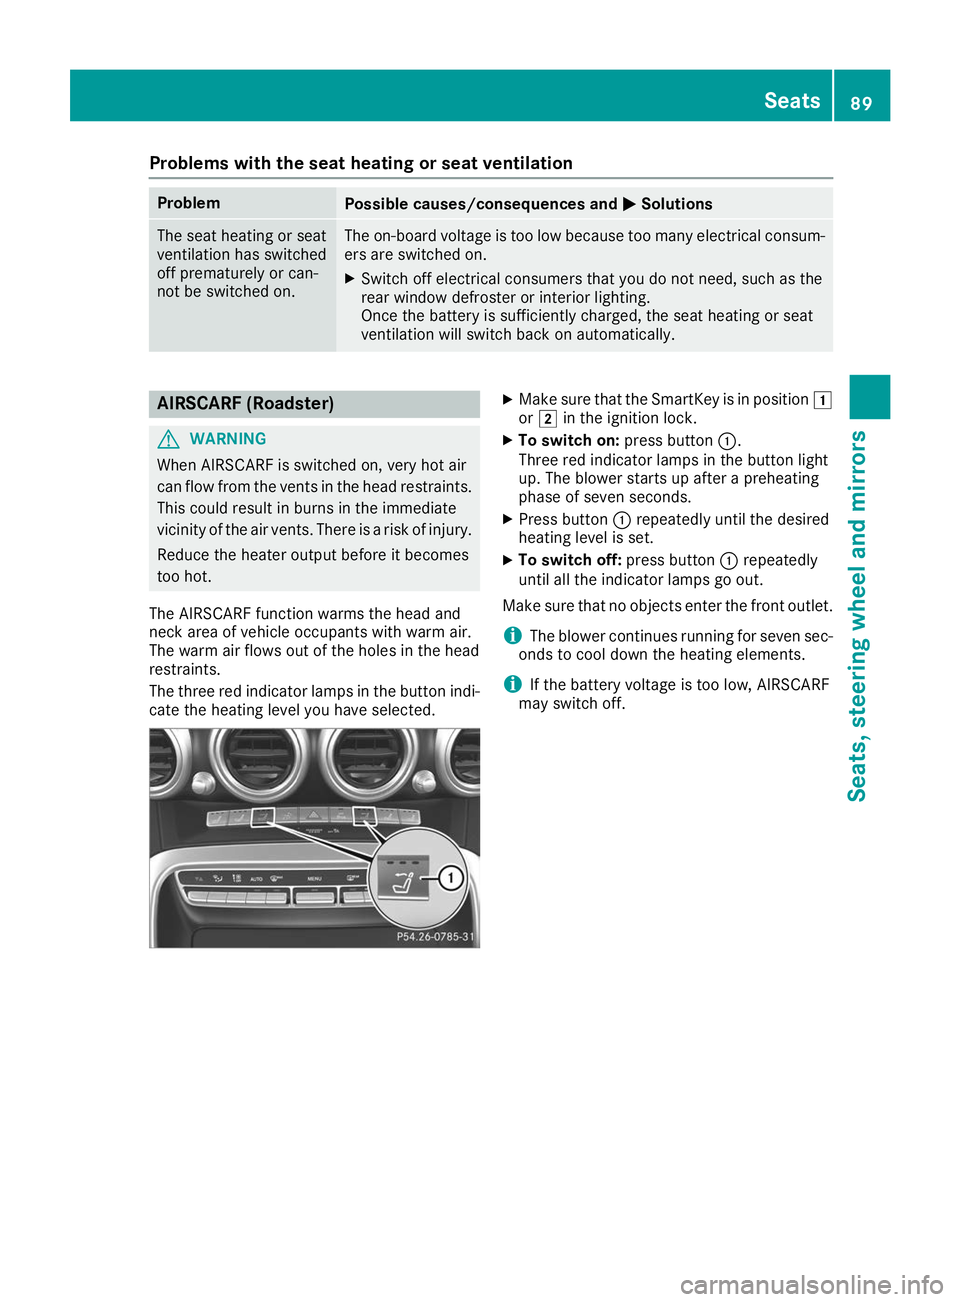
Problems with the seat heating or seat ventilation
Problem
Possible causes/consequences and
0050
0050Solutions The seat heating or seat
ventilation has switched
off prematurely or can-
not be switched on. The on-board voltage is too low because too many electrical consum-
ers are switched on.
X Switch off electrical consumers that you do not need, such as the
rear window defroster or interior lighting.
Once the battery is sufficiently charged, the seat heating or seat
ventilation will switch back on automatically. AIRSCARF (Roadster)
G
WARNING
When AIRSCARF is switched on, very hot air
can flow from the vents in the head restraints. This could result in burns in the immediate
vicinity of the air vents. There is a risk of injury.
Reduce the heater output before it becomes
too hot.
The AIRSCARF function warms the head and
neck area of vehicle occupants with warm air.
The warm air flows out of the holes in the head
restraints.
The three red indicator lamps in the button indi- cate the heating level you have selected. X
Make sure that the SmartKey is in position 0047
or 0048 in the ignition lock.
X To switch on: press button0043.
Three red indicator lamps in the button light
up. The blower starts up after a preheating
phase of seven seconds.
X Press button 0043repeatedly until the desired
heating level is set.
X To switch off: press button0043repeatedly
until all the indicator lamps go out.
Make sure that no objects enter the front outlet.
i The blower continues running for seven sec-
onds to cool down the heating elements.
i If the battery voltage is too low, AIRSCARF
may switch off. Seats
89Seats, steering wheel and mirrors Z