2019 MASERATI QUATTROPORTE fuses
[x] Cancel search: fusesPage 77 of 396

• It is dangerous to try to repair any
part of the air bag system without
the necessary know-how.
• Do not attempt to modify any part
of your air bag system. The air bag
may inflate accidentally or may not
function properly if modifications
are made. Take your vehicle to an
Authorized Maserati Dealer for any
air bag system service. If your seat
including your trim cover and
cushion needs to be serviced in any
way (including removal or
loosening/tightening of seat
attachment bolts), take the vehicle
to an Authorized Maserati Dealer.
• Only Maserati manufacturer
approved seat accessories may be
used. If it is necessary to modify the
air bag system for persons with
disabilities, contact an Authorized
Maserati Dealer.
• If the speedometer, Rev Counter, or
any engine related gauges are not
working, the Occupant Restraint
Controller (ORC) may also be
disabled. The air bags may not be
ready to inflate for your protection.
Promptly check the fuse block for
blown fuses. To identify the air bag
fuse see “Fuse Replacement” in
section "Maintenance and Care". See an Authorized Maserati Dealer if the
fuse does not fix the problem.
Transport of persons with
disability If it is necessary to modify the
advanced air bag system of your
vehicle to accommodate a person with
disabilities, contact an Authorized
Maserati Dealer .
WARNING!
• The advanced air bag system of your
vehicle is not designed to protect
adults with disabilities that require
deactivation of the passenger or
driver air bag.
• If you or another occupant is an
adult with a medical condition that
requires air bag deactivation, please
contact an Authorized Maserati
Dealer. For further information on
disabled driver or passengers see
http://www.safercar.gov.
• As long as the air bag is activated,
persons with disabilities are advised
not to travel in the front seat in
order to avoid the risk of serious
injuries or death, even in minor crashes.
Event Data Recorder (EDR) This vehicle is equipped with an event
data recorder (EDR). The main purpose
of an EDR is to record, in certain crash
or near crash-like situations, such as an
air bag deployment or hitting a road
obstacle, data that will assist in
understanding how a vehicle’s systems
have performed.
The EDR is designed to record data
related to vehicle dynamics and safety
systems for a short period of time,
typically 30 seconds or less.
The EDR in this vehicle is designed to
record such data as:
• how various systems in your vehicle
were operating;
• whether or not the driver and
passenger safety belts were
buckled/fastened;
• how far (if at all) the driver was
depressing the accelerator and/or
brake pedal; and
• how fast the vehicle was traveling.
These data can help provide a better
understanding of the circumstances in
which crashes and injuries occur.Before Starting
2
73
Page 134 of 396
(Continued)
servicing your vehicle. For more
information go to:
www.P65Warnings.ca.gov/passenger-
vehicle
Heated Windshield Washer Nozzles
T
o avoid fluid freezing inside at low
external temperatures, the fluid supply
nozzles can be heated by internal
resistors.
Interior Features Electric Power Outlets The vehicle is equipped with four 12
Volt (13 Amp) electric power outlets,
two available for the front seat
passengers, one for rear seat
passengers and one fitted in the trunk
compartment.
In vehicles equipped with “Smoking
Kit” the electric power outlet inside
the cupholder is replaced with a
cigarette lighter.
All power outlets are supplied only
when the engine is started or the
ignition device set to ACC or RUN .
Power outlets are protected by a fuse.
Insert a cigar lighter or accessory plug
into the power outlets to ensure
proper operation. Otherwise, check
the matching fuse integrity, see “Fuse
Replacement” in section “Maintenance
and Care” for further information.
CAUTION!
• Do not plug in accessories that
exceed the maximum power of 160
Watts (13 Amps) at 12 Volts.
• Power outlets are designed for
accessory plugs only. Do not insert
any other object in the power outlets as this will damage the outlet and
blow the fuse. Damages caused by
improper use of the power outlet are
not covered by the New Vehicle
Limited Warranty.
WARNING!
To avoid serious injury or death:
• Only devices designed for use in this
type of outlet should be inserted
into any 12 Volt outlet.
• Replacing the fuses that protect
power outlets with others of higher
amperage, there is the risk of fire.
• Do not touch with wet hands.
• Close the lids when the plug is not
used and while driving the vehicle.
• If this outlet is mishandled, it may
cause an electric shock and failure.
Power Outlet inside the Cupholder
To access the power outlet is inside the
cupholder beside the transmission
lever, press the cover as indicated to
open it completely. Remove the
cigarette lighter and use its socket as
power outlet.Understanding the Vehicle
3
130
Page 339 of 396
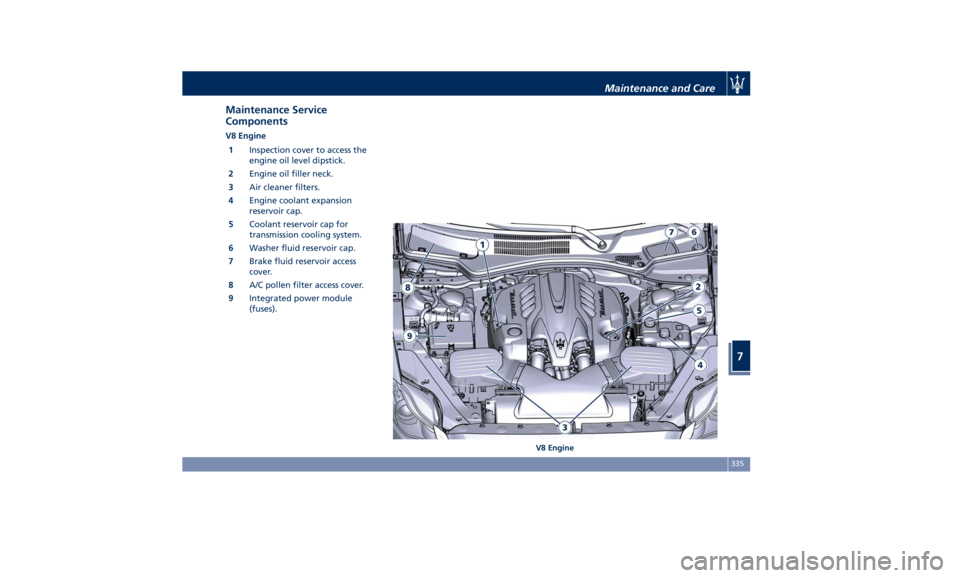
Maintenance Service
Components V8 Engine
1 Inspection cover to access the
engine oil level dipstick.
2 Engine oil filler neck.
3 Air cleaner filters.
4 Engine coolant expansion
reservoir cap.
5 Coolant reservoir cap for
transmission cooling system.
6 Washer fluid reservoir cap.
7 Brake fluid reservoir access
cover.
8 A/C pollen filter access cover.
9 Integrated power module
(fuses).
V8 EngineMaintenance and Care
7
335
Page 340 of 396
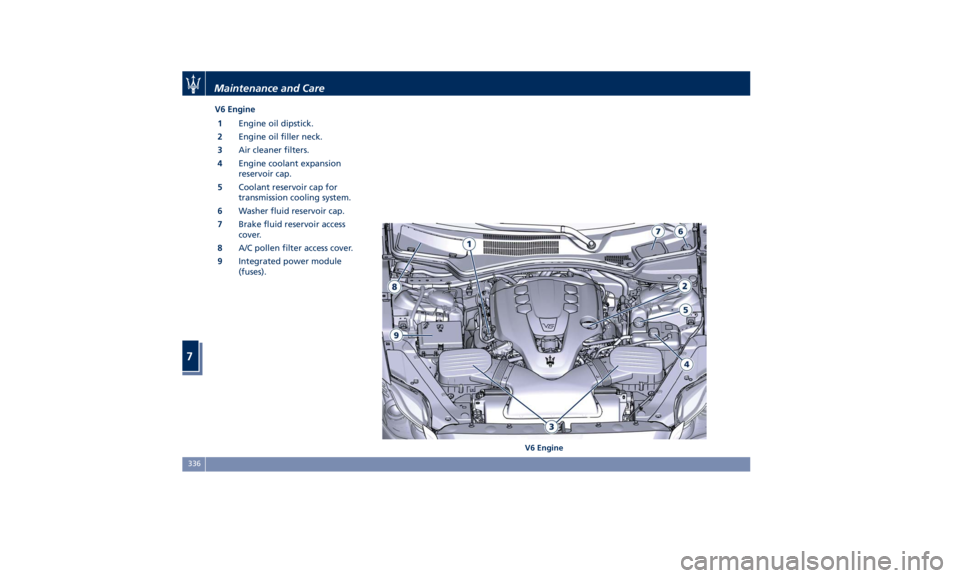
V6 Engine
1 Engine oil dipstick.
2 Engine oil filler neck.
3 Air cleaner filters.
4 Engine coolant expansion
reservoir cap.
5 Coolant reservoir cap for
transmission cooling system.
6 Washer fluid reservoir cap.
7 Brake fluid reservoir access
cover.
8 A/C pollen filter access cover.
9 Integrated power module
(fuses).
V6 EngineMaintenance and Care
7
336
Page 352 of 396
• Turn the charger on and follow the
instructions on its user manual to
completely recharge the battery.
• When the battery is recharged, turn
off the battery charger before
disconnecting it from the battery.
• Disconnect first the terminal clamp
of the charger black cable from the
battery and then the terminal clamp
of the red cable.
• Reassemble the protection cover on
the battery positive post and the
other parts removed for this
operation.
WARNING!
California Proposition 65
Operating, servicing and maintaining
a passenger vehicle or off-road vehicle
can expose you to chemicals including
such as, engine exhaust, carbon
monoxide, phthalates and lead, that
which are known to the State of
California to cause cancer and birth
defects or other reproductive harm. To
minimize exposure, avoid breathing
exhaust, do not idle the engine except
as necessary, service your vehicle in a
well-ventilated area and wear gloves
or wash your hands frequently when
servicing your vehicle. For more information go to:
www.P65Warnings.ca.gov/passenger-
vehicle
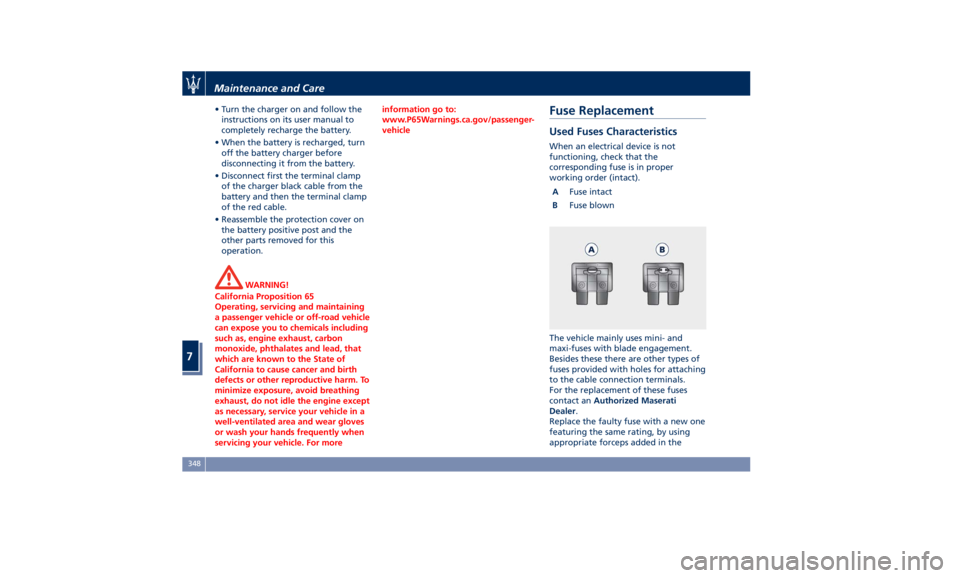
Fuse Replacement Used Fuses Characteristics When an electrical device is not
functioning, check that the
corresponding fuse is in proper
working order (intact).
A Fuse intact
B Fuse blown
The vehicle mainly uses mini- and
maxi-fuses with blade engagement.
Besides these there are other types of
fuses provided with holes for attaching
to the cable connection terminals.
For the replacement of these fuses
contact an Authorized Maserati
Dealer .
Replace the faulty fuse with a new one
featuring the same rating, by using
appropriate forceps added in theMaintenance and Care
7
348
Page 353 of 396
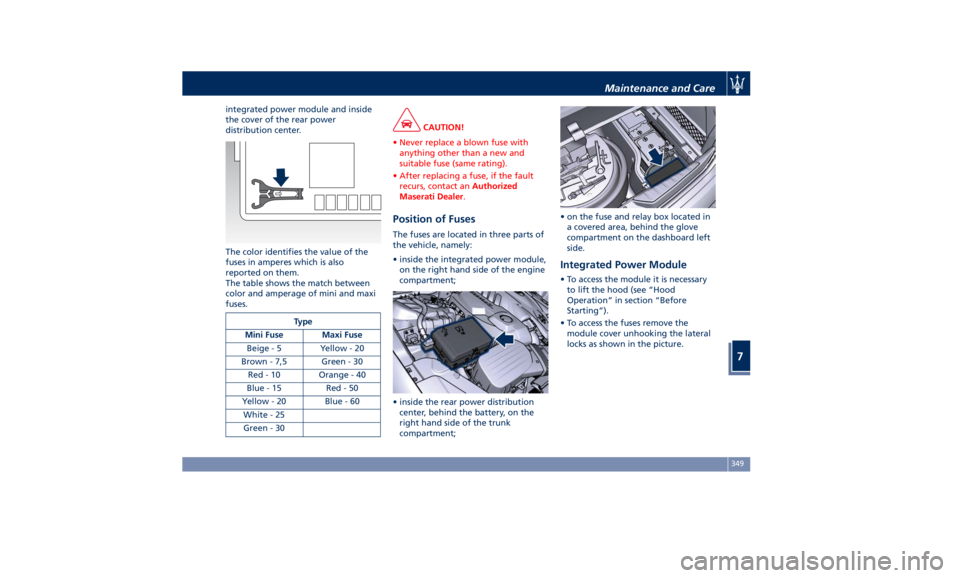
integrated power module and inside
the cover of the rear power
distribution center.
The color identifies the value of the
fuses in amperes which is also
reported on them.
The table shows the match between
color and amperage of mini and maxi
fuses.
Type
Mini Fuse Maxi Fuse
Beige - 5 Yellow - 20
Brown - 7,5 Green - 30
Red - 10 Orange - 40
Blue-15 Red-50
Yellow - 20 Blue - 60
White - 25
Green - 30 CAUTION!
• Never replace a blown fuse with
anything other than a new and
suitable fuse (same rating).
• After replacing a fuse, if the fault
recurs, contact an Authorized
Maserati Dealer .
Position of Fuses The fuses are located in three parts of
the vehicle, namely:
• inside the integrated power module,
on the right hand side of the engine
compartment;
• inside the rear power distribution
center, behind the battery, on the
right hand side of the trunk
compartment; • on the fuse and relay box located in
a covered area, behind the glove
compartment on the dashboard left
side.
Integrated Power Module • To access the module it is necessary
to lift the hood (see “Hood
Operation” in section “Before
Starting”).
• To access the fuses remove the
module cover unhooking the lateral
locks as shown in the picture.Maintenance and Care
7
349
Page 354 of 396
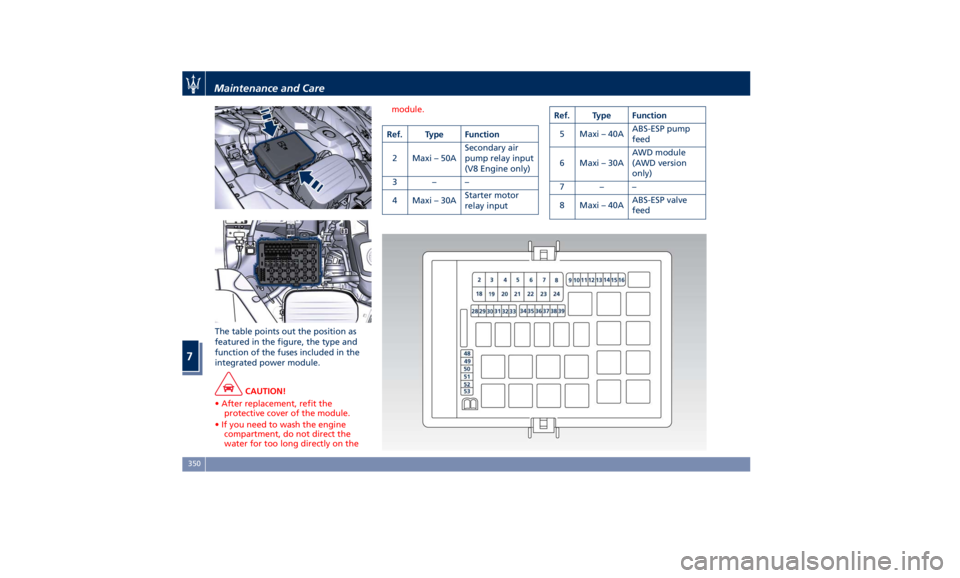
The table points out the position as
featured in the figure, the type and
function of the fuses included in the
integrated power module.
CAUTION!
• After replacement, refit the
protective cover of the module.
• If you need to wash the engine
compartment, do not direct the
water for too long directly on the module.
Ref. Type Function
2 Maxi – 50A Secondary air
pump relay input
(V8 Engine only)
3––
4 Maxi – 30A Starter motor
relay input Ref. Type Function
5 Maxi – 40A ABS-ESP pump
feed
6 Maxi – 30A AWD module
(AWD version
only)
7––
8 Maxi – 40A ABS-ESP valve
feedMaintenance and Care
7
350
Page 356 of 396
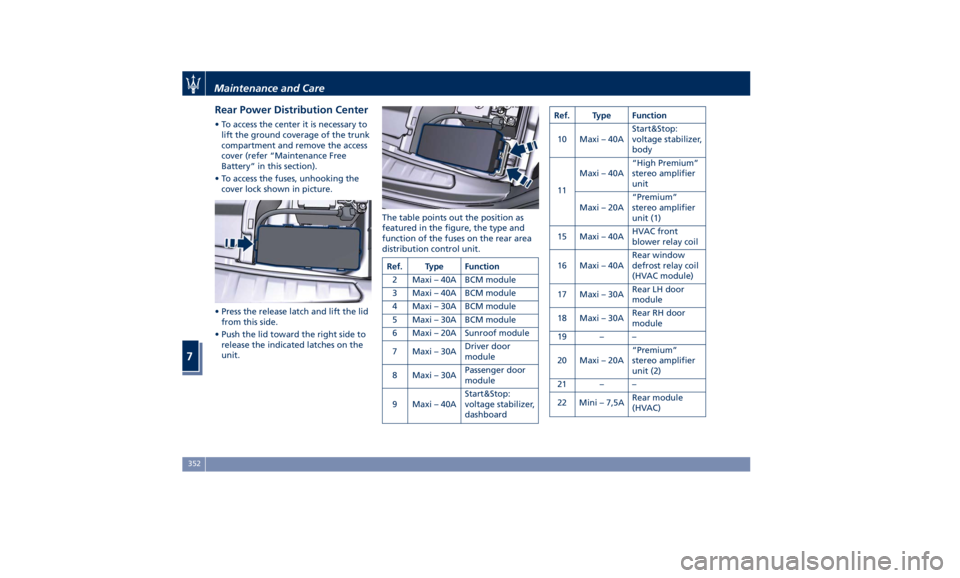
Rear Power Distribution Center • To access the center it is necessary to
lift the ground coverage of the trunk
compartment and remove the access
cover (refer “Maintenance Free
Battery” in this section).
• To access the fuses, unhooking the
cover lock shown in picture.
• Press the release latch and lift the lid
from this side.
• Push the lid toward the right side to
release the indicated latches on the
unit. The table points out the position as
featured in the figure, the type and
function of the fuses on the rear area
distribution control unit.
Ref. Type Function
2 Maxi – 40A BCM module
3 Maxi – 40A BCM module
4 Maxi – 30A BCM module
5 Maxi – 30A BCM module
6 Maxi – 20A Sunroof module
7 Maxi – 30A Driver door
module
8 Maxi – 30A Passenger door
module
9 Maxi – 40A Start&Stop:
voltage stabilizer,
dashboard Ref. Type Function
10 Maxi – 40A Start&Stop:
voltage stabilizer,
body
11 Maxi – 40A “High Premium”
stereo amplifier
unit
Maxi – 20A “Premium”
stereo amplifier
unit (1)
15 Maxi – 40A HVAC front
blower relay coil
16 Maxi – 40A Rear window
defrost relay coil
(HVAC module)
17 Maxi – 30A Rear LH door
module
18 Maxi – 30A Rear RH door
module
19 – –
20 Maxi – 20A “Premium”
stereo amplifier
unit (2)
21 – –
22 Mini – 7,5A Rear module
(HVAC)Maintenance and Care
7
352