2019 MASERATI QUATTROPORTE wheel
[x] Cancel search: wheelPage 211 of 396

two vents on the upper part of the
dashboard and two positioned at
the rear end of the central console.
Each of these vents can be singly
adjusted. The air grids or vanes of
the vents can be moved to adjust air
flow direction. A setting wheel,
placed near each vent, allows to
regulate or close the airflow.
• “Bi-Level” mode
Air for each zone comes from the
dashboard and central console
adjustable vents and the fixed floor
vents. A small portion of the airflow
is directed through the
defrost/demist vents to prevent
windows fogging.
NOTE:
Bi-Level mode is designed to let cooler
air come in the dashboard and rear
part of the central console vents and
warmer air from the floor vents.
• “Defrost” mode
Air for each zone comes from the
dashboard defrost/demist vents to
prevent windows fogging.
• “Mix” mode
Air for each zone comes from the
defrost/demist vent, the vent under
the dashboard and from floor vent. This mode is recommended for cold
climates, to improve comfort and
prevent windows fogging.
• “Hi-Level” mode
Air for each zone comes from the
dashboard defrost/demist vents and
from the dashboard adjustable
vents, the central console adjustable
vent and the fixed floor vent.
• “Tri-Level” mode
Air for each zone comes from all the
adjustable/fixed and defrost/demist
vents.
14. “SYNC” mode
Touch the “SYNC” soft-key on the
MTC+ to switch the Sync feature
on/off. The “SYNC” soft-key
illuminates when this feature is
selected. This function is used to
synchronise the passenger
temperature setting with the driver
temperature setting.
Changing the passenger temperature
setting while in “SYNC” will
automatically exit this feature.
15. “REAR” mode
This soft-key is present only if the
vehicle is equipped with the
additional dual-zone air conditioning
system for rear passengers. Touching "REAR" soft-key you enter
the screen where the settings
available for rear seat passengers are
displayed. For the description of these
controls, see paragraph "Four-Zone
Climate Controls (optional)" of this
chapter.
Dual Zone Climate Control
Functions Air Conditioning (A/C)
The “A/C” soft-key allows to manually
activate or deactivate the air
conditioning system. When the air
conditioning system is turned on, cool
dehumidified air will flow through the
vents into the cabin. For improved fuel
economy, touch the “A/C” soft-key to
turn off the air conditioning and
manually adjust the blower and
airflow mode settings.
When the “A/C” and “AUTO”
functions are switched off it is not
possible to have air at a lower
temperature than the outside.
Recirculation
and Air Quality
Sensor
When outside air contains smoke,
odours, or high humidity, or if rapid
cooling is desired, you may wish to
recirculate interior air by pressing the
recirculation control button or theDashboard Instruments and Controls
4
207
Page 215 of 396
NOTE:
The Bi-Level mode is designed to
provide comfort by sending cooler air
out of the central console and side
pillars vents and warmer air from the
floor vents.
7. “Floor” mode
Air comes from the floor vents under
the front seats.
8. “Torso” mode
Air comes from the adjustable vents
on the central console and the ones
on the pillars between the doors. Each
of these vents can be singly adjusted.
The air grids of the vents can be
moved up/down and right/left to
adjust the airflow direction. A setting
wheel, placed near each vent, allows
to regulate the airflow or to close the
vent.
9. AUTO
This function automatically controls
the interior temperature by adjusting
the air flow rate and the air
distribution.
• Press the AUTO button: the
automatic rear climate control
switches from manual to automatic
mode and vice-versa. The AUTO
symbol on the button illuminates
when this function is activated. • Adjust then the temperature you
wish to maintain by regulating the
left and/or right side temperature
control buttons. Once the desired
temperature is set, the system will
achieve and automatically maintain
that comfort level.
• When the system is set up for your
comfort level, it is not necessary to
change the settings anymore: simply
allow the system to function
automatically.
To provide you with maximum
comfort in the automatic mode,
during cold start-ups the blower speed
will remain low until the engine
warms up.
Four-Zone Climate Control by the
Driver
By operating the MTC+ display
controls the driver can adjust the
settings of the rear climate zones by
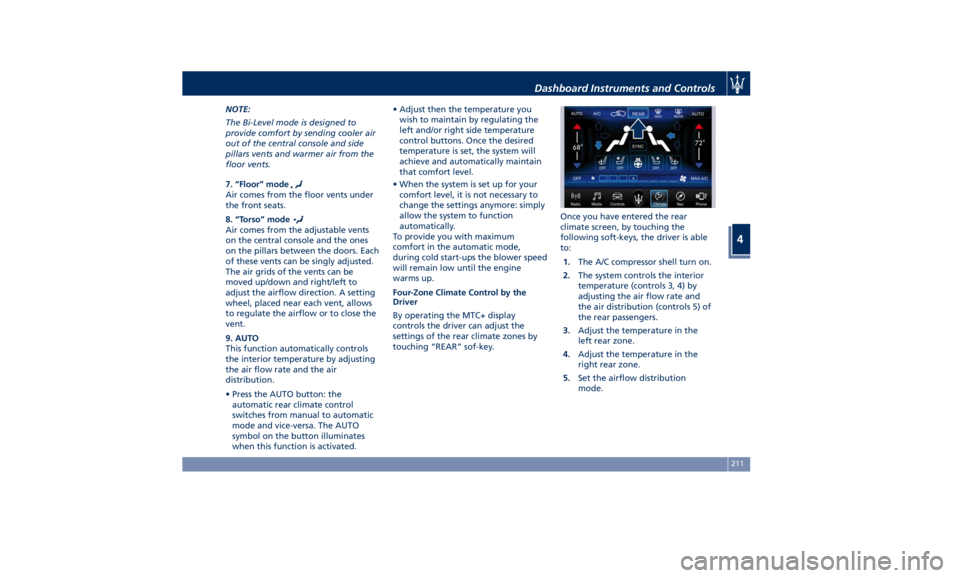
touching “REAR” sof-key. Once you have entered the rear
climate screen, by touching the
following soft-keys, the driver is able
to:
1. The A/C compressor shell turn on.
2. The system controls the interior
temperature (controls 3, 4) by
adjusting the air flow rate and
the air distribution (controls 5) of
the rear passengers.
3. Adjust the temperature in the
left rear zone.
4. Adjust the temperature in the
right rear zone.
5. Set the airflow distribution
mode.Dashboard Instruments and Controls
4
211
Page 217 of 396
the air conditioning system at idle
for about five minutes in the fresh
air by high blower setting. This will
ensure adequate system lubrication
and minimize the possibility of
compressor damage when the
system is started again.
A/C Filter The climate control system filters
outside air containing dust, pollen and
some odors. Strong odors cannot be
totally removed by A/C filter at the
entrance of the air climate system. See
“Maintenance Procedures” in section
“Maintenance and Care” for filter
replacement instructions. Phone and Voice Controls
on Steering Wheel The commands on the right side of the
steering wheel activate/deactivate the
phone mode (
) and the Voice
Recognition (
) controls functions.
These functions are only available
when one or more Bluetooth ®
compatible mobile phones are paired
with the MTC+ System connection: to
pair a phone and to learn all available
functions refer to the MTC+ guide.
NOTE:
On the Maserati website, at
www.maserati.com , or through an
Authorized Maserati Dealer you may
consult the list of telephones that are
compatible with the MTC+, and their
level of compatibility. The voice command communication
system is fully integrated with the
vehicle's audio system.
The volume can be adjusted from the
upper knob on the central console
(see “Infotainment System” in this
section or from the steering wheel
radio controls (see “Audio Controls” in
this section).
The system will automatically mute
the radio when using the phone
mode.
When activating the phone mode
using voice commands with
speakerphone, you should talk quietly
in a normal conversational tone by
keeping the driving position and
turning to the microphone of the
voice command system located inside
of the internal rear-view mirror.
The ability of the system voice control
to recognize the user's voice
commands can be invalidated when
speaking too quickly or too loudly.Dashboard Instruments and Controls
4
213
Page 218 of 396
WARNING!
Any voice-controlled system should be
used only in safe driving conditions
following all applicable regulations.
Full attention should be kept on
driving.
Phone Mode By using the phone button on the
steering wheel it is possible to: activate
the phone mode, start a call, show
recent incoming and outgoing calls,
show contacts list, etc. All these functions can also be reached
by using the touchscreen commands
on the MTC+ display in “Phone” mode.
When pressing the phone button
an audible sound will invite you to
impart a command.
Information on incoming call is
indicated in a pop-up on instrument
cluster display main area if this feature
is checkmarked on MTC+ (see “MTC+
Settings” in this section). Said
information will stay displayed until a control is executed (e.g.: answer,
reject, etc.) for the incoming call.
The screen will only display the phone
number or name of caller (if available)
as long as this complies with system
specifications in terms of font and
number of characters.
Call details can be displayed at any
time through “Audio” submenu item.
“Phone: call details” using the buttons
on steering wheel RH side. On display,
said details shall temporarily replace
the ones on media source in use.
Voice Commands By using voice commands, after
pressing the VR
button on the
steering wheel, it is possible to control
the AM, FM radio, SiriusXM satellite
radio and all devices connected and
managed by the “Media” mode (i.e SD
card, USB/iPod player).
When pressing the VR
button an
acoustic signal will invite to give a
voice command.
NOTE:
For further details refer to the
Maserati Touch Control Plus (MTC+)
guide.Dashboard Instruments and Controls
4
214
Page 221 of 396
5 – Driving Normal Starting of the Engine ............................. 218
Automatic Start&Stop System ............................. 220
Automatic Transmission .................................. 224
All-Wheel Drive (AWD version only) ......................... 233
Drive Mode ........................................... 234
Active Alternator ....................................... 243
Parking Brake ......................................... 243
Parking .............................................. 246
Brake and Stability Control System ......................... 248
Using the Brakes ....................................... 251
Use of the Engine ...................................... 252
Electronic Cruise Control ................................. 254
Adaptive Cruise Control – ACC (optional) ..................... 257
Forward Collision Warning – FCW .......................... 268
Lane Keeping Assist - LKA (optional, with ACC only) ............ 271
Blind Spot Assist (without ACC) ............................ 276
Active Blind Spot Assist - ABSA (optional, with ACC only) ........ 281
Highway Assist – HAS (optional, with ACC only) ................ 284
Traffic Sign Assist – TSA (optional) .......................... 290
Tires - General Information ............................... 292
Tire Pressure Monitoring System (TPMS) ..................... 300
Fuel Requirements ...................................... 304
Refueling ............................................. 307
Driving Conditions ...................................... 309
217
Page 225 of 396

In this case it is possible to release the
brake pedal and the vehicle will
remain in “AutoStop” with engine off.
Pressing the brake pedal and shifting
transmission into D (Drive) or R
(Reverse) will deactivate the
“AutoStop” condition and restart the
engine.
Start&Stop Deactivated Start&Stop function is deactivated
under the following conditions:
• When SPORT drive mode is activated.
• When
(ESC Off) drive mode is
activated.
• If it has been disabled through the
main menu item “Start&Stop”, via
the controls located on the right side
of the steering wheel, or through
the Start & Stop hard button on the
central console (see chapter “Drive
Mode” in this section) or via the MTC+ in the "Controls" page (see
“MTC+ “Controls” Screen” in section
"Dashboard Instruments and
Controls") .
Start&Stop Not Active For keeping driving safety, interior
comfort and a correct functioning of
engine and vehicle, the Start&Stop
function does not activate under the
following conditions:
• When the driver’s seat belt is
unbuckled (see example in picture).
• When the driver door is open.
• When the fuel level is too low.
• When the vehicle is stopped on a
very steep road.
• When the vehicle is stopped with
steered wheels (over 135° of steering
wheel angle for each part). • When the vehicle is maneuvering:
shift lever in R (Reverse).
• When the temperature conditions
inside the vehicle do not correspond
to the air conditioning setting.
• When the front and rear “defroster”
function is activated.
• When the engine coolant and the
engine oil temperature are not on
proper functioning level.
• When the external temperature is
too cold.
• When the battery charge is below
safety value.
• When the previous stop had just
happened (few seconds) and the
minimum speed has not yet been
achieved.
• Shortly after R (Reverse) has been set
or when driving under a certain
speed level.
• When the hood is open.
• The sensors managing the
Start&Stop have been damaged.
• Start&Stop system faults are present.
Automatic Restarting of the
Engine The engine may automatically restart,
before the brake pedal has beenDriving
5
221
Page 226 of 396
released, when one of the following
conditions occurs:
• The SPORT drive mode or (ESC Off)
drive mode is being activated.
• If the Start&Stop function has been
disabled through the main menu
voice “Start & Stop” (see chapter
“Instrument cluster” in section
“Dashboard Instruments and
Controls”) or through the Start&Stop
hard button on the central console
(see chapter “Drive Mode” in this
section) or via MTC+ in the “Control”
page (see “MTC+ ”Control” Screen”
in section “Dashboard Instruments
and Controls”).
• If shift lever is moved to R (Reverse).
• If the steering wheel is moved to
steer the wheels.
• When the temperature conditions
inside the vehicle do not correspond
to the air conditioning setting.
• When changing the temperature
setting on the air conditioning.
• When the defroster function is being
activated.
• When the battery charge is below
safety value.
• When the accelerator pedal is being
pressed (together with the brake
pedal). • If a long time has passed since the
last automatic stop of the engine.
Occupants Safety Function To enhance occupants safety, the
Start&Stop system monitors if the
driver is present and does not allow
automatic restarting of the engine if
one of the following manoeuvres is
being performed while in “AutoStop”
condition:
• The driver unbuckles his/her seat belt
and releases the brake pedal.
• The driver opens the door and
releases the brake pedal.
• The driver unbuckles the seat belt
and opens the door.
• The driver opens the hood.
All the above-mentioned conditions
deactive the Start&Stop function (the
“AutoStart” is deactivated and the
engine remains off) and the
transmission shifts automatically in P
(Park).
The
telltale will flash to indicate
the Start&Stop function disabling. To
restart the engine it is necessary to
press the brake pedal and push the
START/STOP button.
Move the shift lever to D (Drive) to
drive away. WARNING!
• Even when the vehicle is stopped in
the “Stop (AutoStop)” phase, the
driver is responsible for the vehicle
and the occupants and shall take
care of what happens inside and
outside the vehicle.
• Even when the vehicle is stopped
within the “Stop (AutoStop)” phase,
the vehicle driver is responsible for
the vehicle, the vehicle’s occupants
and the vehicle’s surrounding area.
Never leave the vehicle unattended
with the engine running; doing so
poses a risk of danger. It is a good
practice to always ensure to set the
parking brake and place the
transmission gear selector lever into
the P (Park) position, thereby
ensuring the vehicle will not move,
when performing any vehicle checks,
maintenance and/or service
procedures on the vehicle.
Start&Stop Function Disabling Start & Stop enabled is the default
status.
Under certain driving conditions, when
frequent stops and restarts of the
engine may become annoying, it isDriving
5
222
Page 232 of 396
In this way the system moves the
transmission in P (Park) position.
Automatic Transmission Range P (Park)
Use this position to park the vehicle.
The transmission can be shifted from
“P” position only with the brake pedal
and the unlock button pressed: then
move the shift lever. To move the shift
lever from “P” position to any other
position, the engine must be switched
on. The engine can be regularly
started in P (Park) range. Never
attempt to use P (Park) while the
vehicle is in motion. When parking on
a level surface, you may press the “P”
button first, and then apply the
electronic parking brake by pulling the
trigger upwards. The Instrument cluster will display the
related indicator light
and the
message for 5 seconds.
When parking on a hill, apply the
parking brake before pressing the “P”
button.
For enhanced security, turn the front
wheels toward the kerb on a downhill
and away from the kerb on an uphill
grade. WARNING!
• Never use the P (Park) mode as a
substitute for the electric parking
brake. Always apply the parking
brake fully when parked to prevent
vehicle movement and possible
injury or damage.
• Make sure the transmission is in P
(Park) before leaving the vehicle.
CAUTION!
• DO NOT race the engine when
shifting from P (Park) or N (Neutral)
into another gear range, as this can
damage the drivetrain.
• The following indicators should be
used to ensure that you have
engaged the shift lever into the “P”
position:
– when shifting into P (Park), push
the “P” button on the shift lever.
– with the brake pedal released,
verify that “P” position is
illuminated on the shift lever and
in the instrument cluster display.Driving
5
228