2019 MASERATI QUATTROPORTE ESP
[x] Cancel search: ESPPage 118 of 396

the adjacent lane and get a partial
overlap with the visible image on the
inside rearview mirror.
Power mirror preselected positions can
be reset by operating the Memory
Driver Seat device. Check “Driver
Memory Seat” in this section for
further information.
WARNING!
Vehicles and other objects seen in the
external side convex mirror will look
smaller and farther away than they
really are. Relying too much on your
passenger side convex mirror could
cause you to collide with another
vehicle or object. Use the inside mirror
to judge the size or distance of a
vehicle seen in the external side
convex mirror.
Tilt Side Mirrors In Reverse
This
feature provides automatic
external rearview mirrors positioning,
allowing the driver to view the ground
area behind the front doors. The
external mirrors will move slightly
downward from the current position
when the shift lever is shifted into
reverse. The external mirrors will then
return to the original position when the lever is shifted out of the reverse
position. Each memory set of the
driver's seat (see "Driver Memory
Seat" chapter in section
“Understanding the Vehicle”)
corresponds to a mirror tilt position in
reverse.
NOTE:
The mirrors tilt in reverse can be
turned on and off using the MTC+
System, refer to “MTC+ Settings” in
section “Dashboard Instruments and
Controls”.
Folding Mirrors
By selecting this feature on MTC+ the
rear-view mirrors automatically fold
when the vehicle is locked by the key
fob and when the power trunk lid (if
equipped) is closed and locked by
pressing the
button on the right
lower parts of the lid.
When the vehicle and the trunk lid will
be unlocked and the ignition device is
set in RUN position, the rear-view
mirrors will automatically open in the
position they had before the lock.
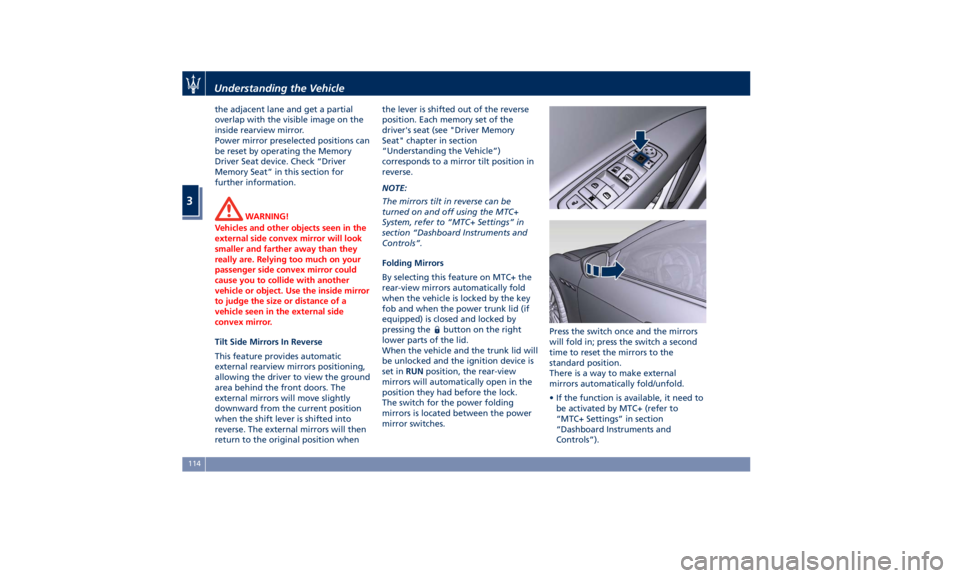
The switch for the power folding
mirrors is located between the power
mirror switches. Press the switch once and the mirrors
will fold in; press the switch a second
time to reset the mirrors to the
standard position.
There is a way to make external
mirrors automatically fold/unfold.
• If the function is available, it need to
be activated by MTC+ (refer to
“MTC+ Settings” in section
“Dashboard Instruments and
Controls”).Understanding the Vehicle
3
114
Page 122 of 396

Automatic Headlights This system automatically turns the
headlights on or off according to
ambient light intensity detected by the
twilight sensor positioned on the inner
surface of the windshield, over the
rear view mirror. To turn the system
on, rotate the lights switch clockwise
to “AUTO” position.
When the automatic system is
activated, the headlight time delay
feature is activated as well. This means
the headlights will stay on for up to 90
seconds after you place the ignition
device into OFF position.
To turn the automatic system off,
move the lights switch out of “AUTO”
position.
NOTE:
The engine must be running before
the headlights turn on in automatic
mode.
WARNING!
The responsibility for turning on the
lights, depending on the daylight and
regulations in force in the country of
use, always lies with the driver. The
automatic system for switching on
and off the external lights is to be considered as an aid for the driver. If
necessary, switch the lights including
the rear fog lights on and off
manually.
Headlights On with Wipers
When
this feature
is active, the
headlights will turn on approximately
10 seconds after activation of the
wipers, if the lights switch is placed in
the “AUTO” position. The headlights
will additionally turn off by
deactivation of the wipers if previously
activated with this function.
NOTE:
The Headlights with wipers feature
may be turned on and off using the
MTC+ System, refer to “MTC+
Settings” in section “Dashboard
Instruments and Controls”.
Headlights Time Delay This safety feature provides headlight
illumination for up to 90 seconds
(programmable) when leaving your
vehicle in an unlit area. To activate the
delay feature, place the ignition switch
in the OFF or ACC position while the
headlights are still on. Then turn off
the headlights within 45 seconds. The delay interval begins when the
lights switch is turned off (position
“0”). If you turn the headlights or
position lights on, or place the ignition
switch in RUN , the system will cancel
the delay.
If you turn the headlights off (“0”
position) before the ignition, they will
turn off in the normal mode.
NOTE:
• To activate this feature the lights
must be turned off (“0” position)
within 45 seconds of placing the
ignition switch in the OFF or ACC
position.
• Once the delay feature is active, any
additional shifting of the light switch
will cancel the feature.
• The headlight delay time is
programmable using the MTC+
System, see “MTC+ Settings” in
section “Dashboard Instruments and
Controls”.
• If the low beam LEDs are active due
to “Headlights with Wipers”, then
the headlamps delay feature will not
be activated when the ignition
switch is set in OFF position.Understanding the Vehicle
3
118
Page 123 of 396

Daytime Running Lights (DRL) The lighting system uses the same
high or low intensity headlamps LED,
respectively, for the DRL lights and
front position lights.
DRL lights will turn on when the
twilight sensor is in “DAY” mode, the
engine is running and the light switch
is in
or “AUTO” position.
If a turn signal is activated, the DRL
LED on the same side of the vehicle
switches in position light function for
the duration of the turn signal
activation. Once the turn signal is
deactivated, the DRL LED will light up
again.
NOTE:
On Canadian vehicles DRL are always
on. On USA vehicles, the DRL lights
can be turned on and off using the
MTC+ System, see “MTC+ Settings” in
section “Dashboard Instruments and
Controls” for further information.
“Full-LED” Headlight with
Cornering Function These headlamps combine the
cornering function to the “Full-LED”
technology consisting of an additional
LED module which turns on when two
conditions occurs: the driver turns the steering wheel or the driver activates
the turn indicator. The cornering
function will illuminate the corner to
enhance the visibility to the driver as
long as speed will be lower than 25
mph (40 km/h).
“Full-LED” Technology
This technology creates headlights
with a simpler construction and a
more compact size compared to those
equipped with traditional or Xenon
light bulbs.
Other advantages are:
• a clearer light beam, with a cool
white tone that allows a better
perception of the contrasts thus
making the night vision more
efficient and less tiring;
• a longer duration equivalent at least
to that of the vehicle;
• a reduced current consumption. These features positively affect some
vehicle management economy aspects
by eliminating/reducing the light bulb
replacements and help limit fuel
consumption.
Automatic High Beam (for
versions/markets, where
provided) The Automatic High Beam headlight
control system provides increased
forward lighting at night by
automating high beam control
through the use of the forward-facing
digital camera located behind the
rear-view mirror, which is the same
one used for example by the Lane
Keeping Assist - LKA system on
vehicles with ADAS systems.
This camera detects the environmental
luminosity, the headlamps of
oncoming vehicles and the tail lamps
of proceding vehicles in the front
area. In these cases, the system
automatically switches from high
beams to low beams until the
approaching vehicle is out of view.
Furthermore, the digital camera is
able to detect the urban areas and the
inhabited centers and to turn off the
high beams when driving near of one
of them.Understanding the Vehicle
3
119
Page 125 of 396

Fog Lights The rear fog lights switch is built into
the lights switch.
To activate the rear fog lights, turn the
light switch to the low beam light
or “AUTO” position. Press the
lights switch
to turn on the rear
fog lights.
Pressing again the lights switch
will deactivate the rear fog lights.
Turning the lights switch off (position
“0”) will also deactivate the rear fog
lights.
A dedicated telltale in the instrument
cluster illuminates when the rear fog
lights are turned on. NOTE:
The rear fog lights will NOT activate
automatically when turning on the
low beam
or “AUTO” headlights
if previously deactivated by turning
the lights switch off. The rear fog
lights will only turn on by operating
the switch as previously described.
Multifunction Lever The multifunction lever controls the
operation of the turn signals,
headlight beam selection, overtaking
lights and windshield wiper and
washer (for this content see the
chapter “Windshield Wipers and
Washers” of this section).
The multifunction lever is fitted on the
left side of the steering column. Turn Signals
Move the multifunction lever all the
way up or down until the stop
triggers.
The left or right arrow on the
speedometer and tachometer
instrument cluster respectively, flashes
to show proper operation of the front
and rear turn signal lights.Understanding the Vehicle
3
121
Page 129 of 396

The right regulator has 2 different
positions:
0
(OFF) Stable position: front seat
lighting and front dome light
LED are turned off.
1 st
Dimmable position: allows
minimum to maximum
brightness tuning of the
front dome light LED and the
front seats lighting.
Dome Lights The front and rear part of the dome,
include each a central and two
reading lights.
The central light automatically turns
on when one of the doors is opened
and turns off when the door is closed
(timed switching off). The light may be
switched on manually by pressing the
central button.
The reading lights are controlled by
the respective side buttons.
If they are turned on by pressing the
button, both central and reading
lights will stay on for about 10
minutes after turning the engine off,
and will then turn off gradually.
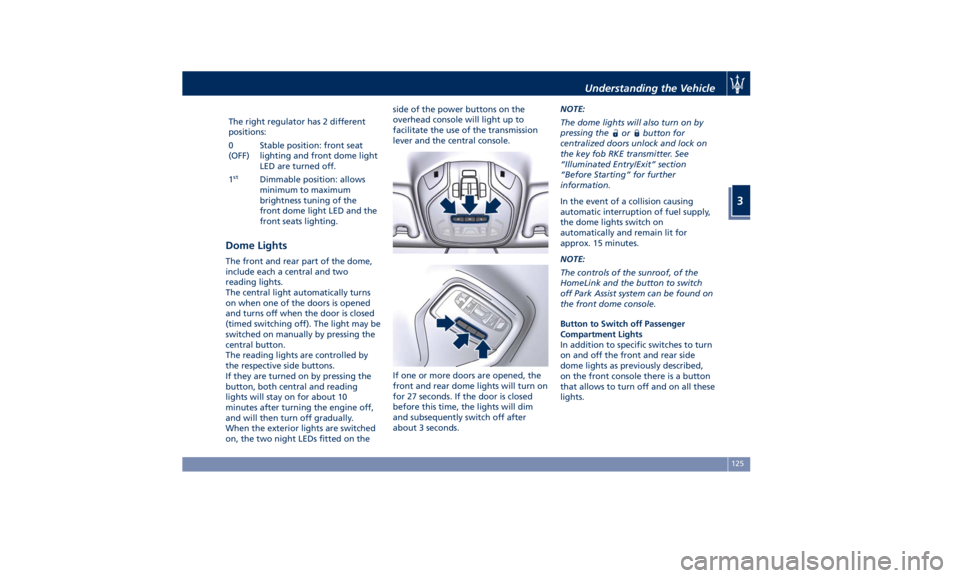
When the exterior lights are switched
on, the two night LEDs fitted on the side of the power buttons on the
overhead console will light up to
facilitate the use of the transmission
lever and the central console.
If one or more doors are opened, the
front and rear dome lights will turn on
for 27 seconds. If the door is closed
before this time, the lights will dim
and subsequently switch off after
about 3 seconds. NOTE:
The dome lights will also turn on by
pressing the
or button for
centralized doors unlock and lock on
the key fob RKE transmitter. See
“Illuminated Entry/Exit” section
“Before Starting” for further
information.
In the event of a collision causing
automatic interruption of fuel supply,
the dome lights switch on
automatically and remain lit for
approx. 15 minutes.
NOTE:
The controls of the sunroof, of the
HomeLink and the button to switch
off Park Assist system can be found on
the front dome console.
Button to Switch off Passenger
Compartment Lights
In addition to specific switches to turn
on and off the front and rear side
dome lights as previously described,
on the front console there is a button
that allows to turn off and on all these
lights.Understanding the Vehicle
3
125
Page 130 of 396

Cargo Lights To illuminate the cargo area there are
two lights inside the trunk
compartment, one on each side. These
lights turn on when trunk lid is opened
and turn off when it is closed.
If trunk lid is left open for a long time,
lights will turn off after 30 minutes to
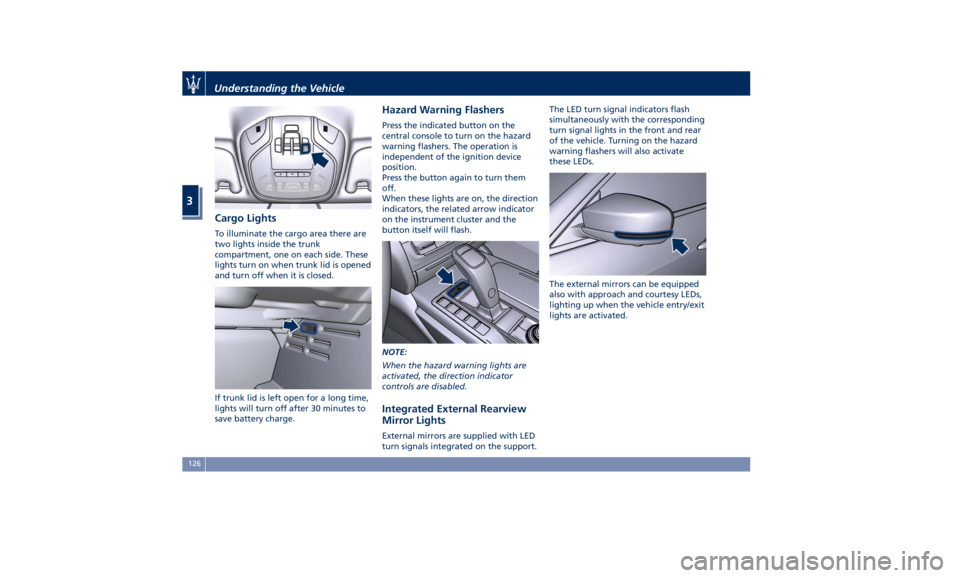
save battery charge. Hazard Warning Flashers Press the indicated button on the
central console to turn on the hazard
warning flashers. The operation is
independent of the ignition device
position.
Press the button again to turn them
off.
When these lights are on, the direction
indicators, the related arrow indicator
on the instrument cluster and the
button itself will flash.
NOTE:
When the hazard warning lights are
activated, the direction indicator
controls are disabled.
Integrated External Rearview
Mirror Lights External mirrors are supplied with LED
turn signals integrated on the support. The LED turn signal indicators flash
simultaneously with the corresponding
turn signal lights in the front and rear
of the vehicle. Turning on the hazard
warning flashers will also activate
these LEDs.
The external mirrors can be equipped
also with approach and courtesy LEDs,
lighting up when the vehicle entry/exit
lights are activated.Understanding the Vehicle
3
126
Page 133 of 396

It is possible to use the “MIST”
position for a maximum of 3 times
within two minutes, corresponding to
different three blades positions on the
windshield. When completed, bring
the ignition switch in RUN : the arms
will reposition. If necessary move the
multifunction lever to other required
operating positions.
WARNING!
Operate or service the windshield
wiper blades without deactivating the
wipers (“OFF” position), leaving the
ignition switch in RUN can be
dangerous for the operator since the
rain sensor may suddenly activate the
wipers. Always use “Service” position
for any intervention on the
windshield wiper blades. Windshield Washers To use the washer on the windshield,
push the end of the multifunction
lever inward (toward the steering
column) and hold it as long as washer
spray is desired.
If you activate the washer while the
windshield wiper control is in the
automatic intermittent range, the
wipers will operate for two wipe
cycles after releasing the lever and
then resume the previously selected
intermittent interval.
If you activate the washer while the
windshield wiper is turned off (“OFF”
position) the wipers will operate for
three wipe cycles and then turn off.
WARNING!
• Do not start the windshield washer during the cold months until the
windshield has warmed up. If it has
not warmed up, the liquid could
freeze on the glass and block your
view.
• Sudden loss of visibility through the
windshield could lead to a collision.
You might not see other vehicles or
other obstacles. To avoid sudden
icing of the windshield during
freezing weather, warm the
windshield with the defroster
before and during windshield
washer use.
WARNING!
California Proposition 65
Operating, servicing and maintaining
a passenger vehicle or off-road vehicle
can expose you to chemicals including
such as, engine exhaust, carbon
monoxide, phthalates and lead, that
which are known to the State of
California to cause cancer and birth
defects or other reproductive harm. To
minimize exposure, avoid breathing
exhaust, do not idle the engine except
as necessary, service your vehicle in a
well-ventilated area and wear gloves
or wash your hands frequently when
(Continued)Understanding the Vehicle
3
129
Page 161 of 396

continuous sound will advise the
driver to turn the signal off.
If the indicator flashes at a fast rate,
check for a defective outside indicator
light bulb.
Seat Belt Reminder Light
When the ignition switch is in
RUN , the seat belt reminder
light will light up for a few
seconds as a bulb check.
During the bulb check, you will hear
an acoustic signal if one or both front
seat belts are unbuckled.
After the bulb check or while driving,
if a seat belt is unbuckled, together
with the acoustic signal the seat belt
reminder light will light up and a
message will indicate which belt is not
fastened.
WARNING!
Maserati urges you to use the seat
belts correctly fastened and adjusted
at all times. Correct use of the seat
belts can help reduce the risk of
serious injury in the event of an
accident. Do not pass seat belts over
sharp edges. They could tear. Do not
pin anything to the seat belts. This
could reduce their initial strength and cause them to tear in the event of a
crash.
Refer to “Occupants Restraint
Systems”
in section
“Before Starting”
for further information.
TFT Display: Menus and
Settings When operating, the TFT Display is
divided into sectors including menus
and sub-menus, running data,
warning/indicator lights and messages.
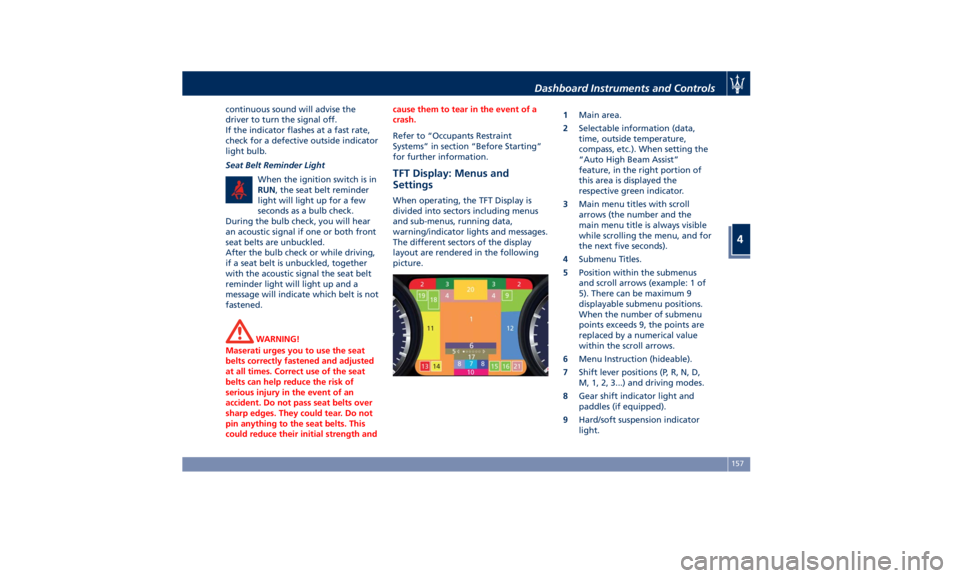
The different sectors of the display
layout are rendered in the following
picture. 1 Main area.
2 Selectable information (data,
time, outside temperature,
compass, etc.). When setting the
“Auto High Beam Assist”
feature, in the right portion of
this area is displayed the
respective green indicator.
3 Main menu titles with scroll
arrows (the number and the
main menu title is always visible
while scrolling the menu, and for
the next five seconds).
4 Submenu Titles.
5 Position within the submenus
and scroll arrows (example: 1 of
5). There can be maximum 9
displayable submenu positions.
When the number of submenu
points exceeds 9, the points are
replaced by a numerical value
within the scroll arrows.
6 Menu Instruction (hideable).
7 Shift lever positions (P, R, N, D,
M, 1, 2, 3...) and driving modes.
8 Gear shift indicator light and
paddles (if equipped).
9 Hard/soft suspension indicator
light.Dashboard Instruments and Controls
4
157