2019 MASERATI LEVANTE warning
[x] Cancel search: warningPage 112 of 436

• Tilt the seat back to the upright
position (see “CArgo Area” in this
section).
• Reposition the head restraint to the
appropriate height for the passenger.
WARNING!
• A loose head restraint thrown
forward in a collision or hard stop
could cause serious injury or death
to occupants of the vehicle. Always
securely stow removed head
restraints in a location outside the
occupant compartment.
• ALL the head restraints MUST be
reinstalled in the vehicle to properly
protect the occupants. Follow the
re-installation instructions above
prior to operating the vehicle or
occupying a seat. Steering Wheel
Adjustment This feature allows you to tilt the
steering column upward or downward
or to lengthen or shorten it in order to
adjust the steering wheel to an
optimized position.
Power Adjustment The power tilt/telescoping steering
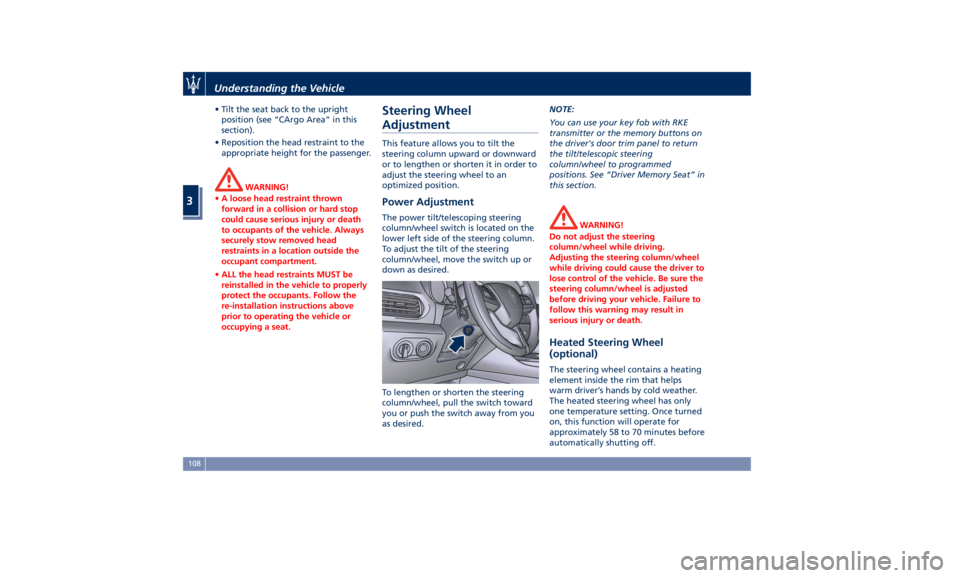
column/wheel switch is located on the
lower left side of the steering column.
To adjust the tilt of the steering
column/wheel, move the switch up or
down as desired.
To lengthen or shorten the steering
column/wheel, pull the switch toward
you or push the switch away from you
as desired. NOTE:
You can use your key fob with RKE
transmitter or the memory buttons on
the driver's door trim panel to return
the tilt/telescopic steering
column/wheel to programmed
positions. See “Driver Memory Seat” in
this section.
WARNING!
Do not adjust the steering
column/wheel while driving.
Adjusting the steering column/wheel
while driving could cause the driver to
lose control of the vehicle. Be sure the
steering column/wheel is adjusted
before driving your vehicle. Failure to
follow this warning may result in
serious injury or death.
Heated Steering Wheel
(optional) The steering wheel contains a heating
element inside the rim that helps
warm driver’s hands by cold weather.
The heated steering wheel has only
one temperature setting. Once turned
on, this function will operate for
approximately 58 to 70 minutes before
automatically shutting off.Understanding the Vehicle
3
108
Page 113 of 436

The heated steering wheel can shut
off early or may not turn on when the
steering wheel is already warm.
The heating steering wheel command
is in the “Climate” screen of MTC+. It
is present in the “Climate” screen even
when the A/C is off. See “Air
Conditioning Controls” in section
“Dashboard Instruments and
Controls” for further details.
When the MTC+ System is in any mode
other than “ Climate” (“Radio”,
“Media”, “Controls”, etc.) the icon of
the heated steering wheel will be
indicated on the upper part of the
display.
NOTE:
The engine must be running for the
heated steering wheel to operate.
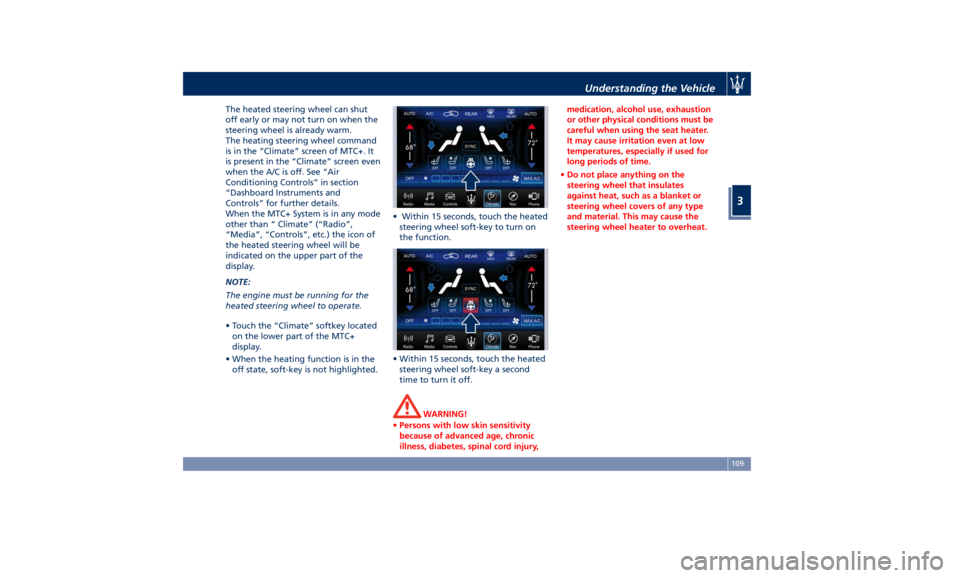
• Touch the “Climate” softkey located
on the lower part of the MTC+
display.
• When the heating function is in the
off state, soft-key is not highlighted. • Within 15 seconds, touch the heated
steering wheel soft-key to turn on
the function.
• Within 15 seconds, touch the heated
steering wheel soft-key a second
time to turn it off.
WARNING!
• Persons with low skin sensitivity
because of advanced age, chronic
illness, diabetes, spinal cord injury, medication, alcohol use, exhaustion
or other physical conditions must be
careful when using the seat heater.
It may cause irritation even at low
temperatures, especially if used for
long periods of time.
• Do not place anything on the
steering wheel that insulates
against heat, such as a blanket or
steering wheel covers of any type
and material. This may cause the
steering wheel heater to overheat.Understanding the Vehicle
3
109
Page 114 of 436

Adjustable Pedals (if
equipped) The adjustable pedals system is
designed to allow greater range of
pedals positions enabling driver
comfort with regard to the steering
wheel tilt and the seat position.
This feature allows the brake and
accelerator pedals to move toward or
away from the driver’s feet.
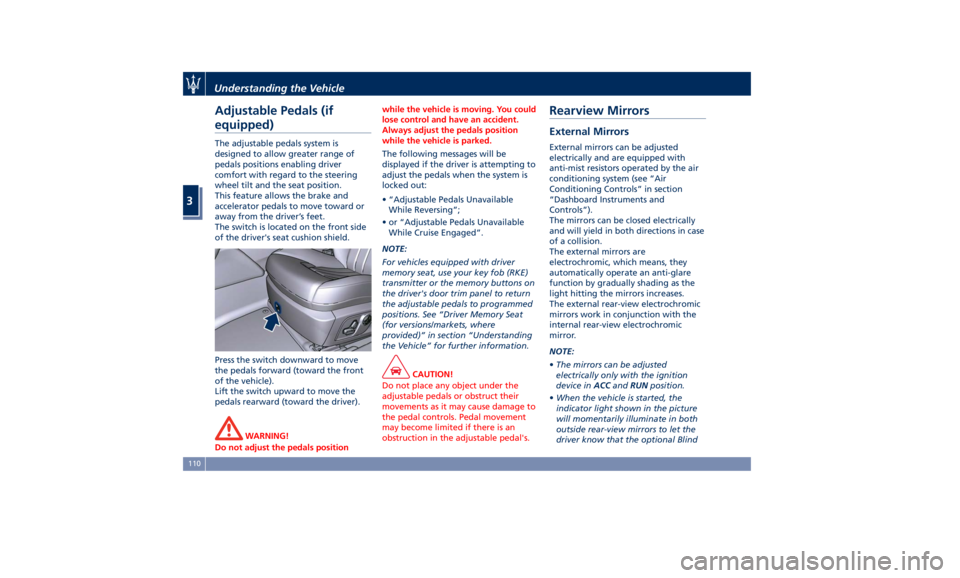
The switch is located on the front side
of the driver's seat cushion shield.
Press the switch downward to move
the pedals forward (toward the front
of the vehicle).
Lift the switch upward to move the
pedals rearward (toward the driver).
WARNING!
Do not adjust the pedals position while the vehicle is moving. You could
lose control and have an accident.
Always adjust the pedals position
while the vehicle is parked.
The following messages will be
displayed
if the driver is attempting to
adjust the pedals when the system is
locked out:
• “Adjustable Pedals Unavailable
While Reversing”;
• or “Adjustable Pedals Unavailable
While Cruise Engaged”.
NOTE:
For vehicles equipped with driver
memory seat, use your key fob (RKE)
transmitter or the memory buttons on
the driver's door trim panel to return
the adjustable pedals to programmed
positions. See “Driver Memory Seat
(for versions/markets, where
provided)” in section “Understanding
the Vehicle” for further information.
CAUTION!
Do not place any object under the
adjustable pedals or obstruct their
movements as it may cause damage to
the pedal controls. Pedal movement
may become limited if there is an
obstruction in the adjustable pedal's.Rearview Mirrors External Mirrors External mirrors can be adjusted
electrically and are equipped with
anti-mist resistors operated by the air
conditioning system (see “Air
Conditioning Controls” in section
“Dashboard Instruments and
Controls”).
The mirrors can be closed electrically
and will yield in both directions in case
of a collision.
The external mirrors are
electrochromic, which means, they
automatically operate an anti-glare
function by gradually shading as the
light hitting the mirrors increases.
The external rear-view electrochromic
mirrors work in conjunction with the
internal rear-view electrochromic
mirror.
NOTE:
• The mirrors can be adjusted
electrically only with the ignition
device in ACC and RUN position.
• When the vehicle is started, the
indicator light shown in the picture
will momentarily illuminate in both
outside rear-view mirrors to let the
driver know that the optional BlindUnderstanding the Vehicle
3
110
Page 115 of 436

Spot Assist (BSA) system is
operational. For more details see
chapter “Blind Spot Assist - BSA” in
section “Driving”.
The external of the rear-view mirror
support is equipped with LEDs,
lighting up when the turn signals and
vehicle entry/exit lights are activated.
When the surround view camera
system is installed, at the external
bottom side of the rear-view mirror is
the side view camera (refer to
“Surround View Camera System
(optional)” in section “Before
Starting”).
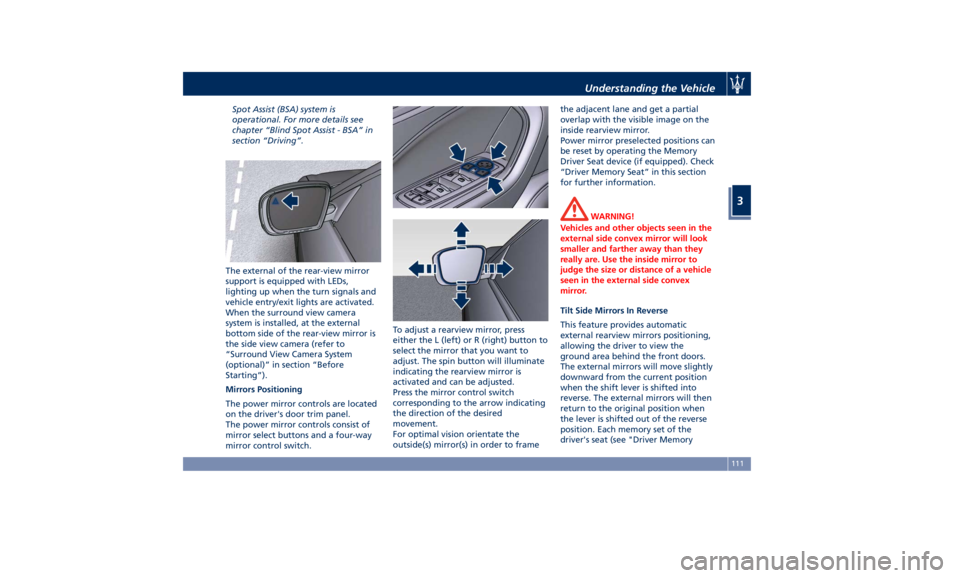
Mirrors Positioning
The power mirror controls are located
on the driver's door trim panel.
The power mirror controls consist of
mirror select buttons and a four-way
mirror control switch. To adjust a rearview mirror, press
either the L (left) or R (right) button to
select the mirror that you want to
adjust. The spin button will illuminate
indicating the rearview mirror is
activated and can be adjusted.
Press the mirror control switch
corresponding to the arrow indicating
the direction of the desired
movement.
For optimal vision orientate the
outside(s) mirror(s) in order to frame the adjacent lane and get a partial
overlap with the visible image on the
inside rearview mirror.
Power mirror preselected positions can
be reset by operating the Memory
Driver Seat device (if equipped). Check
“Driver Memory Seat” in this section
for further information.
WARNING!
Vehicles and other objects seen in the
external side convex mirror will look
smaller and farther away than they
really are. Use the inside mirror to
judge the size or distance of a vehicle
seen in the external side convex
mirror.
Tilt Side Mirrors In Reverse
This
feature provides automatic
external rearview mirrors positioning,
allowing the driver to view the
ground area behind the front doors.
The external mirrors will move slightly
downward from the current position
when the shift lever is shifted into
reverse. The external mirrors will then
return to the original position when
the lever is shifted out of the reverse
position. Each memory set of the
driver's seat (see "Driver MemoryUnderstanding the Vehicle
3
111
Page 119 of 436

Automatic Headlights This system automatically turns the
headlights on or off according to
ambient light intensity detected by
the twilight sensor positioned on the
inner surface of the windshield, over
the rear view mirror. To turn the
system on, rotate the lights switch
clockwise to “AUTO” position.
When the automatic system is
activated, the headlight time delay
feature is activated as well. This means
the headlights will stay on for up to 90
seconds after you place the ignition
device into OFF position.
To turn the automatic system off,
move the lights switch out of “AUTO”
position.
NOTE:
The engine must be running and the
twilight sensor in “NIGHT” mode
before the headlights turn on in
automatic mode.
WARNING!
The responsibility for turning on the
lights, depending on the daylight and
regulations in force in the country of
use, always lies with the driver. The
automatic system for switching on and off the external lights is to be
considered as an aid for the driver. If
necessary, switch the lights including
the front and rear fog lights on and
off manually.
Headlights On with Wipers When this feature is active, the
headlights will turn on approximately
10 seconds after activation of the
wipers, if the lights switch is placed in
the “AUTO” position. The headlights
will additionally turn off by
deactivation of the wipers if
previously activated with this function.
NOTE:
The headlights with wipers feature
may be turned on and off using the
MTC+ System, refer to “MTC+
Settings” in section “Dashboard
Instruments and Controls”.
Headlights Time Delay This safety feature provides headlight
illumination for up to 90 seconds
(programmable) when leaving your
vehicle in an unlit area. To activate the
delay feature, place the ignition
switch in the OFF or ACC position
while the headlights are still on. Then turn off the headlights within 45
seconds.
The delay interval begins when the
lights switch is turned off (position
“0”). If you turn the headlights or
position lights on, or place the
ignition switch in RUN , the system will
cancel the delay.
If you turn the headlights off (“0”
position) before the ignition, they will
turn off in the normal mode.
NOTE:
• To activate this feature the lights
must be turned off (“0” position)
within 45 seconds of placing the
ignition switch in the OFF or ACC
position.
• The headlight delay time is
programmable using the MTC+
System, see “MTC+ Settings” in
section “Dashboard Instruments and
Controls”.
• If the low beam bulbs/LEDs are
active due to “Headlights with
Wipers”, then the headlamps delay
feature will not be activated when
the ignition switch is set in OFF
position.Understanding the Vehicle
3
115
Page 121 of 436

Bi-Xenon Headlight (for
headlights without AFS) The gas-discharge (xenon) headlights
operate with an electric arc saturated
with Xenon gas under pressure,
instead of the incandescent filament.
The light produced is assuredly higher
compared to traditional light bulbs, in
terms of quality (brighter light) as well
as of the span and positioning of the
illuminated area.
WARNING!
If xenon headlamp replacement is
necessary, contact the Authorized
Maserati Dealer only: DANGER - RISK
OF ELECTRICAL SHOCK.
Headlight with AFS (for
versions/markets, where
provided) These headlights combines the “xeno”
technology to the AFS (Advanced
Frontlighting System) adaptive
features.
The system is able to process signals of
onboard systems and subsequently
start up five strategic steps in the
following situations:
• “motorway beam”; • “country beam”;
• “town beam”;
• “adverse weather beam”;
• “tourist beam” (for example in
countries with circulation on the
opposite side). In this case this
function must be activated via the
menu of MTC+ (refer to “MTC+
Settings” in section “Dashboard
Instruments and Controls”).
The advantages offered by the AFS
system are perceived especially in case
of bad weather, fog and/or insufficient
road indications providing broader
illumination of the side zones, which
are normally left in the dark, and for
motorway driving (see comparison
rendered below).
This surely increases driving safety as it
offers less eye stress and increased
orientation for the driver and better
detection of other persons on the
road sides (pedestrians, bicycle riders
and motorcycle drivers).
The table shows the light values (lux)
and the light flux (lumen) of AFS
headlights. Combining a bending mode and a
vertical adjustment, the system assures
better visibility of the road surface
when driving on a curve, steering, or
in the event of road deviations,
optimizing vertical and horizontal
light distribution according to the
current drive path.
The increased lateral illumination is
gained through a fixed bending light
or a cornering light (depending on the
market) elaborating information
about the steering angle, the vehicle
speed and the turn indicator.
The improved vertical illumination, in
case of fast acceleration and/or fast
deceleration, will assure the deeper
illuminated distance from the vehicle,
through a dynamical adaptation of
headlight vertical attitude.Understanding the Vehicle
3
117
Page 123 of 436

detection of other persons on the
road sides (pedestrians, bicycle riders
and motorcycle drivers). Furthermore,
the headlamps are suitable to prevent
glare, providing optimal lighting
when driving the car in a country with
circulation on the opposite side.
The table shows the light values (lux)
and the light flux (lumen) of AFS
headlights.
NOTE:
The values reported in the table may
change depending on the destination
market of the car. The system assures better visibility of
the road surface when driving in a
curve, steering, or in the event of road
deviations, optimizing vertical light
distribution according to the current
drive path.
The increased lateral illumination is
gained through a fixed bending light
or a cornering light (depending on the
market) elaborating information
about the steering angle, the vehicle
speed and the turn indicator.
The improved vertical illumination, in
case of fast acceleration and/or fast
deceleration, will assure the deeper
illuminated distance from the vehicle,
through a dynamical adaptation of
headlight vertical attitude. NOTE:
• Each time the adaptive headlight
system is turned on, the headlights
adjustment will perform a
self-regulation cycle.
• All AFS features are available only if
the vehicle is moving forward.
• “Adaptive Front Light” function can
be turned on or off using the MTC+
System, refer to “MTC+ Settings” in
section “Dashboard Instrument and
Controls” for further information.
AFS System Failure
In the event of AFS system unvailable,
the related warning light and message
will light up on the TFT display. Take
your vehicle to the nearest Center of
the Authorized Maserati Delaer as
soon as possible to check the system.Lighting (at 27 yd/25 m) Light flux
Low beam 55 lux 765 lm
Low beam (low speed) 43 lux 600 lm
Low beam (high speed) 58 lux 800 lm
Low beam (wet road) 42 lux 790 lm
High beam 150 lux 1440 lm Understanding the Vehicle
3
119
Page 125 of 436

NOTE:
• The function is enabled only if the
brightness sensor detects the right
lighting conditions and them switch
to low beam on.
• Broken, muddy, or obstructed
headlights and taillights of vehicles
in the field of view will cause
headlights to remain on longer
(closer to the vehicle). Also, dirt,
film, and other obstructions on the
windshield or camera lens will cause
the system to function improperly.
Automatic High Beam Failure
In the event of an automatic high
beam system failure, the related
amber warning light will light up on
the TFT display.
Take your vehicle to the nearest
Authorized Maserati Dealer as soon as
possible avoiding to use this system. High Beam with “Glare Free”
Feature (for “Full-LED”
headlight with AFS) The "Glare Free" feature associated
with "Full-LED" headlamps assists the
driver during traveling on an off-city
road with not sufficient environmental
illumination allowing the high beam
use also with other traffic participants
without glaring disturbance.
The no glaring effect is obtained
through matrixes of LED that are
dynamically switched on and off in
order to create a shadow zone in
correspondence of each other traffic
participants lights (motor vehicles and
bicycles, as well), according to the
information about other vehicles’
lights coming from the forward-facing
digital camera located on the
windshield , behind the internal
rear-view mirror.
The no glaring system is a
multi-shadow system, since it’s able to
create up to four light tunnels
simultaneously , each tunnel zone is as
large as the obstacle that should not
be glared.
The figure represents an example of
the car that is travelling in the
following scenarios: 1. two vehicles ahead in the same
direction;
2. another vehicle that is
overtaking;
3. another vehicle proceeding in the
opposite direction.
The system is able to detect and react
to an oncoming vehicle starting from
a distance of about 400 yd (400 m), in
a couple of seconds. Instead, in case of
the preceding vehicles, the system is
able to detect and react in few
seconds starting from a distance of
about 100 yd (100 m).
Activation Mode
The digital camera is the same used
for the automatic high beam, and like
automatic high beam also for "Glare
Free" feature it needs to be activated
by MTC+ “Controls” screen, touchingUnderstanding the Vehicle
3
121