2019 MASERATI LEVANTE ESP
[x] Cancel search: ESPPage 125 of 436

NOTE:
• The function is enabled only if the
brightness sensor detects the right
lighting conditions and them switch
to low beam on.
• Broken, muddy, or obstructed
headlights and taillights of vehicles
in the field of view will cause
headlights to remain on longer
(closer to the vehicle). Also, dirt,
film, and other obstructions on the
windshield or camera lens will cause
the system to function improperly.
Automatic High Beam Failure
In the event of an automatic high
beam system failure, the related
amber warning light will light up on
the TFT display.
Take your vehicle to the nearest
Authorized Maserati Dealer as soon as
possible avoiding to use this system. High Beam with “Glare Free”
Feature (for “Full-LED”
headlight with AFS) The "Glare Free" feature associated
with "Full-LED" headlamps assists the
driver during traveling on an off-city
road with not sufficient environmental
illumination allowing the high beam
use also with other traffic participants
without glaring disturbance.
The no glaring effect is obtained
through matrixes of LED that are
dynamically switched on and off in
order to create a shadow zone in
correspondence of each other traffic
participants lights (motor vehicles and
bicycles, as well), according to the
information about other vehicles’
lights coming from the forward-facing
digital camera located on the
windshield , behind the internal
rear-view mirror.
The no glaring system is a
multi-shadow system, since it’s able to
create up to four light tunnels
simultaneously , each tunnel zone is as
large as the obstacle that should not
be glared.
The figure represents an example of
the car that is travelling in the
following scenarios: 1. two vehicles ahead in the same
direction;
2. another vehicle that is
overtaking;
3. another vehicle proceeding in the
opposite direction.
The system is able to detect and react
to an oncoming vehicle starting from
a distance of about 400 yd (400 m), in
a couple of seconds. Instead, in case of
the preceding vehicles, the system is
able to detect and react in few
seconds starting from a distance of
about 100 yd (100 m).
Activation Mode
The digital camera is the same used
for the automatic high beam, and like
automatic high beam also for "Glare
Free" feature it needs to be activated
by MTC+ “Controls” screen, touchingUnderstanding the Vehicle
3
121
Page 128 of 436

Multifunction Lever The multifunction lever controls the
operation of the turn signals,
headlight beam selection and
overtaking lights, wipers and washers
acting on the windshield and on the
liftgate (for this content see the
chapter “Wipers and Washers” of this
section).
The multifunction lever is fitted on the
left side of the steering column.
Turn Signals
Move the multifunction lever all the
way up or down until the stop
triggers.
The left or right arrow on the
speedometer and tachometer
instrument cluster respectively, flashes
to show proper operation of the front
and rear turn signal lights. To activate lane change function, tap
the lever up or down once, without
moving beyond the detent. The turn
signals (right or left) will flash three
times then automatically turn off.
This function is useful when
overtaking or changing lanes. NOTE:
• If either light remains on and does
not flash, or flashes at a fast rate,
check for a defective outside light. If
an indicator on the instrument
cluster fails while moving the lever,
then the turn indicator is probably
defective.
• The message that a turn signal is on
will appear in the instrument cluster
and a continuous chime will sound if
the vehicle is driven more than 1 mile
(1.6 km) with either turn signal on.
High Beams and Flashing
To switch on the high beams with the
light switch in headlamp
or
“AUTO” position, shift the
multifunction lever onward.
The blue telltale
will illuminate on
the tachometer.Understanding the Vehicle
3
124
Page 130 of 436

A check mark will remain next to the
previously-selected item until a new
selection is made.
Press and release the switch (
)to
select the option. A selection notice
pops up for 2 seconds and then the
display reverts to the last modified
parameter.
The dimmable lights are the following:
• instrument cluster dials and display;
• dome light (front/rear); • LED in correspondence of the
internal door handle;
• doors and steering wheel backlight
controls LED;
• front footrest light;
• front seats night lighting.
Automatic Headlights Leveling A correct headlights leveling is crucial
for the safety of the vehicle’s
occupants and of people in the street.
Moreover it is included in the road
regulation law.
In order to obtain the best visibility
conditions while driving with
headlights on, the headlight beam
must be properly leveled, under any
vehicle load condition.
The vehicle is equipped with a system
that automatically adjusts headlight
leveling according to ground clearance
and vehicle load conditions. Dome Lights The dome lights integrated into the
front dome console, include a central
and two reading lights.
The central light automatically turns
on when one of the doors is opened
and turns off when the door is closed
(timed switching off). The light may be
switched on manually by pressing the
central button.
The reading lights are controlled by
the respective side buttons.
If they are turned on by pressing the
button, both central and reading lights
will stay on for about 10 minutes after
turning the engine off, and will then
turn off gradually.
When the exterior lights are switched
on, the two night LEDs fitted on the
side of the power buttons on the
overhead console will light up toUnderstanding the Vehicle
3
126
Page 132 of 436

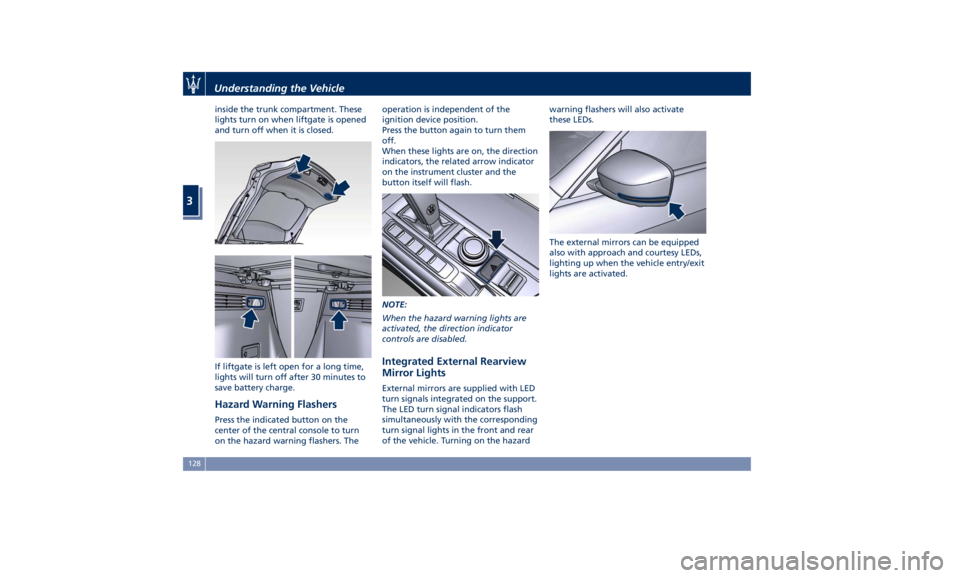
inside the trunk compartment. These
lights turn on when liftgate is opened
and turn off when it is closed.
If liftgate is left open for a long time,
lights will turn off after 30 minutes to
save battery charge.
Hazard Warning Flashers Press the indicated button on the
center of the central console to turn
on the hazard warning flashers. The operation is independent of the
ignition device position.
Press the button again to turn them
off.
When these lights are on, the direction
indicators, the related arrow indicator
on the instrument cluster and the
button itself will flash.
NOTE:
When the hazard warning lights are
activated, the direction indicator
controls are disabled.
Integrated External Rearview
Mirror Lights External mirrors are supplied with LED
turn signals integrated on the support.
The LED turn signal indicators flash
simultaneously with the corresponding
turn signal lights in the front and rear
of the vehicle. Turning on the hazard warning flashers will also activate
these LEDs.
The external mirrors can be equipped
also with approach and courtesy LEDs,
lighting up when the vehicle entry/exit
lights are activated.Understanding the Vehicle
3
128
Page 135 of 436

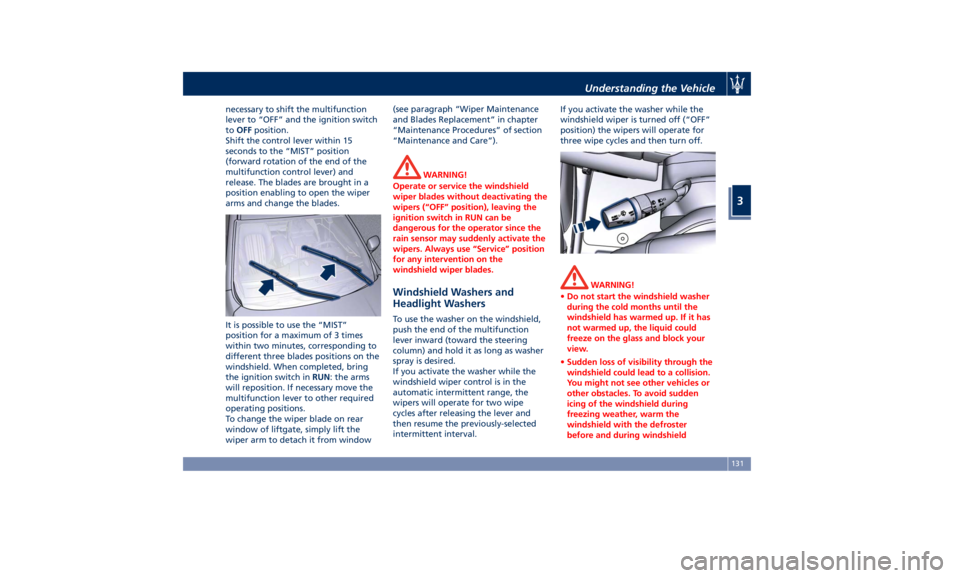
necessary to shift the multifunction
lever to “OFF” and the ignition switch
to OFF position.
Shift the control lever within 15
seconds to the “MIST” position
(forward rotation of the end of the
multifunction control lever) and
release. The blades are brought in a
position enabling to open the wiper
arms and change the blades.
It is possible to use the “MIST”
position for a maximum of 3 times
within two minutes, corresponding to
different three blades positions on the
windshield. When completed, bring
the ignition switch in RUN : the arms
will reposition. If necessary move the
multifunction lever to other required
operating positions.
To change the wiper blade on rear
window of liftgate, simply lift the
wiper arm to detach it from window (see paragraph “Wiper Maintenance
and Blades Replacement” in chapter
“Maintenance Procedures” of section
“Maintenance and Care”).
WARNING!
Operate or service the windshield
wiper blades without deactivating the
wipers (“OFF” position), leaving the
ignition switch in RUN can be
dangerous for the operator since the
rain sensor may suddenly activate the
wipers. Always use “Service” position
for any intervention on the
windshield wiper blades.
Windshield Washers and
Headlight Washers To use the washer on the windshield,
push the end of the multifunction
lever inward (toward the steering
column) and hold it as long as washer
spray is desired.
If you activate the washer while the
windshield wiper control is in the
automatic intermittent range, the
wipers will operate for two wipe
cycles after releasing the lever and
then resume the previously-selected
intermittent interval. If you activate the washer while the
windshield wiper is turned off (“OFF”
position) the wipers will operate for
three wipe cycles and then turn off.
WARNING!
• Do not start the windshield washer
during the cold months until the
windshield has warmed up. If it has
not warmed up, the liquid could
freeze on the glass and block your
view.
• Sudden loss of visibility through the
windshield could lead to a collision.
You might not see other vehicles or
other obstacles. To avoid sudden
icing of the windshield during
freezing weather, warm the
windshield with the defroster
before and during windshieldUnderstanding the Vehicle
3
131
Page 151 of 436

Front to Back Roof Rails
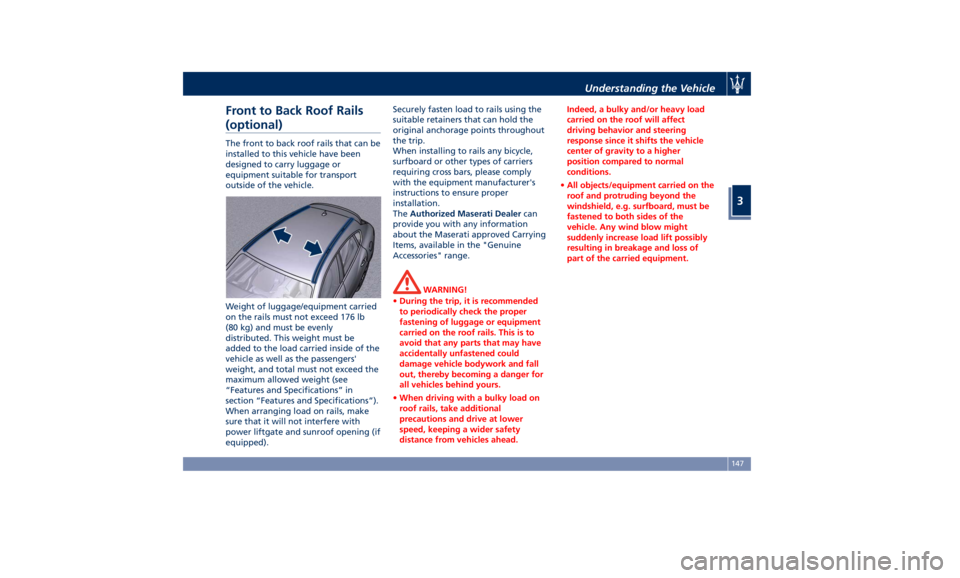
(optional) The front to back roof rails that can be
installed to this vehicle have been
designed to carry luggage or
equipment suitable for transport
outside of the vehicle.
Weight of luggage/equipment carried
on the rails must not exceed 176 lb
(80 kg) and must be evenly
distributed. This weight must be
added to the load carried inside of the
vehicle as well as the passengers'
weight, and total must not exceed the
maximum allowed weight (see
“Features and Specifications” in
section “Features and Specifications”).
When arranging load on rails, make
sure that it will not interfere with
power liftgate and sunroof opening (if
equipped). Securely fasten load to rails using the
suitable retainers that can hold the
original anchorage points throughout
the trip.
When installing to rails any bicycle,
surfboard or other types of carriers
requiring cross bars, please comply
with the equipment manufacturer's
instructions to ensure proper
installation.
The Authorized Maserati Dealer can
provide you with any information
about the Maserati approved Carrying
Items, available in the "Genuine
Accessories" range.
WARNING!
• During the trip, it is recommended
to periodically check the proper
fastening of luggage or equipment
carried on the roof rails. This is to
avoid that any parts that may have
accidentally unfastened could
damage vehicle bodywork and fall
out, thereby becoming a danger for
all vehicles behind yours.
• When driving with a bulky load on
roof rails, take additional
precautions and drive at lower
speed, keeping a wider safety
distance from vehicles ahead. Indeed, a bulky and/or heavy load
carried on the roof will affect
driving behavior and steering
response since it shifts the vehicle
center of gravity to a higher
position compared to normal
conditions.
• All objects/equipment carried on the
roof and protruding beyond the
windshield, e.g. surfboard, must be
fastened to both sides of the
vehicle. Any wind blow might
suddenly increase load lift possibly
resulting in breakage and loss of
part of the carried equipment.Understanding the Vehicle
3
147
Page 169 of 436

WARNING!
Maserati urges you to use the seat
belts correctly fastened and adjusted
at all times. Correct use of the seat
belts can help reduce the risk of
serious injury in the event of an
accident. Do not pass seat belts over
sharp edges: they could tear. Do not
pin anything to the seat belts. This
could reduce their initial strength and
cause them to tear in the event of a
crash.
Refer to “Occupants Restraint
Systems”
in section “Before
Starting”
for further information.
TFT Display: Menus and
Settings When operating, the TFT Display is
divided into sectors including menus
and sub-menus, running data,
warning/indicator lights and messages.
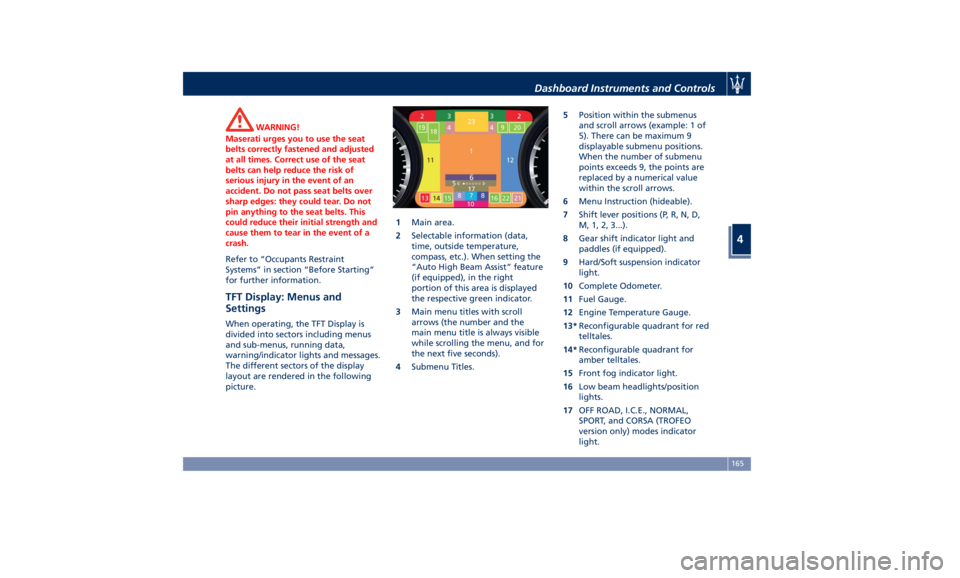
The different sectors of the display
layout are rendered in the following
picture. 1 Main area.
2 Selectable information (data,
time, outside temperature,
compass, etc.). When setting the
“Auto High Beam Assist” feature
(if equipped), in the right
portion of this area is displayed
the respective green indicator.
3 Main menu titles with scroll
arrows (the number and the
main menu title is always visible
while scrolling the menu, and for
the next five seconds).
4 Submenu Titles. 5 Position within the submenus
and scroll arrows (example: 1 of
5). There can be maximum 9
displayable submenu positions.
When the number of submenu
points exceeds 9, the points are
replaced by a numerical value
within the scroll arrows.
6 Menu Instruction (hideable).
7 Shift lever positions (P, R, N, D,
M, 1, 2, 3...).
8 Gear shift indicator light and
paddles (if equipped).
9 Hard/Soft suspension indicator
light.
10 Complete Odometer.
11 Fuel Gauge.
12 Engine Temperature Gauge.
13* Reconfigurable quadrant for red
telltales.
14* Reconfigurable quadrant for
amber telltales.
15 Front fog indicator light.
16 Low beam headlights/position
lights.
17 OFF ROAD, I.C.E., NORMAL,
SPORT, and CORSA (TROFEO
version only) modes indicator
light.Dashboard Instruments and Controls
4
165
Page 184 of 436

the hood (see “Maintenance
Procedures” in section “Maintenance
and Care”).
Electric Power Steering Failure
Warning Light
This warning light, and the
related message, illuminate
when the electric power
steering is not operating and
needs service.
If the warning light is on, steering
assistance may be not available.
WARNING!
After battery disconnection event, the
warning light may be on. In this case,
start the engine and perform a
steering wheel stroke end to end.
If the problem persists, contact an
Authorized
Maserati Dealer .
Catalyst Over Temperature Warning
Light
This warning light, and the
related message, light up if
the engine runs irregularly
with consequent high
temperature in the exhaust system. WARNING!
• If the warning light is accompanied
by the message “Catalyst Temp
Getting Hot Reduce Speed”: the
temperature of the catalytic
converters is too high. The driver
must slow down immediately until
the warning light turns off.
• If the message “Catalyst Temp Hot
Stop Safely Wait To Cool” appears
after decelerating: the temperature
in the catalytic converters has
reached a dangerous level and the
catalytic converters could be
damaged. Drive slowly to the
nearest Authorized Maserati Dealer.
• Maserati declines all responsibility
for whatever damage deriving from
non-compliance with the above
mentioned warnings.
Door Ajar Indicator
This
indicator illuminates
when one
or more doors are
ajar. The indicator will show
which door is ajar. When one
or more doors are open, a related
message will be displayed if the vehicle
is running at a speed of 5 mph (8
km/h) or faster. Liftgate and Hood Ajar Indicators
These light indicators will
illuminate to indicate that the
liftgate and/or the hood are
ajar.
When the liftgate or the hood
is open, a related message will
be displayed besides the light
if the vehicle is running at a speed of
5 mph (8 km/h) or faster.
Electronic Throttle Control (ETC)
Indicator
This indicator light indicates a
failure of the Electronic
Throttle Control (ETC) system.
If the indicator turns on while
driving (a torque decrease is possible),
have the system checked by an
Authorized Maserati Dealer .
When detecting a failure, the light
indicator will illuminate while the
engine is running.
If the indicator remains lit with the
engine running, you can still drive your
vehicle. However, contact an
Authorized Maserati Dealer as soon as
possible.
If the indicator is flashing while the
engine is running, immediate service is
required. You may experience reduced
performance, an elevated/rough idleDashboard Instruments and Controls
4
180