2019 MASERATI LEVANTE Liftgate
[x] Cancel search: LiftgatePage 59 of 436

tailpipes as they can reach high
temperatures and, in case of contact,
they can cause severe burns.
• When it is not necessary to open the
power liftgate with the Hands free
mode, make sure the key fob is
outside the range of use (3.3 ft/1 m).
Otherwise, the power liftgate can
be opened accidentally by an
unintentional movement of the
foot.
In order for the sensors to detect your
foot
movement, move your foot
towards the vehicle rather than
sideways and immediately pull it back:
from this moment, the power liftgate
will activate within two seconds.
If closed, with the foot movement the
power liftgate will:
• unlock and completely open;
• after another kick, will stop; • after another kick, will reverse its
movement and completely close
unless stopped again.
If open, with the foot movement the
power liftgate will:
• completely close but not lock;
• another kick before the completed
closing can stop the movement;
• if the movement was stopped
another kick operation will invert a
complete opening.
NOTE:
• If your foot movement fails to
activate the power liftgate
movement, wiggling your foot
under the bumper will not help.
Repeat the whole kick movement.
• In particular situations, external
factors affecting the sensor area may
trigger the Hands free power
liftgate release feature. For example,
when washing the vehicle, a water
jet aimed at the sensor area may
trigger the Hands free power
liftgate release feature. Keep the
key fob RKE transmitter away from
the sensing range of the sensors (10
ft/3 m) or disable the Hands free
feature from the MTC+ menu (see
“MTC+ Settings” in section
“Dashboard Instruments and Controls”). A key fob RKE
transmitter located in the front seat
passenger area is considered out of
range of the Hands free liftgate
release sensor.
• If somebody or something knocks
against the power liftgate while it is
moving, the safety system might
stop lid opening or closing
movement.
Power Liftgate Emergency
Release If the power release control operated
by pressing the button on the dome
console fails, the battery could be in a
low condition. In this case, it is
possible to temporarily power the
system by using the battery remote
poles located inside the engine
compartment (see “Auxiliary
Jump-Start Procedure” in section “In
an Emergency”). Then it is possible to
normally open the power liftgate by
using the key fob RKE transmitter.
Have the vehicle serviced by an
Authorized Maserati Dealer .Before Starting
2
55
Page 60 of 436
Hood Operation Opening Two latches must be released to open
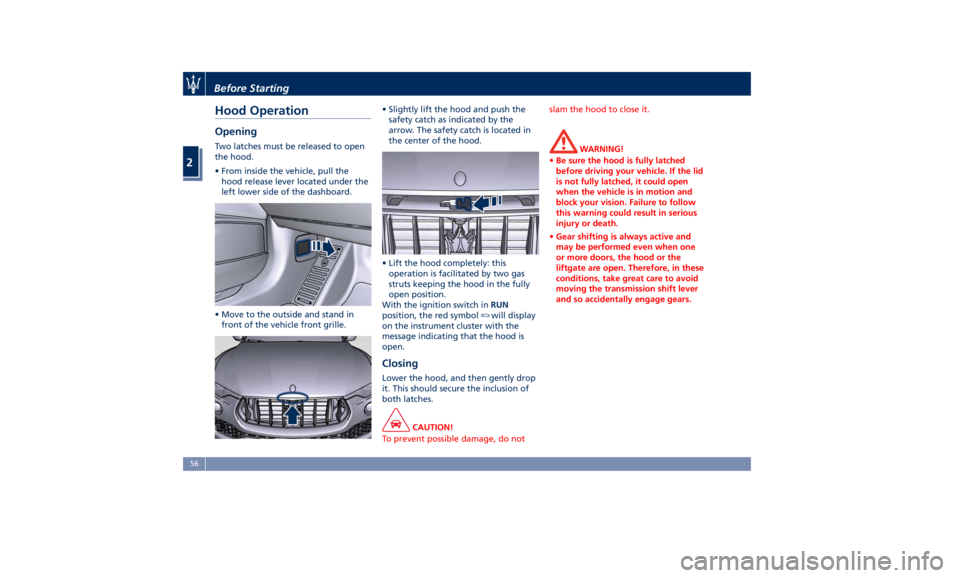
the hood.
• From inside the vehicle, pull the
hood release lever located under the
left lower side of the dashboard.
• Move to the outside and stand in
front of the vehicle front grille. • Slightly lift the hood and push the
safety catch as indicated by the
arrow. The safety catch is located in
the center of the hood.
• Lift the hood completely: this
operation is facilitated by two gas
struts keeping the hood in the fully
open position.
With the ignition switch in RUN
position, the red symbol
will display
on the instrument cluster with the
message indicating that the hood is
open.
Closing Lower the hood, and then gently drop
it. This should secure the inclusion of
both latches.
CAUTION!
To prevent possible damage, do not slam the hood to close it.
WARNING!
• Be sure the hood is fully latched
before driving your vehicle. If the lid
is not fully latched, it could open
when the vehicle is in motion and
block your vision. Failure to follow
this warning could result in serious
injury or death.
• Gear shifting is always active and
may be performed even when one
or more doors, the hood or the
liftgate are open. Therefore, in these
conditions, take great care to avoid
moving the transmission shift lever
and so accidentally engage gears.Before Starting
2
56
Page 91 of 436
Surround View Camera
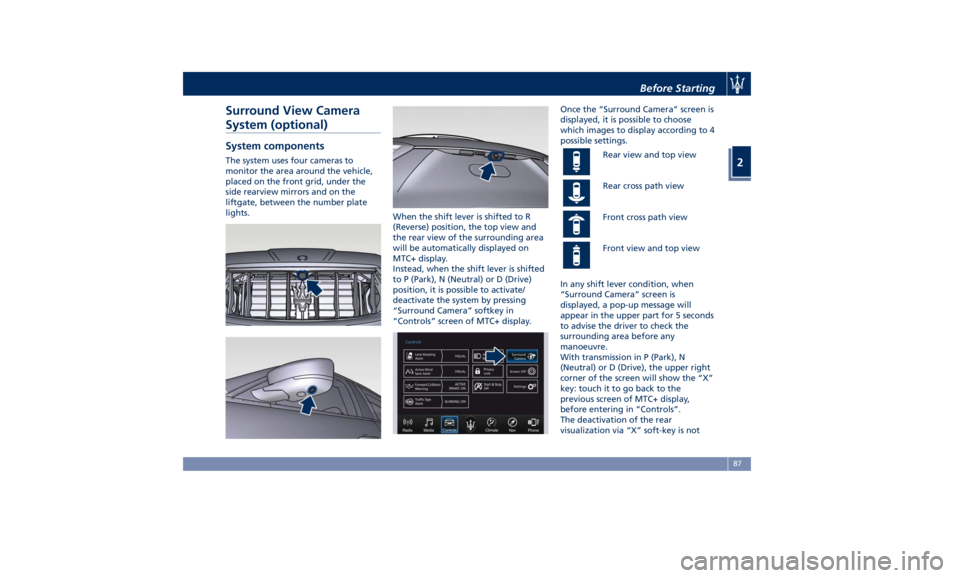
System (optional) System components The system uses four cameras to
monitor the area around the vehicle,
placed on the front grid, under the
side rearview mirrors and on the
liftgate, between the number plate
lights.
When the shift lever is shifted to R
(Reverse) position, the top view and
the rear view of the surrounding area
will be automatically displayed on
MTC+ display.
Instead, when the shift lever is shifted
to P (Park), N (Neutral) or D (Drive)
position, it is possible to activate/
deactivate the system by pressing
“Surround Camera” softkey in
“Controls” screen of MTC+ display. Once the “Surround Camera” screen is
displayed, it is possible to choose
which images to display according to 4
possible settings.
Rear view and top view
Rear cross path view
Front cross path view
Front view and top view
In any shift lever condition, when
“Surround Camera” screen is
displayed, a pop-up message will
appear in the upper part for 5 seconds
to advise the driver to check the
surrounding area before any
manoeuvre.
With transmission in P (Park), N
(Neutral) or D (Drive), the upper right
corner of the screen will show the “X”
key: touch it to go back to the
previous screen of MTC+ display,
before entering in “Controls”.
The deactivation of the rear
visualization via “X” soft-key is notBefore Starting
2
87
Page 94 of 436
Exhaust Gas WARNING!
Exhaust gases can injure. They contain
carbon monoxide (CO), which is
colorless and odorless. Breathing it
can make you unconscious and can
eventually poison you. To avoid
breathing (CO), follow these safety
tips:
• Do not run the engine in a closed
garage or in confined areas any
longer than needed to move your
vehicle in or out of the area.
• If it is necessary to sit in a parked
vehicle with the engine running,
adjust your heating or cooling
controls to force outside air into the
vehicle. Set the blower at high
speed.
• If you are required to drive with the
liftgate open, make sure that all
windows are closed and the climate
control blowers switch is set at high
speed. DO NOT use the recirculation
mode.
The best protection against carbon
monoxide
entry into the
passenger
compartment is a properly maintained
engine exhaust system. Whenever detecting a change in the
sound of the exhaust system or
eventual exhaust fumes inside the
vehicle have the Authorized Maserati
Dealer inspect the complete exhaust
system and adjacent body areas for
broken, damaged, deteriorated, or
mispositioned parts.
Open seams or loose connections could
permit exhaust fumes to seep into the
passenger compartment.
WARNING!
California Proposition 65
Operating, servicing and maintaining
a passenger vehicle or off-road vehicle
can expose you to chemicals including
such as, engine exhaust, carbon
monoxide, phthalates and lead, that
which are known to the State of
California to cause cancer and birth
defects or other reproductive harm. To
minimize exposure, avoid breathing
exhaust, do not idle the engine except
as necessary, service your vehicle in a
well-ventilated area and wear gloves
or wash your hands frequently when
servicing your vehicle. For more
information go to:
www.P65Warnings.ca.gov/passenger-
vehicle Vehicle Safety Checks Seat Belts
• Inspect the belt system periodically,
checking for cuts, frays, and loose
parts. Damaged parts must be
replaced immediately.
• Do not disassemble or modify the
system.
• If the belt has been sharply pulled,
for example as the result of an
accident, the safety belt, together
with the anchoring devices, the
anchoring device mounting screws
and the pretensioner must be
completely replaced. Even if the belt
does not present any exterior signs
of wear or damage, it may have lost
its restraining properties.
Air Bag Warning Light
The
light should illuminate and
remain lit for a few seconds bulb
checking when the ignition switch is
pushed in RUN position (see
“Supplemental Restraint System (SRS)
— Air Bags” chapter in this section).
• If the light
does not illuminate
while starting, contact the
Authorized Maserati Dealer .
• If the light stays on, flickers, or comes
on while driving, have the systemBefore Starting
2
90
Page 96 of 436

• Check the tires (see “Tire Inflation
Pressure” chapter in section
“Features and Specifications”) for
proper cold inflation pressure.
Lights and Indicator Lights
• Have someone observe the operation
of exterior lights while you operate
the controls (see “Lights” chapter in
section “Understanding the
Vehicle”).
• Check turn signal and high beam
indicator lights on the instrument
cluster (see “Instrument Cluster”
chapter in section “Dashboard
Instruments and Controls”).
Door Latches
• Check for positive closing, latching,
and locking of doors and liftgate (see
“Unlock the Vehicle with Key fob”
chapter in this section).
Fluid Leaks
• Check area under vehicle after
overnight parking for recent fluid
leaks (oil, fuel, etc.).
• If gasoline fumes are detected or
fluid leaks are suspected, contact the
Authorized Maserati Dealer . WARNING!
California Proposition 65
Operating, servicing and maintaining
a passenger vehicle or off-road vehicle
can expose you to chemicals including
such as, engine exhaust, carbon
monoxide, phthalates and lead, that
which are known to the State of
California to cause cancer and birth
defects or other reproductive harm. To
minimize exposure, avoid breathing
exhaust, do not idle the engine except
as necessary, service your vehicle in a
well-ventilated area and wear gloves
or wash your hands frequently when
servicing your vehicle. For more
information go to:
www.P65Warnings.ca.gov/passenger-
vehicleBefore Starting
2
92
Page 100 of 436

9 Unlock button for central
console compartment with
cupholder and power outlet.
10 Central console covers with
armrest function.
11 Adjustable air outlets.
12 Cover for power outlet and USB
slots compartment.
13 Four-zone climate controls for
rear passengers (optional).
Front Dome Console
Components
1 Reading lights control button.
2 Central light control button.
3 Reading lights.
4 Central light. 5 HomeLink controls.
6 Button to switch off passenger
compartment lights.
7 Button to open fully/partially
the power liftgate.
8 Button to enable/disable front
sensors of the Park Assist system.
9 Sunroof controls (optional).
Front Doors Components 1 Inside door handle.
2 Driver’s seat, steering wheel,
adjustable pedals and rear
mirrors memory switch (if
equipped).
3 External rearview mirrors
switches.
4 Power window switches.
5 Power door unlocks/locks.
6 Rear windows and sunshade
lockout button.
7 Loudspeakers.
8 Storage compartment.
9 Internal door lock/unlock knob.
10 Door panel grip.
11 Reflex reflector.
12 Outside door handle.Driver door Passenger doorUnderstanding the Vehicle
3
96
Page 107 of 436
to the driver by moving the seat for
Easy Exit or Easy Entry.
Each stored memory setting will have
an associated easy entry/exit position.
NOTE:
The Easy Entry/Exit feature can be
enabled or disabled using the MTC+
System, refer to “MTC+ Settings” in
section “Dashboard Instruments and
Controls” for further information.
Rear Seats Rear seats can fit three passengers.
Seats, head restraints and seat belts
are parts of the occupant restraint
system of the vehicle.
For further information, see chapter
“Occupants Restraint Systems” in
section “Before Starting” and “Head
Restraints” in this section.
WARNING!
Be sure everyone in your vehicle is in
a seat and using a seat belt properly.
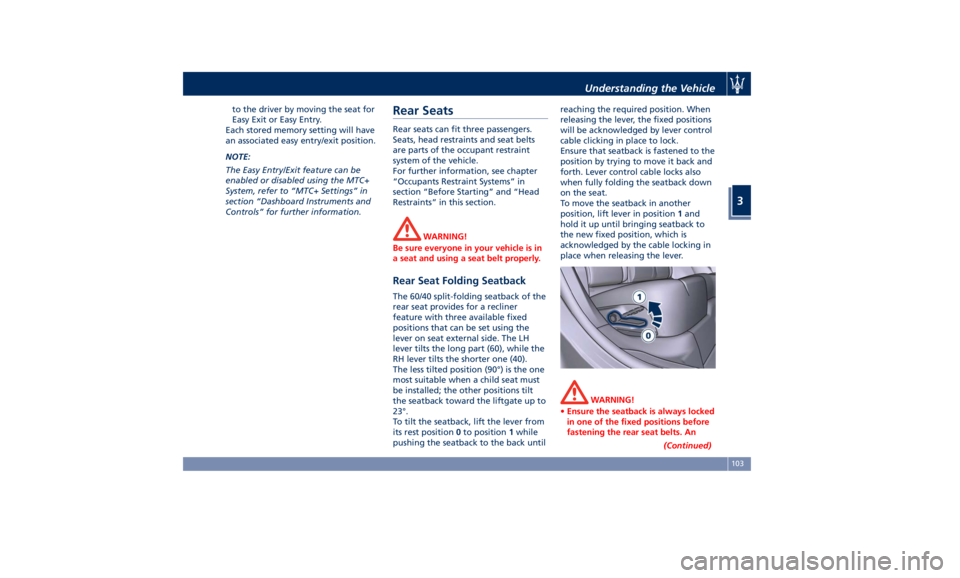
Rear Seat Folding Seatback The 60/40 split-folding seatback of the
rear seat provides for a recliner
feature with three available fixed
positions that can be set using the
lever on seat external side. The LH
lever tilts the long part (60), while the
RH lever tilts the shorter one (40).
The less tilted position (90°) is the one
most suitable when a child seat must
be installed; the other positions tilt
the seatback toward the liftgate up to
23°.
To tilt the seatback, lift the lever from
its rest position 0 to position 1 while
pushing the seatback to the back until reaching the required position. When
releasing the lever, the fixed positions
will be acknowledged by lever control
cable clicking in place to lock.
Ensure that seatback is fastened to the
position by trying to move it back and
forth. Lever control cable locks also
when fully folding the seatback down
on the seat.
To move the seatback in another
position, lift lever in position 1 and
hold it up until bringing seatback to
the new fixed position, which is
acknowledged by the cable locking in
place when releasing the lever.
WARNING!
• Ensure the seatback is always locked
in one of the fixed positions before
fastening the rear seat belts. An
(Continued)Understanding the Vehicle
3
103
Page 116 of 436
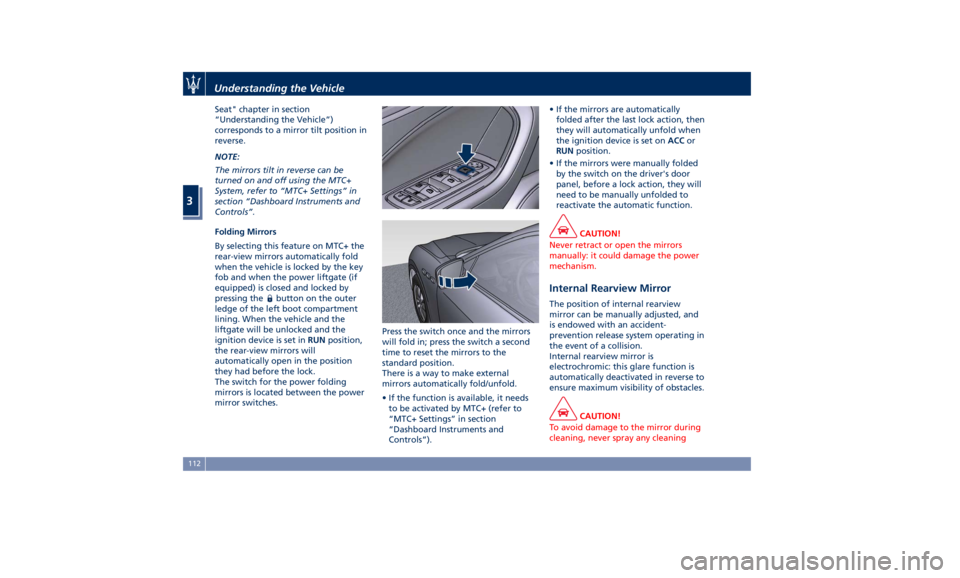
Seat" chapter in section
“Understanding the Vehicle”)
corresponds to a mirror tilt position in
reverse.
NOTE:
The mirrors tilt in reverse can be
turned on and off using the MTC+
System, refer to “MTC+ Settings” in
section “Dashboard Instruments and
Controls”.
Folding Mirrors
By selecting this feature on MTC+ the
rear-view mirrors automatically fold
when the vehicle is locked by the key
fob and when the power liftgate (if
equipped) is closed and locked by
pressing the
button on the outer
ledge of the left boot compartment
lining. When the vehicle and the
liftgate will be unlocked and the
ignition device is set in RUN position,
the rear-view mirrors will
automatically open in the position
they had before the lock.
The switch for the power folding
mirrors is located between the power
mirror switches. Press the switch once and the mirrors
will fold in; press the switch a second
time to reset the mirrors to the
standard position.
There is a way to make external
mirrors automatically fold/unfold.
• If the function is available, it needs
to be activated by MTC+ (refer to
“MTC+ Settings” in section
“Dashboard Instruments and
Controls”). • If the mirrors are automatically
folded after the last lock action, then
they will automatically unfold when
the ignition device is set on ACC or
RUN position.
• If the mirrors were manually folded
by the switch on the driver's door
panel, before a lock action, they will
need to be manually unfolded to
reactivate the automatic function.
CAUTION!
Never retract or open the mirrors
manually: it could damage the power
mechanism.
Internal Rearview Mirror The position of internal rearview
mirror can be manually adjusted, and
is endowed with an accident-
prevention release system operating in
the event of a collision.
Internal rearview mirror is
electrochromic: this glare function is
automatically deactivated in reverse to
ensure maximum visibility of obstacles.
CAUTION!
To avoid damage to the mirror during
cleaning, never spray any cleaningUnderstanding the Vehicle
3
112