2019 MASERATI GHIBLI spare wheel
[x] Cancel search: spare wheelPage 291 of 384

overall conditions should also be
checked monthly. Tire pressures
change by approximately 1 PSI (0.07
bar) per 12°F (7°C) of air temperature
change. Keep this in mind when
checking tire pressure inside a garage,
especially in winter.
Example: If garage temperature = 68°F
(20°C) and the outside temperature =
32°F (0°C) then the cold tire inflation
pressure should be increased by 3 PSI
(0.21 bar) for every 12°F (7°C) for this
outside temperature condition.
Tire pressure may increase from 2 to 6
PSI (0.13 to 0.4 bar) during operation.
DO NOT reduce this normal pressure
build-up or your tire pressure will be
too low. After inspecting or adjusting
the tire pressure, always reinstall the
valve stem cap. This will prevent
moisture and dirt from entering the
valve stem, which could damage the
valve stem and the TPMS sensor
connected to it.
Tread Wear Indicators Tread wear indicators are in the
original equipment tires to help you
determine when your tires should be
replaced.
These indicators are molded into the
bottom of the tread grooves. When the tread is worn to one of the
tread wear indicators, the tire should
be replaced.
WARNING!
The wet performance (aquaplaning
resistance) will decrease
proportionally to the thickness of the
tread.
Tires Durability The service life of a tire depends on
various factors including, but not
limited to:
• driving style;
• tire pressure;
• distance driven.
WARNING!
Tires and the spare tire (if equipped)
should be replaced after six years,
regardless of the remaining tread.
Failure to follow this warning could
result in tire failure. Replacement Tires NOTE:
In order to maintain high performance
and safety level under all driving
conditions, Maserati strongly
recommends to use tires equivalent to
the originals in size, quality and
performance when replacement is
needed.
For the size designation of your tire
see the label on the driver's side rear
door pillar or see table “Wheels” in
section “Features and Specifications”.
The “Load Index” and “Speed
Symbol” for your tire will be found on
the original equipment tire sidewall.
NOTE:
Maserati recommends Maserati
Genuine Tires marked with “MGT”
logo specifically designed for its
models.
It is recommended to replace the two
front tires or two rear tires as a pair.
Replacing just one tire can seriously
affect your vehicle’s handling.
If you ever replace a wheel assembly,
make sure that the wheel’s
specifications (valve, TPMS sensor and
tire) match those of the original
wheels. Failure to use equivalentDriving
5
287
Page 293 of 384

The chains may be fitted only on 18”
and 19” rear wheel tires.
Please contact an Authorized Maserati
Dealer for further information.
Check the snow chain tension after
driving for a distance of about 55 yd
(50 m) with the chains fitted.
With the snow chains fitted, it is
advisable to deactivate the ESC system
(see chapter “Drive Mode” in this
section).
CAUTION!
• The use of non-recommended snow
chains may damage the vehicle.
• Broken snow chains can cause
serious damage. Stop the vehicle
immediately if noise occurs that
could indicate snow chain breakage.
Replace the damaged parts of the
snow chain before further use.
• Do not exceed 30 mph (50 km/h).
• Drive cautiously and avoid severe
turns and large bumps, especially
with a loaded vehicle.
• Avoid holes in the road, do not drive
over steps or sidewalks and do not
drive on long stretches without
snow. This will prevent damage to
the vehicle and the roadbed. NOTE:
The Authorized
Maserati Dealer can
provide you with all information
about the Maserati Snow Chains,
available in the "Genuine Accessories"
range.
Compact Spare Tire The limited-use spare tire, or compact
spare tire, is for temporary emergency
use only. This tire is identified by a
label indicating the driving speed
limitations to comply with when using
the spare tire.
Inflate the spare tire to the cold
inflation pressure listed on the table
“Tire Inflation Pressure” in section
“Features and Specifications”.
Mounting the spare tire affects vehicle
handling. Replace (or repair) as soon
as possible the original equipment tire
and reinstall it on the vehicle. Do not
install more than one compact spare
tire and wheel on the vehicle at a
time.
WARNING!
With these compact spare tires, do not
drive more than 50 mph (80 km/h).
Temporary use spares have limited
tread life.Tire Pressure Monitoring
System (TPMS) The Tire Pressure Monitoring System
(TPMS) will warn the driver of a low
tire pressure according to the vehicle
recommended cold pressure indicated
on the table “Tire Inflation Pressure”
in section “Features and
Specifications” and on the label
applied on the driver's side rear door
pillar.
Tire pressure should always be set
based on cold inflation tire pressure.
The cold tire inflation pressure must
not exceed the maximum inflation
pressure molded into the tire sidewall.
Check “Tires – General Information” in
section “Driving” for information on
how to properly inflate the tires.
The tire pressure will also increase as
the vehicle is driven - this is normal
and there is no adjustment required
when this occurs.
The TPMS will warn the driver of a low
tire pressure if the tire pressure falls
below the low-pressure warning limit
for any reason, including low
temperature effects and natural
pressure loss of the tire.
The TPMS will continue to warn the
driver of low tire pressure as long as
the condition persists and will not turnDriving
5
289
Page 296 of 384

emitting the same radio frequencies
as the TPMS sensors.
• Installing aftermarket window
tinting that contains materials that
may block radio wave signals.
• Accumulation of snow or ice around
the wheels or wheel housings.
• Using tire chains on the vehicle.
• Using wheels/tires not equipped with
TPMS sensors.
The instrument cluster will also display
a "Service Tire Pressure System"
message for a minimum of five
seconds when a system fault related to
an incorrect sensor location fault is
detected. In this case, the "Service Tire
Pressure System" message is then
followed by a graphic display with
pressure values still shown. This
indicates that the pressure values are
still being received from the TPMS
sensors but they may not be located in
the correct vehicle position. The system
still needs to be serviced as long as the
"Service Tire Pressure System" message
is displayed. Vehicles with Compact Spare Tire
• The compact spare tire does not have
a TPMS sensor. Therefore, the TPMS
will not monitor the pressure of the
compact spare tire.
• If you replace a tire having pressure
below the low-pressure warning
limit, with the compact spare tire, on
the next ignition switch cycle, the
TPMS light
will illuminate
followed by a beeping sound. In addition, the graphic in the
instrument cluster will still display a
flashing pressure value
corresponding to the compact tire
position.
• After driving the vehicle for up to 20
minutes above 15 mph (24 km/h), the
TPMS light
will flash for 75
seconds and then remain lit. The
instrument cluster will then display a
"Service Tire Pressure System"
message for a minimum of five
seconds and then display dashes (--)
in place of the pressure value.
• Each subsequent ignition switch cycle
will be followed by a beeping sound,
the TPMS light
will flash for 75
seconds and then remain lit. The
instrument cluster will then display a
"Service Tire Pressure System"
message for a minimum of five
seconds and subsequently displaysDriving
5
292
Page 297 of 384

dashes (--) in place of the pressure
value.
• Once you repair, replace or reinstall
a tire with the compact spare tire,
the TPMS will update automatically.
The TPMS light
will turn OFF and
the graphic in the instrument cluster
will display a new pressure value
instead of dashes (--), as long as no
tire pressure is below the
low-pressure warning limit in any of
the four tires. The vehicle may need
to be driven for up to 20 minutes
above 15 mph (24 km/h) in order for
the TPMS to acquire and process the
updated information.
TPMS Deactivation The TPMS can be deactivated if
replacing all four tire rims with wheel
and tire assemblies not using of TPMS
sensors, such as winter wheel and tire assemblies. After replacing all four
wheel and tire assemblies (road tires)
with tires not equipped with Tire
Pressure Monitoring System sensors,
drive the vehicle for 20 minutes above
15 mph (24 km/h). The TPMS will
chime, the TPMS light
will flash on
and off for 75 seconds and then
remain on and the instrument cluster
will display the “Service Tire Pressure
System” message and then display
dashes (--) in place of the pressure
values. Beginning with the next
ignition switch cycle, the TPMS will no
longer chime or display the “Service
Tire Pressure System” message in the
instrument cluster but dashes (--) will
remain in place of the pressure values.
To reactivate the TPMS, replace all
four wheel and tire assemblies (road
tires) with tires equipped with TPMS
sensors. Then, drive the vehicle for up to 20 minutes above 15 mph
(24 km/h). The TPMS will chime, the
TPMS light
will flash for 75 seconds
and then turn off. The instrument
cluster will then display the “Service
Tire Pressure System” message.
The instrument cluster will also display
pressure values in place of the dashes
(--). On the next ignition switch cycle
the “Service Tire Pressure System”
message will no longer be displayed as
long as no system fault exists.
Radio Frequency Transmitter -
Regulatory Information The “Regulatory Information” for all
the radio and radar frequency devices
can be consulted by accessing the
“Services” section on the website
www.maserati.com.Driving
5
293
Page 308 of 384

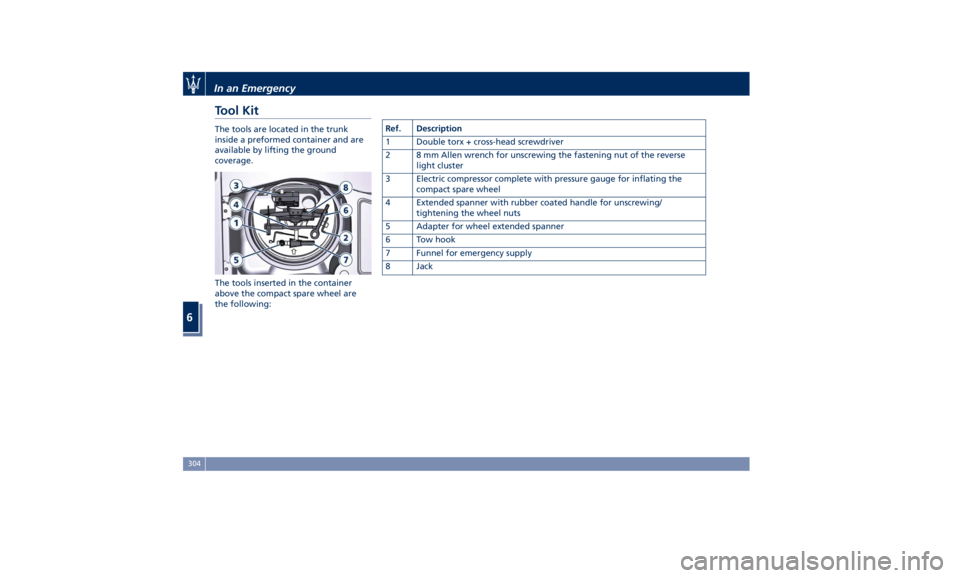
Tool Kit The tools are located in the trunk
inside a preformed container and are
available by lifting the ground
coverage.
The tools inserted in the container
above the compact spare wheel are
the following: Ref. Description
1 Double torx + cross-head screwdriver
2 8 mm Allen wrench for unscrewing the fastening nut of the reverse
light cluster
3 Electric compressor complete with pressure gauge for inflating the
compact spare wheel
4 Extended spanner with rubber coated handle for unscrewing/
tightening the wheel nuts
5 Adapter for wheel extended spanner
6 Tow hook
7 Funnel for emergency supply
8 JackIn an Emergency
6
304
Page 310 of 384

• If fuel or other chemical products can
be smelled, do not smoke and ask
people around you to put their
cigarettes out.
• To extinguish fires, even small ones,
use a fire extinguisher, blankets, sand
or earth. Never use water.
• In multiple accidents occurred on
highways, particularly where visibility
is poor, there is a high risk of being
involved in other collisions. Leave the
vehicle immediately and move away
from the area.
In case of Injured Persons • Never leave the injured person alone.
Persons not directly involved in the
accident are also required to give
assistance.
• Do not crowd around injured
persons.
• Reassure the injured person that help
is on the way.
WARNING!
California Proposition 65
Operating, servicing and maintaining
a passenger vehicle or off-road vehicle
can expose you to chemicals including
such as, engine exhaust, carbon
monoxide, phthalates and lead, that which are known to the State of
California to cause cancer and birth
defects or other reproductive harm. To
minimize exposure, avoid breathing
exhaust, do not idle the engine except
as necessary, service your vehicle in a
well-ventilated area and wear gloves
or wash your hands frequently when
servicing your vehicle. For more
information go to:
www.P65Warnings.ca.gov/passenger-
vehicle
In case of a Punctured Tire If the vehicle is equipped with a
compact spare wheel.
Using the Compact Spare
Wheel NOTE:
The compact spare wheel is supplied in
aluminium or steel: the pictures show
the one in aluminium.
The compact spare wheel is stored in
the trunk and is supplied deflated in
order to limit the amount of space
occupied. An electric compressor is also
provided for inflating. In the event of
a tire puncture, proceed as follows.
• Stop the vehicle in a place that does
not constitute a danger to traffic and
where the wheel can be changed
safely.
• Select the P (Park) mode and then
engage manually the electric parking
brake and move the ignition switch
to OFF position.
• If necessary, turn the hazard warning
flashers on and place the warning
triangle (if equipped) at the required
distance.In an Emergency
6
306
Page 311 of 384

• If provided, the chock can be
installed in order to improve vehicle
stability.
WARNING!
The vehicle must be level and on the
firm ground during the vehicle lifting
operations. If forced to stop the
vehicle on a slope, call the Assistance
service and avoid any operation.
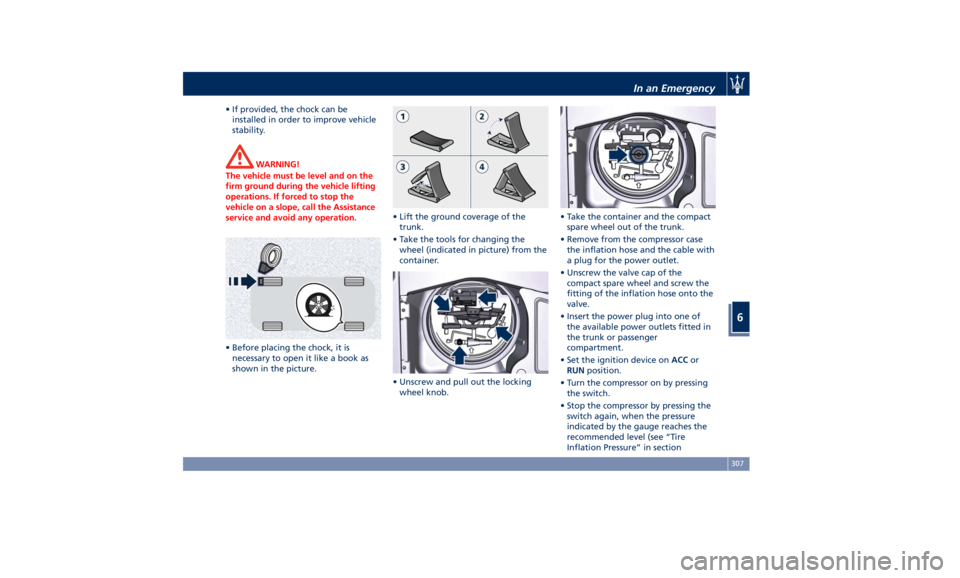
• Before placing the chock, it is
necessary
to open
it like a book as
shown in the picture. • Lift the ground coverage of the
trunk.
• Take the tools for changing the
wheel (indicated in picture) from the
container.
• Unscrew and pull out the locking
wheel knob. • Take the container and the compact
spare wheel out of the trunk.
• Remove from the compressor case
the inflation hose and the cable with
a plug for the power outlet.
• Unscrew the valve cap of the
compact spare wheel and screw the
fitting of the inflation hose onto the
valve.
• Insert the power plug into one of
the available power outlets fitted in
the trunk or passenger
compartment.
• Set the ignition device on ACC or
RUN position.
• Turn the compressor on by pressing
the switch.
• Stop the compressor by pressing the
switch again, when the pressure
indicated by the gauge reaches the
recommended level (see “Tire
Inflation Pressure” in sectionIn an Emergency
6
307
Page 312 of 384

“Features and Specifications”) and
screw the cap on the compact spare
wheel valve.
CAUTION!
• In order to obtain a more accurate
reading, the compressor should be
switched off when checking the tire
pressure of the compact spare wheel
on the pressure gauge.
• Do not run the compressor for more
than 20 minutes: there is a risk it
could overheat. Also, prolonged
power absorption may discharge the
battery, subsequently preventing the
engine from starting.
• The compressor has been designed
exclusively to inflate compact spare wheels; do not use it to inflate air
mattresses, floatation devices, etc.
• Remove the center cover of the
wheel
rim (if equipped) levering into
the provided groove on the outer
ledge of the cover.
• Fit the adapter on the wrench.
Extend the wrench as shown, then
loosen by approximately one turn,
the five bolts on the wheel to be
changed.
• Place the jack near the wheel to be
changed as illustrated.
• Make sure that the head of the jack
is correctly inserted in one of the
slots beneath the rocker panel.
WARNING!
• The jack should be used on level firm
ground wherever possible. • It is recommended that the wheels
of the vehicle be chocked, and that
no person should remain in a vehicle
that is being jacked.
• If the vehicle has been stopped on a
slope or an uneven surface, place
chocks or other suitable items in
front of or behind the wheels to
stop the vehicle from moving.
• Never start or run the engine with
the vehicle on a jack.
• No person should place any portion
of their body under a vehicle that is
supported by a jack.
WARNING!
• Never position yourself under a
jacked vehicle.
• Never use the jack to carry out
maintenance or repairs under the
vehicle.
• Turn the jack lever until the wheel is
raised a few
centimeters off the
ground.
• Completely unscrew the five bolts
and remove the wheel. In case a
wheel security stud bolt is installed, it
can only be removed by using the
specific fitting wrench provided withIn an Emergency
6
308