2019 LINCOLN CONTINENTAL lock
[x] Cancel search: lockPage 199 of 627

3. Using a tool, press and hold the brake
shift interlock switch. The shift buttons
on the instrument panel will flash when
your vehicle is in override mode.
4. With the override switch still held, press the neutral (N) button to shift from park.
5. Release the override button.
6. Your vehicle will remain in neutral for wrecker towing purposes or can be
shifted to the desired gear and driven (if
possible).
7. Release the parking brake.
Automatic Transmission Adaptive
Learning
This feature increases durability and provides
consistent shift feel over the life of your
vehicle. A new vehicle or transmission may
have firm or soft shifts. This operation will
not affect function or durability of your
transmission and is normal. Over time, the
adaptive learning process will fully update
transmission operation. Additionally, the
strategy must be relearned whenever the
battery is disconnected or a new battery is
installed. If Your Vehicle Gets Stuck In Mud or
Snow
Note:
Do not rock your vehicle if your engine
is not at normal operating temperature or
damage to your transmission may occur.
Note: Do not rock your vehicle for more than
a minute or damage to your transmission
and tires may occur, or your engine may
overheat.
If your vehicle gets stuck in mud or snow,
you can help rock your vehicle out by shifting
between forward and reverse gears,
stopping between shifts in a steady pattern.
Press lightly on the accelerator in each gear.
196
Continental (CPL) Canada/United States of America, enUSA, Edition date: 201807, Second-Printing Transmission
Page 206 of 627

Your vehicle has anti-lock brakes, therefore
apply the brakes steadily. Do not “pump
” the
brakes.
Driving on Snow and Ice WARNING: If you are driving in
slippery conditions that require tire chains
or cables, then it is critical that you drive
cautiously. Keep speeds down, allow for
longer stopping distances and avoid
aggressive steering to reduce the chances
of a loss of vehicle control which can lead
to serious injury or death. If the rear end
of your vehicle slides while cornering, steer
in the direction of the slide until you regain
control of your vehicle. Note:
Your vehicle may have original
equipment tires designed to optimize the
performance of your vehicle in dry or wet
summer road conditions. If your vehicle is
equipped with such tires, we recommend
using a dedicated set (all 4 tires) of winter
tires in snow and ice conditions. Do not mix
winter tires and performance tires between
axles or degraded traction and handling
characteristics could result.
Note: Excessive tire slippage can cause
driveline damage.
AWD vehicles have advantages over
two-wheel drive (2WD) vehicles in snow and
ice but can skid like any other vehicle.
Should you start to slide while driving on
snowy or icy roads, turn the steering wheel
in the direction of the slide until you regain
control.
203
Continental (CPL) Canada/United States of America, enUSA, Edition date: 201807, Second-Printing All-Wheel Drive
(If Equipped)
Page 207 of 627

Direction of travel.
A
Steering wheel rotation.
B
Avoid sudden applications of power and
quick changes of direction on snow and ice.
Apply the accelerator slowly and steadily
when starting from a full stop.
Avoid sudden braking as well. Although an
AWD vehicle may accelerate better than a
two-wheel drive vehicle in snow and ice, it
won ’t stop any faster, because as in other
vehicles, braking occurs at all four wheels.
Do not become overconfident as to road
conditions.
Make sure you allow sufficient distance
between you and other vehicles for stopping.
Drive slower than usual and consider using
one of the lower gears. In emergency
stopping situations, apply the brake steadily.
Since your vehicle is equipped with a four
wheel (ABS), do not “pump ” the brakes. See
Hints on Driving With Anti-Lock Brakes
(page 207). Maintenance and Modifications
The suspension and steering systems on
your vehicle have been designed and tested
to provide predictable performance whether
loaded or empty and durable load carrying
capability. For this reason, Ford Motor
Company strongly recommends that you do
not make modifications such as adding or
removing parts (such as lowering kits or
stabilizer bars) or by using replacement parts
not equivalent to the original factory
equipment.
Any modifications to a vehicle that raise the
center of gravity can make it more likely the
vehicle will rollover as a result of a loss of
control. Ford Motor Company recommends
that caution be used with any vehicle
equipped with a high load or device (such
as ladder or luggage racks).
204
Continental (CPL) Canada/United States of America, enUSA, Edition date: 201807, Second-Printing All-Wheel Drive
(If Equipped)E223901
A
B
Page 209 of 627

GENERAL INFORMATION
Note:
Occasional brake noise is normal. If
a metal-to-metal, continuous grinding or
continuous squeal sound is present, the
brake linings may be worn-out and an
authorized dealer should check them. If the
vehicle has continuous vibration or shudder
in the steering wheel while braking, an
authorized dealer should check your vehicle.
Note: Brake dust may accumulate on the
wheels, even under normal driving
conditions. Some dust is inevitable as the
brakes wear and does not contribute to
brake noise. See Cleaning the Wheels
(page 339).
Wet brakes result in reduced braking
efficiency. Gently press the brake pedal a
few times when driving from a car wash or
standing water to dry the brakes. Brake Over Accelerator
In the event the accelerator pedal becomes
stuck or entrapped, apply steady and firm
pressure to the brake pedal to slow the
vehicle and reduce engine power. If you
experience this condition, apply the brakes
and bring your vehicle to a safe stop. Switch
the engine off, move the transmission to park
(P) and apply the parking brake. Inspect the
accelerator pedal and the area around it for
any items or debris that may be obstructing
its movement. If none are found and the
condition persists, have your vehicle towed
to the nearest authorized dealer.
Emergency Brake Assist
Emergency brake assist detects when you
brake heavily by measuring the rate at which
you press the brake pedal. It provides
maximum braking efficiency as long as you
press the pedal. Emergency brake assist
can reduce stopping distances in critical
situations.Anti-lock Brake System
This system helps you maintain steering
control during emergency stops by keeping
the brakes from locking. This lamp momentarily illuminates
when you switch the ignition on. If
the light does not illuminate during
start up, remains on or flashes, the anti-lock
braking system may be disabled. Have the
system checked by an authorized dealer. If
the anti-lock brake system is disabled,
normal braking is still effective.
See
Warning Lamps and Indicators (page
107).
Note: Indicators vary depending on region. This lamp also illuminates
momentarily when you switch the
ignition on to confirm the lamp is
functional. If it does not illuminate
when you switch the ignition on,
or begins to flash at any time, have
the system checked by an authorized dealer.
If the brake warning lamp illuminates with
the parking brake released, have the system
checked immediately.
206
Continental (CPL) Canada/United States of America, enUSA, Edition date: 201807, Second-Printing Brakes E270480
Page 210 of 627

HINTS ON DRIVING WITH ANTI-
LOCK BRAKES
The anti-lock braking system does not
eliminate the risks when:
•
You drive too closely to the vehicle in
front of you.
• Your vehicle is hydroplaning.
• You take corners too fast.
• The road surface is poor.
Note: If the system activates, the brake
pedal may pulse and may travel further.
Maintain pressure on the brake pedal. You
may also hear a noise from the system. This
is normal.
ELECTRIC PARKING BRAKE WARNING: Always fully apply the
parking brake and make sure you shift into
park (P). Failure to follow this instruction
could result in personal injury or death. WARNING:
If you drive extended
distances with the parking brake applied,
you could cause damage to the brake
system. WARNING:
The electric parking
brake does not operate if the vehicle
battery is running out of charge.
Your vehicle has an electric parking brake.
You operate it with a switch instead of a
lever. The switch is on the center console or
to the left-hand side of the steering wheel,
on the lower part of the instrument panel.
Note: The electric parking brake makes
noises during operation. This is normal.
Applying the Electric Parking Brake Pull the switch upward.
The red warning lamp flashes
during operation and illuminates
when the parking brake is applied. Note:
It remains illuminated for a short
period of time after you switch the ignition
off.
If it continues to flash or does not illuminate,
the system has malfunctioned. Have your
vehicle checked as soon as possible.
Note: You can apply the electric parking
brake when the ignition is off.
Note: The electric parking brake could
automatically apply when you shift into park
(P).
See Transmission (page 191).
Applying the Electric Parking Brake in an
Emergency
Note: Do not apply the electric parking brake
when your vehicle is moving, except in an
emergency. If you repeatedly use the electric
parking brake to slow or stop your vehicle,
you could cause damage to the brake
system.
You can use the electric parking brake to
slow or stop your vehicle in an emergency.
207
Continental (CPL) Canada/United States of America, enUSA, Edition date: 201807, Second-Printing BrakesE267156 E270480
Page 218 of 627

PRINCIPLE OF OPERATION
WARNING: To help avoid personal
injury, always use caution when in reverse
(R) and when using the sensing system. WARNING:
The system may not
detect objects with surfaces that absorb
reflection. Always drive with due care and
attention. Failure to take care may result
in a crash. WARNING:
Traffic control systems,
inclement weather, air brakes, external
motors and fans may affect the correct
operation of the sensing system.This may
cause reduced performance or false alerts. WARNING:
The system may not
detect small or moving objects, particularly
those close to the ground.
Note: If your vehicle has MyKey™, the sensing
system cannot be switched off when a
MyKey™ is present.
See Principle of
Operation (page 58). Note:
Keep the sensors on the bumper or
fascia free from snow, ice and large
accumulations of dirt. If the sensors are
covered, the system’ s accuracy can be
affected. Do not clean the sensors with sharp
objects.
Note: If your vehicle sustains damage to the
bumper or fascia, leaving it misaligned or
bent, the sensing zone may be altered
causing inaccurate measurement of
obstacles or false alerts.
Note: Certain add-on devices installed
around the bumper or fascia may create
false alerts. For example, large trailer
hitches, bike or surfboard racks, license plate
brackets, bumper covers or any other device
that may block the normal detection zone
of the system. Remove the add-on device to
prevent false alerts.
Note: When you connect a trailer to your
vehicle, the rear parking aid may detect the
trailer and therefore provide an alert. Disable
the rear parking aid when you connect a
trailer to prevent the alert. The sensing system warns the driver of
obstacles within a certain range of your
vehicle. The system turns on automatically
whenever you switch the ignition on.
You can switch the system off through the
information display menu or from the pop-up
message that appears once you shift the
transmission into reverse (R).
See General
Information (page 112). If your vehicle has a
parking aid button, you can switch the
system off by pressing the button.
If a fault is present in the system, a warning
message appears in the information display.
See
Information Messages (page 120).
215
Continental (CPL) Canada/United States of America, enUSA, Edition date: 201807, Second-Printing Parking Aids
Page 219 of 627

REAR PARKING AID
The rear sensors are only active when the
transmission is in reverse (R). As your vehicle
moves closer to the obstacle, the rate of the
audible warning increases. When the
obstacle is less than 12 in (30 cm) away, the
warning sounds continuously. If the system
detects a stationary or receding object
farther than
12 in (30 cm) from the corners of
the bumper, the tone sounds for only three
seconds. Once the system detects an object
approaching, the warning sounds again. Coverage area of up to
6 ft (1.8 m) from the
rear bumper. There may be decreased
coverage area at the outer corners of the
bumper.
The system detects certain objects while the
transmission is in reverse (R):
• Your vehicle is moving toward a
stationary object at a speed of
3 mph
(5 km/h) or less.
• Your vehicle is not moving, but a moving
object is approaching the rear of your
vehicle at a speed of
3 mph (5 km/h) or
less.
• Your vehicle is moving at a speed of less
than 3 mph (5 km/h) and a moving object
is approaching the rear of your vehicle
at a speed of less than
3 mph (5 km/h).
The system provides audio warnings only
when your vehicle is moving or when your
vehicle is stationary and the detected
obstacle is less than 12 in (30 cm) away from
the bumper. Obstacle Distance Indicator
(If Equipped)
The system provides obstacle distance
indication through the information display.
The distance indicator displays when the
transmission is in reverse (R).
The indicator displays:
• As the distance to the obstacle
decreases the indicator blocks illuminate
and move towards the vehicle icon.
• If there is no obstacle detected, the
distance indicator blocks are greyed out.
FRONT PARKING AID
The front sensors are active when the
transmission is in any position other than
park (P) and your vehicle is traveling at low
speed.
216
Continental (CPL) Canada/United States of America, enUSA, Edition date: 201807, Second-Printing Parking AidsE130178
Page 220 of 627

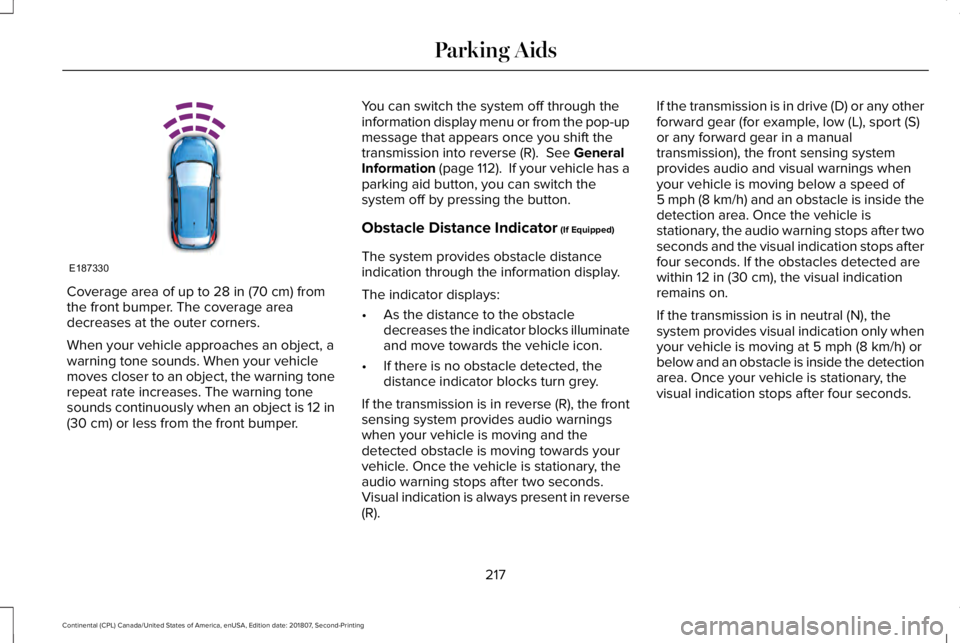
Coverage area of up to 28 in (70 cm) from
the front bumper. The coverage area
decreases at the outer corners.
When your vehicle approaches an object, a
warning tone sounds. When your vehicle
moves closer to an object, the warning tone
repeat rate increases. The warning tone
sounds continuously when an object is 12 in
(30 cm)
or less from the front bumper. You can switch the system off through the
information display menu or from the pop-up
message that appears once you shift the
transmission into reverse (R).
See General
Information (page 112). If your vehicle has a
parking aid button, you can switch the
system off by pressing the button.
Obstacle Distance Indicator
(If Equipped)
The system provides obstacle distance
indication through the information display.
The indicator displays:
• As the distance to the obstacle
decreases the indicator blocks illuminate
and move towards the vehicle icon.
• If there is no obstacle detected, the
distance indicator blocks turn grey.
If the transmission is in reverse (R), the front
sensing system provides audio warnings
when your vehicle is moving and the
detected obstacle is moving towards your
vehicle. Once the vehicle is stationary, the
audio warning stops after two seconds.
Visual indication is always present in reverse
(R). If the transmission is in drive (D) or any other
forward gear (for example, low (L), sport (S)
or any forward gear in a manual
transmission), the front sensing system
provides audio and visual warnings when
your vehicle is moving below a speed of
5 mph (8 km/h) and an obstacle is inside the
detection area. Once the vehicle is
stationary, the audio warning stops after two
seconds and the visual indication stops after
four seconds. If the obstacles detected are
within
12 in (30 cm), the visual indication
remains on.
If the transmission is in neutral (N), the
system provides visual indication only when
your vehicle is moving at
5 mph (8 km/h) or
below and an obstacle is inside the detection
area. Once your vehicle is stationary, the
visual indication stops after four seconds.
217
Continental (CPL) Canada/United States of America, enUSA, Edition date: 201807, Second-Printing Parking AidsE187330