2019 LINCOLN CONTINENTAL tow
[x] Cancel search: towPage 221 of 627

SIDE SENSING SYSTEM (IF EQUIPPED)
The side sensing system uses the front and
rear side sensors to detect and map
obstacles within the vehicle's driving path,
located near the sides of your vehicle. The
side sensors are active when the
transmission is in any position other than
park (P).
Note: Obstacles that enter the side detection
area without being detected and mapped
by the front or rear side sensors will not be
detected. Coverage area is up to
24 in (60 cm) from
the sides of your vehicle. When the system detects an object close to
the side of your vehicle, an audible warning
sounds. As your vehicle moves closer to
obstacles within the driving path of your
vehicle, the rate of the audible warning
increases.
Obstacle Distance Indicator
(If Equipped) The system provides obstacle distance
indication through the information display.
As the distance to the obstacle decreases,
the indicator blocks illuminate and move
toward the vehicle icon. If there is no
obstacle detected, the distance indicator
blocks show greyed out.
When you shift to reverse (R), the side
sensing system provides audible warnings
when your vehicle is moving and obstacles
are detected within
24 in (60 cm) and are
inside the driving path of your vehicle. When
you stop your vehicle the audible warning
stops after two seconds.
Note: Visual distance indication remains on
when the transmission is in reverse (R).
When you shift to drive (D) or any other
forward gear, for example, low (L), sport (S)
or any forward gear in manual transmission,
the side sensing system provides audible
and visual distance warnings when your
vehicle is moving below a speed of
5 mph
218
Continental (CPL) Canada/United States of America, enUSA, Edition date: 201807, Second-Printing Parking AidsE187810 E190459
Page 223 of 627

Active park assist is a multi-step process and
may require you to shift the transmission
multiple times. Follow the onscreen
instructions until the parking maneuver is
complete.
If you are uncomfortable with the proximity
to any vehicle or object, you may choose to
override the system by grabbing the steering
wheel, or by taking full control of your vehicle
after pressing the active park assist button.
Keep your hands, hair, clothing and any
loose items clear of the steering wheel when
using active park assist.
The sensors are on the front and rear
bumpers.
Note:
Keep the sensors free from snow, ice
and large accumulations of dirt.
Note: Do not cover up the sensors.
Note: Do not clean the sensors with sharp
objects. Note:
The sensors may not detect objects
with surfaces that absorb ultrasonic waves.
The sensors may falsely detect objects due
to ultrasonic interference caused by
motorcycle exhausts, truck air brakes or
horns, for example.
Note: If you change any tires, the system
must recalibrate and may not correctly
operate for a short time.
The system may not correctly operate in any
of the following conditions:
• You use a spare tire or a tire that is
significantly worn more than the other
tires.
• One or more tires are incorrectly inflated.
• You try to park on a tight curve.
• Something passes between the front
bumper and the parking space. For
example, a pedestrian or cyclist. •
The edge of the neighboring parked
vehicle is high off the ground. For
example, a bus, tow truck or flatbed
truck.
• The weather conditions are poor. For
example, during heavy rain, snow, fog,
high humidity and high temperatures.
Do not use the system if:
• You have attached an add-on accessory
close to the sensors on the front or rear
of your vehicle. For example, a bike rack
or trailer.
• You have attached an overhanging
object to the roof. For example, a
surfboard.
• The front bumper, rear bumper or the
side sensors are damaged.
• The correct tire size is not in use on your
vehicle. For example, a mini-spare tire.
220
Continental (CPL) Canada/United States of America, enUSA, Edition date: 201807, Second-Printing Parking Aids
Page 232 of 627
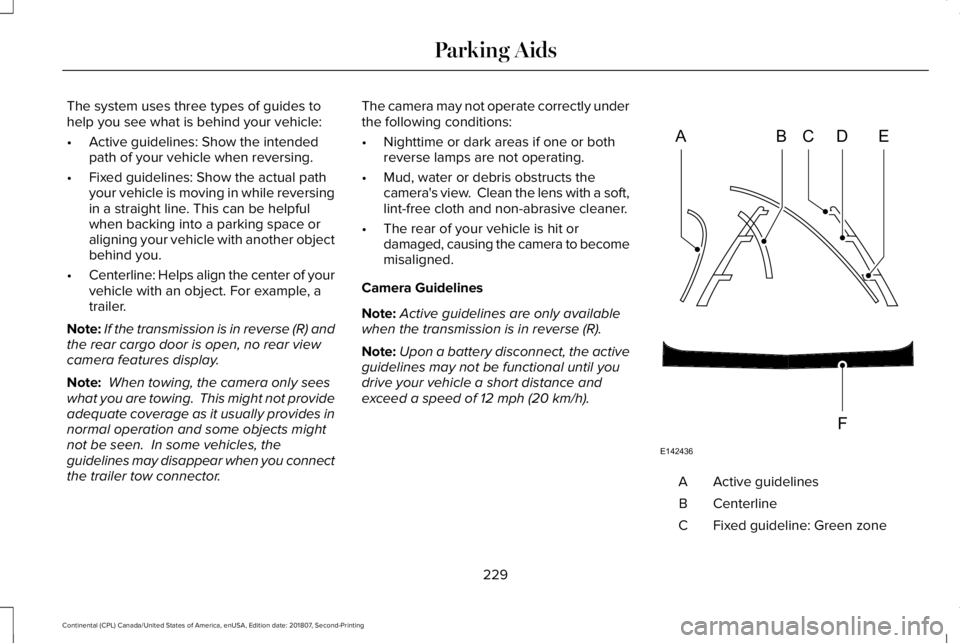
The system uses three types of guides to
help you see what is behind your vehicle:
•
Active guidelines: Show the intended
path of your vehicle when reversing.
• Fixed guidelines: Show the actual path
your vehicle is moving in while reversing
in a straight line. This can be helpful
when backing into a parking space or
aligning your vehicle with another object
behind you.
• Centerline: Helps align the center of your
vehicle with an object. For example, a
trailer.
Note: If the transmission is in reverse (R) and
the rear cargo door is open, no rear view
camera features display.
Note: When towing, the camera only sees
what you are towing. This might not provide
adequate coverage as it usually provides in
normal operation and some objects might
not be seen. In some vehicles, the
guidelines may disappear when you connect
the trailer tow connector. The camera may not operate correctly under
the following conditions:
•
Nighttime or dark areas if one or both
reverse lamps are not operating.
• Mud, water or debris obstructs the
camera's view. Clean the lens with a soft,
lint-free cloth and non-abrasive cleaner.
• The rear of your vehicle is hit or
damaged, causing the camera to become
misaligned.
Camera Guidelines
Note: Active guidelines are only available
when the transmission is in reverse (R).
Note: Upon a battery disconnect, the active
guidelines may not be functional until you
drive your vehicle a short distance and
exceed a speed of 12 mph (20 km/h). Active guidelines
A
Centerline
B
Fixed guideline: Green zone
C
229
Continental (CPL) Canada/United States of America, enUSA, Edition date: 201807, Second-Printing Parking AidsABCD
F
E
E142436
Page 233 of 627
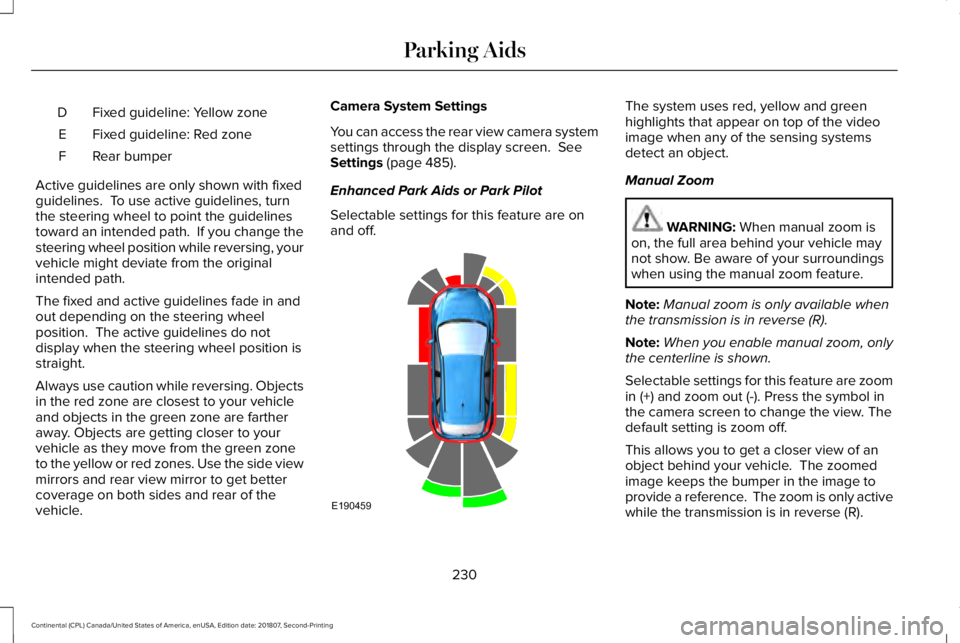
Fixed guideline: Yellow zone
D
Fixed guideline: Red zone
E
Rear bumper
F
Active guidelines are only shown with fixed
guidelines. To use active guidelines, turn
the steering wheel to point the guidelines
toward an intended path. If you change the
steering wheel position while reversing, your
vehicle might deviate from the original
intended path.
The fixed and active guidelines fade in and
out depending on the steering wheel
position. The active guidelines do not
display when the steering wheel position is
straight.
Always use caution while reversing. Objects
in the red zone are closest to your vehicle
and objects in the green zone are farther
away. Objects are getting closer to your
vehicle as they move from the green zone
to the yellow or red zones. Use the side view
mirrors and rear view mirror to get better
coverage on both sides and rear of the
vehicle. Camera System Settings
You can access the rear view camera system
settings through the display screen. See
Settings (page 485).
Enhanced Park Aids or Park Pilot
Selectable settings for this feature are on
and off. The system uses red, yellow and green
highlights that appear on top of the video
image when any of the sensing systems
detect an object.
Manual Zoom
WARNING:
When manual zoom is
on, the full area behind your vehicle may
not show. Be aware of your surroundings
when using the manual zoom feature.
Note: Manual zoom is only available when
the transmission is in reverse (R).
Note: When you enable manual zoom, only
the centerline is shown.
Selectable settings for this feature are zoom
in (+) and zoom out (-). Press the symbol in
the camera screen to change the view. The
default setting is zoom off.
This allows you to get a closer view of an
object behind your vehicle. The zoomed
image keeps the bumper in the image to
provide a reference. The zoom is only active
while the transmission is in reverse (R).
230
Continental (CPL) Canada/United States of America, enUSA, Edition date: 201807, Second-Printing Parking AidsE190459
Page 237 of 627
PRINCIPLE OF OPERATION
Cruise control lets you maintain a set speed
without keeping your foot on the accelerator
pedal. You can use cruise control when your
vehicle speed is greater than 20 mph
(30 km/h).
USING ADAPTIVE CRUISE
CONTROL WARNING:
Always pay close
attention to changing road conditions when
using adaptive cruise control. The system
does not replace attentive driving. Failing
to pay attention to the road may result in
a crash, serious injury or death. WARNING: Do not use the adaptive
cruise control when entering or leaving a
highway, on roads with intersections or
roundabouts or non-vehicular traffic or
roads that are winding, slippery, unpaved,
or steep slopes. WARNING:
Do not use the system
in poor visibility, for example fog, heavy
rain, spray or snow. WARNING:
Do not use the system
when towing a trailer that has aftermarket
electronic trailer brake controls. Failure to
follow this instruction could result in the
loss of control of your vehicle, personal
injury or death. WARNING:
Do not use tire sizes
other than those recommended because
this can affect the normal operation of the
system. Failure to do so may result in a loss
of vehicle control, which could result in
serious injury. WARNING:
Adaptive cruise control
may not detect stationary or slow moving
vehicles below
6 mph (10 km/h). WARNING:
Adaptive cruise control
does not detect pedestrians or objects in
the road. WARNING:
Adaptive cruise control
does not detect oncoming vehicles in the
same lane. WARNING:
Adaptive cruise control
is not a crash warning or avoidance
system.
The system adjusts your vehicle speed to
maintain the set gap between you and the
vehicle in front of you in the same lane. You
can select four gap settings.
The system uses a radar sensor which
projects a beam directly in front of your
vehicle.
Note: It is your responsibility to stay alert,
drive safely and be in control of the vehicle
at all times.
234
Continental (CPL) Canada/United States of America, enUSA, Edition date: 201807, Second-Printing Cruise Control
Page 249 of 627
System Settings
The system has optional setting menus
available. To view or adjust the settings, See
Settings (page 485). The system stores the
last-known selection for each of these
settings. You do not need to readjust your
settings each time you switch the system on.
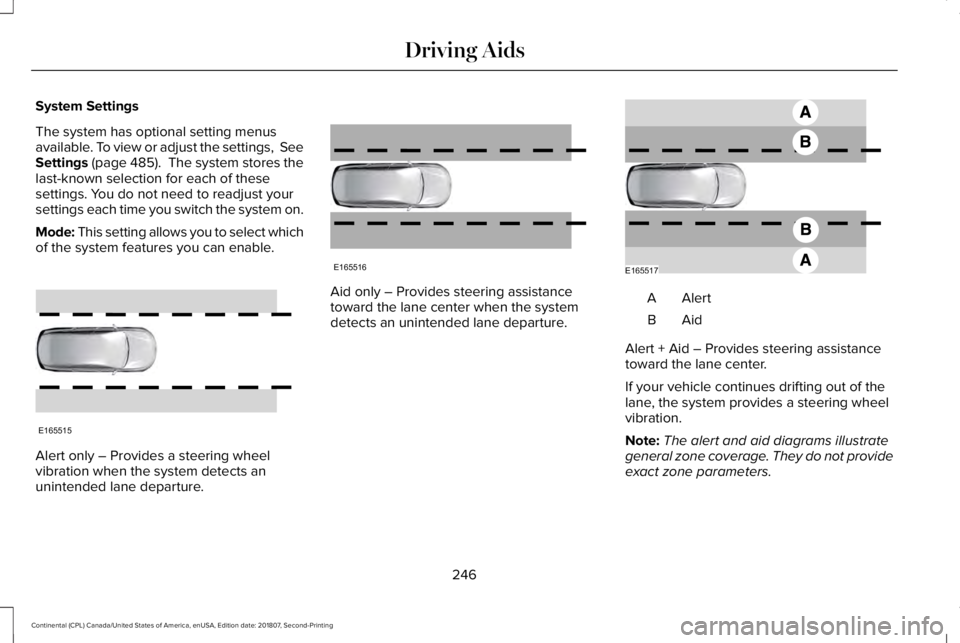
Mode: This setting allows you to select which
of the system features you can enable. Alert only – Provides a steering wheel
vibration when the system detects an
unintended lane departure. Aid only – Provides steering assistance
toward the lane center when the system
detects an unintended lane departure.
AlertA
AidB
Alert + Aid – Provides steering assistance
toward the lane center.
If your vehicle continues drifting out of the
lane, the system provides a steering wheel
vibration.
Note: The alert and aid diagrams illustrate
general zone coverage. They do not provide
exact zone parameters.
246
Continental (CPL) Canada/United States of America, enUSA, Edition date: 201807, Second-Printing Driving AidsE165515 E165516 E165517
Page 252 of 627
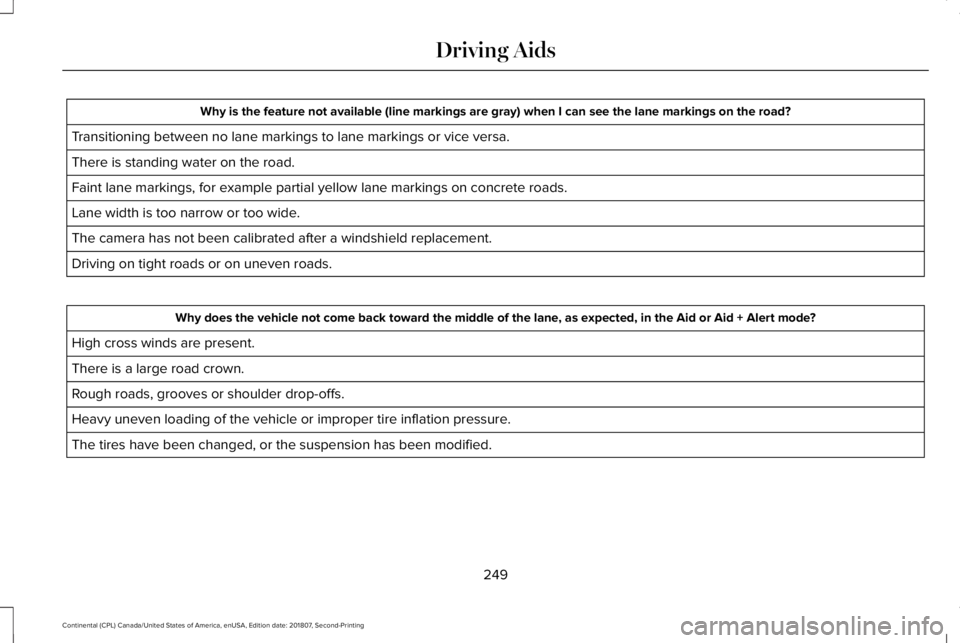
Why is the feature not available (line markings are gray) when I can s\
ee the lane markings on the road?
Transitioning between no lane markings to lane markings or vice versa.
There is standing water on the road.
Faint lane markings, for example partial yellow lane markings on concret\
e roads.
Lane width is too narrow or too wide.
The camera has not been calibrated after a windshield replacement.
Driving on tight roads or on uneven roads. Why does the vehicle not come back toward the middle of the lane, as expected, in the Aid or Aid + Alert mode?
High cross winds are present.
There is a large road crown.
Rough roads, grooves or shoulder drop-offs.
Heavy uneven loading of the vehicle or improper tire inflation pressure.
The tires have been changed, or the suspension has been modified.
249
Continental (CPL) Canada/United States of America, enUSA, Edition date: 201807, Second-Printing Driving Aids
Page 254 of 627

System Lights and Messages
When the system detects a vehicle, an alert
indicator illuminates in the exterior mirror on
the side the approaching vehicle is coming
from. If you turn the direction indicator on for
that side of your vehicle, the alert indicator
flashes.
Note:
The system may not alert you if a
vehicle quickly passes through the detection
zone. Blocked Sensors
The sensors are behind the rear bumper on
both sides of your vehicle.
Note:
Keep the sensors free from snow, ice
and large accumulations of dirt.
Note: Do not cover the sensors with bumper
stickers, repair compound or other objects.
Note: Blocked sensors could affect system
performance.
If the sensors are blocked, a message may
appear in the information display. See
Information Messages (page 120). The alert
indicators remain illuminated but the system
does not alert you. System Errors
If the system detects a fault, a warning lamp
illuminates and a message displays.
See
Information Messages (page 120).
Switching the System Off and On
You can switch the system off using the
information display.
See General
Information (page 112). When you switch the
system off, a warning lamp illuminates and
a message displays. When you switch the
system on or off, the alert indicators flash
twice.
Note: The system remembers the last setting
when you start your vehicle.
Note: The system may not correctly operate
when towing a trailer. For vehicles with a
trailer tow module and tow bar approved by
us, the system turns off when you attach a
trailer. For vehicles with an aftermarket
trailer tow module or tow bar, we
recommend that you switch the system off
when you attach a trailer.
To permanently switch the system off,
contact an authorized dealer.
251
Continental (CPL) Canada/United States of America, enUSA, Edition date: 201807, Second-Printing Driving AidsE142442 E205199