2019 LINCOLN CONTINENTAL instrument panel
[x] Cancel search: instrument panelPage 199 of 627
3. Using a tool, press and hold the brake
shift interlock switch. The shift buttons
on the instrument panel will flash when
your vehicle is in override mode.
4. With the override switch still held, press the neutral (N) button to shift from park.
5. Release the override button.
6. Your vehicle will remain in neutral for wrecker towing purposes or can be
shifted to the desired gear and driven (if
possible).
7. Release the parking brake.
Automatic Transmission Adaptive
Learning
This feature increases durability and provides
consistent shift feel over the life of your
vehicle. A new vehicle or transmission may
have firm or soft shifts. This operation will
not affect function or durability of your
transmission and is normal. Over time, the
adaptive learning process will fully update
transmission operation. Additionally, the
strategy must be relearned whenever the
battery is disconnected or a new battery is
installed. If Your Vehicle Gets Stuck In Mud or
Snow
Note:
Do not rock your vehicle if your engine
is not at normal operating temperature or
damage to your transmission may occur.
Note: Do not rock your vehicle for more than
a minute or damage to your transmission
and tires may occur, or your engine may
overheat.
If your vehicle gets stuck in mud or snow,
you can help rock your vehicle out by shifting
between forward and reverse gears,
stopping between shifts in a steady pattern.
Press lightly on the accelerator in each gear.
196
Continental (CPL) Canada/United States of America, enUSA, Edition date: 201807, Second-Printing Transmission
Page 210 of 627
HINTS ON DRIVING WITH ANTI-
LOCK BRAKES
The anti-lock braking system does not
eliminate the risks when:
•
You drive too closely to the vehicle in
front of you.
• Your vehicle is hydroplaning.
• You take corners too fast.
• The road surface is poor.
Note: If the system activates, the brake
pedal may pulse and may travel further.
Maintain pressure on the brake pedal. You
may also hear a noise from the system. This
is normal.
ELECTRIC PARKING BRAKE WARNING: Always fully apply the
parking brake and make sure you shift into
park (P). Failure to follow this instruction
could result in personal injury or death. WARNING:
If you drive extended
distances with the parking brake applied,
you could cause damage to the brake
system. WARNING:
The electric parking
brake does not operate if the vehicle
battery is running out of charge.
Your vehicle has an electric parking brake.
You operate it with a switch instead of a
lever. The switch is on the center console or
to the left-hand side of the steering wheel,
on the lower part of the instrument panel.
Note: The electric parking brake makes
noises during operation. This is normal.
Applying the Electric Parking Brake Pull the switch upward.
The red warning lamp flashes
during operation and illuminates
when the parking brake is applied. Note:
It remains illuminated for a short
period of time after you switch the ignition
off.
If it continues to flash or does not illuminate,
the system has malfunctioned. Have your
vehicle checked as soon as possible.
Note: You can apply the electric parking
brake when the ignition is off.
Note: The electric parking brake could
automatically apply when you shift into park
(P).
See Transmission (page 191).
Applying the Electric Parking Brake in an
Emergency
Note: Do not apply the electric parking brake
when your vehicle is moving, except in an
emergency. If you repeatedly use the electric
parking brake to slow or stop your vehicle,
you could cause damage to the brake
system.
You can use the electric parking brake to
slow or stop your vehicle in an emergency.
207
Continental (CPL) Canada/United States of America, enUSA, Edition date: 201807, Second-Printing BrakesE267156 E270480
Page 215 of 627
PRINCIPLE OF OPERATION
The traction control system helps avoid drive
wheel spin and loss of traction.
If your vehicle begins to slide, the system
applies the brakes to individual wheels and,
when needed, reduces engine power at the
same time. If the wheels spin when
accelerating on slippery or loose surfaces,
the system reduces engine power in order
to increase traction.
USING TRACTION CONTROL
WARNING: The stability and traction
control light illuminates steadily if the
system detects a failure. Make sure you
did not manually disable the traction
control system using the information
display controls or the switch. If the stability
control and traction control light is still illuminating steadily, have the system
serviced by an authorized dealer
immediately. Operating your vehicle with
the traction control disabled could lead to
an increased risk of loss of vehicle control,
vehicle rollover, personal injury and death.
The system automatically turns on each time
you switch the ignition on.
If your vehicle is stuck in mud or snow,
switching traction control off may be
beneficial as this allows the wheels to spin.
Note: When you switch traction control off,
stability control remains fully active.
Switching the System Off
When you switch the system off or on, a
message appears in the information display
showing system status.
You can switch the system off by either using
the information display controls or the switch. Using the Information Display Controls
You can switch this feature off or on in the
information display. See General Information
(page
112).
Using a Switch
(If Equipped)
Use the traction control switch on the
instrument panel to switch the system off or
on.
System Indicator Lights and Messages The stability and traction control
light:
• Temporarily illuminates on engine
start-up.
• Flashes when a driving condition
activates either of the systems.
• Illuminates if a problem occurs in either
of the systems. The stability and traction control
off light temporarily illuminates on
engine start-up and stays on when
you switch the traction control system off.
212
Continental (CPL) Canada/United States of America, enUSA, Edition date: 201807, Second-Printing Traction ControlE138639 E130458
Page 280 of 627
If you need to arrange roadside assistance
for yourself, Lincoln Motor Company
reimburses a reasonable amount for towing
to the nearest Lincoln dealership within
100 mi (160 km). To obtain reimbursement
information, United States clients, call
1-800-521-4140. Clients need to submit their
original receipts.
Vehicles Sold in Canada: Getting
Roadside Assistance
To fully assist you should you have a vehicle
concern, Lincoln Motor Company offers a
complimentary roadside assistance program.
This program is eligible within Canada or the
continental United States.
This program is separate from the New
Vehicle Limited Warranty, beginning from
the original warranty start date and lasts the
life of the vehicle for the original owner.
Subsequent owners receive coverage that
is concurrent with the 6 years or
70,000 mi
(110,000 km) (whichever occurs first)
powertrain warranty coverage period. If you purchased your vehicle in Canada and
require roadside assistance, please call
1-800-387-9333.
Vehicles Sold in Canada: Using
Roadside Assistance
Complete the roadside assistance
identification card and place it in your wallet
for quick reference.
In Canada, this card is found in the Warranty
Guide in the glove compartment of your
vehicle.
Vehicles Sold in Canada: Roadside
Assistance Program Coverage
The service is available 24 hours a day,
seven days a week.
Canadian roadside coverage and benefits
may differ from the U.S. coverage.
For complete program coverage details
review your warranty guide, contact your
dealer, call us in Canada at 1-800-387-9333,
or visit our website at
www.lincolncanada.com.HAZARD FLASHERS
Note:
The hazard flashers operate when the
ignition is in any position, or if the key is not
in the ignition. If used when the vehicle is not
running, the battery loses charge. As a result,
there may be insufficient power to restart
your vehicle. The flasher control is on the
instrument panel. Use your hazard
flashers when your vehicle is
creating a safety hazard for other motorists.
• Press the flasher control and all front and
rear direction indicators flash.
• Press the button again to switch them off.
FUEL SHUTOFF WARNING:
If your vehicle has been
involved in a crash, have the fuel system
checked. Failure to follow this instruction
could result in fire, personal injury or death.
277
Continental (CPL) Canada/United States of America, enUSA, Edition date: 201807, Second-Printing Roadside Emergencies
Page 305 of 627
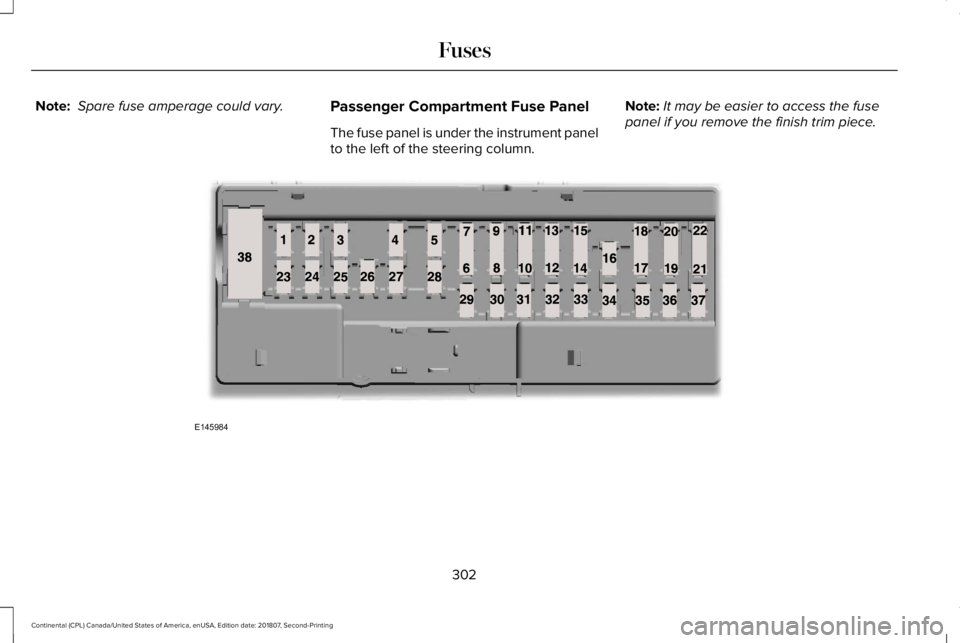
Note:
Spare fuse amperage could vary.
Passenger Compartment Fuse Panel
The fuse panel is under the instrument panel
to the left of the steering column. Note:
It may be easier to access the fuse
panel if you remove the finish trim piece. 302
Continental (CPL) Canada/United States of America, enUSA, Edition date: 201807, Second-Printing FusesE145984
Page 313 of 627
GENERAL INFORMATION
Have your vehicle serviced regularly to help
maintain its roadworthiness and resale value.
There is a large network of authorized
dealers that are there to help you with their
professional servicing expertise. We believe
that their specially trained technicians are
best qualified to service your vehicle properly
and expertly. They are supported by a wide
range of highly specialized tools developed
specifically for servicing your vehicle.
If your vehicle requires professional service,
an authorized dealer can provide the
necessary parts and service. Check your
warranty information to find out which parts
and services are covered.
Use only recommended fuels, lubricants,
fluids and service parts conforming to
specifications. Motorcraft® parts are
designed and built to provide the best
performance in your vehicle.
Precautions
•
Do not work on a hot engine.
• Make sure that nothing gets caught in
moving parts.
• Do not work on a vehicle with the engine
running in an enclosed space, unless you
are sure you have enough ventilation.
• Keep all open flames and other burning
material (such as cigarettes) away from
the battery and all fuel related parts.
Working with the Engine Off
1. Set the parking brake and shift the transmission to park (P).
2. Switch off the engine.
3. Block the wheels.
Working with the Engine On WARNING: To reduce the risk of
vehicle damage and personal burn injuries,
do not start your engine with the air
cleaner removed and do not remove it
while the engine is running. 1. Set the parking brake and shift the
transmission to park (P).
2. Block the wheels.
OPENING AND CLOSING THE
HOOD
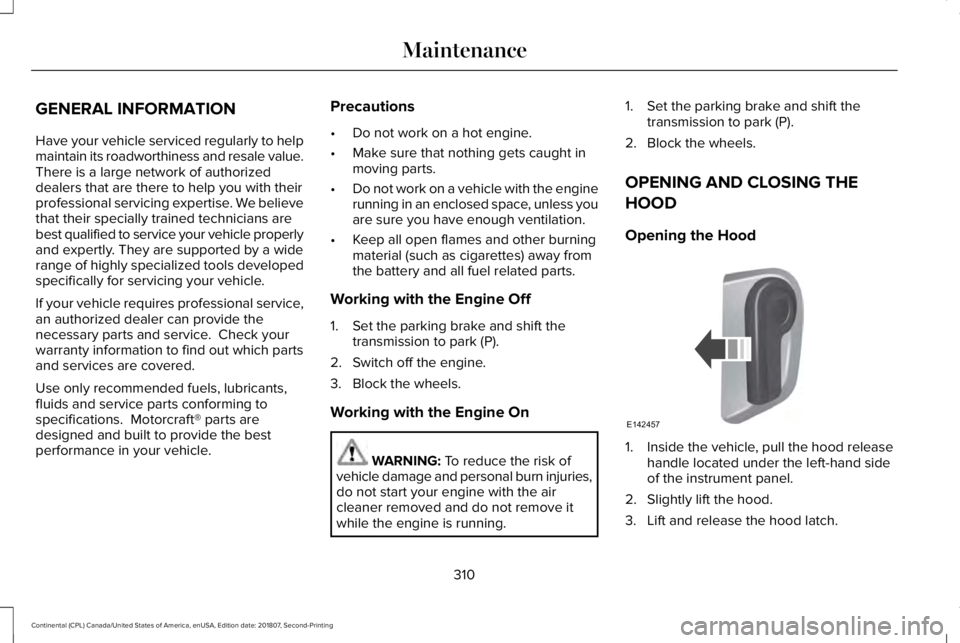
Opening the Hood 1. Inside the vehicle, pull the hood release
handle located under the left-hand side
of the instrument panel.
2. Slightly lift the hood.
3. Lift and release the hood latch.
310
Continental (CPL) Canada/United States of America, enUSA, Edition date: 201807, Second-Printing MaintenanceE142457
Page 338 of 627
•
Do not allow wax to come in contact with
any non-body (low-gloss black) colored
trim. The wax will discolor or stain the
parts over time.
•Roof racks.
• Bumpers.
• Grained door handles.
• Side moldings.
• Mirror housings.
• Windshield cowl area.
• Do not apply wax to glass areas.
• After waxing, your car's paint should feel
smooth, and be free of streaks and
smudges.
CLEANING THE ENGINE
Engines are more efficient when they are
clean because grease and dirt buildup keep
the engine warmer than normal. When washing:
•
Take care when using a power washer
to clean the engine. The high-pressure
fluid could penetrate the sealed parts
and cause damage.
• Do not spray a hot engine with cold water
to avoid cracking the engine block or
other engine components.
• Spray Motorcraft Engine Shampoo and
Degreaser on all parts that require
cleaning and pressure rinse clean. In
Canada, use Motorcraft Engine Shampoo.
Note: If your vehicle has an engine cover
remove the cover before application of
Motorcraft Engine Shampoo and Degreaser.
Immediately rinse away any over spray.
• Never wash or rinse the engine while it
is hot or running; water in the running
engine may cause internal damage.
• Never wash or rinse any ignition coil,
spark plug wire or spark plug well, or the
area in and around these locations.
• Cover the battery, power distribution box,
and air filter assembly to prevent water
damage when cleaning the engine. CLEANING THE WINDOWS AND
WIPER BLADES
Car wash chemicals and environmental
fallout can result in windshield and wiper
blade contamination. Dirty windshield and
wipers will result in poor windshield wiper
operation. Keep the windshield and wiper
blades clean to maintain windshield wiper
performance.
To clean the windshield and wiper blades:
•
Clean the windshield with a non-abrasive
glass cleaner. When cleaning the interior
of the windshield, avoid getting any glass
cleaner on the instrument panel or door
panels. Wipe any glass cleaner off these
surfaces immediately.
• For windshields contaminated with tree
sap, chemicals, wax or bugs, clean the
entire windshield using steel wool (no
greater than 0000 grade) in a circular
motion and rinse with water.
• Clean the wiper blades with isopropyl
rubbing alcohol or windshield washer
concentrate.
335
Continental (CPL) Canada/United States of America, enUSA, Edition date: 201807, Second-Printing Vehicle Care
Page 341 of 627
CLEANING THE INSTRUMENT
PANEL AND INSTRUMENT
CLUSTER LENS
WARNING: Do not use chemical
solvents or strong detergents when
cleaning the steering wheel or instrument
panel to avoid contamination of the airbag
system.
Note: Follow the same procedure as
cleaning leather seats for cleaning leather
instrument panels and leather interior trim
surfaces. See Cleaning Leather Seats
(page
338).
Clean the instrument panel and cluster lens
with a clean, damp and soft cloth, then use
a clean, dry and soft cloth to dry these areas. •
Avoid cleaners or polishes that increase
the gloss of the upper portion of the
instrument panel. The dull finish in this
area helps protect you from undesirable
windshield reflection.
• Do not use any household cleaning
products or glass cleaners as these may
damage the finish of the instrument
panel, interior trim and cluster lens.
• Wash or wipe your hands clean if you
have been in contact with certain
products such as insect repellent and
suntan lotion to avoid possible damage
to the interior painted surfaces.
• Do not allow air fresheners and hand
sanitizers to spill onto interior surfaces.
If a spill occurs, wipe off immediately.
Your warranty may not cover these
damages.
If a staining liquid like coffee or juice has
been spilled on the instrument panel or on
interior trim surfaces:
1. Wipe up spilled liquid using a clean, soft
cloth as quickly as possible. 2. Use Motorcraft Premium Leather and
Vinyl Cleaner or a commercially available
leather cleaning product for automotive
interiors. Test any cleaner or stain
remover on an inconspicuous area.
3. Alternatively, wipe the surface with a clean, soft cloth and a mild soap and
water solution. Dry the area with a clean,
soft cloth.
4. If necessary, apply more soap and water
solution or cleaning product to a clean,
soft cloth and press it onto the soiled
area. Allow this to set at room
temperature for 30 minutes.
5. Remove the soaked cloth, then with a clean, damp cloth, use a rubbing motion
for 60 seconds on the soiled area.
6. Dry the area with a clean, soft cloth.
CLEANING LEATHER SEATS
Note: Follow the same procedure as
cleaning leather seats for cleaning leather
instrument panels and leather interior trim
surfaces.
338
Continental (CPL) Canada/United States of America, enUSA, Edition date: 201807, Second-Printing Vehicle Care