2019 LINCOLN CONTINENTAL radio
[x] Cancel search: radioPage 90 of 627

Note:
If you press any adjustment or
memory button when in easy exit mode, the
system cancels the operation.
Note: Depending on your vehicle, the column
may move up and in.
AUDIO CONTROL
You can operate the following functions with
the control: Seek down or previous.
A
Volume up or down and mute.
B
Seek up or next.
C Seek, Next or Previous
Press the seek button to:
•
Tune the radio to the next or previous
stored preset.
• Play the next or the previous track.
Press and hold the seek button to:
• Tune the radio to the next station up or
down the frequency band.
• Seek through a track.
VOICE CONTROL
The controls are on the steering wheel. Press and release to activate voice
recognition.CRUISE CONTROL
See Using Adaptive Cruise Control (page
234).
87
Continental (CPL) Canada/United States of America, enUSA, Edition date: 201807, Second-Printing Steering WheelE221073 E142599 E223599
Page 171 of 627

Note:
Put a new battery in the hand-held
transmitter. This helps ensure quicker
training and accurate transmission of the
radio-frequency signal. 1. With your vehicle parked outside of the
garage, switch your ignition to the on
position, but do not start your vehicle.
2. Press and release the function button that you would like to program.
3. Hold your hand-held garage door transmitter 1–3 in (2–8 cm) away from the
HomeLink button you want to program. 4.
Press and hold the hand-held transmitter
button you want to program while
watching the indicator light on HomeLink.
Continue to hold the hand-held button
until the HomeLink indicator light flashes
rapidly or is continuously on.
Note: You may need to use a different
method if you live in Canada or have
difficulties programming your gate operator
or garage door opener. See Gate Operator
/ Canadian Programming.
5. Press and hold the HomeLink button you
programmed for two seconds, then
release. You may need to do this twice
to activate the door. If your garage door
does not operate, watch the HomeLink
indicator light.
If the indicator light stays on, the
programming is complete. Your device
should activate when the HomeLink button
is pressed and released. If the indicator light flashes rapidly, press and
hold for two seconds and release the
programmed HomeLink button. Repeat the
"press/hold/release" sequence up to three
times to complete the programming process.
If your device still does not operate, you must
program your garage door. See
Programming Your Garage Door Opener
Motor.
To program additional buttons, repeat Steps
1 – 4.
For questions or comments, please contact
HomeLink at www.homelink.com,
www.youtube.com/user/HomeLinkGentex
or by calling the toll-free help line at
1-800-355-3515.
Programming Your Garage Door Opener
Motor
Note:
You may need a ladder to reach the
unit and you may need to remove the cover
or lamp lens on your garage door opener.
168
Continental (CPL) Canada/United States of America, enUSA, Edition date: 201807, Second-Printing Garage Door OpenerE188212
Page 172 of 627

1. Press the learn button on the garage
door opener motor and then you have
30 seconds to complete the next two
steps.
2. Return to your vehicle. 3. Press and hold the function button you
want to program for 2 seconds, then
release. Repeat this step. Depending on
your brand of garage door opener, you
may need to repeat this sequence a third
time.
Gate Operator / Canadian Programming
Canadian radio-frequency laws require
transmitter signals to “time-out” (or quit) after
several seconds of transmission – which may
not be long enough for HomeLink to pick up
the signal during programming. Similar to
this Canadian law, some U.S. gate operators
are designed to “time-out” in the same
manner.
Note: If programming a garage door opener
or gate operator, it is advised to unplug the
device during the “cycling” process to
prevent possible overheating.
1. Press and release, every two seconds,
your hand-held transmitter until the
HomeLink indicator light changes to a
rapidly blinking or continuously on light.
2. Release the hand-held transmitter button. 3. Continue programing HomeLink. See
In-Vehicle Programming, Step 4
.
Erasing the Function Button Codes
Note: You cannot erase individual buttons. 1. Press and hold the outer two function
buttons simultaneously for approximately
10 seconds until the indicator light above
the buttons flashes rapidly.
2. When the indicator light flashes, release
the buttons. You erased the codes for all
buttons.
169
Continental (CPL) Canada/United States of America, enUSA, Edition date: 201807, Second-Printing Garage Door OpenerE142659 E188212 E188213
Page 178 of 627

GENERAL INFORMATION
WARNING: Extended idling at high
engine speeds can produce very high
temperatures in the engine and exhaust
system, creating the risk of fire or other
damage. WARNING: Do not park, idle or drive
your vehicle on dry grass or other dry
ground cover. The emission system heats
up the engine compartment and exhaust
system, creating the risk of fire. WARNING:
Do not start the engine
in a closed garage or in other enclosed
areas. Exhaust fumes can be toxic. Always
open the garage door before you start the
engine. WARNING:
Exhaust leaks may result
in entry of harmful and potentially lethal
fumes into the passenger compartment. If
you smell exhaust fumes inside your
vehicle, have your vehicle inspected
immediately. Do not drive if you smell
exhaust fumes.
If you disconnect the battery, your vehicle
may exhibit some unusual driving
characteristics for approximately 5 mi (8 km)
after you reconnect it. This is because the
engine management system must realign
itself with the engine. You can disregard any
unusual driving characteristics during this
period.
The powertrain control system meets all
Canadian interference-causing equipment
standard requirements regulating the
impulse electrical field or radio noise.
When you start the engine, avoid pressing
the accelerator pedal before and during
operation. Only use the accelerator pedal
when you have difficulty starting the engine. KEYLESS STARTING
Note:
The system may not function if the
intelligent access key is close to metal
objects or electronic devices, for example
keys or a cell phone.
Note: A valid intelligent access key must be
located inside your vehicle to switch the
ignition on and start your vehicle.
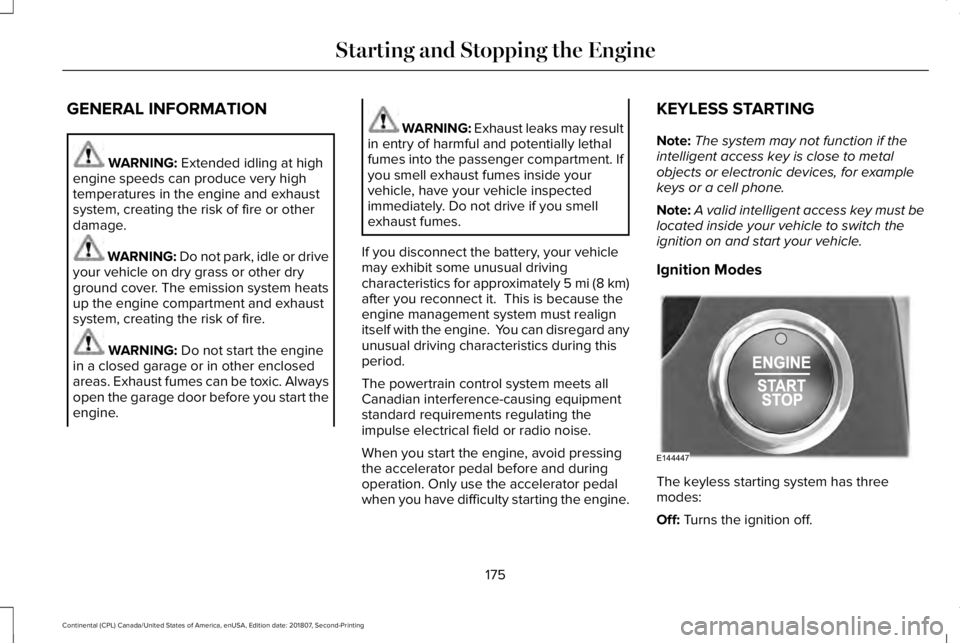
Ignition Modes The keyless starting system has three
modes:
Off:
Turns the ignition off.
175
Continental (CPL) Canada/United States of America, enUSA, Edition date: 201807, Second-Printing Starting and Stopping the EngineE144447
Page 309 of 627

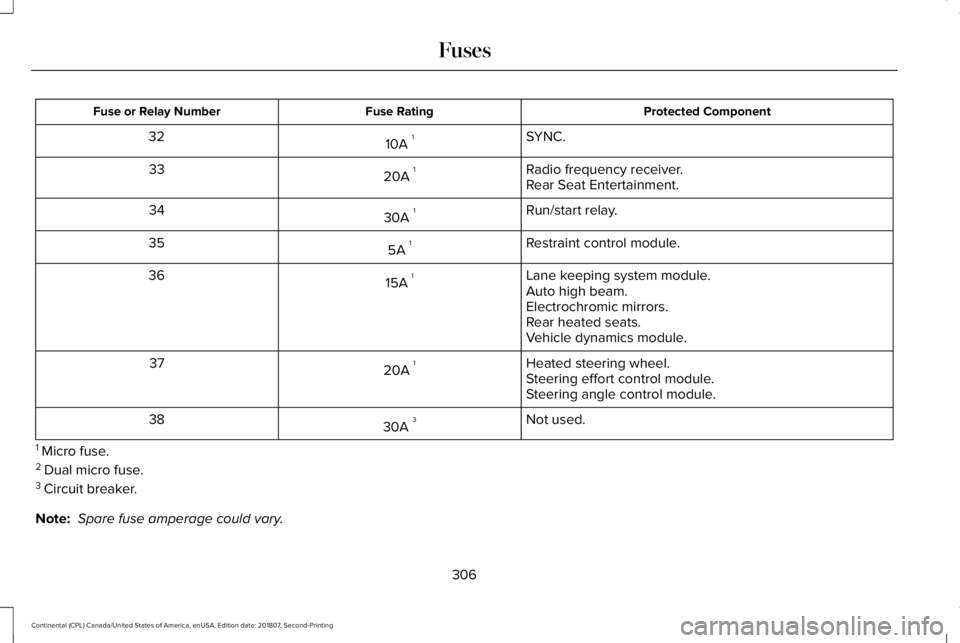
Protected Component
Fuse Rating
Fuse or Relay Number
SYNC.
10A 1
32
Radio frequency receiver.
20A 1
33
Rear Seat Entertainment.
Run/start relay.
30A 1
34
Restraint control module.
5A 1
35
Lane keeping system module.
15A 1
36
Auto high beam.
Electrochromic mirrors.
Rear heated seats.
Vehicle dynamics module.
Heated steering wheel.
20A 1
37
Steering effort control module.
Steering angle control module.
Not used.
30A 3
38
1 Micro fuse.
2 Dual micro fuse.
3 Circuit breaker.
Note: Spare fuse amperage could vary.
306
Continental (CPL) Canada/United States of America, enUSA, Edition date: 201807, Second-Printing Fuses
Page 329 of 627

Because your vehicle
’s engine is
electronically-controlled by a computer,
some engine control settings are maintained
by power from the battery. Some engine
computer settings, like the idle trim and fuel
trim strategy, optimize the driveability and
performance of the engine. The clock and
radio station presets are also maintained in
memory by power from the low-voltage
battery. These settings are erased when a
technician disconnects and connects the
low-voltage battery.
To restore the settings, do the following:
Note: Until you switch the ignition to the on
position, you will receive a message in your
information display stating that your vehicle
is not in park.
1. Apply the parking brake.
2. Shift into park (P) or neutral (N).
3. Switch off all accessories.
4. Press the brake pedal and start your vehicle. 5. Run the engine until it reaches normal
operating temperature. While the engine
is warming up, complete the following:
Reset the clock. See Audio Unit (page
408). Reset the power windows
bounce-back feature. See Power
Windows (page 99). Reset the radio
station presets. See Audio Unit (page
408).
6. Allow the engine to idle for at least one minute.
7. Drive the vehicle at least 10 mi (16 km) to
completely relearn the idle trim and fuel
trim strategy.
Note: If you do not allow the engine to
relearn the idle and fuel trim strategy, the
idle quality of your vehicle may be adversely
affected until the engine computer
eventually relearns the idle trim and fuel trim
strategy.
Note: Certain features may not operate if
the battery monitor system is not reset with
a scan tool following a jump start or battery
replacement. Normal electrical accessory
operation should resume after your vehicle
is left undisturbed for 8 hours. Make sure that you dispose of old batteries
in an environmentally friendly way. Seek
advice from your local authority about
recycling old batteries.
If storing your vehicle for more than 30 days
without recharging the battery, we
recommend that you disconnect the battery
cables to maintain battery charge for quick
starting.
CHECKING THE WIPER BLADES
Run the tip of your fingers over the edge of
the blade to check for roughness.
Clean the wiper blades with washer fluid or
water applied with a soft sponge or cloth.
326
Continental (CPL) Canada/United States of America, enUSA, Edition date: 201807, Second-Printing MaintenanceE142463
Page 361 of 627

Each tire, including the spare (if
provided), should be checked
monthly when cold and inflate to
the inflation pressure recommended by the
vehicle manufacturer on the vehicle placard
or tire inflation pressure label. (If your vehicle
has tires of a different size than the size
indicated on the vehicle placard or tire
inflation pressure label, you should
determine the proper tire inflation pressure
for those tires).
As an added safety feature, your vehicle has
been equipped with a Tire Pressure
Monitoring System (TPMS) that illuminates a
low tire pressure telltale when one or more
of your tires is significantly under-inflated.
Accordingly, when the low tire pressure
telltale illuminates, you should stop and
check your tires as soon as possible, and
inflate them to the proper pressure. Driving
on a significantly under-inflated tire causes
the tire to overheat and can lead to tire
failure. Under-inflation also reduces fuel
efficiency and tire tread life, and could affect
the vehicle ’s handling and stopping ability. Please note that the TPMS is not a substitute
for proper tire maintenance, and it is the
driver’
s responsibility to maintain correct tire
pressure, even if under-inflation has not
reached the level to trigger illumination of
the TPMS low tire pressure telltale.
Your vehicle has also been equipped with a
TPMS malfunction indicator to indicate when
the system is not operating properly. The
TPMS malfunction indicator is combined with
the low tire pressure telltale. When the
system detects a malfunction, the telltale will
flash for approximately one minute and then
remain continuously illuminated. This
sequence will continue upon subsequent
vehicle start-ups as long as the malfunction
exists.
When the malfunction indicator is illuminated,
the system will not be able to detect or signal
low tire pressure as intended. TPMS
malfunctions could occur for a variety of
reasons, including the installation of
replacement or alternate tires or wheels on
the vehicle that prevent the TPMS from functioning properly. Always check the TPMS
malfunction telltale after replacing one or
more tires or wheels on your vehicle to
ensure that the replacement or alternate tires
and wheels allow the TPMS to continue to
function properly.
This device complies with Part 15 of the FCC
Rules and with License exempt RSS
Standards of Industry Canada. Operation is
subject to the following two conditions:
1. This device will not cause harmful
interference, and
2. This device must accept any interference
received, including interference that
could cause undesired operation.
Note: Changes or modifications not
expressively approved by the party
responsible for compliance could void the
user's authority to operate the equipment.
The term "IC:" before the radio certification
number only signifies that Industry Canada
technical specifications were met.
358
Continental (CPL) Canada/United States of America, enUSA, Edition date: 201807, Second-Printing Wheels and Tires
Page 408 of 627

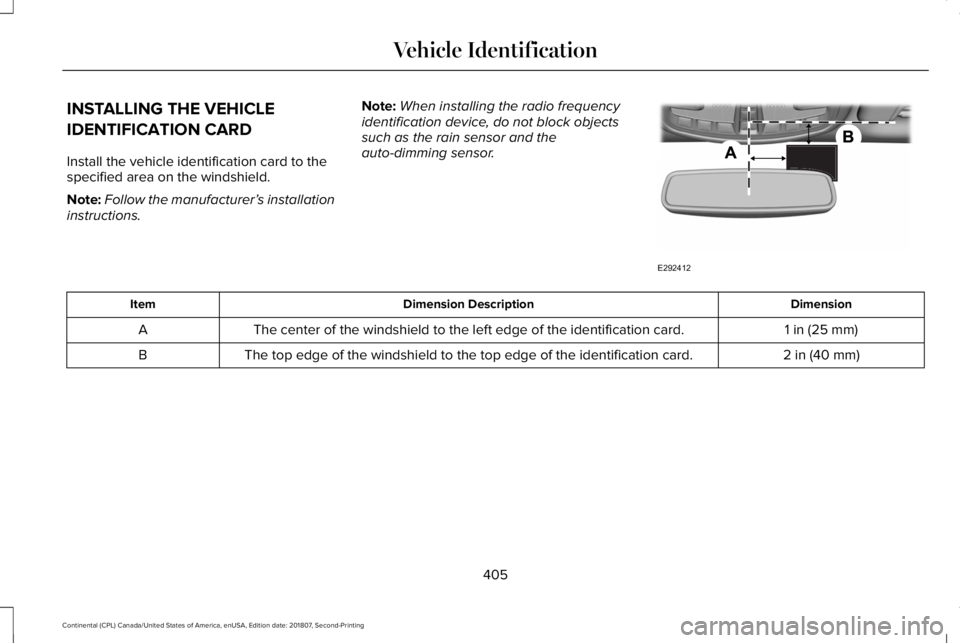
INSTALLING THE VEHICLE
IDENTIFICATION CARD
Install the vehicle identification card to the
specified area on the windshield.
Note:
Follow the manufacturer’ s installation
instructions. Note:
When installing the radio frequency
identification device, do not block objects
such as the rain sensor and the
auto-dimming sensor. Dimension
Dimension Description
Item
1 in (25 mm)
The center of the windshield to the left edge of the identification card\
.
A
2 in (40 mm)
The top edge of the windshield to the top edge of the identification car\
d.
B
405
Continental (CPL) Canada/United States of America, enUSA, Edition date: 201807, Second-Printing Vehicle IdentificationE292412