2019 LEXUS UX250H instrument panel
[x] Cancel search: instrument panelPage 158 of 476

1584-1. Before driving
Cargo capacity depends on the total
weight of the occupants.
(Cargo capacity) = (Total load capac-
ity) (Total weight of occupants)
Steps for Determining Correct Load
Limit
(1) Locate the statement “The com-
bined weight of occupants and cargo
should never exceed XXX kg or XXX
lbs.” on your vehicle’s placard.
(2) Determine the combined weight of
the driver and passengers that will be
riding in your vehicle.
(3) Subtract the combined weight of
the driver and passengers from XXX
kg or XXX lbs.
(4) The resulting figure equals the
available amount of cargo and luggage
load capacity.
For example, if the “XXX” amount
equals 1400 lbs. and there will be five
150 lb passengers in your vehicle, the
amount of available cargo and luggage
load capacity is 650 lbs. (1400 − 750
(5 150) = 650 lbs.)
(5) Determine the combined weight of
luggage and cargo being loaded on
the vehicle. That weight may not safely
exceed the available cargo and lug-
gage load capacity calculated in Step
WARNING
●Do not place cargo or luggage in or on
the following locations.
• At the feet of the driver
• On the front passenger or rear seats (when stacking items)
• On the luggage cover
• On the instrument panel
• On the dashboard
• In front of the Center Display
●Secure all items in the occupant com-
partment.
■When using a roof luggage carrier
Observe the following precautions:
●Place the cargo so that its weight is dis-
tributed evenly between the front and
rear axles.
●If loading long or wide cargo, never
exceed the vehicle overall length or
width. ( P.416)
●Before driving, make sure the cargo is
securely fastened on the roof luggage
carrier.
●Loading cargo on the roof luggage
carrier will make the center of gravity
of the vehicle higher. Avoid high
speeds, sudden starts, sharp turns,
sudden braking or abrupt maneuvers,
otherwise it may result in loss of con-
trol or vehicle rollover due to failure to
operate this vehicle correctly and
result in death or serious injury.
●If driving for a long distance, on rough
roads, or at high speeds, stop the vehi-
cle now and then during the trip to
make sure the cargo remains in its
place.
●Do not exceed 176.3 lb. (80 kg) cargo
weight on the roof luggage carrier.
NOTICE
■When loading cargo (vehicles with
moon roof)
Be careful not to scratch the surface of
the moon roof.
Capacity and distribution
Page 177 of 476

1774-3. Operating the lights and wipers
4
Driving
4-3.Operating the lights and wipers
Operating the switch turns on
the lights as follows:U.S.A.
Canada
1 The side marker, parking, tail,
license plate, instrument panel
lights, and daytime running lights
( P.177) turn on.
2 The headlights and all the
lights listed above (except daytime
running lights) turn on.
3 The headlights, daytime run-
ning lights ( P.177) and all the lights listed above turn on and off
automatically.
4 (U.S.A.) Off
(Canada) The daytime running
lights turn on.
■AUTO mode can be used when
The power switch is in ON.
■Daytime running light system
●The daytime running lights illuminate the
parking lights and illuminate brighter than
the parking lights.
●To make your vehicle more visible to
other drivers during daytime driving, the
daytime running lights turn on automati-
cally when all of the following conditions
are met. (The daytime running lights are
not designed for use at night.)
• The hybrid system is started
• The parking brake is released
• The headlight switch is in the (Can-
ada only), or (when the sur-
roundings are bright) position
The daytime running lights remain on after
they illuminate due to the conditions above,
even if the parking brake is set again.
●For the U.S.A.: Daytime running lights
can be turned off by operating the head-
light switch to position.
●Compared to turning on the headlights,
the daytime running light system offers
greater durability and consumes less
electricity, so it can help improve fuel
economy.
■Headlight control sensor
The sensor may not function properly if an
object is placed on the sensor, or anything
that blocks the sensor is affixed to the wind-
shield.
Doing so interferes with the sensor detect-
ing the level of ambien t light and may cause
the automatic headlight system to malfunc-
tion.
Headlight switch
The headlights can be operated
manually or automatically.
Turning on the headlights
A
B
Page 285 of 476

2855-3. Using the air conditioning system and defogger
5
Interior features
WARNING
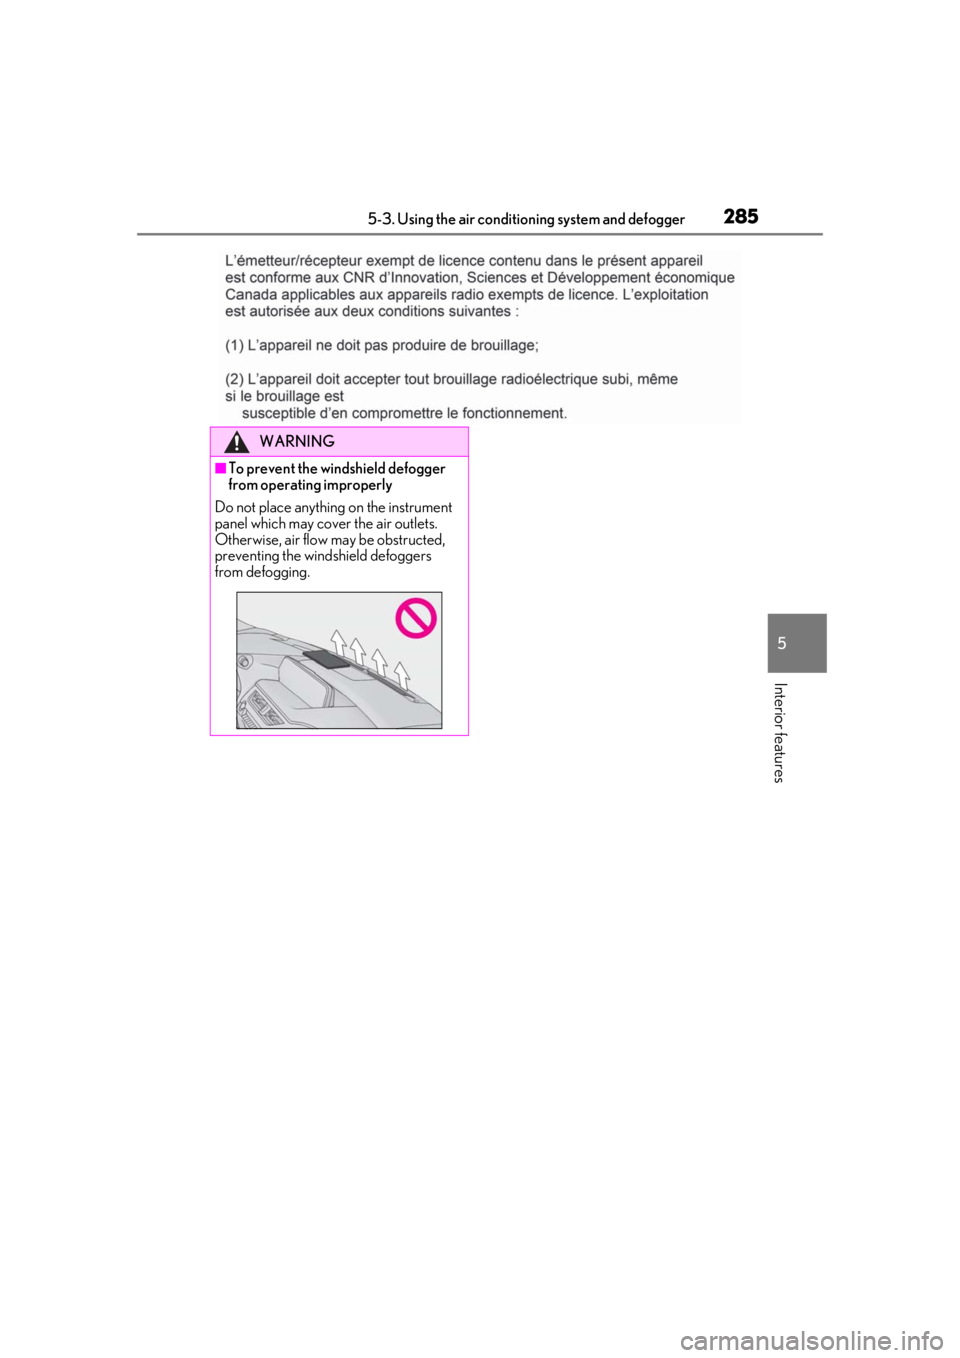
■To prevent the windshield defogger
from operating improperly
Do not place anything on the instrument
panel which may cover the air outlets.
Otherwise, air flow may be obstructed,
preventing the windshield defoggers
from defogging.
Page 302 of 476

3025-6. Using the other interior features
Please use a power supply for elec-
tronic goods that use less than 12
VDC/10 A (power consumption of
120 W).
When using electronic goods, make
sure that the power consumption of all
the connected power outlets is less
than 120 W.
Front
Press down the lid to open it.
Rear
Open the lid.
■The power outlet can be used when
The power switch is in ACC or ON.
The USB charging ports are used to
supply 2.1 A of electricity at 5 V to
external devices.
The USB charging ports are for
Power outlet
NOTICE
■When power outlet is not in use
To avoid damaging the power outlet,
close the power outlet lid when the
power outlet is not in use.
Foreign objects or li quids that enter the
power outlet may cause a short circuit.
■To prevent 12-volt battery discharge
Do not use the power outlet longer than
necessary when the hy brid system is off.
■To prevent incorrect operation of the
vehicle
When turning the powe r switch off, make
sure to disconnect accessories designed
for charging, such as portable chargers,
power banks, etc. from the power outlets.
If such an accessory is left connected, the
following may occur:
●The doors will not be able to be locked.
●The opening screen will be displayed
on the multi-information display.
●The interior lights, instrument panel
lights, etc. will illuminate.
USB charging ports
Page 325 of 476

3256-1. Maintenance and care
6
Maintenance and care
Remove dirt and dust using a vac-
uum cleaner. Wipe dirty surfaces
with a cloth dampened with luke-
warm water.
If dirt cannot be removed, wipe it off
with a soft cloth dampened with
neutral detergent diluted to approx-
imately 1%.
Wring out any excess water from
the cloth and thoroughly wipe off
remaining traces of detergent and
water.
■Shampooing the carpets
There are several commercial foaming-type
cleaners available. Use a sponge or brush
to apply the foam. Rub in overlapping cir-
cles. Do not use water. Wipe dirty surfaces
and let them dry. Excellent results are
obtained by keeping the carpet as dry as
possible.
■Handling the seat belts
Clean with mild soap and lukewarm water
using a cloth or spon ge. Also check the
belts periodically for excessive wear, fraying
or cuts.
■Front side windows with UV protective
coating (vehicles with UV protective
coating)
The front side windows have UV protective
coating. To prevent any damage to the UV
protective coating, observe the following:
●If the windows are dirty, gently wipe them with a cloth soaked in water or lukewarm
water as soon as possible.
●If the windows are very dirty, do not open
and close them repeatedly.
Cleaning and protecting the
v
ehicle interior
Perform cleaning in a manner
appropriate to each component
and its material.
Protecting the vehicle interior
WARNING
■Water in the vehicle
●Do not splash or spill liquid in the vehi-
cle, such as on the floor, in the hybrid
battery (traction battery) air intake
vent, and in the luggage compartment.
( P.67)
Doing so may cause the hybrid battery,
electrical components, etc. to mal-
function or catch fire.
●Do not get any of the SRS components
or wiring in the vehicle interior wet.
( P.31)
An electrical malfunction may cause
the airbags to deploy or not function
properly, resulting in death or serious
injury.
●Vehicles with wireless charger: Do not
let the wireless charger ( P.303) get
wet. Failure to do so may cause the
charger to become hot and cause
burns or could cause electric shock
resulting in death or serious injury.
■Cleaning the interior (especially
instrument panel)
Do not use polish wax or polish cleaner.
The instrument panel may reflect off the
windshield, obstructing the driver’s view
and leading to an accident, resulting in
death or serious injury.
Page 326 of 476

3266-1. Maintenance and care
Remove dirt using a water-damp-
ened soft cloth or synthetic chamois.
Wipe the surface with a dry soft
cloth to remove any remaining
moisture.
■Cleaning the areas with satin-finish
metal accents
The metal areas use a layer of real metal for
the surface. It is necessary to clean them
regularly. If dirty area s are left uncleaned for
long periods of time, they may be difficult to
clean.
■Cleaning the leather
Remove dirt and dust using a vac-
uum cleaner.
Wipe off any excess dirt and dust
with a soft cloth dampened with
diluted detergent.
Use a diluted water solution of approxi-
mately 5% neutral wool detergent.
Wring out any excess water from
the cloth and thoroughly wipe off all
remaining traces of detergent.
Wipe the surface with a dry, soft
cloth to remove any remaining
moisture. Allow the leather to dry in
a shaded and ventilated area.
NOTICE
■Cleaning detergents
●Do not use the following types of
detergent, as they may discolor the
vehicle interior or cause streaks or
damage to painted surfaces:
• Non-seat portions: Organic sub- stances such as benzene or gasoline,
alkaline or acidic solutions, dye, and
bleach
• Seats: Alkaline or acidic solutions, such as thinner, benzene, and alcohol
●Do not use polish wax or polish
cleaner. The instrument panel’s or
other interior part’s painted surface
may be damaged.
■Water on the floor
Do not wash the vehicle floor with water.
Vehicle systems such as the audio system
may be damaged if water comes into
contact with electrical components such
as the audio system above or under the
floor of the vehicle. Water may also
cause the body to rust.
■When cleaning the inside of the wind-
shield
Do not allow glass cleaner to contact the
lens. Also, do not touch the lens.
( P.192)
■Cleaning the inside of the rear win-
dow
●Do not use glass cleaner to clean the
rear window, as this may cause dam-
age to the rear window defogger
heater wires or antenna. Use a cloth
dampened with lukewarm water to
gently wipe the window clean. Wipe
the window in strokes running parallel
to the heater wires or antenna.
●Be careful not to scratch or damage
the heater wires or antenna.
■Cleaning the front side windows
Do not use any compound or abrasive
product (e.g., glass cleaner, detergent,
wax) to clean the windows. It may dam-
age the coating.
Cleaning the areas with satin-fin-
ish metal accents
Cleaning the leather areas
Page 370 of 476

3706-3. Do-it-yourself maintenance
1Turn the power switch off.
2 Open the fuse box cover.
Engine compartment: type A fuse
box
Push the tab in and lift the lid off.
Engine compartment: type B fuse
box
Push the tab in and lift the lid off.
Left side instrument panel
Remove the lid.
Luggage compartment
Remove the 12-volt battery cover
( P.343) and push the tab in and lift the
lid off.
3 Remove the fuse.
Only type A fuse can be removed using the
pullout tool.
4Check if the fuse is blown.
Replace the blown fuse with a new fuse of
an appropriate amperage rating. The
amperage rating can be found on the fuse
box lid.
Checking and replacing
fuses
If any of the electrical components
do not operate, a fuse may have
blown. If this happens, check and
replace the fuses as necessary.
Checking and replacing fuses
Page 416 of 476

4168-1. Specifications
8-1.Specifications
*1:Unladen vehicle
*2: Vehicles without shark fin antenna
*3: Vehicles with shark fin antenna
■Vehicle identification number
The vehicle identification number
(VIN) is the legal identifier for your
vehicle. This is the primary identifica-
tion number for your Lexus. It is used in
registering the ownership of your vehi-
cle.
This number is stamped on the top left
of the instrument panel. This number is also on the Certification
Label.
Maintenance data (fuel, oil level, etc.)
Dimensions and weight
Overall length177.0 in. (4495 mm)
Overall width72.4 in. (1840 mm)
Overall height*159.8 in. (1520 mm)*2
60.6 in. (1540 mm)*3
Wheelbase103.9 in. (2640 mm)
TreadFront61.0 in. (1550 mm)
Rear61.0 in. (1550 mm)
Vehicle capacity weight
(Occupants + luggage)890 lb. (405 kg)
Vehicle identification