2019 LEXUS LS500 change time
[x] Cancel search: change timePage 329 of 512

3295-3. Using the air conditio ning system and defogger
LS500_OM_(U)_1810 5
Interior features ■
Rear Multi Operation Panel (if
equipped)
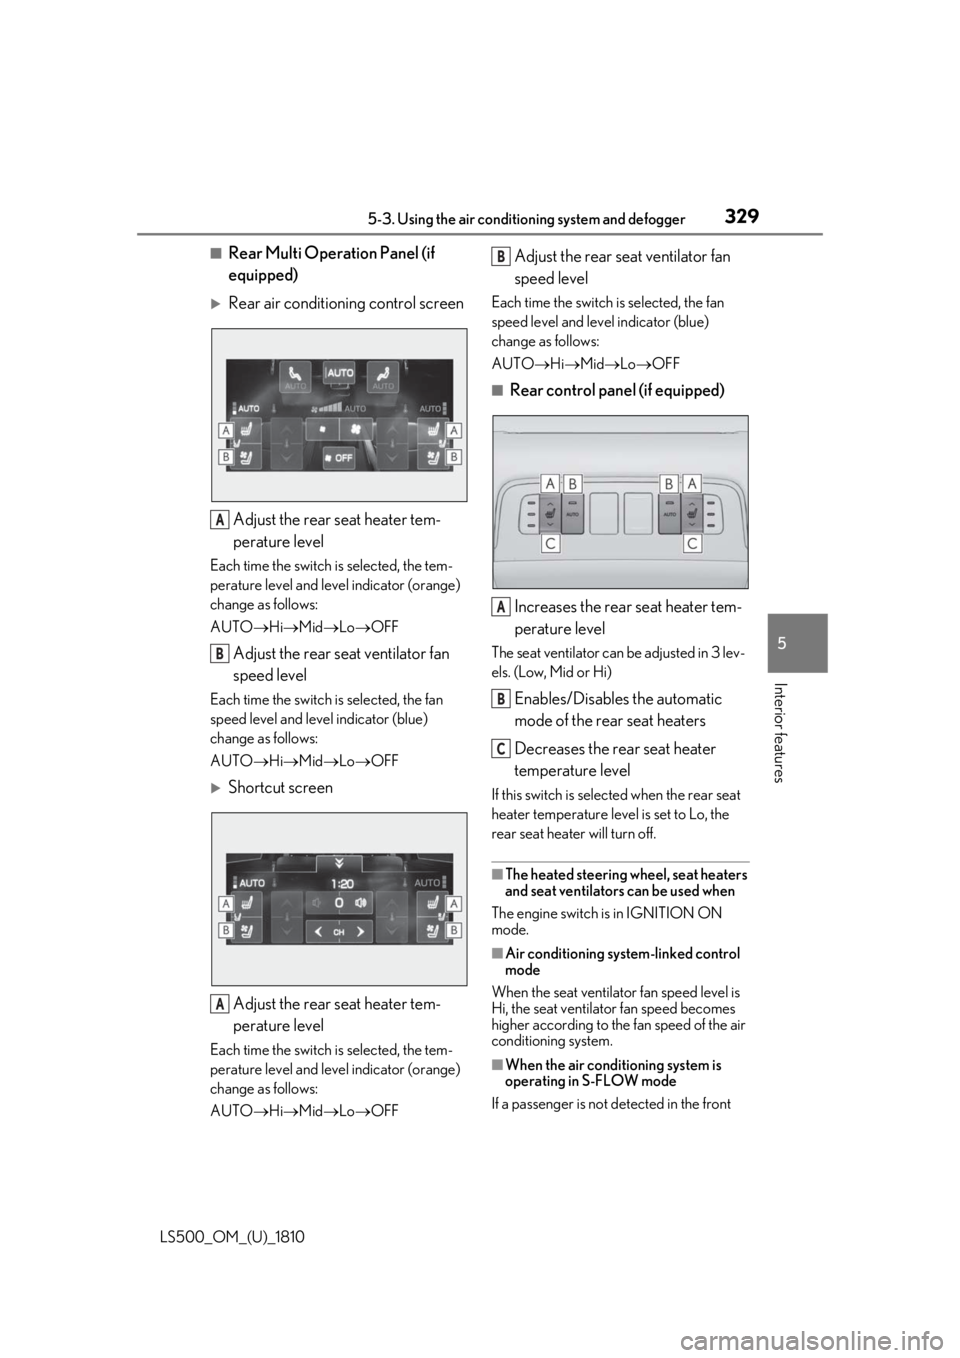
Rear air conditioning control screen
Adjust the rear seat heater tem-
perature levelEach time the switch is selected, the tem-
perature level and leve l indicator (orange)
change as follows:
AUTO Hi Mid Lo OFF
Adjust the rear seat ventilator fan
speed levelEach time the switch is selected, the fan
speed level and leve l indicator (blue)
change as follows:
AUTO Hi Mid Lo OFF
Shortcut screen
Adjust the rear seat heater tem-
perature levelEach time the switch is selected, the tem-
perature level and leve l indicator (orange)
change as follows:
AUTO Hi Mid Lo OFF Adjust the rear seat ventilator fan
speed level Each time the switch is selected, the fan
speed level and level indicator (blue)
change as follows:
AUTO Hi Mid Lo OFF■
Rear control panel (if equipped)
Increases the rear seat heater tem-
perature level The seat ventilator can be adjusted in 3 lev-
els. (Low, Mid or Hi)
Enables/Disables the automatic
mode of the rear seat heaters
Decreases the rear seat heater
temperature level If this switch is select ed when the rear seat
heater temperature level is set to Lo, the
rear seat heater will turn off.
■
The heated steering wheel, seat heaters
and seat ventilators can be used when
The engine switch is in IGNITION ON
mode.
■
Air conditioning system-linked control
mode
When the seat ventilator fan speed level is
Hi, the seat ventilato r fan speed becomes
higher according to the fan speed of the air
conditioning system.
■
When the air conditioning system is
operating in S-FLOW mode
If a passenger is not detected in the front A
B
A B
A
B
C
Page 353 of 512

3535-6. Using the other interior features
LS500_OM_(U)_1810 5
Interior features transmitter button at 2 second inter-
vals, repeatedly, until the HomeLink ®
indicator light changes from slowly
flashing (orange) to rapidly flashing
(green) (rolling code ) or continuously
lit (green) (fixed code).
4 Test the HomeLink ®
operation by
pressing the newly programmed
button and observing the indicator
light:
Indicator light illuminates: Program-
ming of a fixed code device has
completed. The garage door or
other device should operate when a
HomeLink ®
button is pressed and
released.
Indicator light flashes rapidly: The
garage door opener motor or other
device is equipped with a rolling
code. To complete programming,
firmly press and hold the Home-
Link ®
button for 2 seconds then
release it.
If the garage door or other device
does not operate, proceed to “Pro-
gramming a rolling code system”.
5 Repeat the steps above to program
another device for any of the
remaining HomeLink ®
buttons.■
Programming a rolling code sys-
tem
2 or more people may be necessary to
complete rolling code programming.
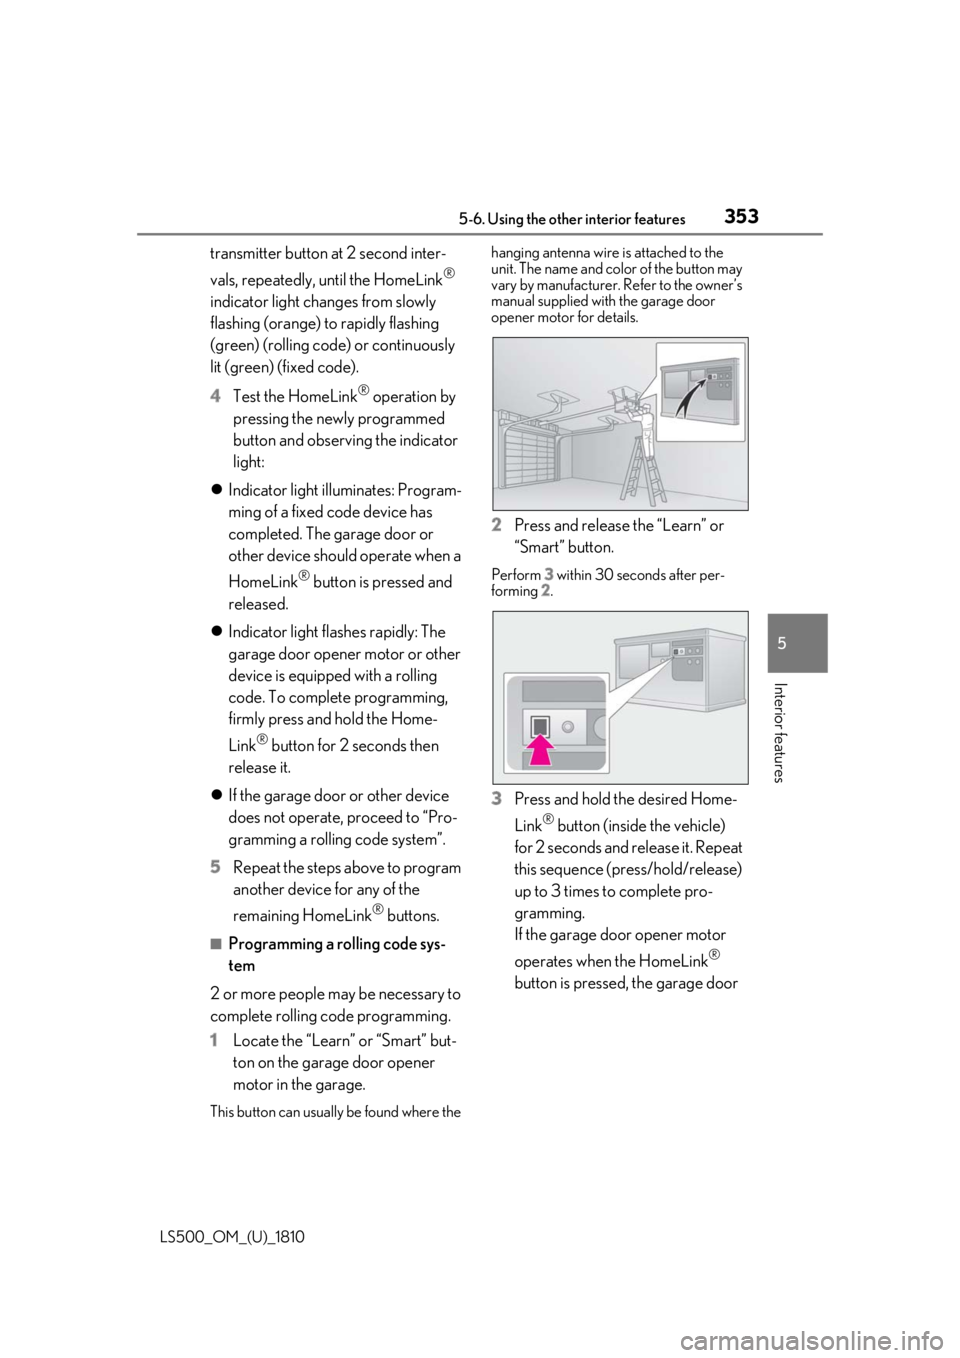
1 Locate the “Learn” or “Smart” but-
ton on the garage door opener
motor in the garage.
This button can usuall y be found where the hanging antenna wire is attached to the
unit. The name and color of the button may
vary by manufacturer. Refer to the owner’s
manual supplied with the garage door
opener motor for details.
2 Press and release the “Learn” or
“Smart” button. Perform 3 within 30 seconds after per-
forming 2 .
3 Press and hold the desired Home-
Link ®
button (inside the vehicle)
for 2 seconds and release it. Repeat
this sequence (press/hold/release)
up to 3 times to complete pro-
gramming.
If the garage door opener motor
operates when the HomeLink ®
button is pressed, the garage door
Page 385 of 512

3856-3. Do-it-yourself maintenance
LS500_OM_(U)_1810 6
Maintenance and care before serious problems arise.
The tire pressure detected by the
tire pressure warning system can be
displayed on the multi-information
display. ( P.80)
If the tire pressure drops below a
predetermined level, the driver is
warned by a screen display and a
warning light. ( P.419)
■
Routine tire inflation pressure checks
The tire pressure warning system does not
replace routine tire inflation pressure
checks. Make sure to check tire inflation
pressure as part of your routine of daily
vehicle checks.
■
Tire inflation pressure
●
It may take a few minutes to display the
tire inflation pressure after the engine
switch is turned to IGNITION ON mode.
It may also take a few minutes to display
the tire inflation pres sure after inflation
pressure has been adjusted.
●
Tire inflation pressu re changes with tem-
perature. The displayed values may also be different from the values measured
using a tire pressure gauge. ■
Situations in which the tire pressure
warning system may not operate prop-
erly ●
In the following cases, the tire pressure
warning system may not operate prop-
erly.
• If non-genuine Lexus wheels are used.
• If a tire has been replaced with a tire that
is not an OE (Original Equipment) tire.
• If a tire has been replaced with a tire that
is not of the specified size.
• If tire chains, etc. are installed.
• An auxiliary-supported run-flat tire is
equipped.
• If a window tint that affects the radio wave
signals is installed.
• If there is a lot of snow or ice on the vehi-
cle, particularly around the wheels or
wheel housings.
• If the tire inflation pressure is much higher
than the specified level.
• If wheels not equipped with tire pressure
warning valves and transmitter are used.
• If the ID code on the tire pressure warn-
ing valves and transmitters is not regis-
tered in the tire pressure warning
computer. ●
Performance may be af fected in the fol-
lowing situations.
• When driving near a TV tower, electric
power plant, gas stat ion, radio station,
large display, airport or other facility that
generates strong radi o waves or electri-
cal noise
• When carrying a portable radio, cellular
phone, cordless phone or other wireless
communication device
If tire position information is not correctly
displayed due to the radio wave conditions,
the display may be corrected by changing
the location of the vehicle as the radio wave
conditions may change.
●
When the vehicle is stopped, the time
taken for the warning to start or turn off
may be longer.
●
When the inflation pressure of a tire
drops rapidly, for example when a tire has
burst, the warning may not operate.
Page 388 of 512

388 6-3. Do-it-yourself maintenance
LS500_OM_(U)_1810 ■
The tire pressure warning system
must be initialized in the following
circumstances:
When the tire inflation pressure is
changed such as when changing
traveling speed or load weight.
When the tire inflation pressure is
changed such as when the tire size
is changed.
When rotating the tires.
After performing the transmitter ID
code registration procedure.
( P.389)
When the tire pressure warning system
is initialized, the cu rrent tire inflation
pressure is set as the benchmark pres-
sure. ■
How to initialize the tire pressure
warning system
1 Park the vehicle in a safe place, turn
the engine switch off and wait 20
minutes or more.The initialization procedure cannot be
started while the vehicle is moving.
2 Adjust the tire inflation pressure to
the specified cold tire inflation pres-
sure level.Make sure to adjust th e tire pressure to the
specified cold tire infl ation pressure level.
The tire pressure warning system will oper-
ate based on this pressure level.
3 Start the engine.
4 Press or of the meter con-
trol switch to select . 5 Press or to select “Vehicle
Settings” and then press .
6 Press or to select “TPWS”
and then press .
7 Press or to select “Set
Pressure”. Then press and hold
until the tire pressure warning light
blinks 3 times. Then a message will be displayed on the
multi-information display.
“---” will be displayed on the multi-informa-
tion display for the inflation pressure of
each tire while initialization is being per-
formed.
8 Drive straight (with occasional left
and right turns) at approximately
25 mph (40 km/h) or more for
approximately 10 to 30 minutes. Initialization is comple te when the position
of each tire is determ ined and the inflation
pressure of each tire is displayed on the
multi-information display.
Initialization may take longer than normal
to complete if the vehicle speed cannot be
maintained at approx imately 25 mph (40
km/h) or more. If initialization cannot be
completed after driving for 1 hour or more,
park the vehicle in a safe place, turn the
engine switch off and wait 20 minutes or
more before performing the driving proce-
dure again. ( P.389)Initializing the tire pressure
warning system
Page 390 of 512

390 6-3. Do-it-yourself maintenance
LS500_OM_(U)_1810 2 Press or of the meter con-
trol switch to select .
3 Press or to select “Vehicle
Settings” and then press .
4 Press or to select “TPWS”
and then press .
5 Press or to select “Change
Wheel Set”. Then press and hold
until the tire pressure warning
light blinks slowly 3 times.Then a message will be displayed on the
multi-information display.
When registration is being performed, the
tire pressure warning light will blink for
approximately 1 minute then illuminate and
“---” will be displayed for the inflation pres-
sure of each tire on the multi-information
display.
6 Drive straight (with occasional left
and right turns) at approximately
25 mph (40 km/h) or more for
approximately 10 to 30 minutes.Registration is complete when the tire
pressure warning light turns off and the
inflation pressure of each tire is displayed
on the multi-information display.
Registration may take longer than normal
to complete if the vehicle speed cannot be
maintained at approximately 25 mph (40
km/h) or more. If registration cannot be
completed after driving for 1 hour or more, perform the registrati on procedure again
from the beginning. ( P.390)
After registering the ID codes, make sure
to initialize the tire pressure warning sys-
tem. ( P.388)■
When registering ID codes ●
Before performing ID code registration,
make sure that no wheels with tire pres-
sure warning valve and transmitters
installed are near the vehicle. ●
Make sure to initializ e the tire pressure
warning system after registering the ID
codes. If the system is initialized before
registering the ID codes, the initialized
values will be invalid. ●
As the tires will be warm when registra-
tion is completed, ma ke sure to allow the
tires to cool before performing initializa-
tion. ■
Canceling ID code registration ●
To cancel ID code regi stration after it has
been started, turn the engine switch off
before driving the vehicle.
If the vehicle is driven after ID code regis-
tration is started, to cancel registration,
perform the ID code registration start
procedure again and turn the engine
switch off before driving. ●
If ID code registration has been canceled,
the tire pressure warning light will blink
for approximately 1 minute when the
engine switch is tu rned to IGNITION
ON mode and then illuminate. The tire
pressure warning system will be opera-
tional when the tire pressure warning
light turns off.
●
If the warning light does not turn off even
after several minutes have elapsed, ID
code registration may not have been can-
celled correctly. To cancel registration,
perform the ID code registration start
procedure again and then turn the engine
switch off before driving.
■
If ID codes are not registered properly
●
In the following situations, ID code regis-
tration may take longer than usual to be
completed or may not be possible. (Usu-
ally, the vehicle will need to be driven for
Page 434 of 512

434 7-2. Steps to take in an emergency
LS500_OM_(U)_1810 ■
Key linked functions
1 Closes the windows and the moon
roof *
or panoramic moon roof *
(turn and hold)
2 Opens the windows and the moon
roof *
or panoramic moon roof *
(turn and hold)These settings must be customized at your
Lexus dealer. *
:If equipped 1 Depress the brake pedal.
2 Touch the Lexus emblem side of the
electronic key to the engine switch. When the electronic key is detected, a
buzzer sounds and the engine switch will
turn to IGNITION ON mode.
When the smart access system with
push-button start is deactivated in custom-
ization setting, the engine switch will turn
to ACCESSORY mode.
3 Firmly depress the brake pedal and
check that is shown on the
multi-information display.
4 Press the engine switch.
In the event that the engine still cannot
be started, contact your Lexus dealer. ■
Stopping the engine
Set the parking brake, shift the shift position
to P and press the engine switch as you nor-
mally do when stop ping the engine.
■
Electronic key battery
As the above procedure is a temporary
measure, it is recommended that the elec-
tronic key battery be replaced immediately
when the battery is depleted. ( P.399)
■
Changing engine switch modes
Release the brake pe dal and press the
engine switch in step 3 above. The engine
does not start and modes will be changed
each time the switch is pressed. ( P.166)WARNING
■
When using the mechanical key and
operating the power windows or the
moon roof or panoramic moon roof
Operate the power window or the moon
roof or panoramic moon roof after
checking to make sure that there is no
possibility of any passe nger having any of
their body parts caught in the window or
the moon roof or panoramic moon roof.
Also, do not allow ch ildren to operate the
mechanical key. It is possible for children
and other passengers to get caught in
the power window or the moon roof or
panoramic moon roof. Starting the engine
Page 481 of 512

4818-3. Initialization
LS500_OM_(U)_1810 8
Vehicle specifications 8-3.Initialization
*
:If equippedItems to initialize The following items must be initialized for normal system operation after such
cases as the battery being reconnected, or maintenance being performed on
the vehicle:
List of items to initialize Item When to initialize Reference
PKSB (Parking Support
Brake) *
• After reconnecting or changing the
battery P.274
Message indicating
maintenance is
required • After maintenance is performed P.364
Oil maintenance • After maintenance is performed P.377
Tire pressure warning
system • When the tire inflation pressure is
changed, such as when changing trav-
eling speed or load weight.
• When the tire inflation pressure is
changed, such as when the tire size is
changed.
• When rotating the tires.
• After performing the transmitter ID
code registration procedure. P.388
Lexus parking assist
monitor *
• Battery has been reinstalled.
• The steering wheel has been moved
while the battery was being reinstalled.
• Battery power is low. Refer to the “NAVI-
GATION AND MUL-
TIMEDIA SYSTEM
OWNER’S MAN-
UAL”.
Panoramic view moni-
tor *
• Battery has been reinstalled.
• The steering wheel has been moved
while the battery was being reinstalled.
• Battery power is low. Refer to the “NAVI-
GATION AND MUL-
TIMEDIA SYSTEM
OWNER’S MAN-
UAL”.
Page 499 of 512

4991-1. What to do if... (Troubleshooting)
LS500_OM_(U)_1810 499Alphabetical Index
Display
Center Display............................................306
Dynamic radar cruise control with
full-speed range ...................................... 237
Head-up display ........................................... 87
Intuitive parking assist.............................. 257
LTA (Lane Tracing Assist)...................... 231
Multi-information display ..........................80
Parking Support Brake function (rear
pedestrians) ..............................................286
RCD (Rear Camera Detection) ........ 267
RCTA .............................................................. 263
Warning message..................................... 425
Distance until next engine oil
change ......................................................74, 79
Do-it-yourself maintenance .................... 365
Door courtesy lights .....................................331
Door lock
Doors................................................................ 100
Smart access system with push-button
start ..................................................................... 111
Wireless remote control........................... 98
Doors
Automatic door lock ing and unlocking
system ........................................................... 104
Door closer ................................................... 103
Door glasses .................................................. 142
Door lock........................................................ 100
Open door warning bu zzer ........ 101, 103
Outside rear view mirrors ..................... 140
Rear door child-protectors ................... 103
Drive distance .................................................. 82
Drive info 1/Drive info 2 .............................. 82
Driver’s seat position memory
Driving position memory........................ 130
Memory recall function ............................133
Power easy access system .................... 130
Drive-start control ....................................... 155
Driving
Break-in tips .................................................. 155
Correct driving posture .............................23
Driving mode select switch ..................289 Procedures .................................................... 154
Winter drive tips ........................................ 300
Driving information disp lay ........................ 82
Driving position memory........................... 130
Memory recall function............................ 133
Power easy access system .................... 130
Driving range ................................................... 82
Driving support system information display
............................................................................. 85
DRS (Dynamic Rear Steering) .............. 295
Dynamic radar cruise control with
full-speed range ............................. 237, 247
Warning message .....................................245
Dynamic Rear Steering (DRS) .............. 295
E
ECB (Electronically Controlled Brake Sys-
tem) ................................................................ 294
Eco Driving Indicator............................. 83, 91
Eco Driving Indicator Light ........................ 83
EDR (Event data recorder) ............................7
Elapsed time ..................................................... 82
Electric Power Steering (EPS) .............. 295
Warning light ................................................ 418
Electronic key .................................................. 96
Battery-saving function.............................. 112
If the electronic key does not operate
properly .......................................................433
Replacing the battery .............................. 399
Electronic roof sunshade
Jam protection function ........................... 149
Operation ........................................................147
Electronically Controlled Brake System
(ECB) ............................................................ 294
Electronically modulated air suspension
............................................................................291
Emergency flashers .................................... 406
Emergency, in case of
If a warning buzzer sounds.................... 415
If a warning light turns on........................ 415
If a warning message is displayed .....425
If the battery is discharged ....................435