2019 Lexus ES300h automatic mirrors
[x] Cancel search: automatic mirrorsPage 110 of 456
1103-3. Adjusting the seats
*:If equipped
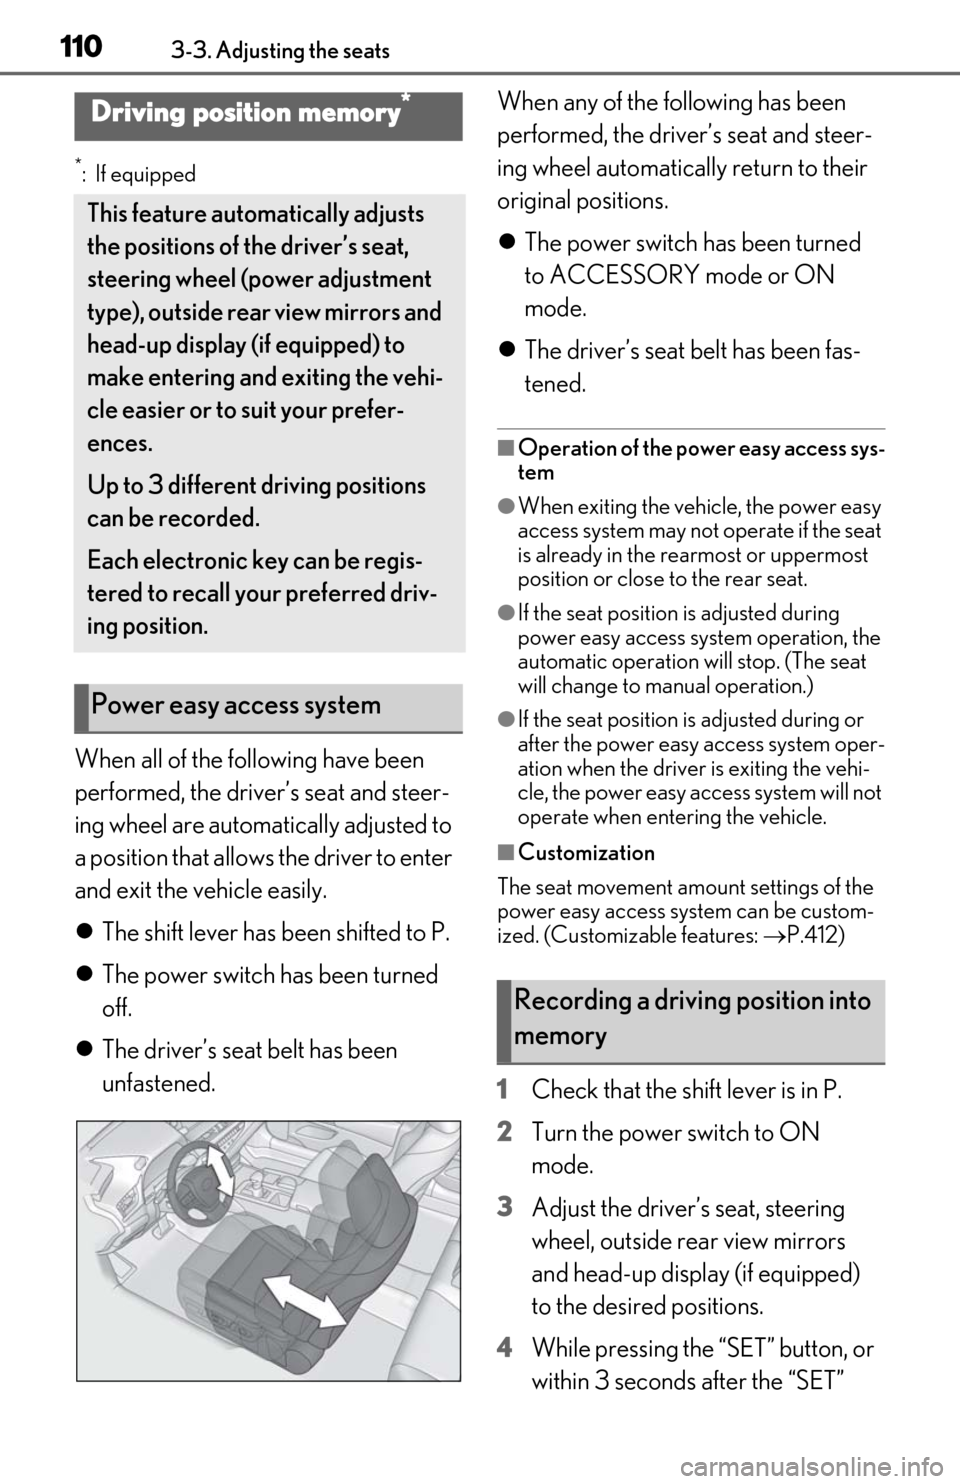
When all of the following have been
performed, the driver’s seat and steer-
ing wheel are automatically adjusted to
a position that allows the driver to enter
and exit the vehicle easily.
The shift lever has been shifted to P.
The power switch has been turned
off.
The driver’s seat belt has been
unfastened. When any of the following has been
performed, the driver’s seat and steer-
ing wheel automatically return to their
original positions.
The power switch has been turned
to ACCESSORY mode or ON
mode.
The driver’s seat belt has been fas-
tened.
■Operation of the power easy access sys-
tem
●When exiting the vehicle, the power easy
access system may not operate if the seat
is already in the rearmost or uppermost
position or close to the rear seat.
●If the seat position is adjusted during
power easy access syst em operation, the
automatic operation will stop. (The seat
will change to manual operation.)
●If the seat position is adjusted during or
after the power easy access system oper-
ation when the driver is exiting the vehi-
cle, the power easy access system will not
operate when entering the vehicle.
■Customization
The seat movement amou nt settings of the
power easy access system can be custom-
ized. (Customizable features: P.412)
1 Check that the shift lever is in P.
2 Turn the power switch to ON
mode.
3 Adjust the driver’s seat, steering
wheel, outside rear view mirrors
and head-up display (if equipped)
to the desired positions.
4 While pressing the “SET” button, or
within 3 seconds after the “SET”
Driving position memory*
This feature auto matically adjusts
the positions of the driver’s seat,
steering wheel (power adjustment
type), outside rear view mirrors and
head-up display (if equipped) to
make entering and exiting the vehi-
cle easier or to suit your prefer-
ences.
Up to 3 different driving positions
can be recorded.
Each electronic key can be regis-
tered to recall your preferred driv-
ing position.
Power easy access system
Recording a driving position into
memory
Page 115 of 456
1153-4. Adjusting the steering wheel and mirrors
3
Before driving
3-4.Adjusting the steering wheel and mirrors
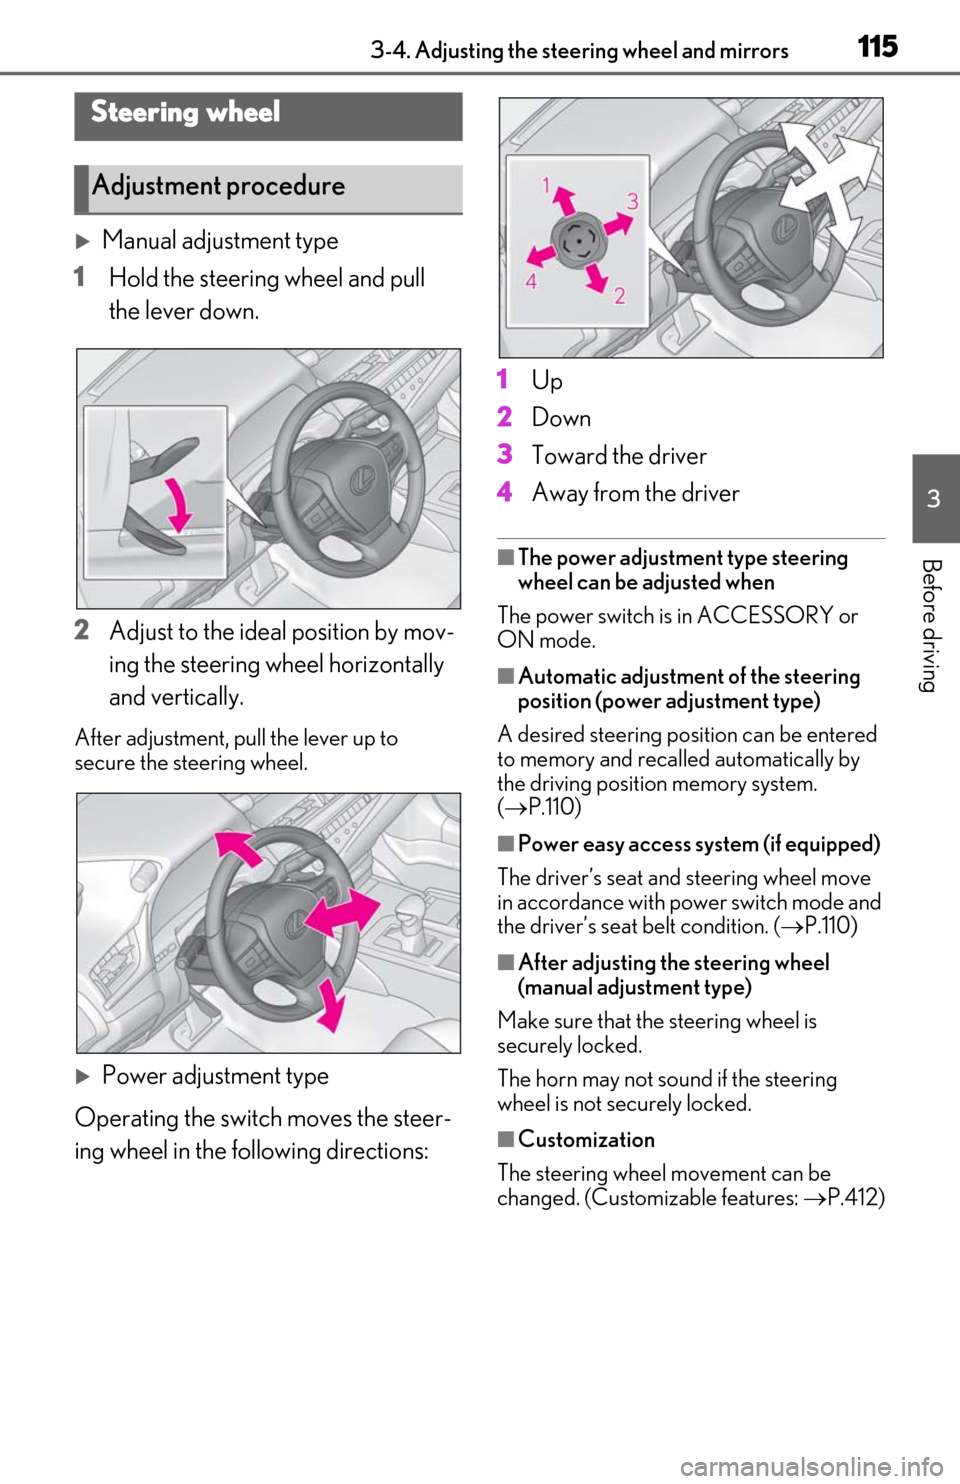
Manual adjustment type
1 Hold the steering wheel and pull
the lever down.
2 Adjust to the ideal position by mov-
ing the steering wheel horizontally
and vertically.
After adjustment, pull the lever up to
secure the steering wheel.
Power adjustment type
Operating the switch moves the steer-
ing wheel in the following directions: 1
Up
2 Down
3 Toward the driver
4 Away from the driver
■The power adjustment type steering
wheel can be adjusted when
The power switch is in ACCESSORY or
ON mode.
■Automatic adjustment of the steering
position (power adjustment type)
A desired steering posi tion can be entered
to memory and recalled automatically by
the driving position memory system.
( P.110)
■Power easy access system (if equipped)
The driver’s seat and steering wheel move
in accordance with power switch mode and
the driver’s seat belt condition. ( P.110)
■After adjusting the steering wheel
(manual adjustment type)
Make sure that the steering wheel is
securely locked.
The horn may not sound if the steering
wheel is not securely locked.
■Customization
The steering wheel movement can be
changed. (Customizable features: P.412)
Steering wheel
Adjustment procedure
Page 116 of 456
1163-4. Adjusting the steering wheel and mirrors
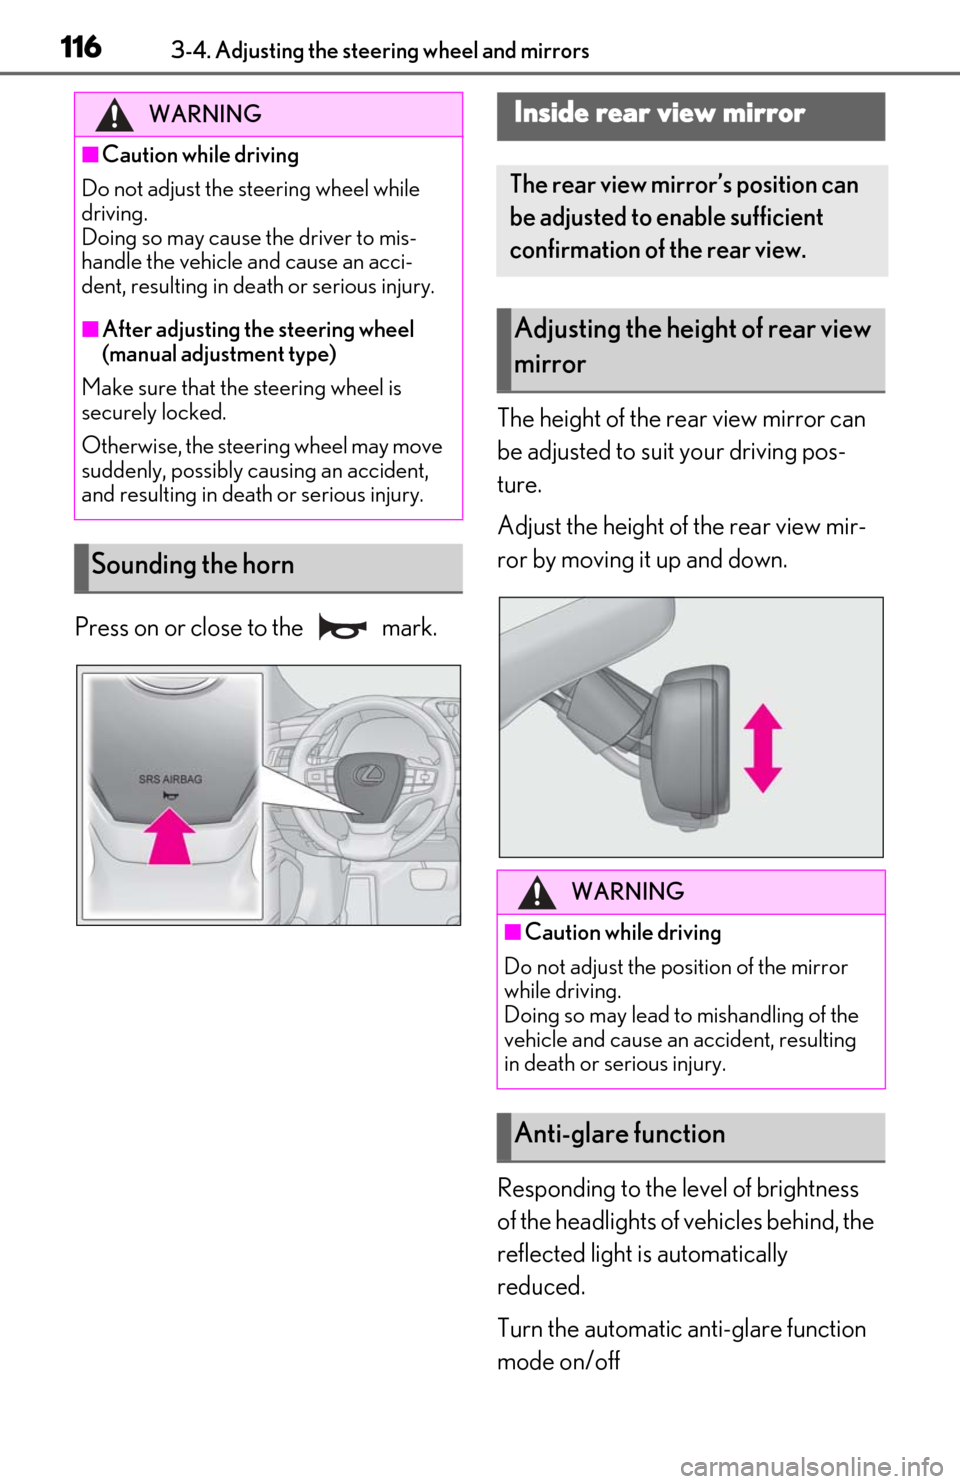
Press on or close to the mark.The height of the rear view mirror can
be adjusted to suit your driving pos-
ture.
Adjust the height of the rear view mir-
ror by moving it up and down.
Responding to the level of brightness
of the headlights of vehicles behind, the
reflected light is automatically
reduced.
Turn the automatic anti-glare function
mode on/off
WARNING
■Caution while driving
Do not adjust the steering wheel while
driving.
Doing so may cause the driver to mis-
handle the vehicle and cause an acci-
dent, resulting in death or serious injury.
■After adjusting the steering wheel
(manual adjustment type)
Make sure that the steering wheel is
securely locked.
Otherwise, the steering wheel may move
suddenly, possibly causing an accident,
and resulting in death or serious injury.
Sounding the horn
Inside rear view mirror
The rear view mirror’s position can
be adjusted to enable sufficient
confirmation of the rear view.
Adjusting the heig ht of rear view
mirror
WARNING
■Caution while driving
Do not adjust the position of the mirror
while driving.
Doing so may lead to mishandling of the
vehicle and cause an accident, resulting
in death or serious injury.
Anti-glare function
Page 117 of 456

1173-4. Adjusting the steering wheel and mirrors
3
Before driving
When the automatic anti-glare function is
in ON mode, the indicator illuminates.
The function will set to ON mode each
time the power switch is turned to ON
mode.
Pressing the button turns the function to
OFF mode. (The indicator also turns
off.)
■To prevent sensor error
To ensure that the sensors operate properly,
do not touch or cover them.
1To select a mirror to adjust, press
the switch.
Left
Right
A
A
Outside rear view mirrors
The rear view mirror’s position can
be adjusted to enable sufficient
confirmation of the rear view.
WARNING
■Important points while driving
Observe the following precautions while
driving.
Failure to do so may result in loss of con-
trol of the vehicle and cause an accident,
resulting in death or serious injury.
●Do not adjust the mirrors while driving.
●Do not drive with the mirrors folded.
●Both the driver and passenger side
mirrors must be extended and prop-
erly adjusted before driving.
Adjustment procedure
A
B
Page 118 of 456
1183-4. Adjusting the steering wheel and mirrors
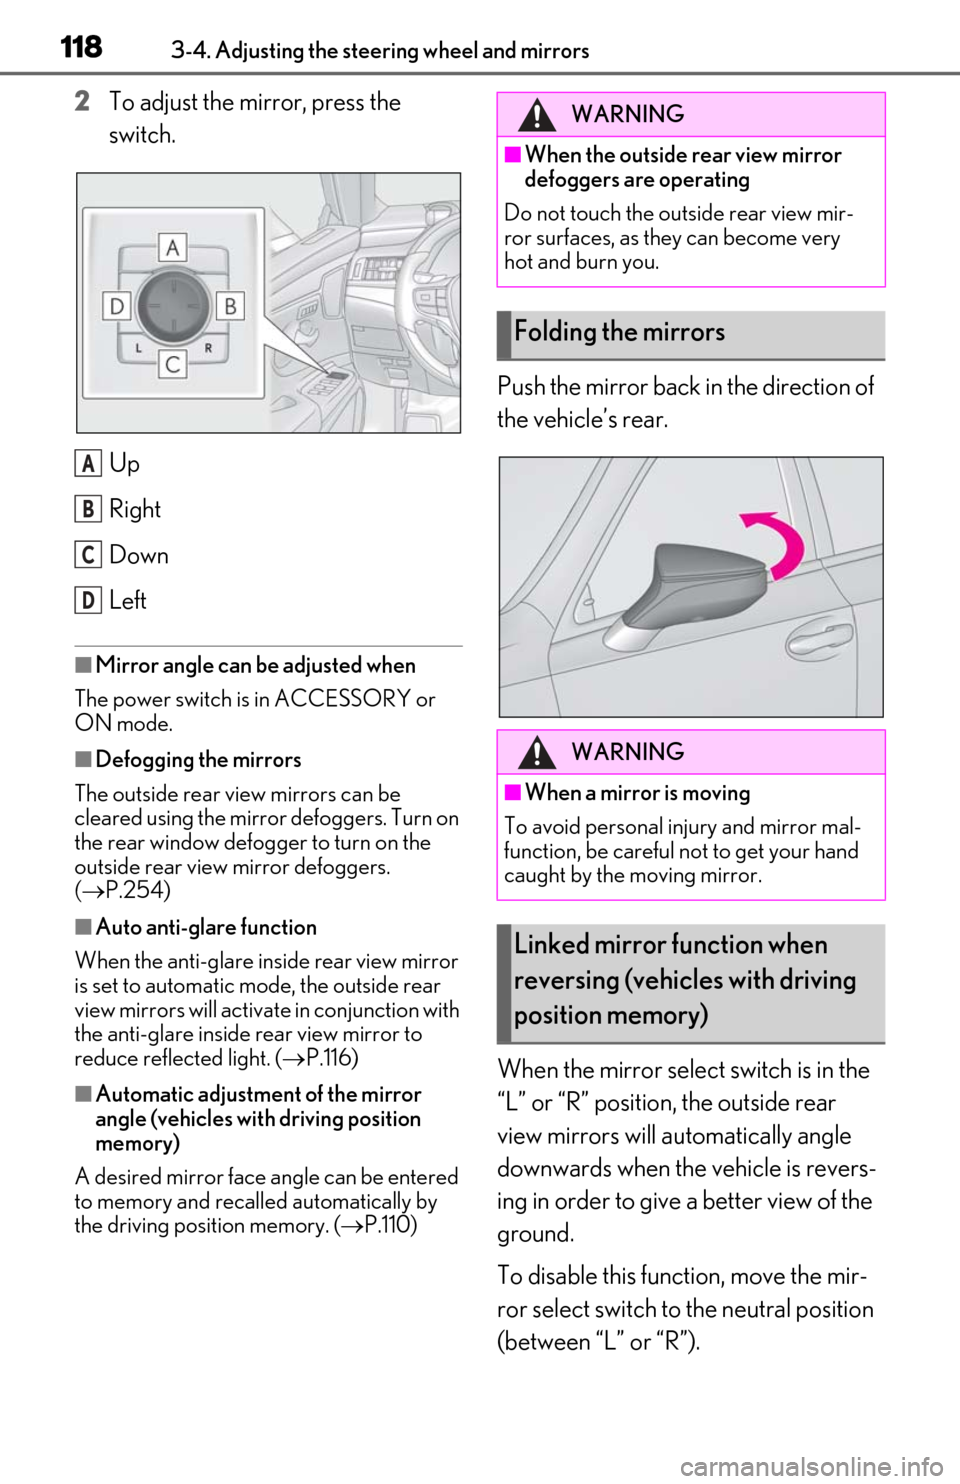
2To adjust the mirror, press the
switch.
Up
Right
Down
Left
■Mirror angle can be adjusted when
The power switch is in ACCESSORY or
ON mode.
■Defogging the mirrors
The outside rear view mirrors can be
cleared using the mirror defoggers. Turn on
the rear window defogger to turn on the
outside rear view mirror defoggers.
( P.254)
■Auto anti-glare function
When the anti-glare insi de rear view mirror
is set to automatic mode, the outside rear
view mirrors will activate in conjunction with
the anti-glare inside rear view mirror to
reduce reflected light. ( P.116)
■Automatic adjustment of the mirror
angle (vehicles with driving position
memory)
A desired mirror face angle can be entered
to memory and recalled automatically by
the driving position memory. ( P.110)
Push the mirror back in the direction of
the vehicle’s rear.
When the mirror select switch is in the
“L” or “R” position, the outside rear
view mirrors will automatically angle
downwards when the vehicle is revers-
ing in order to give a better view of the
ground.
To disable this function, move the mir-
ror select switch to the neutral position
(between “L” or “R”).
A
B
C
D
WARNING
■When the outside rear view mirror
defoggers are operating
Do not touch the outside rear view mir-
ror surfaces, as they can become very
hot and burn you.
Folding the mirrors
WARNING
■When a mirror is moving
To avoid personal injury and mirror mal-
function, be careful not to get your hand
caught by the moving mirror.
Linked mirror function when
reversing (vehicles with driving
position memory)
Page 119 of 456

1193-4. Adjusting the steering wheel and mirrors
3
Before driving
■Adjusting the mirror angle when
the vehicle is reversing
With the shift lever in R, adjust the mir-
ror angle at a desired position. The
adjusted angle will be memorized and
the mirror will automatically tilt to the
memorized angle whenever the shift
lever is shifted to R from next time.
The memorized downward tilt position of
the mirror is linked to the normal position
(angle adjusted with th e shift lever in other
than R). Therefore, if the normal position is
changed after adjustment, the tilt position
will also change.
When the normal position is changed,
readjust the angle in reversing.
Page 254 of 456
2545-3. Using the air conditioning system
to increase the fan speed and the fan
speed decrease switch to decrease the
fan speed.
Press the off switch to turn the fan off.
■Changing the air flow mode
Press the airflow mode control switch.
The mode changes as follows each
time the switch is pressed. ( P.255)
■Switching between outside air and
recirculated air modes
Press the outside/recirculated air
mode switch.
The mode changes as follows each
time the switch is pressed. (recirculated air mode)
automatic mode
* (outside
air mode) (recirculated air
mode)
When the system is switched to automatic
mode, the air conditioning system operates
automatically.
*: This item cannot be selected when the air conditioning is off.
■Defogging the windshield
Defoggers are used to defog the wind-
shield and front side windows.
Press the windshield defogger switch.
Set the outside/reci rculated air mode
switch to outside air mode if the recircu-
lated air mode is used. (It may switch auto-
matically.)
To defog the windshield and the side win-
dows early, turn the air flow and tempera-
ture up.
To return to the previous mode, press the
windshield defogger switch again when the
windshield is defogged.
■Defogging the rear window and
outside rear view mirrors
Defoggers are used to defog the rear
window, and to remove raindrops, dew
and frost from the outside rear view
mirrors.
Press the rear window and outside rear
view mirror defoggers switch.
The defoggers will automatically turn off
after 15 minutes.
■When the outside temperature exceeds
75°F (24°C) and the air conditioning
system is on
●In order to reduce the air conditioning
power consumption, the air conditioning
system may switch to recirculated air
mode automatically. This may also
reduce fuel consumption.
●Recirculated air mode is selected as a
default mode when the power switch is
turned to ON mode.
●It is possible to switch to outside air mode
at any time by pressing the outside/recir-
culated air mode switch.
■Fogging up of the windows
The windows will easily fog up when the
humidity in the vehicle is high. Turning “A/C”
on will dehumidify the air from the outlets
and defog the windshield effectively.
●If you turn “A/C” off, the windows may fog
up more easily.
●The windows may fog up if the recircu-
lated air mode is used.
■Outside/recirculated air mode
●When driving on dusty roads such as tun-
nels or in heavy traffic, set the out-
side/recirculated air mode switch to the
recirculated air mode. This is effective in
preventing outside air from entering the
vehicle interior. During cooling opera-
tion, setting the recirc ulated air mode will
also cool the vehicle interior effectively.
●Outside/recirculated air mode may auto-
matically switch regardless of the air con-
Page 272 of 456

2725-6. Using the other interior features
5-6.Using the other interior features
1To set the visor in the forward posi-
tion, flip it down.
2
To set the visor in the side position,
flip down, unhook, and swing it to
the side.
3
To use the side extender, place the
visor in the side position, then slide
it backward.
Slide the cover to open.
The light turns on when the cover is
opened.
The GPS clock’s time is automatically
adjusted by utilizing GPS time infor-
mation.
For details, refer to the “NAVIGATION
AND MULTIMEDIA SYSTEM OWNER’S
MANUAL”.
Please use as a power supply for elec-
tronic goods that use less than 12
VDC/10 A (power consumption of
120 W).
Front
Open the lid.
Rear
Open the lid.
Other interior features
Sun visors
Vanity mirrors
NOTICE
■To prevent 12-volt battery discharge
Do not leave the lights on longer than
necessary when the hy brid system is off.
Clock
Power outlets