2019 Lexus ES300h tire pressure reset
[x] Cancel search: tire pressure resetPage 74 of 456

742-1. Instrument cluster
■Liquid crystal display
Small spots or light spots may appear on the
display. This phenomenon is characteristic
of liquid crystal displays, and there is no
problem continuing to use the display.
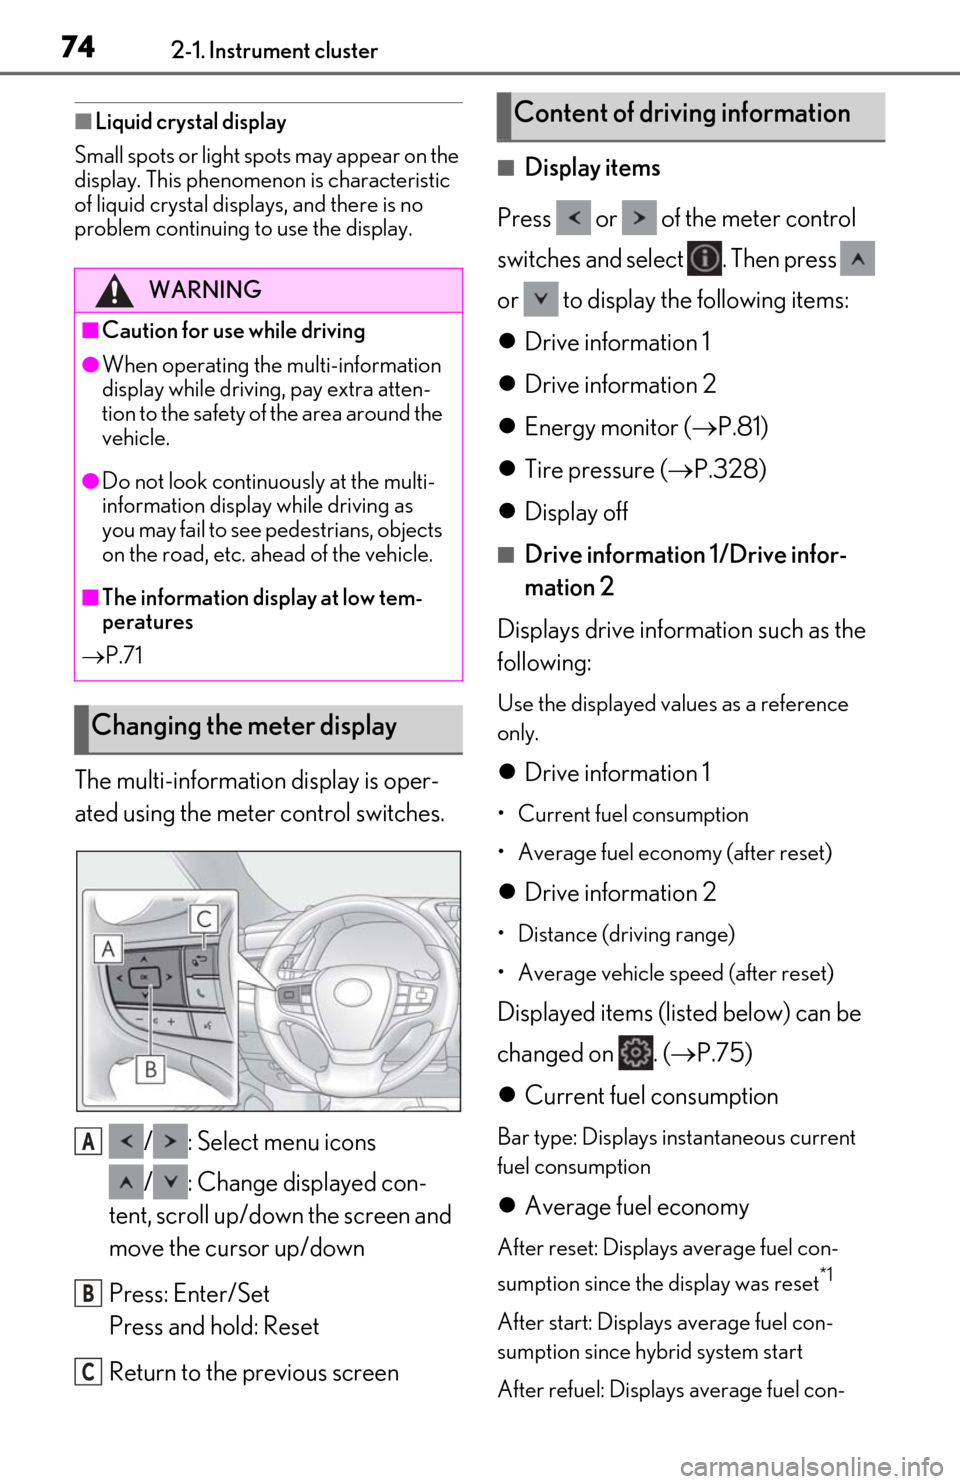
The multi-information display is oper-
ated using the meter control switches.
/ : Select menu icons
/ : Change displayed con-
tent, scroll up/down the screen and
move the cursor up/down
Press: Enter/Set
Press and hold: Reset
Return to the previous screen
■Display items
Press or of the meter control
switches and select . Then press
or to display the following items:
Drive information 1
Drive information 2
Energy monitor ( P.81)
Tire pressure ( P.328)
Display off
■Drive information 1/Drive infor-
mation 2
Displays drive information such as the
following:
Use the displayed values as a reference
only.
Drive information 1
• Current fuel consumption
• Average fuel economy (after reset)
Drive information 2
• Distance (driving range)
• Average vehicle speed (after reset)
Displayed items (listed below) can be
changed on . ( P.75)
Current fuel consumption
Bar type: Displays instantaneous current
fuel consumption
Average fuel economy
After reset: Displays average fuel con-
sumption since the display was reset
*1
After start: Displays average fuel con-
sumption since hybrid system start
After refuel: Displays average fuel con-
WARNING
■Caution for use while driving
●When operating the multi-information
display while driving, pay extra atten-
tion to the safety of the area around the
vehicle.
●Do not look continuously at the multi-
information display while driving as
you may fail to see pedestrians, objects
on the road, etc. ahead of the vehicle.
■The information display at low tem-
peratures
P.71
Changing the meter display
A
B
C
Content of driving information
Page 332 of 456

3326-3. Do-it-yourself maintenance
a vehicle speed of approximately 25 mph
(40 km/h) or more.
●Make sure to carry out initialization after
adjusting the tire inflation pressure.
Also, make sure the tires are cold before
carrying out initialization or tire inflation
pressure adjustment.
●The tire pressure warning system can be
initialized by yourse lf, but depending on
the driving conditions and driving envi-
ronment, initialization may take some
time to complete.
■The initialization operation
●If you have accidenta lly turned the power
switch off during initialization, it is not
necessary to manually restart the initial-
ization again, as initialization will restart
automatically the next time the power
switch is turned to ON mode.
●If you accidentally perform initialization
when initialization is not necessary, adjust
the tire inflation pres sure to the specified
level when the tires are cold, and conduct
initialization again.
●While the position of each tire is being
determined and the inflation pressures
are not being displayed on the multi-
information display, if the inflation pres-
sure of a tire drops, the tire pressure
warning light will come on.
■If the tire pressure warning system is not
initialized properly
●In the following situations, initialization
may take longer than usual to be com-
pleted or may not be possible. Normally,
initialization completes within approxi-
mately 30 minutes.
• Vehicle is not driven at approximately 25 mph (40 km/h) or more
• Vehicle is driven on unpaved roads
• Vehicle is driven near other vehicles and system cannot recognize tire pressure
warning valve and tran smitters of your
vehicle over those of other vehicles
If initialization does not complete after driv-
ing for 1 hour or more, park the vehicle in a
safe place for approximately 20 minutes
and then drive the vehicle again.
●If the vehicle is reversed during initializa-
tion, the data up to that point is reset, so perform the initiali
zation procedure
again from the beginning.
●In the following situations, initialization
will not be started or was not completed
properly and the system will not operate
properly. Perform the initialization proce-
dure again.
• If, when attempting to start initialization,
the tire pressure warning light does not
blink 3 times.
• If, when the vehicle has been driven for about 20 minutes after performing ini-
tialization, the tire pressure warning light
blinks for approximately 1 minute and
then illuminates.
If initialization canno t be completed after
performing the above procedure, contact
your Lexus dealer.
Every tire pressure warning valve and
transmitter has a unique ID code.
When replacing a tire pressure warn-
ing valve and transmitter, it is necessary
to register the ID code.
When registering the ID codes, per-
form the following procedure.
1
Park the vehicle in a safe place, wait
for approximately 20 minutes, and
then start the hybrid system.
( P.135)
WARNING
■When initializing the tire pressure
warning system
Do not initialize tire inflation pressure
without first adjusting the tire inflation
pressure to the specified level. Other-
wise, the tire pressure warning light may
not come on even if the tire inflation pres-
sure is low, or it may come on when the
tire inflation pressure is actually normal.
Registering ID codes
Page 334 of 456

3346-3. Do-it-yourself maintenance
tration may take longer than usual to be
completed or may not be possible. Nor-
mally, registration completes within
approximately 30 minutes.
• Vehicle is not parked for approximately 20 minutes or more before driving
• Vehicle is not driven at approximately 25
mph (40 km/h) or more
• Vehicle is driven on unpaved roads
• Vehicle is driven near other vehicles and
system cannot recognize tire pressure
warning valve and tran smitters of your
vehicle over those of other vehicles
• Wheel with tire pressure warning valve and transmitter installed is inside or near
the vehicle
If registration does not complete after driv-
ing for 1 hour or more, perform the ID code
registration procedure again from the
beginning.
●If the vehicle is reve rsed during registra-
tion, the data up to that point is reset, so
perform the registrati on procedure again
from the beginning.
●In the following situations, ID code regis-
tration will not be started or was not com-
pleted properly and the system will not
operate properly. Perform the ID code
registration procedure again.
• If, when attempting to start ID code regis- tration, the tire pressure warning light
does not blink slowly 3 times.
• If, when the vehicle has been driven for about 20 minutes after performing ID
code registration, the tire pressure warn-
ing light blinks for approximately 1 minute
and then illuminates.
●If ID code registration cannot be com-
pleted after performing the above proce-
dure, contact your Lexus dealer.
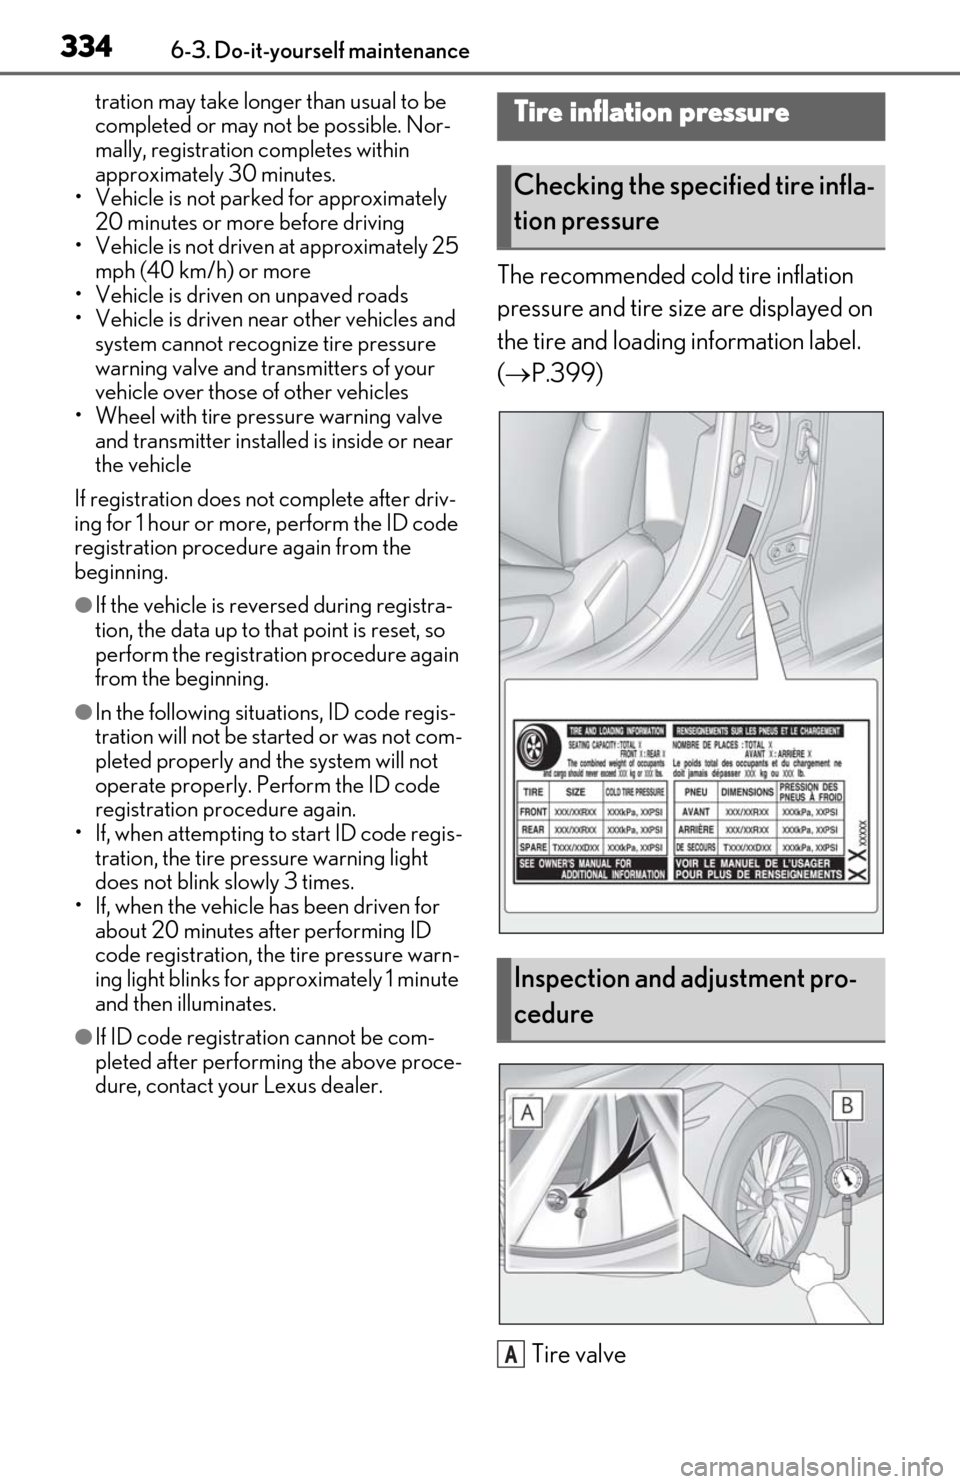
The recommended cold tire inflation
pressure and tire size are displayed on
the tire and loading information label.
( P.399)
Tire valve
Tire inflation pressure
Checking the specified tire infla-
tion pressure
Inspection and adjustment pro-
cedure
A
Page 378 of 456

3787-2. Steps to take in an emergency
76 ft•lbf (103 N•m, 10.5 kgf•m)
5Stow the flat tire, tire jack and all
tools.
■The compact spare tire
●The compact spare tire is identified by the
label “TEMPORARY USE ONLY” on
the tire sidewall.
Use the compact spare tire temporarily,
and only in an emergency.
●Make sure to check the tire inflation pres-
sure of the compact spare tire. (P.399)
■After completing the tire change
The tire pressure warning system must be
reset. ( P.330)
■When using the compact spare tire
As the compact spare tire is not equipped
with a tire pressure warning valve and trans-
mitter, low inflation pressure of the spare
tire will not be indicated by the tire pressure
warning system. Also, if you replace the
compact spare tire after the tire pressure
warning light comes on, the light remains
on.
■When the compact spare tire is
equipped
The vehicle becomes lower when driving
with the compact spar e tire compared to
when driving with standard tires.
■If you have a flat front tire on a road cov-
ered with snow or ice
Install the compact spare tire on one of the
rear wheels of the vehicle. Perform the fol-
lowing steps and fit tire chains to the front
tires: 1
Replace a rear tire with the compact
spare tire.
2
Replace the flat front tire with the tire
removed from the rear of the vehicle.
3
Fit tire chains to the front tires.
WARNING
■When using the compact spare tire
●Remember that the compact spare tire
provided is specific ally designed for
use with your vehicle. Do not use your
compact spare tire on another vehicle.
●Do not use more than one compact
spare tire simultaneously.
●Replace the compact spare tire with a
standard tire as soon as possible.
●Avoid sudden acceleration, abrupt
steering, sudden braking and shifting
operations that cause sudden engine
braking.
■When the compact spare tire is
attached
The vehicle speed may not be correctly
detected, and the following systems may
not operate correctly:
• ABS & Brake assist
• VSC
• TRAC
• Dynamic radar cruise control with full- speed range
• PCS (Pre-Collision System)
• EPS
• LTA (Lane Tracing Assist)
• Panoramic view monitor (if equipped)
• Lexus parking assist monitor (if equipped)
• Intuitive parking assist (if equipped)
• Navigation system (if equipped)
• BSM (Blind spot monitor) (if equipped)
• Automatic high Beam
Page 450 of 456

450Alphabetical index
Snow tires ....................................................... 242
Spare tireStorage location ......................................... 373
Spark plug ...................................................... 397
Specifications ................................................ 394
Speedometer ................................................... 70
Sport mode .................................................... 202
Steering lock Column lock release..................................135
Steering lock system warning message...........................................................................135
Steering wheel ................................................. 115 Adjustment....................................................... 115
Heated steering wheel.............................. 261
Meter control switches ...............................74
Power easy access system ...................... 110
Steering wheel position memory ......... 110
Stop lights Replacing light bulbs................................ 344
Storage feature ............................................ 268
Stuck If the vehicle becomes stuck................ 392
Suggestion function........................................76
Sunshade Roof .................................................................... 123
Sun visors .........................................................272
Switches “ODO TRIP” switch .....................................72
“SOS” button ............................................... 292
Automatic High Beam system..............153
Brake Hold switch ..................................... 148
BSM (Blind spot monitor) switch........ 197
Door lock switches ...................................... 93
Driving Mode Select switch ................. 202
Driving position memory switches ...... 110
Dynamic radar cruise control with full-speed range switch ................................ 188
Emergency flashers switch .................. 350
EV drive mode switch ..............................139
Garage door opener switches .......... 284
Heated steering wheel switch...............261
HUD (Head-up display) switch............ 78 Ignition switch ............................................... 135
Instrument panel light control switches
............................................................................. 72
Intuitive parking assist switch .............. 206
Light switches ............................................... 150
LTA (Lane-Tracing Assist) switch ....... 181
Meter control switches .............................. 74
Moon roof switches.................................... 122
Outside rear view mirr or switches ...... 117
Paddle shift switches ....................... 143, 144
Parking brake switch................................. 146
PCS OFF switch ........................................... 171
PKSB (Parking Support Brake) switch ............................................................................219
Power door lock switch ............................ 93
Power switch................................................. 135
Power window switches ......................... 120
RCD (Rear Camera Detection) switch ........................................................................... 215
RCTA switch ................................................... 211
Rear sunshades switch............................. 281
Rear window and outside rear view mir- ror defoggers switch ............................253
Seat heater switches...................................261
Seat ventilator switches ............................261
Tilt and telescopic steering control switch ............................................................................. 115
Tire pressure warning reset switch.... 331
Trunk closer switch ......................................98
Trunk opener main switch........................ 101
Trunk opener switch ................................... 97
Vehicle-to-vehicle distance switch.... 188
VSC OFF switch ....................................... 237
Window lock switch.................................... 121
Windshield wiper and washer switch155
Windshield wiper de-icer switch....... 257
T
Tachometer....................................................... 70
Tail lights........................................................... 150 Light switch .................................................... 150
Replacing light bulbs ................................344