Page 33 of 56
 Climate Control button")
*IF EQUIPPED ALWAYS CHECK THE OWNER’S MANUAL FOR COMPLE TE OPER ATING INFORMATION AND SAFE T Y WARNINGS.
AUTOSYNCOFFCLIMATE
A/C
REAR
FRONT
A
B
GHIJ
CDEF
K
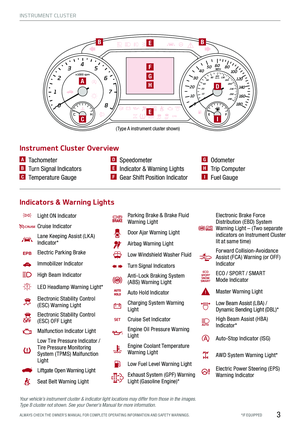
A AUTO (Automatic) Climate Control button
B Front Windshield Defrost button
C Rear Window Defrost button
D Air Conditioning button
E Recirculated Air button
F Fresh Air button
G System OFF button
H Fan Speed Control buttons
I Mode Select button
J Climate Control System button
K SYNC (Synchronize All Zones) Temperature
Control button
Automatic Climate Control System
Climate Control Auto Function
Press AUTO A to select full auto operation. In
AUTO mode the driver and front passenger have
full control of their own temperature zones. The
mode, fan speed, air intake and air conditioning
will activate and adjust accordingly to achieve the
temperature settings for each zone.
To set temperatures:
§ Tu r n A to set the driver’s zone temperature
§ Tu r n K to set the front passenger’s zone
temperature
REMINDERS:
§
Pressing any button during AUTO operation will deactivate the AUTO function and switch to manual mode, except for Temperature Control
§ When in AUTO mode, Air Flow Mode and Fan Speed do not display on the Climate Control Display
§
Warm air may flow in through vents if Recirculated Air button is not pressed ON (LED lit).
Front Climate Control
Defrost Outside Windshield
1. Set fan speed to the highest position H
2. Set temperature to hot A
3. Press the front defrost button B
Defog Inside Windshield
1. Set desired fan speed H
2. Set desired temperature A
3. Press the front defrost button B
Face-Level F lo o r- L evel
Bi-Level Floor/Defrost-Level
Air Flow Modes
To select air flow modes, press the Mode Select
button I:
Dual-Zone Climate Control
Pressing the SYNC button K synchronizes both
climate control zones (driver and passenger) to
the driver's temperature control.
31
CENTER PANEL
Page 34 of 56
 VIDEO
To view a video on your mobile device, snap this QR Code or visit the listed website. Refer to page 2 for more i")
*IF EQUIPPED 32
CENTER PANEL
AUTOMATIC TRANSMISSION CONTROL (SHIFT BY WIRE) VIDEO
To view a video on your mobile device, snap this QR Code or visit the listed website. Refer to page 2 for more information.
P
R
N
D
AUTO
HOLD
DRIVE MODEOFFOFF
P
A
B
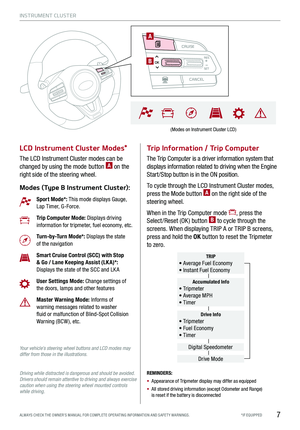
Automatic Transmission (Shift by Cable* / Shift by Wire*)
and Sport Shift Mode (Shift by Cable only)
Quick Tips
§ Press the Unlock button A when shifting from P (Park) to any gear
§ The instrument cluster and the light on top of the shift lever identifies the gear the vehicle is currently in
REMINDERS:
§
When in P (Park), if the Unlock button is not pressed while shifting, the transmission does not shift
§
If the vehicle is turned off while in Neutral without shifting into Park, it will remain in Neutral until the driver’s door is opened. At that point it will automatically shift into Park
§
If going through a car wash, remind the attendant to keep the vehicle in Neutral (N) and keep the engine running. Also, disable the power liftgate lid control, turn off the auto rain sensing wipers and fold in the mirrors
To shift into any gear from Park, depress the brake pedal,
then press the Unlock button A, located on the side of the
gear shift lever, and shift.
P: Park – To shift into Park from any gear, press the P button B on the gear shift while vehicle is stationary and the brake
pedal is depressed (Shift by Wire only).
R: Reverse – To shift into Reverse, depress brake pedal,
press the Unlock button A, and move the shift lever forward
twice to skip over Neutral and into Reverse.
N: Neutral
D: Drive
[+]: Sport Shift Mode Upshift*
[–]: Sport Shift Mode Downshift*
Paddle Shifters: With the gear shift in Drive, pull the paddle
shifter to manually change gears.
[+]: Manual Mode Upshift
[–]: Manual Mode Downshift
REMINDERS:
§ Press and hold the [+} right paddle shifter to return to Automatic mode (Shift by Wire* only)
§ When in Sport Shift mode, pulling the left and right paddle shifters at the same time will NOT shift gears
P
R
N D
+
-
(Shift by Wire type shown)
(Shift by Cable type shown)
A
www.youtube.com/KiaFeatureVideos
Page 35 of 56

*IF EQUIPPED ALWAYS CHECK THE OWNER’S MANUAL FOR COMPLE TE OPER ATING INFORMATION AND SAFE T Y WARNINGS.
ELECTRIC PARKING BRAKE / AUTO HOLD VIDEO
To view a video on your mobile device, snap this QR Code or visit the listed website. Refer to page 2 for more information.
P
R
N
D
AUTO
HOLD
DRIVE MODE
OFFOFF
P
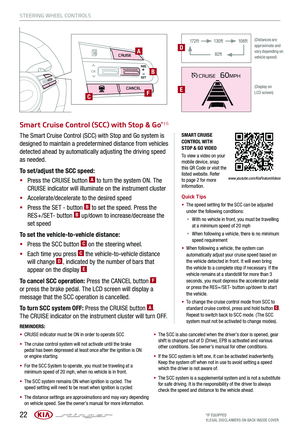
The Electric Parking Brake (EPB) system utilizes an electric
motor to engage the parking brake.
Applying the Parking Brake
Depress the brake pedal and pull up the EPB switch A.
Ensure that the indicator light is illuminated on the
instrument cluster.
Releasing the Parking Brake
The EPB will automatically release when the shifter is placed
in Reverse or Drive. To release EPB manually, depress the
brake pedal, then press the EPB switch A, with the ignition
switch in the ON position. Ensure that the indicator light
i s O F F.
Electric Parking Brake (EPB)
Quick Tips
§
Pull up and hold EPB switch again to increase brake pressure if parked on a decline or incline.
§ When leaving your keys with parking lot attendants or valet, make sure to inform them how to operate the EPB
§ If parked on a steep incline, pull up the EPB switch for more than 3 seconds for a firmer EPB application
REMINDERS:
§ As a bulb check, the EPB malfunction indicator will illuminate for approximately 3 seconds when the ignition switch is turned ON
§ If the warning light does not illuminate temporarily or remains continuously lit, take your vehicle to an authorized Kia dealer and have the system checked
§ The EPB should not be operated while the vehicle is moving
§ A click or electric brake motor sound may be heard while operating or releasing the EPB. These conditions are normal and indicate that the EPB is functioning properly
§ EPB will not release unless the hood, liftgate and all doors are closed and seat belts are fastened
33
CENTER PANEL
A
www.youtube.com/KiaFeatureVideos
Page 36 of 56

*IF EQUIPPED 34
CENTER PANEL
P
R
N
D
OFFOFF
P
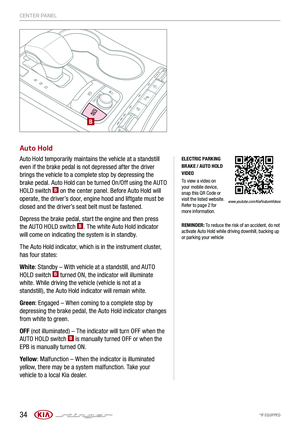
Auto Hold
Auto Hold temporarily maintains the vehicle at a standstill
even if the brake pedal is not depressed after the driver
brings the vehicle to a complete stop by depressing the
brake pedal. Auto Hold can be turned On/Off using the AUTO
HOLD switch B on the center panel. Before Auto Hold will
operate, the driver’s door, engine hood and liftgate must be
closed and the driver’s seat belt must be fastened.
Depress the brake pedal, start the engine and then press
the AUTO HOLD switch B. The white Auto Hold indicator
will come on indicating the system is in standby.
The Auto Hold indicator, which is in the instrument cluster,
has four states:
White: Standby – With vehicle at a standstill, and AUTO
HOLD switch B turned ON, the indicator will illuminate
white. While driving the vehicle (vehicle is not at a
standstill), the Auto Hold indicator will remain white.
Green: Engaged – When coming to a complete stop by
depressing the brake pedal, the Auto Hold indicator changes
from white to green.
OFF (not illuminated) – The indicator will turn OFF when the
AUTO HOLD switch B is manually turned OFF or when the
EPB is manually turned ON.
Yellow: Malfunction – When the indicator is illuminated
yellow, there may be a system malfunction. Take your
vehicle to a local Kia dealer.
B
ELECTRIC PARKING BRAKE / AUTO HOLD VIDEO
To view a video on your mobile device, snap this QR Code or visit the listed website. Refer to page 2 for more information.
REMINDER: To reduce the risk of an accident, do not activate Auto Hold while driving downhill, backing up or parking your vehicle
www.youtube.com/KiaFeatureVideos
Page 37 of 56

35
CENTER PANEL
ALWAYS CHECK THE OWNER’S MANUAL FOR COMPLE TE OPERATING INFORMATION AND SAFETY WARNINGS.*IF EQUIPPED†LEG AL DISCL AIMERS ON BACK INSIDE COVER
SU R ROUN D V IE W
MON IT O R IN G ( S V M )
SY STE M V ID EO
T o vie w a v id eo on y o u r
m ob il e d evic e , s n ap t h is
Q R C od e or vis it th e
listed we bsit e . R efe r
to pa ge 2 for more
i n fo rm atio n .
W hen i n Drive & N eu tr a l: When i n Reve rs e :
D is play s the f ro n t s id e a nd S VM i mag es
s imu lt a n eous ly o n the s cre en
D is play s the f ro n t s id e i mag e o n the s cre en
D is play s the f ro n t s id e a nd l eft s id e i mag es
s imu lt a n eous ly o n the s cre en
D is play s the f ro n t s id e a nd r ig h t s id e i mag es
s imu lt a n eous ly o n the s cre en
D is play s the r ea r v iew a nd A VM i mag es
s imu lt a n eous ly o n the s cre en
D is play s the r ea r s id e i mag e o n the s cre en
D is play s the r ea r a nd l eft s id e i mag es
s imu lt a n eous ly o n the s cre en
D is play s the r ea r a nd r ig h t s id e i mag es
s imu lt a n eous ly o n the s cre en
AUTO
HOLD
DRIVE MODE
OFF
OFF
VIEW
PA
R
EM IN DER : T he SVM ca m era is eq uip ped with
an opt ic a l le n s to pro vi de a wi der r an ge of visi on
an d m ay ap pear dif fe re nt fro m th e actu al d is tan ce.
T he Surro u n d Vie w Mon it or in g sys te m is on ly a
s u p ple m en ta l d evi ce . D riv e rs shou ld not re ly so le ly
on th e SVM in for mation when par kin g an d ba ck in g
u p. D riv ers shou ld alw ays pay atte nti on an d direc tly
c h ec k th e le ft /r igh t an d rear .
Su rrou nd V ie w M on it ori ng ( SV M ) S yste m *
The Surro un d V iew M on it ori ng (S VM ) S ys te m is a p ark in g
s u p po rt sy s te m th at s
how s t h e are a s aro un d th e fro nt, re a r,
l ef t an d right sid es of th e ve h ic le via fo ur camera s d is p laye d
o nt o th e navig ati on sc re en .
P re ss
A t o t urn t he S VM s ys te m O N/O FF.
When O FF: T he c ame ra v iew w ill auto ma tic a ll y d is pl ay
o n t he n avig atio n s creen w hen t he v eh icle i s shif te d i nto
R eve rs e . T he c ame ra v iew w ill turn o ff w hen t he v eh icle i s
s h if te d o ut o f R eve rs e
When ON: T he ca mera view will dis p la y on th e navig ati on
sc re en in bo th Dri ve an d Re ve rs e . In Drive , th e ca mera
v ie w w ill co nti nu e to dis p la y unti l th e ve h ic le is tr a ve li n g
a t speed s a bo ve appro xim ate ly 13 m ph. If yo u k e ep th e
S VM s y s te m on , th e ca mera vie w w ill re a p pea r on t
h e
n avig ati on sc re en wh ene ve r t h e ve h ic le spe ed dro ps b elo w
a ppro xim ate ly 13 m ph
C am era V ie w Mod es – T o ch ange c ame ra v iew m od es, u se t he t ouch s creen o r rota te t he c on tr o lle r a nd
p ush t o select t he m od e.
www.youtube.com/KiaFeatureVideos
Page 38 of 56

36*IF EQUIPPED†LEG AL DISCL AIMERS ON BACK INSIDE COVER
SE AT WARMERS AND V ENTIL ATED SE AT S VIDEO
To view a video on your mobile device, snap this QR Code or visit the listed website. Refer to page 2 for more information.
P
R
N
D
AUTO
HOLD
DRIVE MODE
OFFOFF
P
AB
A
B
Seat Warmers† 21 / Ventilated Seats*
Quick Tip
With the seat warmer switch in the ON position, the heating system in the seat turns OFF or ON automatically depending on the seat temperature.
Front Seats
Seat Warmers:
§ Press button A up once for high setting (3 LEDs lit).
§ Press button twice for medium setting (2 LEDs lit).
§ Press a third time for low setting (1 LED lit) and again to
turn OFF.
Ventilated Seats:
§ Press button B down once for high setting (3 LEDs lit).
§ Press twice for medium setting (2 LEDs lit).
§ Press a third time for low setting (1 LED lit) and again to
turn OFF.
REMINDER: Use extreme caution when using the seat warmers to avoid burns. Refer to the Owner’s Manual for more information.
P
B
A
CENTER PANEL
www.youtube.com/KiaFeatureVideos
Page 39 of 56
*IF EQUIPPED
A
B
C
D
AABCD
SeatbackLumbarSeat Cushion ExtensionSeatSeat Cushion
Power Adjustable Driver’s Seat*† 19
Move/Press controls to adjust Seat, Seat forward/backward, Seat Cushion tilt up/down, Seatback forward/
backward, Lumbar up/down/forward/backward or Seat Cushion Extension forward/backward.
E
37
S E AT I N G
ALWAYS CHECK THE OWNER’S MANUAL FOR COMPLE TE OPERATING INFORMATION AND SAFETY WARNINGS.*IF EQUIPPED†LEG AL DISCL AIMERS ON BACK INSIDE COVER
REMINDER: Do not attempt to adjust the seat while the vehicle is moving. This could result in loss of control of the vehicle.
Page 40 of 56

38*IF EQUIPPED†LEG AL DISCL AIMERS ON BACK INSIDE COVER
Driver Position Memory System*
The integrated system stores into memory the position of the
driver’s seat, outside rearview mirrors, and steering wheel
positions. To store positions into memory, first place the gear
shift into P (Park) while the Engine Start /Stop button is in the
ON position. Then:
1.
Adjust the driver’s seat, outside rearview mirrors, settings
and steering wheel positions
2.
Press the SET button A on the control panel. System will beep once
3.
Press one of the memory buttons 1 or 2 B within 4 seconds. The system
will beep twice when memory has been stored
Front Seat Headrest Adjustment*† 10
To raise headrest: Pull headrest up.
To lower headrest: Press lock E, then press the headrest down.
(Located on driver’s door control panel)
A
B
REMINDERS:
§ Button may be hard to see if headrest is in its lowest position.
§
Do not operate the vehicle with the headrests removed. Headrests can provide critical neck and head support in an accident.
REMINDER: Do not operate the vehicle with the headrests removed. Headrests can provide critical neck and head support in an accident.
S E AT I N G