Page 25 of 56
*IF EQUIPPED ALWAYS CHECK THE OWNER’S MANUAL FOR COMPLE TE OPER ATING INFORMATION AND SAFE T Y WARNINGS.
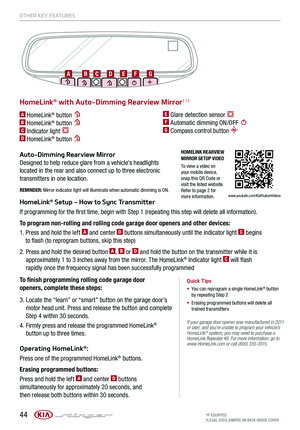
Your vehicle’s steering wheel buttons may differ from those in the illustrations. See your Owner’s Manual for more details.
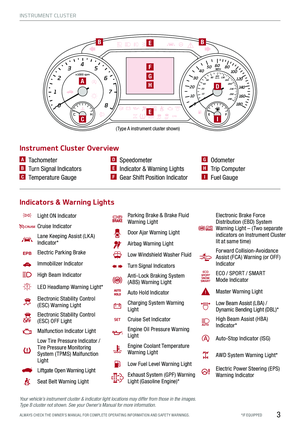
Standard Cruise Control
A
Cruise Control ON/OFF button: Press up to turn the
cruise control ON/OFF
B Resume Cruising Speed button: Press up to resume or
increase cruising speed
B Set Cruising Speed button: Press down to set or
decrease cruising speed
D Cruise Control Cancel button: To cancel cruise control
setting, do one of the following:
§ Press the brake pedal
§ Press the CANCEL button
Quick Tips
§ The standard cruise control system is designed to function above approximately 20 mph only
§ The Cruise Control system will not activate until the brake pedal has been depressed at least once after ignition ON or engine start
Smart Cruise Control (SCC) with Stop & Go* (Continued)
STEERING WHEEL CONTROLS
23
Page 26 of 56

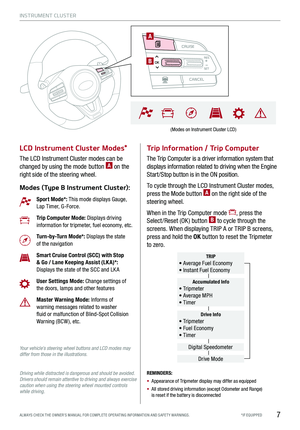
A Volume button: Press up/down to raise/lower speaker
volume
Mute button: Press to mute the microphone during a call
B Talk button: Press to activate Voice Recognition
C Receive/Place Call button: Press to place/receive/
answer incoming calls. Press to pair a phone (If no phone is
paired; UVO with Premium Navigation only)
D End Call button: Press down to end a call or cancel
a function
Your vehicle’s steering wheel buttons may differ from those in the image. See your Owner’s Manual for more details.
Driving while distracted is dangerous and should be avoided. Drivers should remain attentive to driving and always exercise caution when using the steering wheel mounted controls while driving.
For more information, refer to the Car Multimedia System User's Manual. For Bluetooth® wireless technology FAQs, go to www.kia.com, Owners section.
Bluetooth® Wireless Technology† 5,23
Quick Tips
§ When using the voice command feature, wait for the system BEEP before speaking the command
§ Phonebook transfer upload time varies by phone model and with number of phonebook entries
§ Because of differences in phone quality, service providers and Bluetooth® wireless technology chip programming, functionality may differ from one phone to another
STEERING WHEEL CONTROLS
24
MODE MODE
A
B
CD
*IF EQUIPPED†LEG AL DISCL AIMERS ON BACK INSIDE COVER
Page 27 of 56

*IF EQUIPPED ALWAYS CHECK THE OWNER’S MANUAL FOR COMPLE TE OPER ATING INFORMATION AND SAFE T Y WARNINGS.
VOICE RECOGNITION TIPS VIDEO
To view a video on your mobile device, snap this QR Code or visit the listed website. Refer to page 2 for more information.
Bluetooth® Wireless Technology (Continued)
Pairing a Phone
For instructions on how to pair a phone, refer to the audio
system’s user’s guide.
How to Place a Call
There are two options for placing a call:
§ Option 1: Press the Receive/Place Call button C to place
a call using the touchscreen
§ Option 2: Press on the Talk button B. Then say the
command “Call {name}” or “Dial {number}”
When using the voice command feature, wait for the system
BEEP before speaking the command.
Voice Recognition and Phone Contact Tips
To help optimize the Bluetooth® Wireless Technology Voice
Recognition system, below are some tips and reminders.
Improve the performance by making a few simple changes to
your phone contacts.
The system may have difficulty understanding some accents
or uncommon names. Below are other tips to optimize using
the voice recognition:
§ Use full names (first and last names) vs. short or
single-syllable names (“John Smith” vs.“Dad,” “Smith
Residence” vs.“Home”)
§ Avoid using special characters, emojis or hyphenated
names (@, &, #, /, -, *, +, etc.)
§ Avoid using acronyms (“In Case of Emergency” vs.“ICE”)
or words with all capital letters
§ Spell words completely, no abbreviations (“Doctor Smith”
vs.“Dr. Smith”)
Quick Tips
§ During the pairing process, be sure to accept the connection requests on the phone for phonebook download and to allow acceptance of all future Bluetooth® connection requests
§
When placing a call, speak in a natural, moderate tone, with clear pronunciation. The system may have trouble recognizing commands if you speak too soft or too loud
§
Always wait for the beep before speaking any commands
§
Close windows and sunroof and turn off A /C; open windows, sunroof, weather (wind/rain), or an A /C fan operating at higher speeds can interfere with Voice Recognition
§
Press the talk button and say “Help” to get a list of available commands
STEERING WHEEL CONTROLS
25
www.youtube.com/KiaFeatureVideos
Page 28 of 56

26
STEERING WHEEL CONTROLS
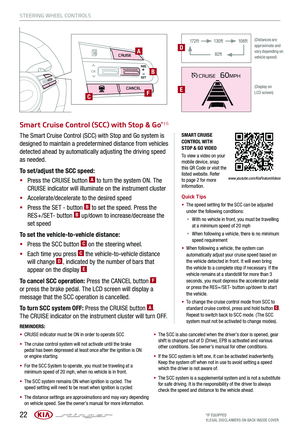
Audio Controls† 23
REMINDERS:
§
Your vehicle’s steering wheel buttons may differ from those in the images. See your Owner’s Manual for more details
§
Driving while distracted is dangerous and should be avoided. Drivers should remain attentive to driving and always exercise caution when using the steering-wheel-mounted controls while driving
§
To help minimize driver distraction, some audio system functionalities have been modified while the vehicle is in Drive, Reverse or moved out of Park.
A Audio System MODE button: Press to cycle
through FM/AM/SiriusXM®†22/USB Music/Aux/iPod®/
Bluetooth® Audio
B Seek/Preset buttons:
§ FM/AM/SiriusXM® Mode: Press to advance through
preset stations. Press and hold to auto seek
§ Media Modes: Press to move track up/down. Press
and hold to fast forward/rewind
C Volume buttons: Press up/down arrows to raise/lower
volume
Mute button: Press to mute all audio (Media pauses in
some Media modes when pressed)
Quick Tips
§
Pressing the Audio System Mode button for more than 1 second will turn Audio Mode ON/OFF
§ Surround Sound can be turned on or off
MODE MODE
A
BC
*IF EQUIPPED†LEG AL DISCL AIMERS ON BACK INSIDE COVER
Page 29 of 56

27
UVO eServices Activation†1
Using a compatible smartphone to access your app store or
marketplace, download the Kia UVO app.
1. In your smartphone’s settings, ensure that location services
are enabled.
2. Using the Kia UVO app, register for a new MyUVO.com account.
3. Follow the In Car Setup Instructions on the Kia UVO app to complete
the UVO eServices Activation.
For further UVO eServices operations, refer to the Car Multimedia System User's Manual.
Android Auto™*
Setting up Android Auto™:
1. From an Android Auto™ compatible device,
download the Android Auto™ app from the
Google Play™ Store† 11.
2. Open the Android Auto™ app and proceed with
the on-screen instructions to complete setup on
the mobile device.
How to start Android Auto™:
1. Press the SETUP key on your audio control unit’s
control panel.
2. Press the Phone Projection or Connectivity
button , select Android Auto™ then select
ENABLE ANDROID AUTO. Accept all terms,
conditions and requests on the head unit and
phone in order to use Android Auto™.
3. Connect the Android™ device with the vehicle’s
USB port using the manufacturer’s cable
provided with your phone.
4. From the vehicle’s home screen, select the
Android Auto™ button, where you’ll see all the
Android Auto™ supported apps.
REMINDERS:
§ Android Auto compatibility requirements: Micro-USB cable that came with your phone, OS Android™ 5.0 or higher, compatible Android smartphone and data and wireless plan for applicable feature(s).
§ Apple CarPlay compatibility requirements: Apple Lightning® cable, latest iOS software, iPhone 5 or later and data and wireless plan for applicable feature(s)
§ It is recommended to always update your phone to the latest operating system release
§
Driving while distracted can result in a loss of vehicle control that may lead to an accident, severe bodily injury, and death. The driver’s primary responsibility is in the safe and legal operation of a vehicle, and use of any handheld devices, other equipment, or vehicle systems which take the driver’s eyes, attention and focus away from the safe operation of a vehicle or which are not permissible by law should never be used during operation of the vehicle.
Apple CarPlay®*
Setting up and starting Apple CarPlay®:
1. On the head unit, press the SETUP key.
2. Press the Phone Projection or Connectivity
button , select Apple CarPlay® then select
ENABLE APPLE CARPL AY.[Accept all terms,
conditions and requests on the head unit and
phone in order to use Apple CarPlay®]
3. Connect the Apple CarPlay® compatible
iPhone†14 with the vehicle’s USB port using the
manufacturer’s cable provided with your iPhone
4. From the vehicle’s home screen, select the
Apple CarPlay® button, where you’ll see all the
Apple CarPlay® supported apps
AUDIO SYSTEMS
ALWAYS CHECK THE OWNER’S MANUAL FOR COMPLE TE OPERATING INFORMATION AND SAFETY WARNINGS.*IF EQUIPPED†LEG AL DISCL AIMERS ON BACK INSIDE COVER
Android AutoTM†3 / Apple CarPlay® Setup*†4
Page 30 of 56

28
AUDIO SYSTEMS
UVO ESERVICES VIDEO
To view a video on your mobile device, snap this QR Code or visit the listed website. Refer to page 2 for more information.
RADIO
MEDIA SEEK
PASSENGERPASSENGER
AIR BAGOFF
TRACK APPS/
PHONE SETUP
UVO eServices*†1
FM/AM/SiriusXM®†22/Media (USB, iPod®†14, Aux, Bluetooth® Audio, My Music)
Sound Settings – To adjust the sound settings:
1. Press the SETUP key on the audio control unit or the on-
screen MENU button, when in MEDIA mode.
2. Select the on-screen SOUND button, or SOUND SET TINGS
3. Select the menu item (Position, Volume, Tone, Priority,
Advanced, Default)
4. Use the onscreen buttons to adjust settings. Press the return
button to save settings
Radio Presets – You can listen to FM, AM and SiriusXM radio
and save frequently used stations.
How to Save a Preset - Press and hold the desired slot. This
saves the current station in the selected slot
SiriusXM Smart Favorites - For the first ten favorite SiriusXM
channels, you may play live or repeat from the beginning of a
song or a program segment. In Radio mode, choose SiriusXM,
then select any of the first six favorites. During song or
program play, tap the Skip Backward icon to start from the
beginning of the song or program. Tap the Play Live icon to
return to the live broadcast.
Custom Button : A programmable key to provide quick
access to one of several available system features.
To Program the Custom Button: Press the SETUP button,
then press the Custom button. Select one of the available
features you would like the Custom button to open.
REMINDER: Driving while distracted is dangerous and should be avoided. Drivers should remain attentive to driving and always exercise caution when using the audio system controls while driving. To help minimize driver distraction, some audio system functionalities have been modified while the vehicle is in Drive, Reverse or moved out of Park.
Press to select FM/AM/SiriusXM® modes
Press to PowerON/OFF. Rotate to adjust Volume
Press to go to Custom Menu - A programmable key to provide quick access to one of several available system features
Your vehicle’s audio system may differ from that in the illustration. For further UVO eServices operations, refer to the Car Multimedia System User's Manual. For other audio system information, refer to pages 26-29.
Press to enter APPS/Info menuPress to select PHONE modePress briefly to do the following: • FM/AM mode: Play the previous/ next frequency.• SiriusXM™ mode: Change the channel. • MEDIA mode: Change the track, file or title (except for AUX ).
Press and hold to the do the following(over 0.8 seconds):• FM/AM mode: Move quickly through all of the frequencies. When released, the system seeks the next available frequency.• MEDIA mode: Rewinds or fast forwards the track or file (except for AUX and Bluetooth® Audio).
Press to display SE TUP/Settings mode
Press to select MEDIA modeRotate to change Radio/SiriusXM® Station/Media tracks/files.
Quick Tips
§ Navigation may be available when connected to Android Auto or Apple CarPlay supported smartphones
§ When using the voice command feature, wait for the system to BEEP before speaking the command
§ At any time, you can interrupt Command Feedback by pressing the TALK button
§ Prolonged use of the audio control unit in ACC mode may drain the vehicle’s battery
§ A warning screen may appear periodically to remind users that the UVO eServices should be operated when the engine is running to prevent battery discharge
*IF EQUIPPED†LEG AL DISCL AIMERS ON BACK INSIDE COVER
www.youtube.com/KiaFeatureVideos
Page 31 of 56

Your vehicle’s audio system may differ from that in the illustra")
29
AUDIO SYSTEMS
UVO eServices with Premium Navigation† 1,15
FM/AM/SiriusXM®†22/Media (USB, iPod®†14, Aux, Bluetooth® Audio)
Your vehicle’s audio system may differ from that in the illustration. For further UVO eServices operations, refer to the Car Multimedia System User's Manual. For other audio system information, refer to pages 26-28.
Sound Settings – To adjust the sound settings:
1. Press the SETUP key on the audio control unit
2. Select the on-screen SOUND button
3. Select the menu item ( Volume Levels, Tone, Priority,
Navigation, Advanced, Default, Beep)
4. Use the onscreen buttons to adjust settings
Radio Presets – You can listen to FM, AM and SiriusXM radio
and save frequently used stations.
How to Save a Preset - Press and hold the desired slot. This
saves the current station in the selected slot
SiriusXM Smart Favorites - For the first ten favorite SiriusXM
channels, you may play live or repeat from the beginning of a
song or a program segment. In Radio mode, choose SiriusXM,
then select any of the first six favorites. During song or program
play, tap the Skip Backward icon to start from the beginning of
the song or program. Tap the Play Live icon to return to the live
broadcast.
Quick Tips
§
Prolonged use of the navigation system in ACC mode may drain the vehicle’s battery. A warning screen may appear periodically to remind users that the navigation system should be operated with the engine running to prevent battery discharge
§
When using the voice command feature, wait for the system BEEP before speaking the command
§ Surround Sound can be turned on or off
§
At any time, you can interrupt UVO eServices System Command Feedback by pressing the TALK button on the steering wheel
RADIO
MEDIA SEEK
PASSENGERPASSENGER
AIR BAGOFF
TRACK MAP
N AVSETUP
MAP
SD card/slot
UVO ESERVICES WITH PREMIUM N AVIG ATION SYSTEM VIDEO
To view a video on your mobile device, snap this QR Code or visit the listed website. Refer to page 2 for more information.
Press to select FM/AM/SiriusXM® modes
Press to PowerON/OFF. Rotate to adjust Volume
Press to go to Custom (Set) Menu
Press to display the MAP screen for the current position mode
Press to display the NAV screen to set destination and route
Press briefly to do the following: • FM/AM mode: Play the previous/ next frequency.• SiriusXM™ mode: Change the channel. • MEDIA mode: Change the track, file or title (except for AUX ).
Press and hold to the do the following(over 0.8 seconds):• FM/AM mode: Move quickly through all of the frequencies. When released, the system seeks the next available frequency.• MEDIA mode: Rewinds or fast forwards the track or file (except for AUX and Bluetooth® Audio).
Press to display SE TUP/Settings mode
Press to select MEDIA modeRotate to change Radio/SiriusXM® Station/Media tracks/files.
Custom Button is a programmable key to provide quick
access to one of several available system features. To Program
the Custom button:
1. Press the SETUP button, then press the Custom button
2. Select one of the available features you would like the
Custom button to open
ALWAYS CHECK THE OWNER’S MANUAL FOR COMPLE TE OPERATING INFORMATION AND SAFETY WARNINGS.*IF EQUIPPED†LEG AL DISCL AIMERS ON BACK INSIDE COVER
www.youtube.com/KiaFeatureVideos
Page 32 of 56

*IF EQUIPPED 30
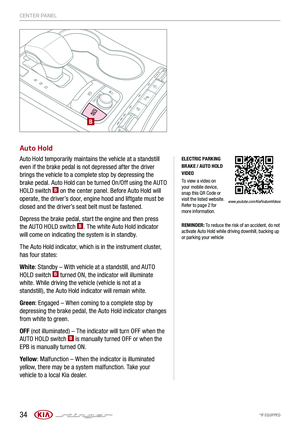
CENTER PANEL
For more information on the Aux/USB/iPod® Port, Power Outlets and USB Charger, refer to the Owner’s Manual.
Wireless Smartphone Charging System*
Clock
Select SETUP key on audio control unit. Then
scroll to and select DATE / TIME, and adjust.
Refer to the Car Multimedia System User’s Manual for more information.
REMINDERS:
§ Daylight Savings must be enabled or disabled in the Clock Settings screen.
§ To access manual date and time setting, turn GPS Time OFF
in the Clock Settings (UVO eServices with Premium Navigation*)
Aux/USB/iPod® Ports, Power Outlets & USB Charger Power Outlets A: Use the power outlets for mobile phones
and other devices designed to operate on a 12V (180W max)
power outlet.
Aux/USB/iPod® Port B: Use the Aux port to connect audio
devices and the USB port to connect USB audio devices,
smartphones and iPod® devices.
USB Charger C: Devices can be recharged using a USB
cable. The Engine Start /Stop button needs to in the ACC/ON/
START position to operate the USB Charger.
1. Slide open tray cover D
2. Place compatible smartphone on the center of the
charging pad E
3. Indicator light F will change to amber once the
wireless charging begins
4. Once charging is complete, the orange light F
will change to green
REMINDERS:
-
Using the power outlets (accessory plugs) for prolonged periods of time with the Engine Start /Stop button in the ACC position (Engine OFF ) may cause the battery to discharge
-
Use manufacturer cables only that came with your device. Third party cables may cause damage to device. It is recommended to always update your phone to the latest operating system release
Quick Tip
The power outlets are inactive when ignition is in the OFF position.
12V180WAUX USB
BAC
(Located in center console in front of gearshift)
REMINDERS:
§ The smartphone must be a compatible phone with QI function available
§ Avoid placing other metal items in the bin while charging as to not impede the charging area
§ This vehicle is equipped with wireless charging technology which allows for a device to be charged using inductive charging, however, device compatibility varies. See your owner’s manual for more detailed information and the back page for legal disclaimers
§ Inductive charging systems are less ef ficient than conventional charging through cable. As a result, higher device operating temperatures may be experienced during use
§ Charging Performance – Device position on the wireless charging system can affect charging performance. Other factors that may affect the charging rate includes foreign objects, such as coins or pens, and phone case thickness
§ Typically this feature will operate unless ignition is on or in the ACC position
12V180WAUXUSB
D
E
F
WIRELESS CHARGING VIDEO
www.youtube.com/KiaFeatureVideos