2019 KIA SPORTAGE replace
[x] Cancel search: replacePage 148 of 607
461
Features of your vehicle
Programming
Your vehicle may require the ignition
switch to be turned to the ACC posi-
tion for programming and/or opera-
tion of HomeLink. It is also recom-
mended that a new battery be
replaced in the hand-held transmitter
of the device being programmed to
HomeLink for quicker training and
accurate transmission of the radio-
frequency.
Follow these steps to train your
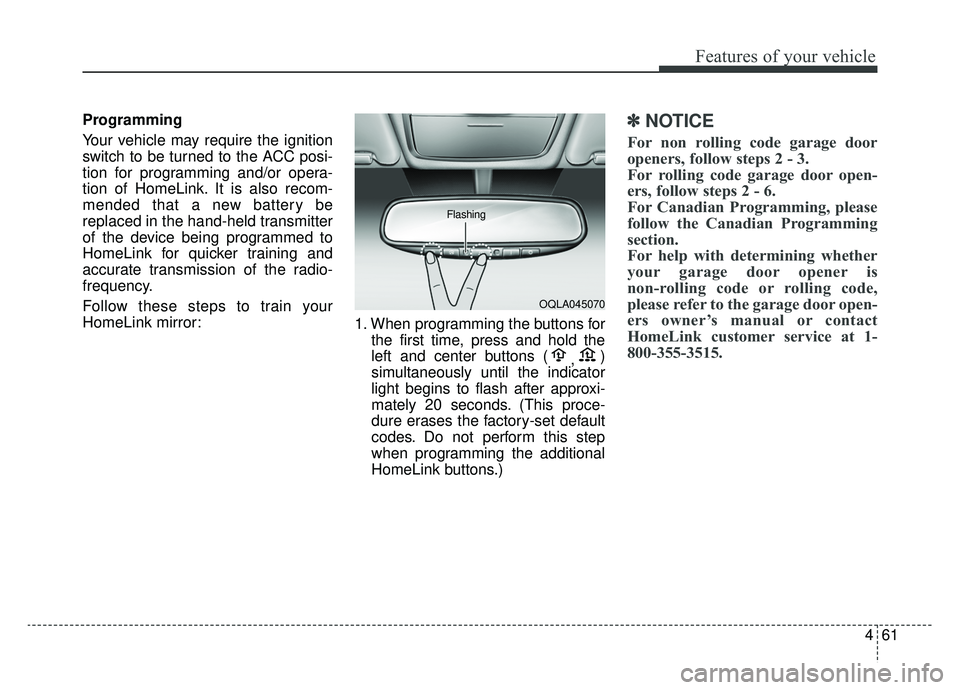
HomeLink mirror:1. When programming the buttons for
the first time, press and hold the
left and center buttons ( ,)
simultaneously until the indicator
light begins to flash after approxi-
mately 20 seconds. (This proce-
dure erases the factory-set default
codes. Do not perform this step
when programming the additional
HomeLink buttons.)✽ ✽ NOTICE
For non rolling code garage door
openers, follow steps 2 - 3.
For rolling code garage door open-
ers, follow steps 2 - 6.
For Canadian Programming, please
follow the Canadian Programming
section.
For help with determining whether
your garage door opener is
non-rolling code or rolling code,
please refer to the garage door open-
ers owner’s manual or contact
HomeLink customer service at 1-
800-355-3515.
OQLA045070
Flashing
Page 149 of 607
Features of your vehicle
62
4
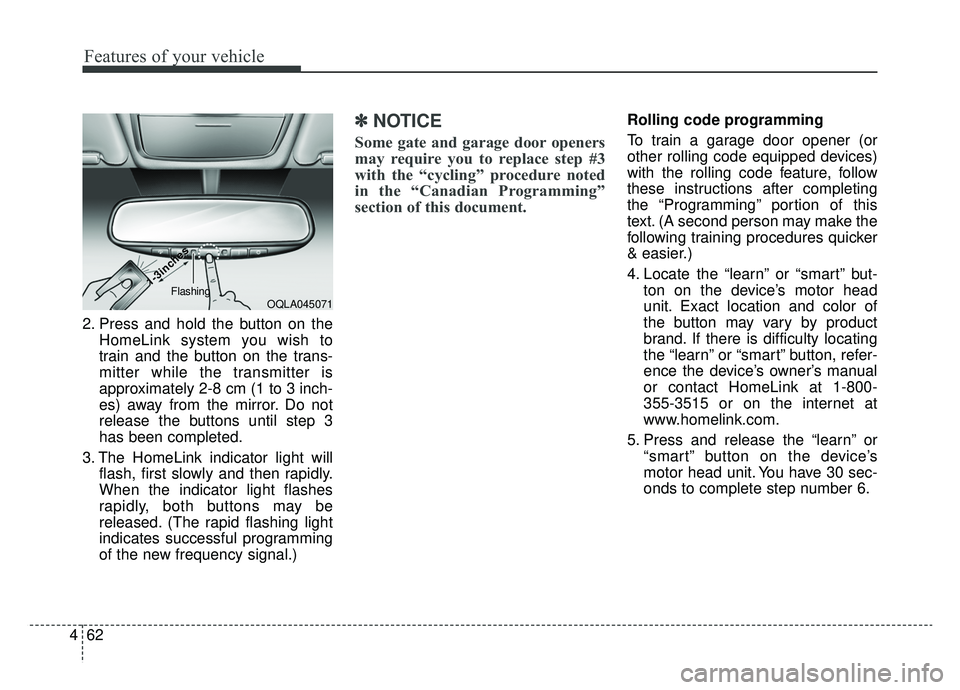
2. Press and hold the button on the
HomeLink system you wish to
train and the button on the trans-
mitter while the transmitter is
approximately 2-8 cm (1 to 3 inch-
es) away from the mirror. Do not
release the buttons until step 3
has been completed.
3. The HomeLink indicator light will flash, first slowly and then rapidly.
When the indicator light flashes
rapidly, both buttons may be
released. (The rapid flashing light
indicates successful programming
of the new frequency signal.)
✽ ✽NOTICE
Some gate and garage door openers
may require you to replace step #3
with the “cycling” procedure noted
in the “Canadian Programming”
section of this document.
Rolling code programming
To train a garage door opener (or
other rolling code equipped devices)
with the rolling code feature, follow
these instructions after completing
the “Programming” portion of this
text. (A second person may make the
following training procedures quicker
& easier.)
4. Locate the “learn” or “smart” but-
ton on the device’s motor head
unit. Exact location and color of
the button may vary by product
brand. If there is difficulty locating
the “learn” or “smart” button, refer-
ence the device’s owner’s manual
or contact HomeLink at 1-800-
355-3515 or on the internet at
www.homelink.com.
5. Press and release the “learn” or “smart” button on the device’s
motor head unit. You have 30 sec-
onds to complete step number 6.
OQLA045071
1-3inc
1-3inc
hes
hesFlashing
Page 178 of 607
491
Features of your vehicle
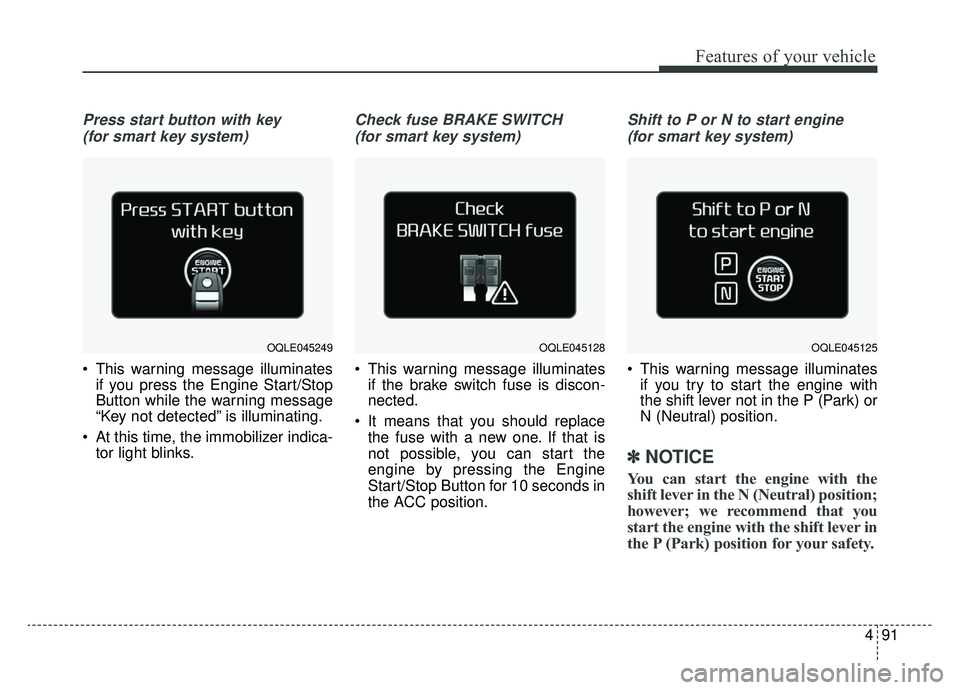
Press start button with key (for smart key system)
This warning message illuminates if you press the Engine Start/Stop
Button while the warning message
“Key not detected” is illuminating.
At this time, the immobilizer indica- tor light blinks.
Check fuse BRAKE SWITCH
(for smart key system)
This warning message illuminates if the brake switch fuse is discon-
nected.
It means that you should replace the fuse with a new one. If that is
not possible, you can start the
engine by pressing the Engine
Start/Stop Button for 10 seconds in
the ACC position.
Shift to P or N to start engine
(for smart key system)
This warning message illuminates if you try to start the engine with
the shift lever not in the P (Park) or
N (Neutral) position.
✽ ✽ NOTICE
You can start the engine with the
shift lever in the N (Neutral) position;
however; we recommend that you
start the engine with the shift lever in
the P (Park) position for your safety.
OQLE045249OQLE045125OQLE045128
Page 195 of 607
Features of your vehicle
108
4
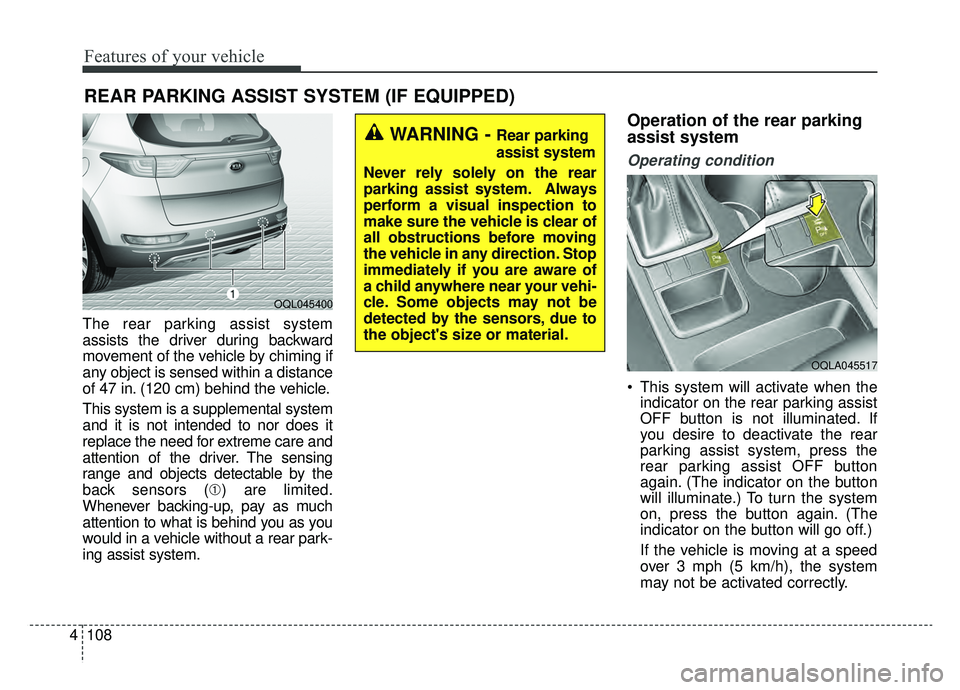
The rear parking assist system
assists the driver during backward
movement of the vehicle by chiming if
any object is sensed within a distance
of 47 in. (120 cm) behind the vehicle.
This system is a supplemental system
and it is not intended to nor does it
replace the need for extreme care and
attention of the driver. The sensing
range and objects detectable by the
back sensors (➀ ) are limited.
Whenever backing-up, pay as much
attention to what is behind you as you
would in a vehicle without a rear park-
ing assist system.
Operation of the rear parking
assist system
Operating condition
This system will activate when the indicator on the rear parking assist
OFF button is not illuminated. If
you desire to deactivate the rear
parking assist system, press the
rear parking assist OFF button
again. (The indicator on the button
will illuminate.) To turn the system
on, press the button again. (The
indicator on the button will go off.)
If the vehicle is moving at a speed
over 3 mph (5 km/h), the system
may not be activated correctly.
REAR PARKING ASSIST SYSTEM (IF EQUIPPED)
WARNING - Rear parking
assist system
Never rely solely on the rear
parking assist system. Always
perform a visual inspection to
make sure the vehicle is clear of
all obstructions before moving
the vehicle in any direction. Stop
immediately if you are aware of
a child anywhere near your vehi-
cle. Some objects may not be
detected by the sensors, due to
the object's size or material.
OQL045400
OQLA045517
Page 199 of 607
Features of your vehicle
112
4
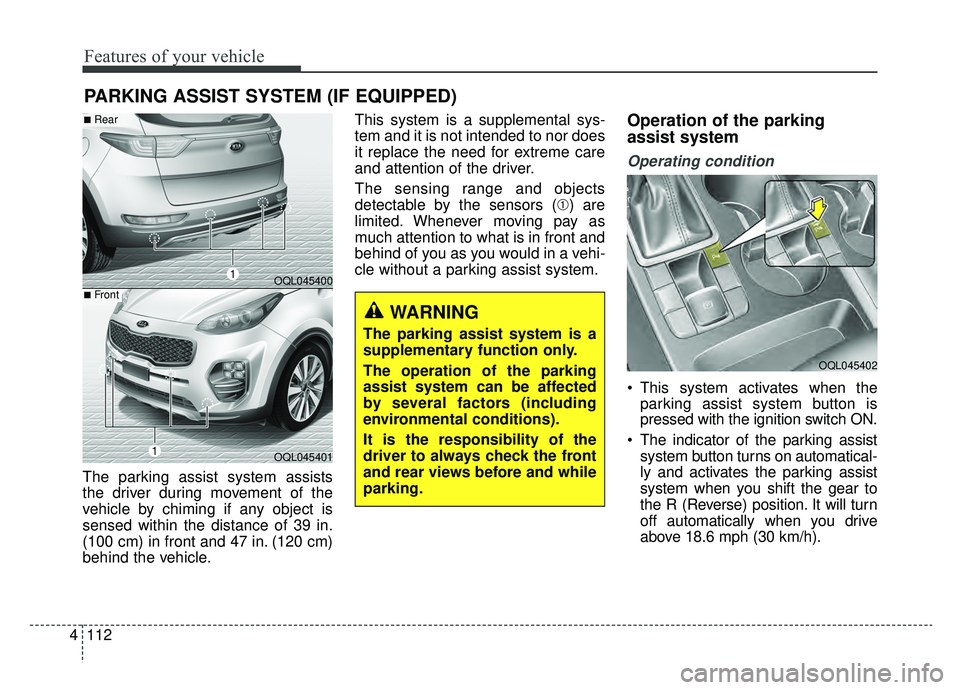
The parking assist system assists
the driver during movement of the
vehicle by chiming if any object is
sensed within the distance of 39 in.
(100 cm) in front and 47 in. (120 cm)
behind the vehicle. This system is a supplemental sys-
tem and it is not intended to nor does
it replace the need for extreme care
and attention of the driver.
The sensing range and objects
detectable by the sensors (➀) are
limited. Whenever moving pay as
much attention to what is in front and
behind of you as you would in a vehi-
cle without a parking assist system.
Operation of the parking
assist system
Operating condition
This system activates when the
parking assist system button is
pressed with the ignition switch ON.
The indicator of the parking assist system button turns on automatical-
ly and activates the parking assist
system when you shift the gear to
the R (Reverse) position. It will turn
off automatically when you drive
above 18.6 mph (30 km/h).
PARKING ASSIST SYSTEM (IF EQUIPPED)
WARNING
The parking assist system is a
supplementary function only.
The operation of the parking
assist system can be affected
by several factors (including
environmental conditions).
It is the responsibility of the
driver to always check the front
and rear views before and while
parking.
OQL045400
OQL045401
■Rear
■Front
OQL045402
Page 209 of 607
Features of your vehicle
122
4
The system may not operate normal-
ly in the below conditions.
When the light from the on-coming
or front vehicle is not detected
because of lamp damage, hidden
from sight, etc.
When the lamp of the on-coming or front vehicle is covered with dust,
snow or water.
When the light from the on-coming or front vehicle is not detected
because of exhaust fumes, smoke,
fog, snow, etc.
When the front window is covered with foreign matters such as ice,
dust, fog, or is damaged.
When there is a similar shape lamp with the front vehicle’s lamps.
When it is hard to see because of fog, heavy rain or snow.
When the headlamp is not repaired or replaced at an authorized deal-
er.
When headlamp aiming is not properly adjusted.
When driving on a narrow curved road or rough road. When driving downhill or uphill.
When only part of the vehicle in
front is visible on a crossroad or
curved road.
When there is a traffic light, reflect- ing sign, flashing sign or mirror.
When the road conditions are bad such as being wet or covered with
snow.
When the front vehicle’s head- lamps are off but the fog lamps on.
When a vehicle suddenly appears from a curve.
When the vehicle is tilted from a flat tire or being towed.
When the LDWS (lane departure warning system) warning light illu-
minates. (if equipped)✽ ✽ NOTICE
• Do not place any accessories,
stickers or tint the windshield.
• Have on the windshield glass replaced from an authorized deal-
er.
• Do not remove or damage related parts of the High Beam Assist sys-
tem.
• Be careful that water doesn’t get into the High Beam Assist unit.
• Do not place objects on the dash- board that reflect light such as
mirrors, white paper, etc. The sys-
tem may malfunction if sunlight is
reflected.
• At times, the Smart High Beam system may not work properly,
always check the road conditions
for your safety. When the system
does not operate normally, manu-
ally change between the high
beam and low beam.
Page 210 of 607
4123
Features of your vehicle
Turn signals and lane change
signals
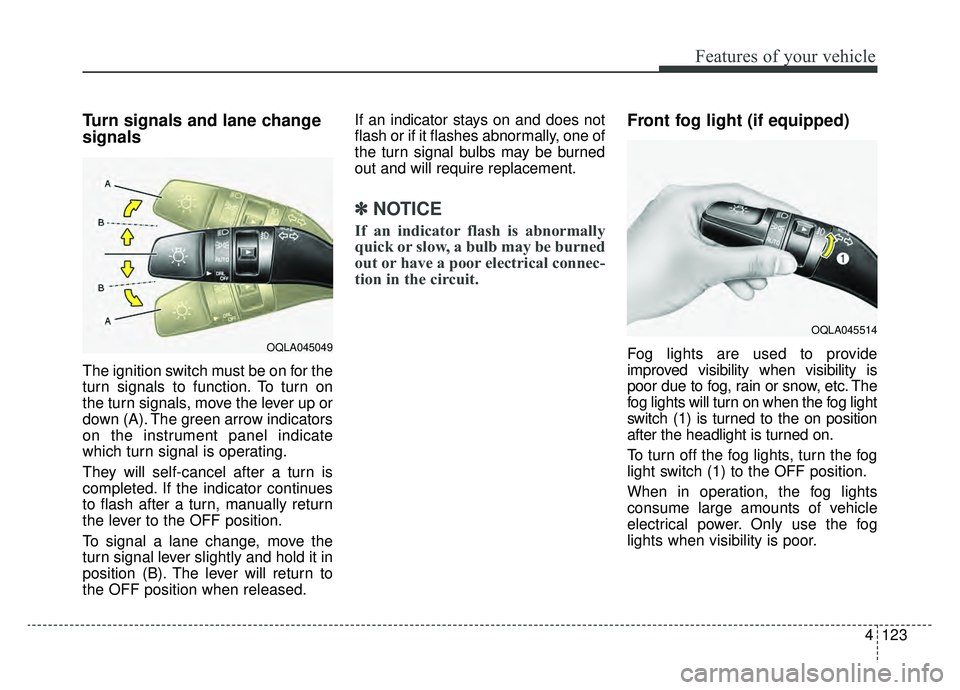
The ignition switch must be on for the
turn signals to function. To turn on
the turn signals, move the lever up or
down (A). The green arrow indicators
on the instrument panel indicate
which turn signal is operating.
They will self-cancel after a turn is
completed. If the indicator continues
to flash after a turn, manually return
the lever to the OFF position.
To signal a lane change, move the
turn signal lever slightly and hold it in
position (B). The lever will return to
the OFF position when released.If an indicator stays on and does not
flash or if it flashes abnormally, one of
the turn signal bulbs may be burned
out and will require replacement.
✽ ✽
NOTICE
If an indicator flash is abnormally
quick or slow, a bulb may be burned
out or have a poor electrical connec-
tion in the circuit.
Front fog light (if equipped)
Fog lights are used to provide
improved visibility when visibility is
poor due to fog, rain or snow, etc. The
fog lights will turn on when the fog light
switch (1) is turned to the on position
after the headlight is turned on.
To turn off the fog lights, turn the fog
light switch (1) to the OFF position.
When in operation, the fog lights
consume large amounts of vehicle
electrical power. Only use the fog
lights when visibility is poor.OQLA045049
OQLA045514
Page 227 of 607
Features of your vehicle
140
4
System operation
Ventilation
1.Set the mode to the position.
2.Set the air intake control to the out-
side (fresh) air position.
3.Set the temperature control to the desired position.
4.Set the fan speed control to the desired speed.
Heating
1.Set the mode to the position.
2.Set the air intake control to the out-side (fresh) air position.
3.Set the temperature control to the desired position.
4.Set the fan speed control to the desired speed.
5.If dehumidified heating is desired, turn the air conditioning system (if
equipped) on.
If the windshield fogs up, set the mode to the or position. Operation Tips
To keep dust or unpleasant fumes
from entering the vehicle through
the ventilation system, temporarily
set the air intake control to the
recirculated air position. Be sure to
return the control to the fresh air
position when the irritation has
passed to keep fresh air in the
vehicle. This will help keep the driv-
er alert and comfortable.
Air for the heating/cooling system is drawn in through the grilles just
ahead of the windshield. Care
should be taken that these are not
blocked by leaves, snow, ice or
other obstructions.
To prevent interior fog on the wind- shield, set the air intake control to
the fresh air position and fan speed
to the desired position, turn on the
air conditioning system, and adjust
the temperature control to desired
temperature.
Air conditioning
Kia Air Conditioning Systems are
filled with refrigerant.
1.Start the engine. Push the air con-ditioning button.
2.Set the mode to the position.
3.Set the air intake control to the out- side air or recirculated air position.
4.Adjust the fan speed control and temperature control to maintain
maximum comfort.
The refrigerant system should only be serviced by trained and certified
technicians to ensure proper and
safe operation.
The refrigerant system should be serviced in a well-ventilated place.
The air conditioning evaporator (cooling coil) shall never be repaired
or replaced with one removed from
a used or salvaged vehicle and new
replacement MAC evaporators
should be certified (and labeled) as
meeting SAE Standard J2842.