2019 KIA SPORTAGE ECO mode
[x] Cancel search: ECO modePage 4 of 607
i
Thank you for choosing a Kia vehicle.
When you require service, remember that your Kia dealer
knows your vehicle best. Your dealer has factory-trained tech-
nicians, recommended special tools and genuine Kia replace-
ment parts. It is dedicated to your complete customer satisfac-
tion.
Because subsequent owners require this important information
as well, this publication should remain with the vehicle if it is
sold.
This manual will familiarize you with operational, mainte-
nance and safety information about your new vehicle. It is sup-
plemented by a Warranty and Consumer Information manual
that provides important information on all warranties regarding
your vehicle.
We urge you to read these publications carefully and follow the
recommendations to help assure enjoyable and safe operation
of your new vehicle.
Kia offers a great variety of options, components and features
for its various models. Therefore, some of the equipment
described in this manual, along with the various illustrations,
may not be applicable to your particular vehicle.
The information and specifications provided in this manual
were accurate at the time of printing. Kia reserves the right to
discontinue or change specifications or design at any time
without notice and without incurring any obligation. If you
have questions, always check with your Kia dealer.
We assure you of our continuing interest in your motoring
pleasure and satisfaction in your Kia vehicle.
© 2018 Kia MOTORS AMERICA, Inc.
All rights reserved. May not be reproduced or translated in
whole or in part without the written consent of Kia Motors
America, Inc.
Printed in Korea
Foreword
Page 59 of 607
Safety features of your vehicle
42
3
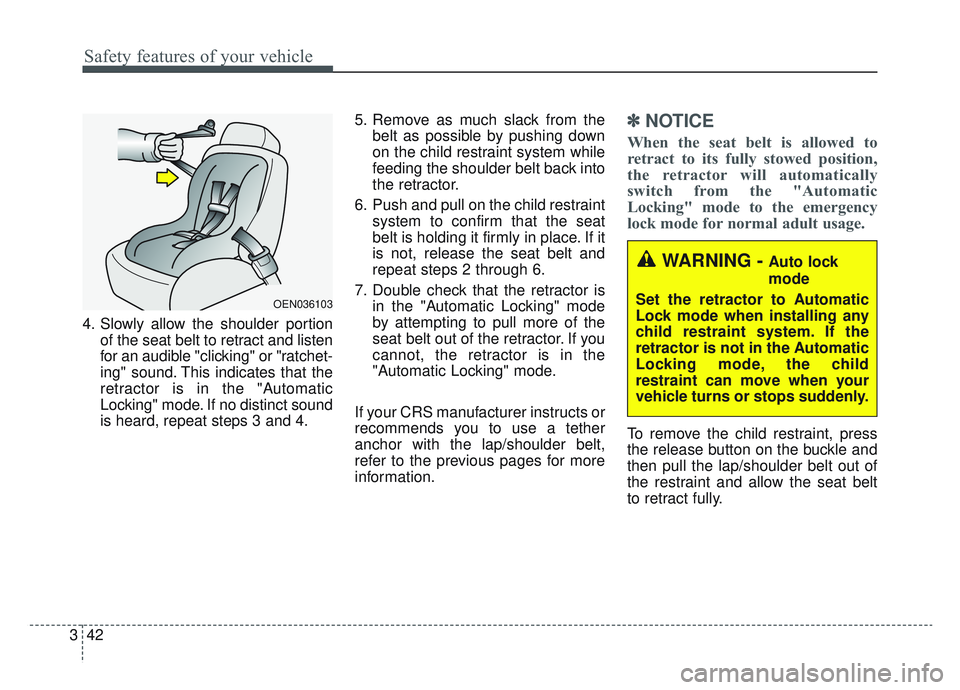
4. Slowly allow the shoulder portion
of the seat belt to retract and listen
for an audible "clicking" or "ratchet-
ing" sound. This indicates that the
retractor is in the "Automatic
Locking" mode. If no distinct sound
is heard, repeat steps 3 and 4. 5. Remove as much slack from the
belt as possible by pushing down
on the child restraint system while
feeding the shoulder belt back into
the retractor.
6. Push and pull on the child restraint system to confirm that the seat
belt is holding it firmly in place. If it
is not, release the seat belt and
repeat steps 2 through 6.
7. Double check that the retractor is in the "Automatic Locking" mode
by attempting to pull more of the
seat belt out of the retractor. If you
cannot, the retractor is in the
"Automatic Locking" mode.
If your CRS manufacturer instructs or
recommends you to use a tether
anchor with the lap/shoulder belt,
refer to the previous pages for more
information.
✽ ✽ NOTICE
When the seat belt is allowed to
retract to its fully stowed position,
the retractor will automatically
switch from the "Automatic
Locking" mode to the emergency
lock mode for normal adult usage.
To remove the child restraint, press
the release button on the buckle and
then pull the lap/shoulder belt out of
the restraint and allow the seat belt
to retract fully.
OEN036103
WARNING - Auto lock
mode
Set the retractor to Automatic
Lock mode when installing any
child restraint system. If the
retractor is not in the Automatic
Locking mode, the child
restraint can move when your
vehicle turns or stops suddenly.
Page 69 of 607
Safety features of your vehicle
52
3
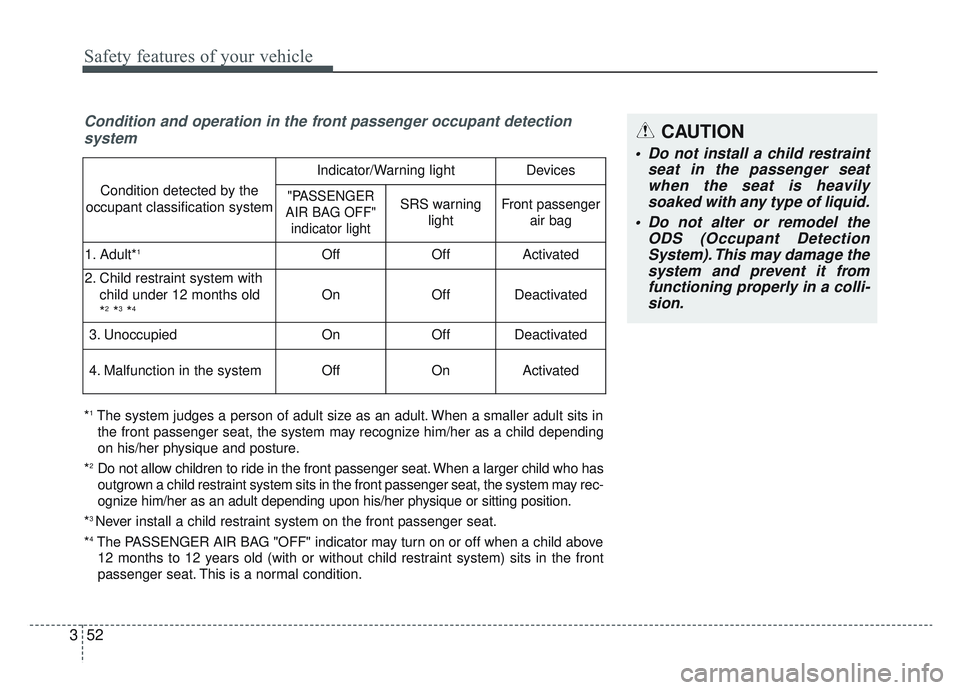
Condition and operation in the front passenger occupant detection
system
*1The system judges a person of adult size as an adult. When a smaller adult sits in
the front passenger seat, the system may recognize him/her as a child depending
on his/her physique and posture.
*
2Do not allow children to ride in the front passenger seat. When a larger child who has
outgrown a child restraint system sits in the front passenger seat, the system may rec-
ognize him/her as an adult depending upon his/her physique or sitting position.
*
3 Never install a child restraint system on the front passenger seat.
*
4The PASSENGER AIR BAG "OFF" indicator may turn on or off when a child above 12 months to 12 years old (with or without child restraint system) sits in the front
passenger seat. This is a normal condition.
Condition detected by the
occupant classification system
Indicator/Warning lightDevices
"PASSENGER
AIR BAG OFF" indicator lightSRS warning lightFront passenger air bag
1. Adult*1OffOffActivated
2. Child restraint system with
child under 12 months old
*
2*3*4OnOffDeactivated
3. Unoccupied OnOffDeactivated
4. Malfunction in the systemOffOnActivated
CAUTION
Do not install a child restraint seat in the passenger seatwhen the seat is heavilysoaked with any type of liquid.
Do not alter or remodel the ODS (Occupant DetectionSystem). This may damage thesystem and prevent it fromfunctioning properly in a colli-sion.
Page 75 of 607
Safety features of your vehicle
58
3
Driver's and passenger's front
air bag
Your vehicle is equipped with an
Advanced Supplemental Restraint
(Air Bag) System and lap/shoulder
belts at both the driver and passen-
ger seating position. The indication of the system's pres-
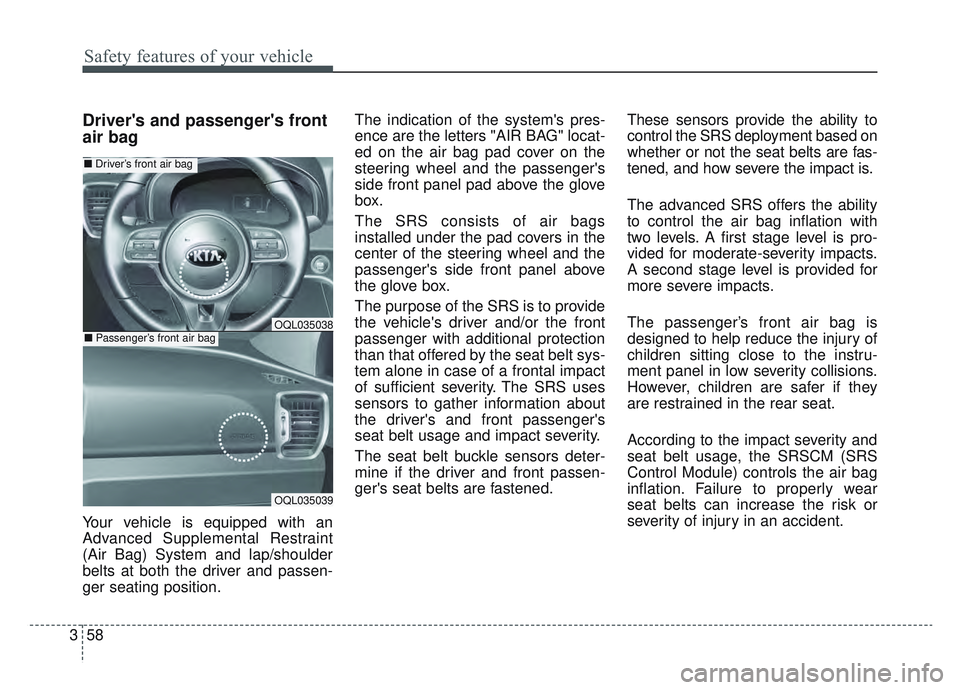
ence are the letters "AIR BAG" locat-
ed on the air bag pad cover on the
steering wheel and the passenger's
side front panel pad above the glove
box.
The SRS consists of air bags
installed under the pad covers in the
center of the steering wheel and the
passenger's side front panel above
the glove box.
The purpose of the SRS is to provide
the vehicle's driver and/or the front
passenger with additional protection
than that offered by the seat belt sys-
tem alone in case of a frontal impact
of sufficient severity. The SRS uses
sensors to gather information about
the driver's and front passenger's
seat belt usage and impact severity.
The seat belt buckle sensors deter-
mine if the driver and front passen-
ger's seat belts are fastened.
These sensors provide the ability to
control the SRS deployment based on
whether or not the seat belts are fas-
tened, and how severe the impact is.
The advanced SRS offers the ability
to control the air bag inflation with
two levels. A first stage level is pro-
vided for moderate-severity impacts.
A second stage level is provided for
more severe impacts.
The passenger’s front air bag is
designed to help reduce the injury of
children sitting close to the instru-
ment panel in low severity collisions.
However, children are safer if they
are restrained in the rear seat.
According to the impact severity and
seat belt usage, the SRSCM (SRS
Control Module) controls the air bag
inflation. Failure to properly wear
seat belts can increase the risk or
severity of injury in an accident.
OQL035039
■
Driver’s front air bag
■Passenger’s front air bagOQL035038
Page 89 of 607
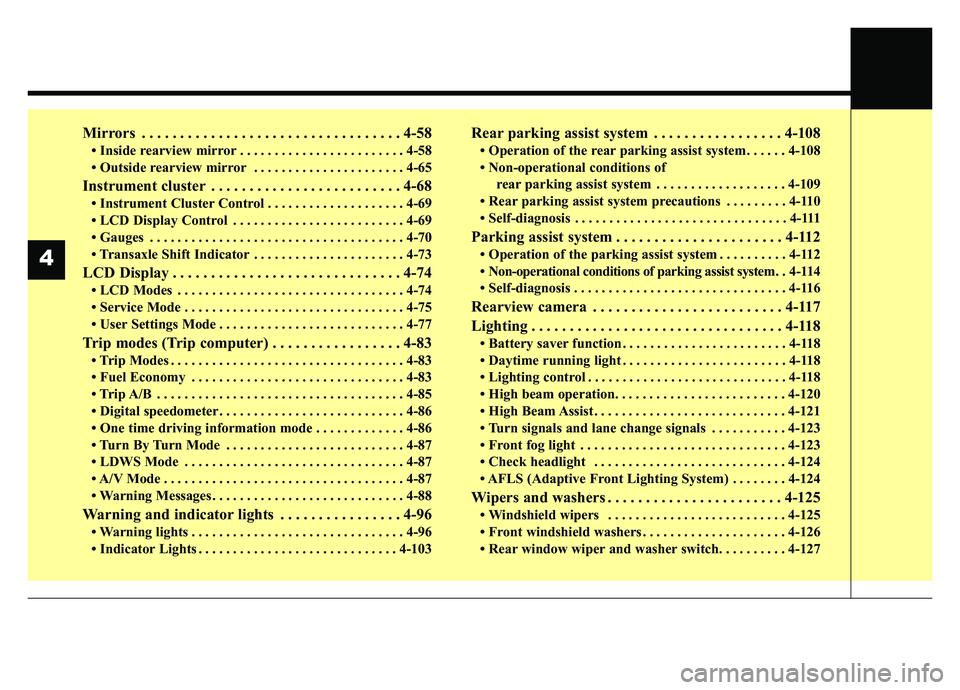
Mirrors . . . . . . . . . . . . . . . . . . . . . . . . . . . . . . . . . . 4-58\
• Inside rearview mirror . . . . . . . . . . . . . . . . . . . . . . . . 4-58
• Outside rearview mirror . . . . . . . . . . . . . . . . . . . . . . 4-65
Instrument cluster . . . . . . . . . . . . . . . . . . . . . . . . . 4-68
• Instrument Cluster Control . . . . . . . . . . . . . . . . . . . . 4-69
• LCD Display Control . . . . . . . . . . . . . . . . . . . . . . . . . 4-69
• Gauges . . . . . . . . . . . . . . . . . . . . . . . . . . . . . . . . . . . . \
. 4-70
• Transaxle Shift Indicator . . . . . . . . . . . . . . . . . . . . . . 4-73
LCD Display . . . . . . . . . . . . . . . . . . . . . . . . . . . . . . 4-74
• LCD Modes . . . . . . . . . . . . . . . . . . . . . . . . . . . . . . . . . 4-74
• Service Mode . . . . . . . . . . . . . . . . . . . . . . . . . . . . . . . . 4-75
• User Settings Mode . . . . . . . . . . . . . . . . . . . . . . . . . . . 4-77
Trip modes (Trip computer) . . . . . . . . . . . . . . . . . 4-83
• Trip Modes . . . . . . . . . . . . . . . . . . . . . . . . . . . . . . . . . . 4-83\
• Fuel Economy . . . . . . . . . . . . . . . . . . . . . . . . . . . . . . . 4-83
• Trip A/B . . . . . . . . . . . . . . . . . . . . . . . . . . . . . . . . . . . . \
4-85
• Digital speedometer . . . . . . . . . . . . . . . . . . . . . . . . . . . 4-86
• One time driving information mode . . . . . . . . . . . . . 4-86
• Turn By Turn Mode . . . . . . . . . . . . . . . . . . . . . . . . . . 4-87
• LDWS Mode . . . . . . . . . . . . . . . . . . . . . . . . . . . . . . . . 4-87
• A/V Mode . . . . . . . . . . . . . . . . . . . . . . . . . . . . . . . . . . . 4-\
87
• Warning Messages . . . . . . . . . . . . . . . . . . . . . . . . . . . . 4-88
Warning and indicator lights . . . . . . . . . . . . . . . . 4-96
• Warning lights . . . . . . . . . . . . . . . . . . . . . . . . . . . . . . . 4-96
• Indicator Lights . . . . . . . . . . . . . . . . . . . . . . . . . . . . . 4-103
Rear parking assist system . . . . . . . . . . . . . . . . . 4-108
• Operation of the rear parking assist system . . . . . . 4-108
• Non-operational conditions of rear parking assist system . . . . . . . . . . . . . . . . . . . 4-109
• Rear parking assist system precautions . . . . . . . . . 4-110
• Self-diagnosis . . . . . . . . . . . . . . . . . . . . . . . . . . . . . . . 4-111
Parking assist system . . . . . . . . . . . . . . . . . . . . . . 4-112
• Operation of the parking assist system . . . . . . . . . . 4-112
• Non-operational conditions of parking assist system. . 4-114
• Self-diagnosis . . . . . . . . . . . . . . . . . . . . . . . . . . . . . . . 4-116
Rearview camera . . . . . . . . . . . . . . . . . . . . . . . . . 4-117
Lighting . . . . . . . . . . . . . . . . . . . . . . . . . . . . . . . . . 4-118
• Battery saver function . . . . . . . . . . . . . . . . . . . . . . . . 4-118
• Daytime running light . . . . . . . . . . . . . . . . . . . . . . . . 4-118
• Lighting control . . . . . . . . . . . . . . . . . . . . . . . . . . . . . 4-118
• High beam operation. . . . . . . . . . . . . . . . . . . . . . . . . 4-120
• High Beam Assist . . . . . . . . . . . . . . . . . . . . . . . . . . . . 4-121
• Turn signals and lane change signals . . . . . . . . . . . 4-123
• Front fog light . . . . . . . . . . . . . . . . . . . . . . . . . . . . . . 4-123
• Check headlight . . . . . . . . . . . . . . . . . . . . . . . . . . . . 4-124
• AFLS (Adaptive Front Lighting System) . . . . . . . . 4-124
Wipers and washers . . . . . . . . . . . . . . . . . . . . . . . 4-125
• Windshield wipers . . . . . . . . . . . . . . . . . . . . . . . . . . 4-125
• Front windshield washers . . . . . . . . . . . . . . . . . . . . . 4-126
• Rear window wiper and washer switch. . . . . . . . . . 4-127
4
Page 122 of 607
435
Features of your vehicle
1. Setting
To activate the Smart Power Liftgate,
go to User Settings Mode and select
Smart Power Liftgate on the LCD
display.❈ ❈ For more information, refer to
the "LCD Display" section in
this chapter.
2. Detect and Alert
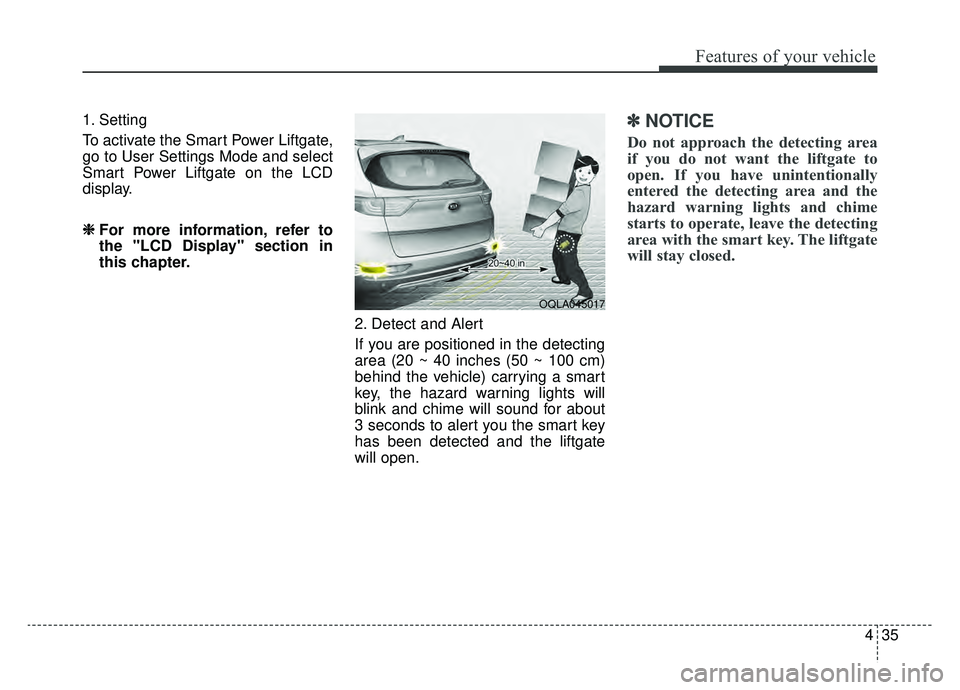
If you are positioned in the detecting
area (20 ~ 40 inches (50 ~ 100 cm)
behind the vehicle) carrying a smart
key, the hazard warning lights will
blink and chime will sound for about
3 seconds to alert you the smart key
has been detected and the liftgate
will open.✽ ✽NOTICE
Do not approach the detecting area
if you do not want the liftgate to
open. If you have unintentionally
entered the detecting area and the
hazard warning lights and chime
starts to operate, leave the detecting
area with the smart key. The liftgate
will stay closed.
OQLA045017
Page 150 of 607
463
Features of your vehicle
6. Return to the vehicle and firmlypress and release the pro-
grammed HomeLink button up to
three times. The rolling code
equipped device should now rec-
ognize the HomeLink signal and
activate when the HomeLink but-
ton is pressed. The remaining two
buttons may now be programmed
if this has not previously been
done. Refer to the “Programming”
portion of this text. Operating HomeLink
To operate, simply press the
programmed HomeLink button.
Activation will now occur for the
trained product (garage door, securi-
ty system, entry door lock, estate
gate, or home or office lighting). For
convenience, the hand-held trans-
mitter of the device may also be used
at any time. The HomeLink Wireless
Controls System (once programmed)
or the original hand-held transmitter
may be used to activate the device
(e.g. garage door, entry door lock,
etc.). In the event that there are still
programming difficulties, contact
HomeLink at 1-800-355-3515 or on
the internet at www.homelink.com. Erasing programmed HomeLink
buttons
To erase the three programmed but-
tons (individual buttons cannot be
erased):
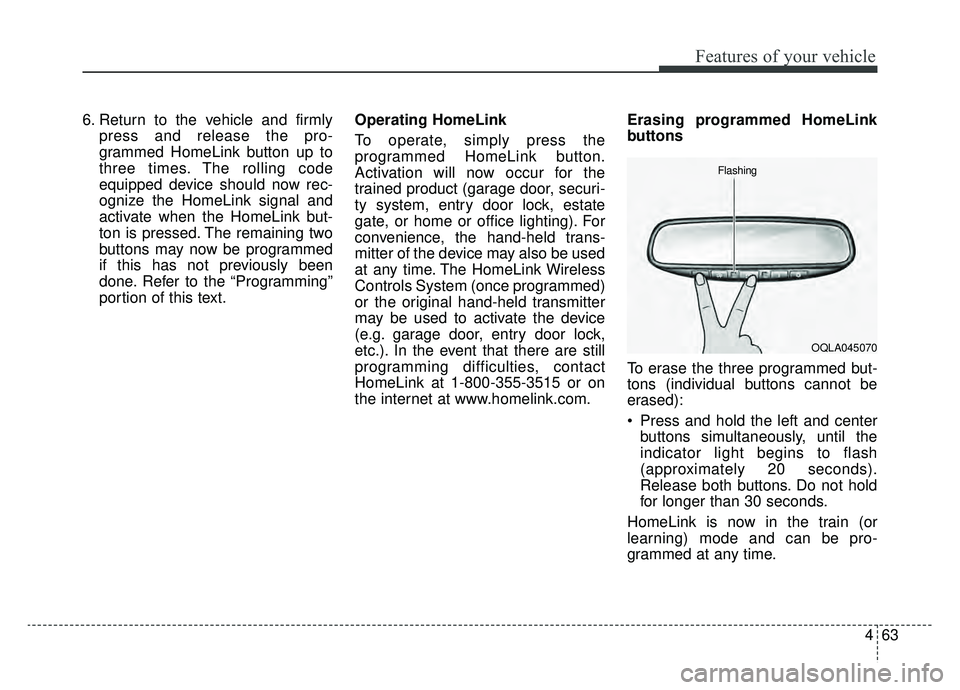
Press and hold the left and center
buttons simultaneously, until the
indicator light begins to flash
(approximately 20 seconds).
Release both buttons. Do not hold
for longer than 30 seconds.
HomeLink is now in the train (or
learning) mode and can be pro-
grammed at any time.
OQLA045070
Flashing
Page 161 of 607
Features of your vehicle
74
4
LCD DISPLAY (IF EQUIPPED)
❈ For controlling the LCD modes, refer to "LCD Display Control" in this chapter.
LCD Modes
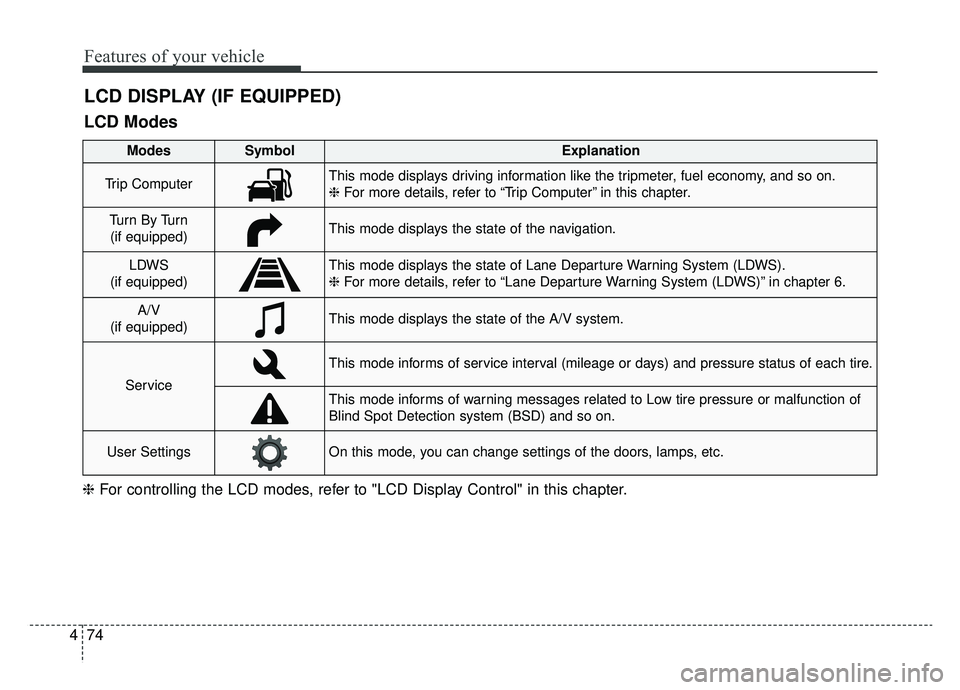
Modes SymbolExplanation
Trip ComputerThis mode displays driving information like the tripmeter, fuel economy, and so on.
❈ For more details, refer to “Trip Computer” in this chapter.
Tu r n B y Tu r n
(if equipped)This mode displays the state of the navigation.
LDWS
(if equipped)This mode displays the state of Lane Departure Warning System (LDWS).
❈ For more details, refer to “Lane Departure Warning System (LDWS)” in chapter 6.
A/V
(if equipped)This mode displays the state of the A/V system.
Service
This mode informs of service interval (mileage or days) and pressure status of each tire.
This mode informs of warning messages related to Low tire pressure or malfunction of
Blind Spot Detection system (BSD) and so on.
User SettingsOn this mode, you can change settings of the doors, lamps, etc.