2019 KIA SPORTAGE replace
[x] Cancel search: replacePage 457 of 607
What to do in an emergency
20
7
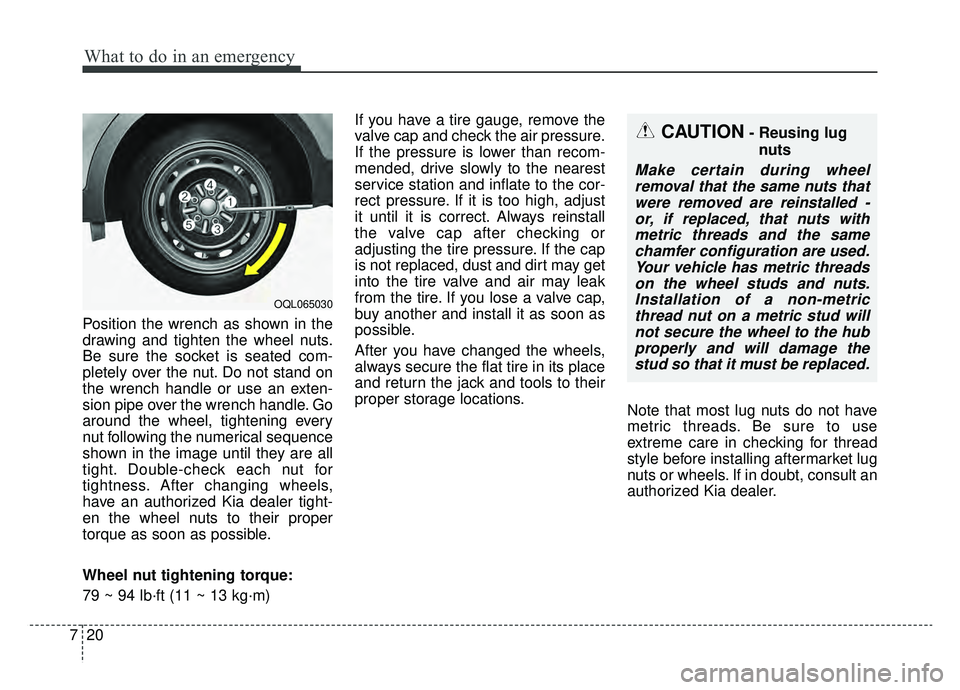
Position the wrench as shown in the
drawing and tighten the wheel nuts.
Be sure the socket is seated com-
pletely over the nut. Do not stand on
the wrench handle or use an exten-
sion pipe over the wrench handle. Go
around the wheel, tightening every
nut following the numerical sequence
shown in the image until they are all
tight. Double-check each nut for
tightness. After changing wheels,
have an authorized Kia dealer tight-
en the wheel nuts to their proper
torque as soon as possible.
Wheel nut tightening torque:
79 ~ 94 lb·ft (11 ~ 13 kg·m) If you have a tire gauge, remove the
valve cap and check the air pressure.
If the pressure is lower than recom-
mended, drive slowly to the nearest
service station and inflate to the cor-
rect pressure. If it is too high, adjust
it until it is correct. Always reinstall
the valve cap after checking or
adjusting the tire pressure. If the cap
is not replaced, dust and dirt may get
into the tire valve and air may leak
from the tire. If you lose a valve cap,
buy another and install it as soon as
possible.
After you have changed the wheels,
always secure the flat tire in its place
and return the jack and tools to their
proper storage locations.
Note that most lug nuts do not have
metric threads. Be sure to use
extreme care in checking for thread
style before installing aftermarket lug
nuts or wheels. If in doubt, consult an
authorized Kia dealer.
CAUTION- Reusing lug
nuts
Make certain during wheelremoval that the same nuts thatwere removed are reinstalled -or, if replaced, that nuts withmetric threads and the samechamfer configuration are used.Your vehicle has metric threadson the wheel studs and nuts.Installation of a non-metricthread nut on a metric stud willnot secure the wheel to the hubproperly and will damage thestud so that it must be replaced.
OQL065030
Page 458 of 607
721
What to do in an emergency
To prevent the jack, wheel lug nut
wrench and spare tire from rattling
while the vehicle is in motion, store
them properly.
Check the inflation pressures as
soon as possible after installing the
spare tire. Adjust it to the specified
pressure, if necessary. Refer to
“Tires and wheels” in section 8.
Important - use of compact sparetire
Your vehicle is equipped with a com-
pact spare tire. This compact spare
tire takes up less space than a regu-
lar-size tire. This tire is smaller than a
conventional tire and is designed for
temporary use only.
You should drive carefully when the compact spare is in use. The
compact spare should be replaced
by the proper conventional tire and
rim at the first opportunity.
The operation of this vehicle is not recommended with more than one
compact spare tire in use at the
same time. The compact spare should be inflat-
ed to 60 psi (420 kPa).
✽ ✽
NOTICE
Check the inflation pressure after
installing the spare tire. Adjust it to
the specified pressure, as necessary.
WARNING- Spare tire
The compact spare tire is for
emergency use only. Do not
operate your vehicle on this
compact spare at speeds over
50 mph (80 km/h). The original
tire should be repaired or
replaced as soon as possible to
avoid failure of the spare possi-
bly leading to personal injury or
death.WARNING- Wheel studs
If the studs are damaged, they
may lose their ability to retain
the wheel. This could lead to the
loss of the wheel and a collision
resulting in serious injuries.
Page 459 of 607
What to do in an emergency
22
7
When using a compact spare tire,
observe the following precautions:
Under no circumstances should
you exceed 50 mph (80 km/h); a
higher speed could damage the
tire.
Ensure that you drive slowly enough for the road conditions to
avoid all hazards. Any road hazard,
such as a pothole or debris, could
seriously damage the compact
spare.
Any continuous road use of this tire could result in tire failure, loss of
vehicle control, and possible per-
sonal injury.
Do not exceed the vehicle’s maxi- mum load rating or the load-carry-
ing capacity shown on the sidewall
of the compact spare tire.
Avoid driving over obstacles. The compact spare tire diameter is
smaller than the diameter of a con-
ventional tire and reduces the
ground clearance approximately 1
inch (25 mm), which could result in
damage to the vehicle. Do not take this vehicle through an
automatic vehicle wash while the
compact spare tire is installed.
Do not use tire chains on the com- pact spare tire. Because of the
smaller size, a tire chain will not fit
properly. This could damage the
vehicle and result in loss of the
chain.
Do not use the compact spare tire on any other vehicle because this
tire has been designed especially
for your vehicle.
The compact spare tire’s tread life is shorter than a regular tire.
Inspect your compact spare tire
regularly and replace worn com-
pact spare tires with the same size
and design, mounted on the same
wheel.
The compact spare tire should not be used on any other wheels, nor
should standard tires, snow tires,
wheel covers or trim rings be used
with the compact spare wheel. If
such use is attempted, damage to
these items or other vehicle com-
ponents may occur. Do not use more than one compact
spare tire at a time.
Do not tow a trailer while the com- pact spare tire is installed.
Page 461 of 607
What to do in an emergency
24
7
IF YOU HAVE A FLAT TIRE (WITH TIRE MOBILITY KIT, IF EQUIPPED)
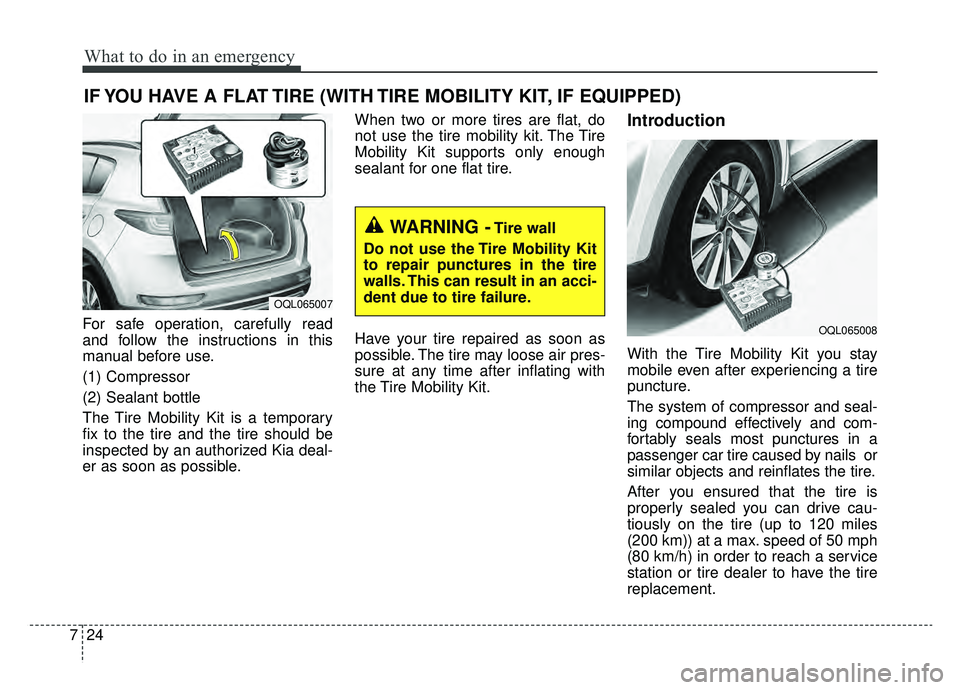
For safe operation, carefully read
and follow the instructions in this
manual before use.
(1) Compressor
(2) Sealant bottle
The Tire Mobility Kit is a temporary
fix to the tire and the tire should be
inspected by an authorized Kia deal-
er as soon as possible. When two or more tires are flat, do
not use the tire mobility kit. The Tire
Mobility Kit supports only enough
sealant for one flat tire.
Have your tire repaired as soon as
possible. The tire may loose air pres-
sure at any time after inflating with
the Tire Mobility Kit.
Introduction
With the Tire Mobility Kit you stay
mobile even after experiencing a tire
puncture.
The system of compressor and seal-
ing compound effectively and com-
fortably seals most punctures in a
passenger car tire caused by nails or
similar objects and reinflates the tire.
After you ensured that the tire is
properly sealed you can drive cau-
tiously on the tire (up to 120 miles
(200 km)) at a max. speed of 50 mph
(80 km/h) in order to reach a service
station or tire dealer to have the tire
replacement.
OQL065008
OQL065007
WARNING -Tire wall
Do not use the Tire Mobility Kit
to repair punctures in the tire
walls. This can result in an acci-
dent due to tire failure.
Page 468 of 607
731
What to do in an emergency
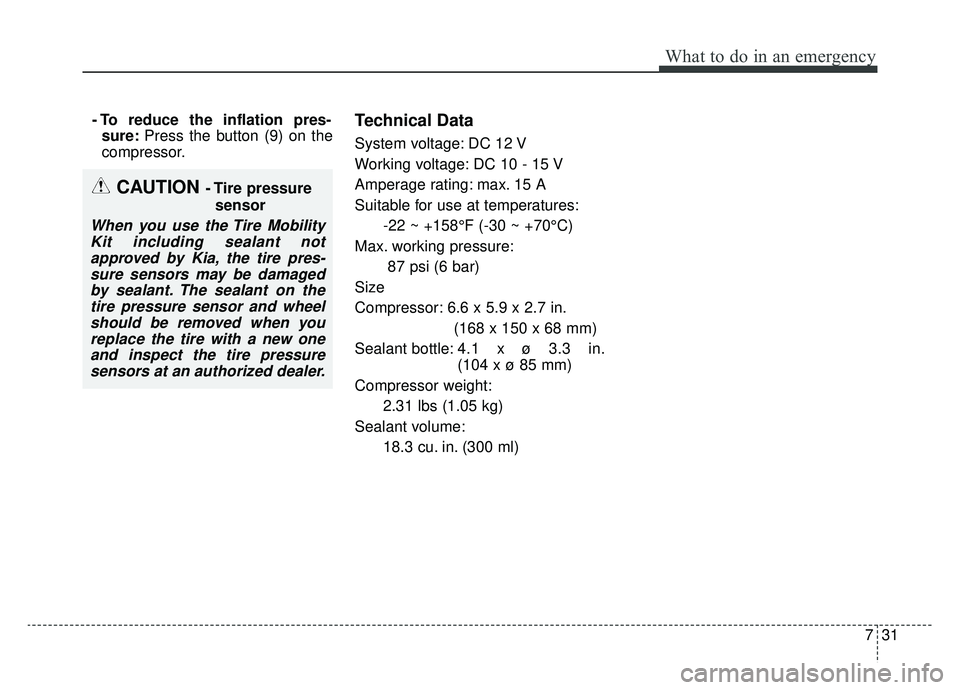
- To reduce the inflation pres-sure: Press the button (9) on the
compressor.Technical Data
System voltage: DC 12 V
Working voltage: DC 10 - 15 V
Amperage rating: max. 15 A
Suitable for use at temperatures:
-22 ~ +158°F (-30 ~ +70°C)
Max. working pressure: 87 psi (6 bar)
Size
Compressor: 6.6 x 5.9 x 2.7 in. (168 x 150 x 68 mm)
Sealant bottle: 4.1 x ø 3.3 in.
(104 x ø 85 mm)
Compressor weight: 2.31 lbs (1.05 kg)
Sealant volume: 18.3 cu. in. (300 ml)
CAUTION - Tire pressuresensor
When you use the Tire MobilityKit including sealant notapproved by Kia, the tire pres-sure sensors may be damagedby sealant. The sealant on thetire pressure sensor and wheelshould be removed when youreplace the tire with a new oneand inspect the tire pressuresensors at an authorized dealer.
Page 474 of 607
Maintenance
Engine compartment . . . . . . . . . . . . . . . . . . . . . . . . 8-3
Maintenance services . . . . . . . . . . . . . . . . . . . . . . . . 8-4
• Owner’s responsibility . . . . . . . . . . . . . . . . . . . . . . . . . 8-4
• Owner maintenance precautions . . . . . . . . . . . . . . . . . 8-5
Owner maintenance . . . . . . . . . . . . . . . . . . . . . . . . . 8-6
• Owner maintenance schedule. . . . . . . . . . . . . . . . . . . . 8-6
Scheduled maintenance service. . . . . . . . . . . . . . . . 8-8
Explanation of scheduled maintenance items . . . 8-20
Checking fluid levels . . . . . . . . . . . . . . . . . . . . . . . 8-24
Engine oil. . . . . . . . . . . . . . . . . . . . . . . . . . . . . . . . . 8-25
• Checking the engine oil level . . . . . . . . . . . . . . . . . . . 8-25
• Changing the engine oil and filter . . . . . . . . . . . . . . . 8-26
Engine coolant . . . . . . . . . . . . . . . . . . . . . . . . . . . . 8-27
• Checking the coolant level . . . . . . . . . . . . . . . . . . . . . 8-27
• Changing the coolant . . . . . . . . . . . . . . . . . . . . . . . . . 8-30
Brake fluid . . . . . . . . . . . . . . . . . . . . . . . . . . . . . . . 8-31
• Checking the brake fluid level . . . . . . . . . . . . . . . . . . 8-31
Washer fluid . . . . . . . . . . . . . . . . . . . . . . . . . . . . . . 8-32
• Checking the washer fluid level . . . . . . . . . . . . . . . . . 8-32
Parking brake . . . . . . . . . . . . . . . . . . . . . . . . . . . . . 8-33
• Checking the parking brake. . . . . . . . . . . . . . . . . . . . 8-33
Air cleaner. . . . . . . . . . . . . . . . . . . . . . . . . . . . . . . . 8-34
• Filter replacement . . . . . . . . . . . . . . . . . . . . . . . . . . . . 8-34
Climate control air filter . . . . . . . . . . . . . . . . . . . . 8-36
• Filter inspection . . . . . . . . . . . . . . . . . . . . . . . . . . . . . . 8-36
Wiper blades . . . . . . . . . . . . . . . . . . . . . . . . . . . . . . 8-38
• Blade inspection . . . . . . . . . . . . . . . . . . . . . . . . . . . . . . 8-38
• Blade replacement . . . . . . . . . . . . . . . . . . . . . . . . . . . . 8-38
Battery . . . . . . . . . . . . . . . . . . . . . . . . . . . . . . . . . . . 8-\
41
• For best battery service . . . . . . . . . . . . . . . . . . . . . . . 8-41
• Recharging the battery . . . . . . . . . . . . . . . . . . . . . . . . 8-42
• Reset items . . . . . . . . . . . . . . . . . . . . . . . . . . . . . . . . . . 8-43\
Tires and wheels . . . . . . . . . . . . . . . . . . . . . . . . . . . 8-44
• Tire care . . . . . . . . . . . . . . . . . . . . . . . . . . . . . . . . . . . . \
8-44
• Recommended cold tire inflation pressures . . . . . . . 8-44
• Tire pressure . . . . . . . . . . . . . . . . . . . . . . . . . . . . . . . . 8-45
• Checking tire inflation pressure. . . . . . . . . . . . . . . . . 8-45
• Tire rotation . . . . . . . . . . . . . . . . . . . . . . . . . . . . . . . . . 8-46
• Wheel alignment and tire balance . . . . . . . . . . . . . . . 8-47
• Tire replacement . . . . . . . . . . . . . . . . . . . . . . . . . . . . . 8-48
• Wheel replacement . . . . . . . . . . . . . . . . . . . . . . . . . . . 8-49
• Tire traction . . . . . . . . . . . . . . . . . . . . . . . . . . . . . . . . . 8-49
• Tire maintenance . . . . . . . . . . . . . . . . . . . . . . . . . . . . . 8-49
• Tire sidewall labeling . . . . . . . . . . . . . . . . . . . . . . . . . 8-49
• All season tires . . . . . . . . . . . . . . . . . . . . . . . . . . . . . . . 8-56
• Summer tires . . . . . . . . . . . . . . . . . . . . . . . . . . . . . . . . 8-56
• Snow tires . . . . . . . . . . . . . . . . . . . . . . . . . . . . . . . . . . . 8-\
56
• Tire chains . . . . . . . . . . . . . . . . . . . . . . . . . . . . . . . . . . 8-56\
8
Page 475 of 607
• Radial-ply tires . . . . . . . . . . . . . . . . . . . . . . . . . . . . . . 8-57
• Low aspect ratio tire . . . . . . . . . . . . . . . . . . . . . . . . . . 8-57
Fuses . . . . . . . . . . . . . . . . . . . . . . . . . . . . . . . . . . . . \
8-59
• Inner panel fuse replacement . . . . . . . . . . . . . . . . . . . 8-60
• Engine compartment fuse replacement. . . . . . . . . . . 8-62
• Fuse/relay panel description. . . . . . . . . . . . . . . . . . . . 8-65
Light bulbs . . . . . . . . . . . . . . . . . . . . . . . . . . . . . . . 8-77
• Bulb replacement precaution . . . . . . . . . . . . . . . . . . . 8-77
• Light bulb position (Front). . . . . . . . . . . . . . . . . . . . . 8-78
• Light bulb position (Rear) . . . . . . . . . . . . . . . . . . . . . 8-79
• Light bulb position (Side) . . . . . . . . . . . . . . . . . . . . . . 8-80
• Headlamp (HID type) bulb replacement . . . . . . . . . 8-80
• Headlamp (High/Low beam) bulb replacement . . . . 8-81
• Front turn signal lamp bulb replacement . . . . . . . . . 8-82
• Position lamp + DRL bulb replacement . . . . . . . . . . 8-83
• Front fog lamp (Bulb and LED type) bulbreplacement . . . . . . . . . . . . . . . . . . . . . . . . . . . . . . . . 8-83
• Stop and tail lamp bulb replacement . . . . . . . . . . . . 8-84
• Tail lamp (inside) bulb replacement . . . . . . . . . . . . . 8-85
• Stop and tail lamp (LED type) bulb replacement . . 8-86
• Back-up lamp and Rear turn signal lamp bulb replacement . . . . . . . . . . . . . . . . . . . . . . . . . . . . . . . . 8-86
• High mounted stop lamp bulb replacement . . . . . . . 8-87
• License plate lamp bulb Replacement. . . . . . . . . . . . 8-87
• Side repeater lamp (LED type) bulb replacement . . 8-88 • Map lamp bulb replacement . . . . . . . . . . . . . . . . . . . 8-88
• Vanity mirror lamp bulb replacement . . . . . . . . . . . 8-88
• Room lamp bulb replacement . . . . . . . . . . . . . . . . . . 8-89
• Personal lamp bulb replacement . . . . . . . . . . . . . . . . 8-90
• Glove box lamp bulb replacement . . . . . . . . . . . . . . . 8-90
• Tailgate room lamp bulb replacement . . . . . . . . . . . 8-91
Appearance care . . . . . . . . . . . . . . . . . . . . . . . . . . . 8-92
• Exterior care . . . . . . . . . . . . . . . . . . . . . . . . . . . . . . . . 8-92
• Interior care . . . . . . . . . . . . . . . . . . . . . . . . . . . . . . . . . 8-97
Emission control system . . . . . . . . . . . . . . . . . . . 8-100
• 1. Crankcase emission control system . . . . . . . . . . . 8-100
• 2. Evaporative emission control (including ORVR:
Onboard Refueling Vapor Recovery) system . . 8-100
• 3. Exhaust emission control system . . . . . . . . . . . . . 8-101
California Perchlorate notice . . . . . . . . . . . . . . . 8-103
8
Page 481 of 607
Maintenance
88
SCHEDULED MAINTENANCE SERVICE
Follow the Normal Maintenance Schedule if the vehicle is usually operated where none of the following conditions apply.
If any of the following conditions apply, follow the Maintenance Under Severe Usage Conditions.
Repeated driving short distance of less than 5 miles (8 km) in normal temperature or less than 10 miles (16 km) infreezing temperature
Extensive engine idling or low speed driving for long distances
Driving on rough, dusty, muddy, unpaved, graveled or salt-spread roads
Driving in areas using salt or other corrosive materials or in very cold weather
Driving in heavy dust conditions
Driving in heavy traffic areas
Driving on uphill, downhill, or mountain roads repeatedly
Towing a trailer or using a camper, or roof rack
Driving as a patrol car, taxi, other commercial use of vehicle towing
Driving over 106 mile/h (170 km/h)
Frequently driving in stop-and-go condition
If your vehicle is operated under the above conditions, you should inspect, replace or refill more frequently than the following Normal Maintenance Schedule. After 120 months or 150,000 miles continue to follow the prescribed main-tenance intervals.