2019 KIA SOUL power steering
[x] Cancel search: power steeringPage 15 of 564
Your vehicle at a glance
42
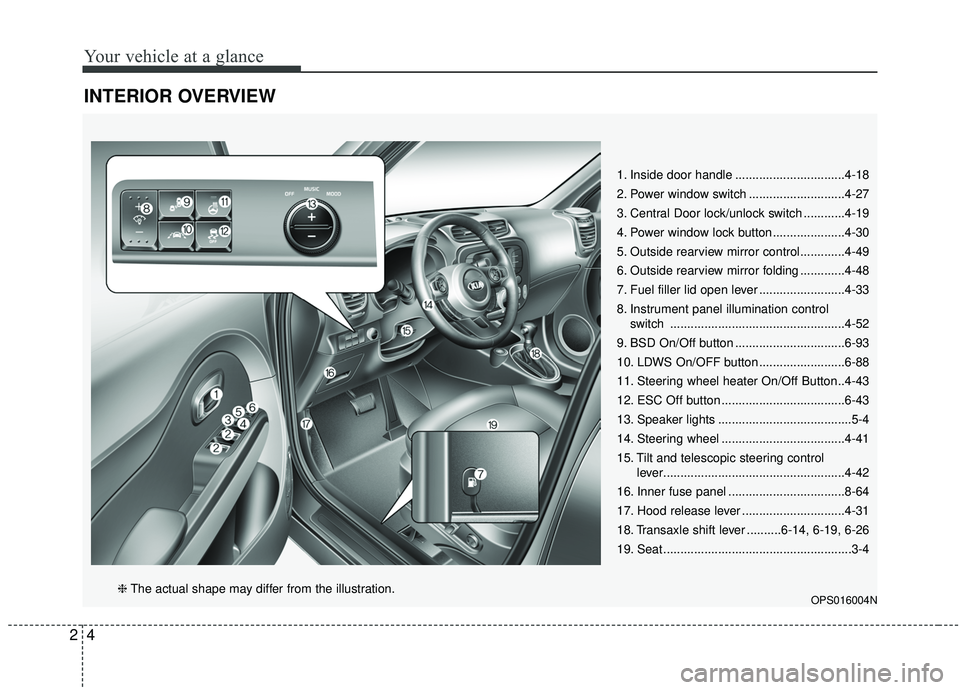
INTERIOR OVERVIEW
1. Inside door handle ................................4-18
2. Power window switch ............................4-27
3. Central Door lock/unlock switch ............4-19
4. Power window lock button .....................4-30
5. Outside rearview mirror control.............4-49
6. Outside rearview mirror folding .............4-48
7. Fuel filler lid open lever .........................4-33
8. Instrument panel illumination controlswitch ...................................................4-52
9. BSD On/Off button ................................6-93
10. LDWS On/OFF button .........................6-88
11. Steering wheel heater On/Off Button..4-43
12. ESC Off button ....................................6-43
13. Speaker lights .......................................5-4
14. Steering wheel ....................................4-41
15. Tilt and telescopic steering control lever.....................................................4-42
16. Inner fuse panel ..................................8-64
17. Hood release lever ..............................4-31
18. Transaxle shift lever ..........6-14, 6-19, 6-26
19. Seat .......................................................3-4
OPS016004N❈ The actual shape may differ from the illustration.
Page 26 of 564
Safety features of your vehicle
83
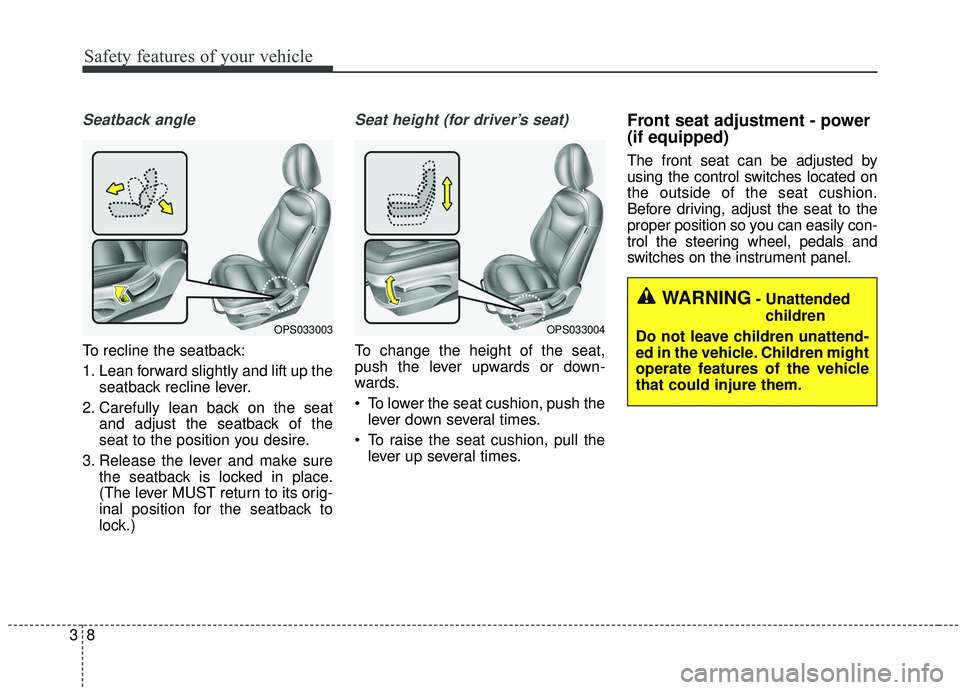
Seatback angle
To recline the seatback:
1. Lean forward slightly and lift up theseatback recline lever.
2. Carefully lean back on the seat and adjust the seatback of the
seat to the position you desire.
3. Release the lever and make sure the seatback is locked in place.
(The lever MUST return to its orig-
inal position for the seatback to
lock.)
Seat height (for driver’s seat)
To change the height of the seat,
push the lever upwards or down-
wards.
To lower the seat cushion, push thelever down several times.
To raise the seat cushion, pull the lever up several times.
Front seat adjustment - power
(if equipped)
The front seat can be adjusted by
using the control switches located on
the outside of the seat cushion.
Before driving, adjust the seat to the
proper position so you can easily con-
trol the steering wheel, pedals and
switches on the instrument panel.
OPS033003OPS033004
WARNING- Unattended
children
Do not leave children unattend-
ed in the vehicle. Children might
operate features of the vehicle
that could injure them.
Page 127 of 564

441
Features of your vehicle
Electric power steering (EPS)
The power steering uses a motor to
assist you in steering the vehicle. If
the engine is off or if the power steer-
ing system becomes inoperative, the
vehicle may still be steered, but it will
require increased steering effort.
The motor driven power steering is
controlled by a power steering con-
trol unit which senses the steering
wheel torque and vehicle speed to
command the motor.
The steering becomes heavier as
the vehicle’s speed increases and
becomes lighter as the vehicle’s
speed decreases for optimum steer-
ing control.
Should you notice any change in the
effort required to steer during normal
vehicle operation, have the power
steering checked by an authorized
Kia dealer. If the Electric Power Steering System
does not operate normally, the warn-
ing light will illuminate on the instru-
ment cluster. The steering wheel may
require increased steering effort.
Take your vehicle to an authorized
Kia dealer and have the vehicle
checked as soon as possible.
When you operate the steering wheel in low temperature, noise
may occur. If temperature rises, the
noise will likely disappear. This is a
normal condition.
When the vehicle is stationary, when the steering wheel is turned
all the way to the left or right con-
tinuously, the steering wheel
becomes harder to turn. The power
assist is limited to protect the
motor from overheating.
As time passes, the steering wheel
return to its normal condition.
✽ ✽ NOTICE
The following symptoms may occur
during normal vehicle operation:
• The EPS warning light does not
illuminate.
• The steering gets heavy immedi- ately after turning the ignition
switch on. This happens as the sys-
tem performs the EPS system
diagnostics. When the diagnostics
are completed, the steering wheel
will return to its normal condition.
• A click noise may be heard from the EPS relay after the ignition
switch is turned to the ON or
LOCK (OFF) position.
• A motor noise may be heard when the vehicle is at a stop or at a low
driving speed.
• If the Electric Power Steering System does not operate normally,
the warning light will illuminate on
the instrument cluster. The steer-
ing wheel may become difficult to
control or operate abnormally.
Take your vehicle to an authorized
Kia dealer and have the vehicle
checked as soon as possible. (Continued)
STEERING WHEEL
Page 131 of 564
445
Features of your vehicle
Normal mode
The normal mode offers medium
steering effort.
Sport mode
The steering wheel becomes heav-
ier. The sport mode is usually used
when driving on the highway.
CAUTION
For your safety, if you pressthe steering mode buttonwhile operating the steeringwheel, but the steering effortwill not change immediately.After operating the steeringwheel, the steering effort willchange automatically to theselected mode.
Use caution when changing the steering mode while driv-ing.
When the electronic power steering is not operating prop-erly, the flex steering wheelwill not work.
Page 159 of 564
473
Features of your vehicle
Fuel Economy
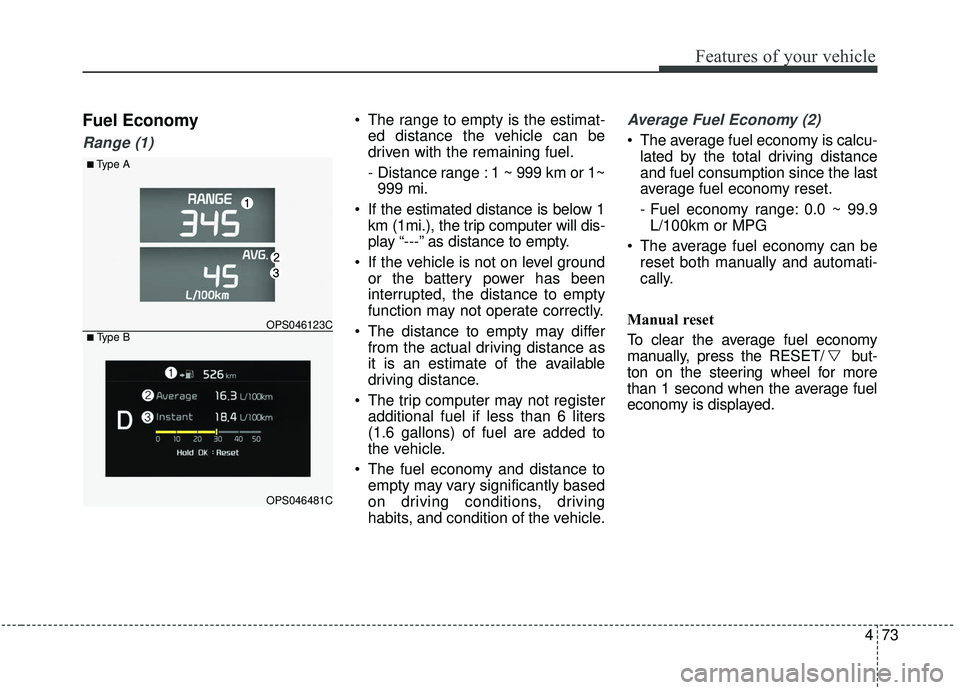
Range (1)
The range to empty is the estimat-ed distance the vehicle can be
driven with the remaining fuel.
- Distance range : 1 ~ 999 km or 1~999 mi.
If the estimated distance is below 1 km (1mi.), the trip computer will dis-
play “---” as distance to empty.
If the vehicle is not on level ground or the battery power has been
interrupted, the distance to empty
function may not operate correctly.
The distance to empty may differ from the actual driving distance as
it is an estimate of the available
driving distance.
The trip computer may not register additional fuel if less than 6 liters
(1.6 gallons) of fuel are added to
the vehicle.
The fuel economy and distance to empty may vary significantly based
on driving conditions, driving
habits, and condition of the vehicle.Average Fuel Economy (2)
The average fuel economy is calcu-lated by the total driving distance
and fuel consumption since the last
average fuel economy reset.
- Fuel economy range: 0.0 ~ 99.9L/100km or MPG
The average fuel economy can be reset both manually and automati-
cally.
Manual reset
To clear the average fuel economy
manually, press the RESET/ but-
ton on the steering wheel for more
than 1 second when the average fuel
economy is displayed.
■Type A
OPS046123C
OPS046481C
■ Type B
Page 166 of 564
Features of your vehicle
80
4
✽ ✽
NOTICE- Electronic Brake
force Distribution (EBD)
System Warning Light
When the ABS Warning Light is on
or both ABS and Parking Brake &
Brake Fluid Warning Lights are on,
the speedometer, odometer, or trip-
meter may not work. Also, the EPS
Warning Light may illuminate and
the steering effort may increase or
decrease.
In this case, have your vehicle inspect-
ed by an authorized Kia dealer as
soon as possible.
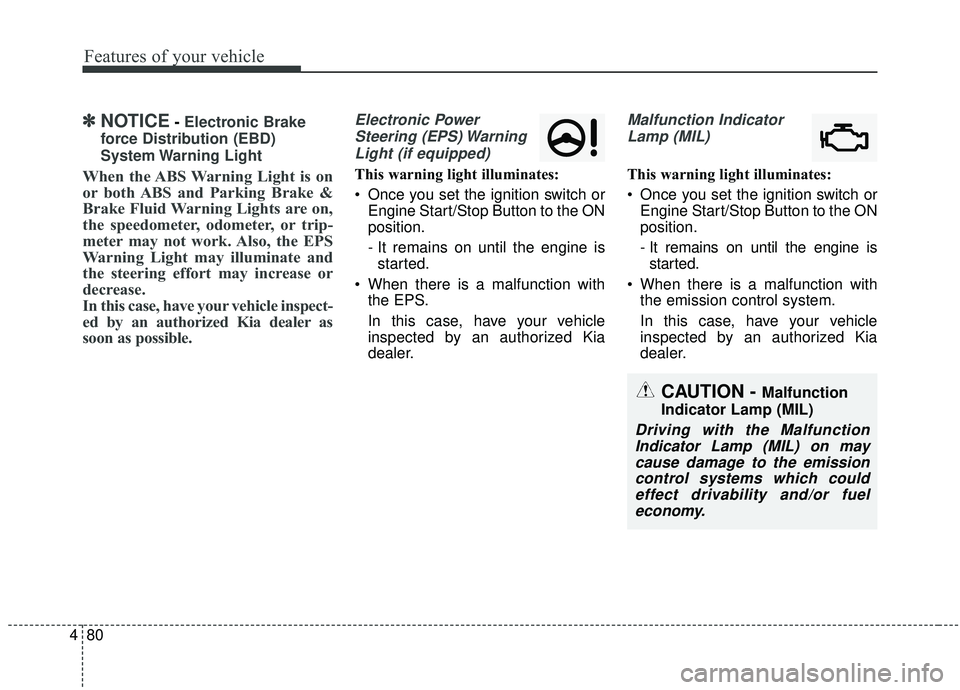
Electronic Power Steering (EPS) WarningLight (if equipped)
This warning light illuminates:
Once you set the ignition switch or Engine Start/Stop Button to the ON
position.
- It remains on until the engine isstarted.
When there is a malfunction with the EPS.
In this case, have your vehicle
inspected by an authorized Kia
dealer.
Malfunction Indicator
Lamp (MIL)
This warning light illuminates:
Once you set the ignition switch or Engine Start/Stop Button to the ON
position.
- It remains on until the engine isstarted.
When there is a malfunction with the emission control system.
In this case, have your vehicle
inspected by an authorized Kia
dealer.
CAUTION - Malfunction
Indicator Lamp (MIL)
Driving with the Malfunction Indicator Lamp (MIL) on maycause damage to the emissioncontrol systems which couldeffect drivability and/or fueleconomy.
Page 272 of 564
Audio system
534 If a
Bluetooth®Wireless Technology
connection is lost due to abnormal
conditions while a
Bluetooth®
Wireless Technology device is con-
nected (communication range
exceeded, device power OFF,
communication errors, etc.), the
disconnected
Bluetooth®Wireless
Technology device is searched for
and automatically reconnected.
If you want to disable the
Bluetooth®
Wireless Technology device auto-
connect function, turn the
Bluetooth®Wireless Technology
function OFF on your device.
Consult the user manuals for indi-
vidual devices to see whether
Bluetooth®Wireless Technology is
supported.
Handsfree call quality and volume may vary depending on the type of
Bluetooth®Wireless Technology
device.
Some
Bluetooth®Wireless Technology
devices are subject to intermittent
Bluetooth®Wireless Technology
connection failures. In this case,
use the following method. 1) Turn the
Bluetooth®Wireless
Technology function off on your
Bluetooth®Wireless Technology
device ➟Turn it on and try
again.
2) Delete the paired device from both the audio system and
Bluetooth®Wireless Technology
device, then pair again.
3) Power down your
Bluetooth®
Wireless Technology device ➟
Turn it on and try again.
4) Completely remove the battery from your
Bluetooth®Wireless
Technology device; reinsert it,
reboot, and attempt connection.
5) Restart the vehicle and reat- tempt connection.
✽ ✽NOTICE
-Bluetooth®Wireless Technology
specifications
• Power Class 2: -6 to 4 dBm
• Aerial power: Max 3 mW
• Frequency range: 2400 to 2483.5 MHz.
Pairing a Bluetooth®Wireless
Technology device
Information on pairing Bluetooth®
Wireless Technology devices
Pairing refers to the process of pair-
ing
Bluetooth®Wireless Technology
cell phones or devices with the
system prior to connection. This is
a necessary procedure for
Bluetooth®
Wireless Technology connection
and usage.
Up to five devices can be paired.
Pairing
Bluetooth®Wireless
Technology device is not allowed
while vehicle is moving.
Pairing the first Bluetooth
®Wireless
Technology device
Press the [PHONE] button on the
audio system or the [CALL] button
on the steering wheel remote control
➟ Search for the vehicle from the
Bluetooth®Wireless Technology
device, and pair ➟ Enter the passkey
on the
Bluetooth®Wireless Technology
device or approve passkey ➟
Bluetooth®Wireless Technology pair-
ing completed.
Page 327 of 564

637
Driving your vehicle
Power brakes
Your vehicle has power-assisted
brakes that adjust automatically
through normal usage.
In the event that the power-assisted
brakes lose power because of a
stalled engine or some other reason,
you can still stop your vehicle by
applying greater force to the brake
pedal than you normally would. The
stopping distance, however, will be
longer.
When the engine is not running, the
reserve brake power is partially
depleted each time the brake pedal
is applied. Do not pump the brake
pedal when the power assist has
been interrupted.
Pump the brake pedal only when
necessary to maintain steering con-
trol on slippery surfaces.Wet brakes may impair the vehicle’s
ability to safely slow down; the vehi-
cle may also pull to one side when
the brakes are applied. Applying the
brakes lightly will indicate whether
they have been affected in this way.
Always test your brakes in this fash-
ion after driving through deep water.
To dry the brakes, apply them lightly
while maintaining a safe forward
speed until brake performance
returns to normal.
BRAKE SYSTEM
WARNING- Steep hill
braking
Avoid continuous application of
the brakes when descending a
long or steep hill by shifting to a
lower gear. Continuous brake
application will cause the
brakes to overheat and could
result in a temporary loss of
braking performance.
CAUTION- Brake Pedal
Do not drive with your foot rest- ing on the brake pedal. This willcreate abnormally high braketemperatures which can causeexcessive brake lining and padwear.