2019 KIA SOUL door lock
[x] Cancel search: door lockPage 14 of 564
23
Your vehicle at a glance
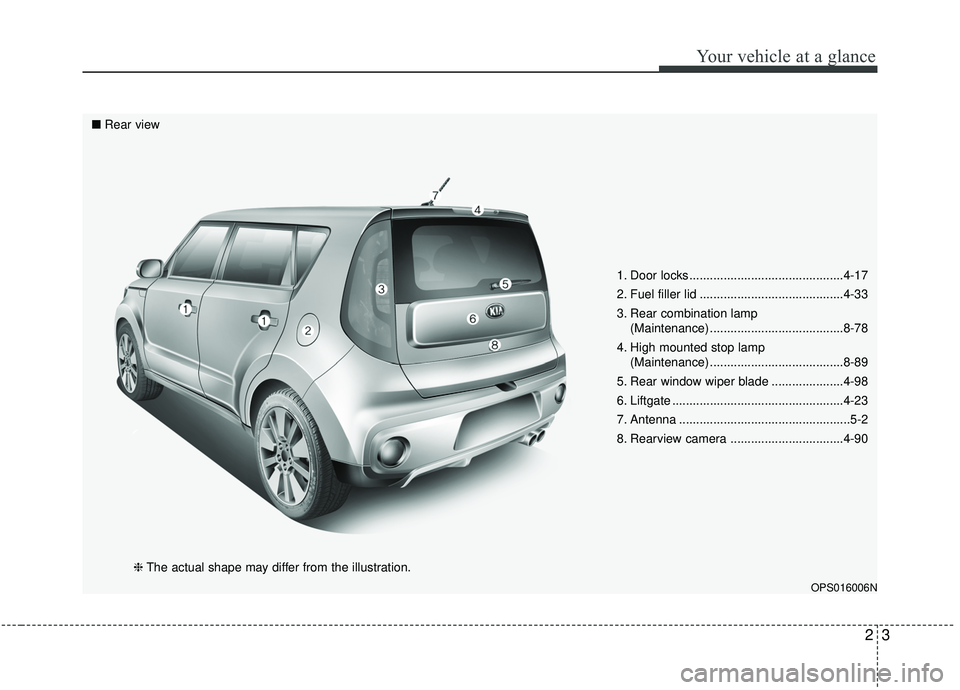
1. Door locks .............................................4-17
2. Fuel filler lid ..........................................4-33
3. Rear combination lamp(Maintenance) .......................................8-78
4. High mounted stop lamp (Maintenance) .......................................8-89
5. Rear window wiper blade .....................4-98
6. Liftgate ..................................................4-23
7. Antenna ..................................................5-2
8. Rearview camera .................................4-90
OPS016006N
■ Rear view
❈The actual shape may differ from the illustration.
Page 15 of 564
Your vehicle at a glance
42
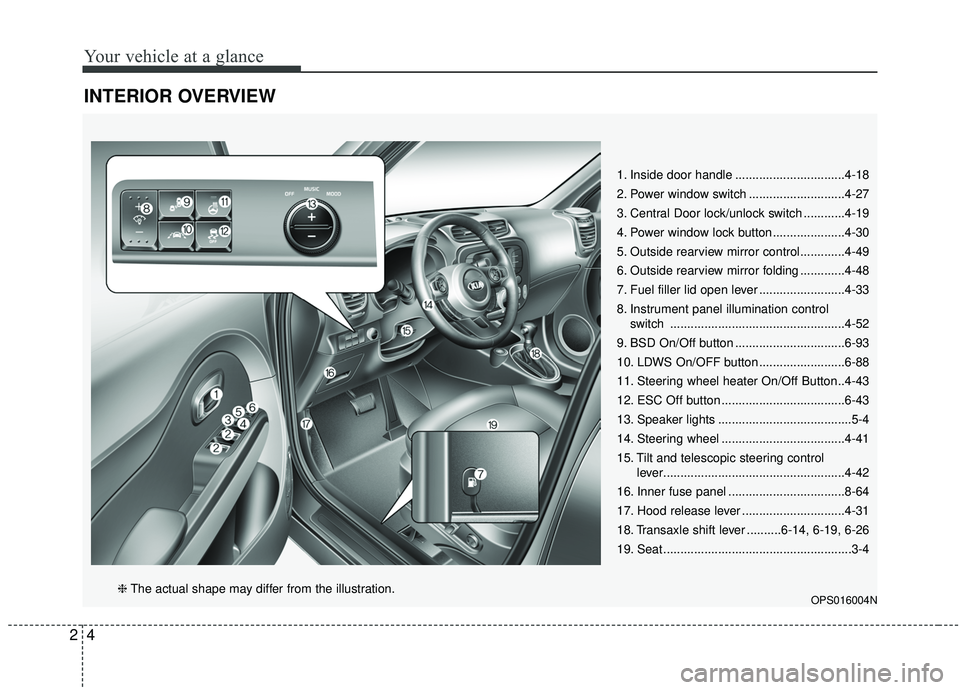
INTERIOR OVERVIEW
1. Inside door handle ................................4-18
2. Power window switch ............................4-27
3. Central Door lock/unlock switch ............4-19
4. Power window lock button .....................4-30
5. Outside rearview mirror control.............4-49
6. Outside rearview mirror folding .............4-48
7. Fuel filler lid open lever .........................4-33
8. Instrument panel illumination controlswitch ...................................................4-52
9. BSD On/Off button ................................6-93
10. LDWS On/OFF button .........................6-88
11. Steering wheel heater On/Off Button..4-43
12. ESC Off button ....................................6-43
13. Speaker lights .......................................5-4
14. Steering wheel ....................................4-41
15. Tilt and telescopic steering control lever.....................................................4-42
16. Inner fuse panel ..................................8-64
17. Hood release lever ..............................4-31
18. Transaxle shift lever ..........6-14, 6-19, 6-26
19. Seat .......................................................3-4
OPS016004N❈ The actual shape may differ from the illustration.
Page 40 of 564
Safety features of your vehicle
22
3
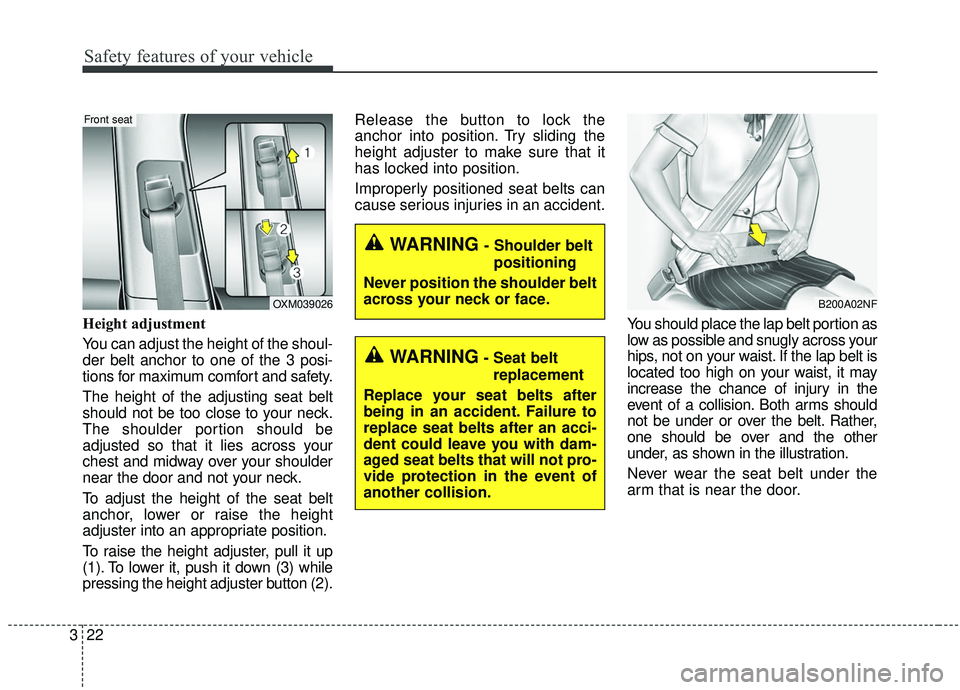
Height adjustment
You can adjust the height of the shoul-
der belt anchor to one of the 3 posi-
tions for maximum comfort and safety.
The height of the adjusting seat belt
should not be too close to your neck.
The shoulder portion should be
adjusted so that it lies across your
chest and midway over your shoulder
near the door and not your neck.
To adjust the height of the seat belt
anchor, lower or raise the height
adjuster into an appropriate position.
To raise the height adjuster, pull it up
(1). To lower it, push it down (3) while
pressing the height adjuster button (2). Release the button to lock the
anchor into position. Try sliding the
height adjuster to make sure that it
has locked into position.
Improperly positioned seat belts can
cause serious injuries in an accident.
You should place the lap belt portion as
low as possible and snugly across your
hips, not on your waist. If the lap belt is
located too high on your waist, it may
increase the chance of injury in the
event of a collision. Both arms should
not be under or over the belt. Rather,
one should be over and the other
under, as shown in the illustration.
Never wear the seat belt under the
arm that is near the door.
B200A02NFOXM039026
Front seat
WARNING- Shoulder beltpositioning
Never position the shoulder belt
across your neck or face.
WARNING- Seat belt replacement
Replace your seat belts after
being in an accident. Failure to
replace seat belts after an acci-
dent could leave you with dam-
aged seat belts that will not pro-
vide protection in the event of
another collision.
Page 67 of 564
349
Safety features of your vehicle
If an air bag deploys, there may bea loud noise followed by a fine dust
released in the vehicle. These con-
ditions are normal and are not haz-
ardous - the air bags are packed in
this fine powder. The dust generat-
ed during air bag deployment may
cause skin or eye irritation as well
as aggravate asthma for some per-
sons. Always wash all exposed
skin areas thoroughly with cold
water and a mild soap after an
accident in which the air bags were
deployed. The SRS can function only when
the ignition switch is in the ON
position. If the SRS air bag warning
light does not illuminate, or contin-
uously remains on after illuminat-
ing for about 6 seconds when the
ignition switch is turned to the ON
position, or after the engine is
started, comes on while driving,
the SRS is not working properly. If
this occurs, have your vehicle
immediately inspected by an
authorized Kia dealer.
✽ ✽ NOTICE
Before you replace a fuse or discon-
nect a battery terminal, turn the igni-
tion switch to the LOCK position and
remove the ignition switch. Never
remove or replace the air bag related
fuse(s) when the ignition switch is in
the ON position. Failure to heed this
warning will cause the SRS air bag
warning light to illuminate.
Occupant Detection System
(ODS)
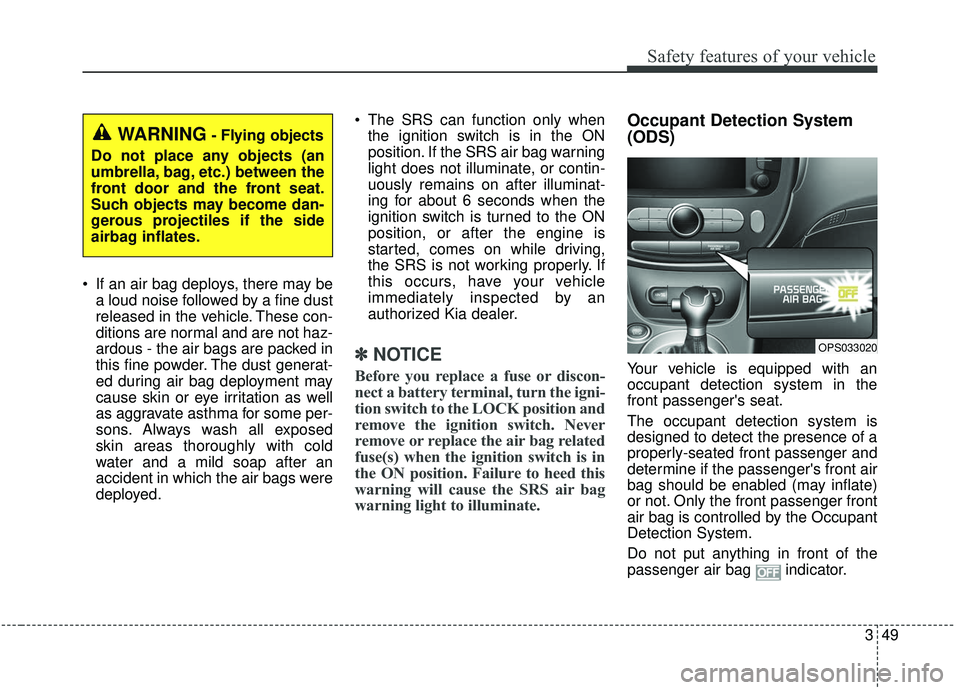
Your vehicle is equipped with an
occupant detection system in the
front passenger's seat.
The occupant detection system is
designed to detect the presence of a
properly-seated front passenger and
determine if the passenger's front air
bag should be enabled (may inflate)
or not. Only the front passenger front
air bag is controlled by the Occupant
Detection System.
Do not put anything in front of the
passenger air bag indicator.
WARNING- Flying objects
Do not place any objects (an
umbrella, bag, etc.) between the
front door and the front seat.
Such objects may become dan-
gerous projectiles if the side
airbag inflates.
OPS033020
Page 87 of 564
Features of your vehicle
Key . . . . . . . . . . . . . . . . . . . . . . . . . . . . . . . . . . . . \
. . . 4-4
• Record your key number . . . . . . . . . . . . . . . . . . . . . . . 4-4
. . . . . . . . . . . . . . . . . . . . . . . . . . . . . . . . 4-4
. . . . . . . . . . . . . . . . . . . . . . . . 4-6
. . . . . . . . . . . . . . . . . . . . . . . . . . . 4-6
. . . . . . . . . . . . . . . . . . . . . . . . . . . . 4-7
Smart key . . . . . . . . . . . . . . . . . . . . . . . . . . . . . . . . 4-10
. . . . . . . . . . . . . . . . . . . . . . 4-10
. . . . . . . . . . . . . . . . . . . . . . . . . . . 4-10
. . . . . . . . . . . . . . . . . . . . . . . . . 4-13
. . . . . . . . . . . . . . . . . . . . . . . . 4-13
. . . . . . . . . . . . . . . . . . 4-14
. . . . . . . . . . . . . . . . . . . . . . . . . . 4-16
Door locks . . . . . . . . . . . . . . . . . . . . . . . . . . . . . . . . 4-17
. . . . 4-17
. . . . . . 4-18
. . . . . . . . . . . . . . 4-20
. . . . . . . . . . . . . . . . . . 4-20
. . . . . . . . . . . . . . . . . 4-20
. . . . . . . . . . . . . . . . . 4-21
Liftgate . . . . . . . . . . . . . . . . . . . . . . . . . . . . . . . . . . 4-23\
. . . . . . . . . . . . . . . . . . . . . . . . . . . 4-23
Windows . . . . . . . . . . . . . . . . . . . . . . . . . . . . . . . . . 4-26
. . . . . . . . . . . . . . . . . . . . . . . . . . . . . . 4-27
Hood. . . . . . . . . . . . . . . . . . . . . . . . . . . . . . . . . . . . \
. 4-31
. . . . . . . . . . . . . . . . . . . . . . . . . . . . 4-31
. . . . . . . . . . . . . . . . . . . . . . . . . . . . . 4-31
Fuel filler lid . . . . . . . . . . . . . . . . . . . . . . . . . . . . . . 4-33
. . . . . . . . . . . . . . . . . . . . . . 4-33
. . . . . . . . . . . . . . . . . . . . . . . 4-33
Panoramic sunroof . . . . . . . . . . . . . . . . . . . . . . . . . 4-36
. . . . . . . . . . . . . . . . . . . . . . . . . . . 4-37
. . . . . . . . . . . . . . . . . . . . . . . . . . . . 4-38
. . . . . . . . . . . . . . . . . . . . . . . . . . . 4-39
. . . . . . . . . . . . . . . . . . . . . . . . . 4-40
Steering wheel . . . . . . . . . . . . . . . . . . . . . . . . . . . . . 4-41
. . . . . . . . . . . . . . . . . . 4-41
. . . . . . . . . . . . . . . . . . . . . 4-42
. . . . . . . . . . . . . . . . . . . . . . . . . 4-43
. . . . . . . . . . . . . . . . . . . . . . . . . . . . . . . . . . . . \
. . . 4-44
. . . . . . . . . . . . . . . . . . . . . . . . . . . . . . . . . . . 4-\
44
Mirrors . . . . . . . . . . . . . . . . . . . . . . . . . . . . . . . . . . 4-46\
. . . . . . . . . . . . . . . . . . . . . . . . 4-46
. . . . . . . . . . . . . . . . . . . . . . . 4-48
4
Page 90 of 564

Features of your vehicle
44
Record your key number
The key code num-
ber is stamped on
the key code tag
attached to the key
set. Should you
lose your keys, this number will
enable an authorized Kia dealer to
duplicate the keys easily. Remove
the key code tag and store it in a safe
place. Also, record the key code
number and keep it in a safe and
handy place, but not in the vehicle.
Key operations
• Used to start the engine.
Used to lock and unlock the doors. To unfold the key, press the release
button (1) then the key will unfold
automatically. To fold the key, fold
the key manually while pressing
the release button (1).
KEY
CAUTION
Do not fold the key withoutpressing the release button.This may damage the key.
WARNING- Aftermarket
key
Use only Kia original parts for
the ignition key in your vehicle.
If an aftermarket key is used,
the ignition switch may not
return to ON after START. If this
happens, the starter will contin-
ue to operate causing damage
to the starter motor and possi-
ble fire due to excessive current
in the wiring.
OED036001A
OPS046493N
■Type A (if equipped)
■ Type B (if equipped)
Page 91 of 564
45
Features of your vehicle
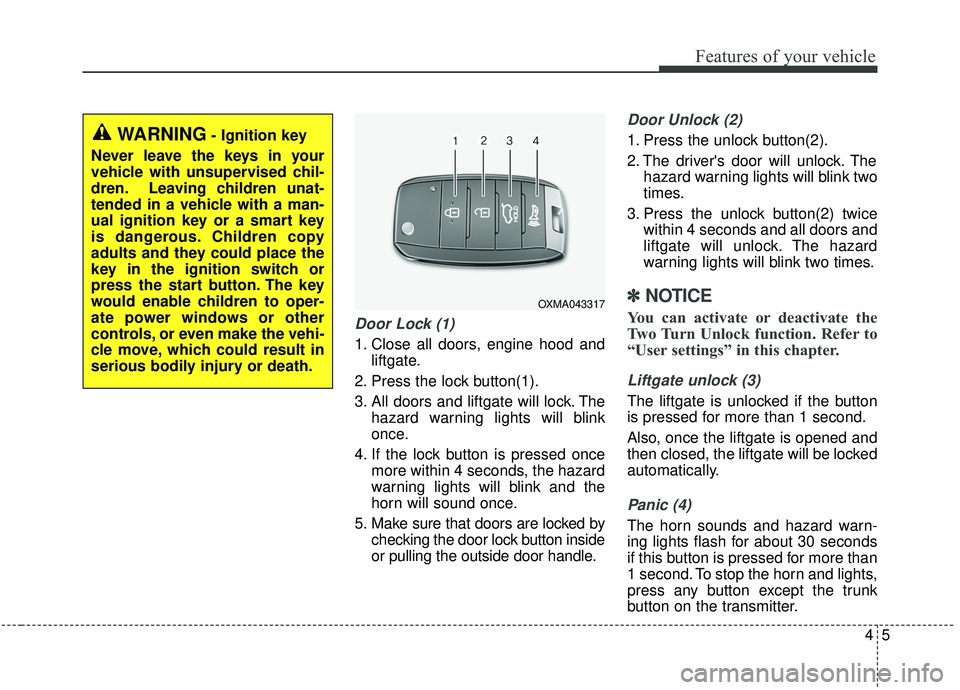
Door Lock (1)
1. Close all doors, engine hood andliftgate.
2. Press the lock button(1).
3. All doors and liftgate will lock. The hazard warning lights will blink
once.
4. If the lock button is pressed once more within 4 seconds, the hazard
warning lights will blink and the
horn will sound once.
5. Make sure that doors are locked by checking the door lock button inside
or pulling the outside door handle.
Door Unlock (2)
1. Press the unlock button(2).
2. The driver's door will unlock. Thehazard warning lights will blink two
times.
3. Press the unlock button(2) twice within 4 seconds and all doors and
liftgate will unlock. The hazard
warning lights will blink two times.
✽ ✽NOTICE
You can activate or deactivate the
Two Turn Unlock function. Refer to
“User settings” in this chapter.
Liftgate unlock (3)
The liftgate is unlocked if the button
is pressed for more than 1 second.
Also, once the liftgate is opened and
then closed, the liftgate will be locked
automatically.
Panic (4)
The horn sounds and hazard warn-
ing lights flash for about 30 seconds
if this button is pressed for more than
1 second. To stop the horn and lights,
press any button except the trunk
button on the transmitter.
OXMA043317
WARNING- Ignition key
Never leave the keys in your
vehicle with unsupervised chil-
dren. Leaving children unat-
tended in a vehicle with a man-
ual ignition key or a smart key
is dangerous. Children copy
adults and they could place the
key in the ignition switch or
press the start button. The key
would enable children to oper-
ate power windows or other
controls, or even make the vehi-
cle move, which could result in
serious bodily injury or death.
Page 92 of 564
Features of your vehicle
64
Transmitter precautions
The transmitter will not work if anyof following occur:
- The ignition key is in the ignitionswitch.
- You exceed the operating dis- tance limit (about 10 m [30 feet]).
- The battery in the transmitter is weak.
- Other vehicles or objects may be blocking the signal.
- The weather is extremely cold.
- The transmitter is close to a radio transmitter such as a radio sub-
station or an airport which can
interfere with normal operation of
the transmitter.
When the transmitter does not work correctly, open and close the door
with the ignition key. If you have a
problem with the transmitter, con-
tact an authorized Kia dealer. If the transmitter is in close proxim-
ity to your mobile phone, the signal
could be blocked by your mobile
phones normal operational signals.
This is especially important when
the phone is active such as making
and receiving calls, text messag-
ing, and/or sending/receiving
emails. Avoid placing the transmit-
ter and your mobile phone in the
same pants or jacket pocket and
always try to maintain an adequate
distance between the two devices.
✽ ✽ NOTICE
If the keyless entry system is inoper-
ative due to exposure to water or liq-
uids, it will not be covered by your
manufacturer’s vehicle warranty.
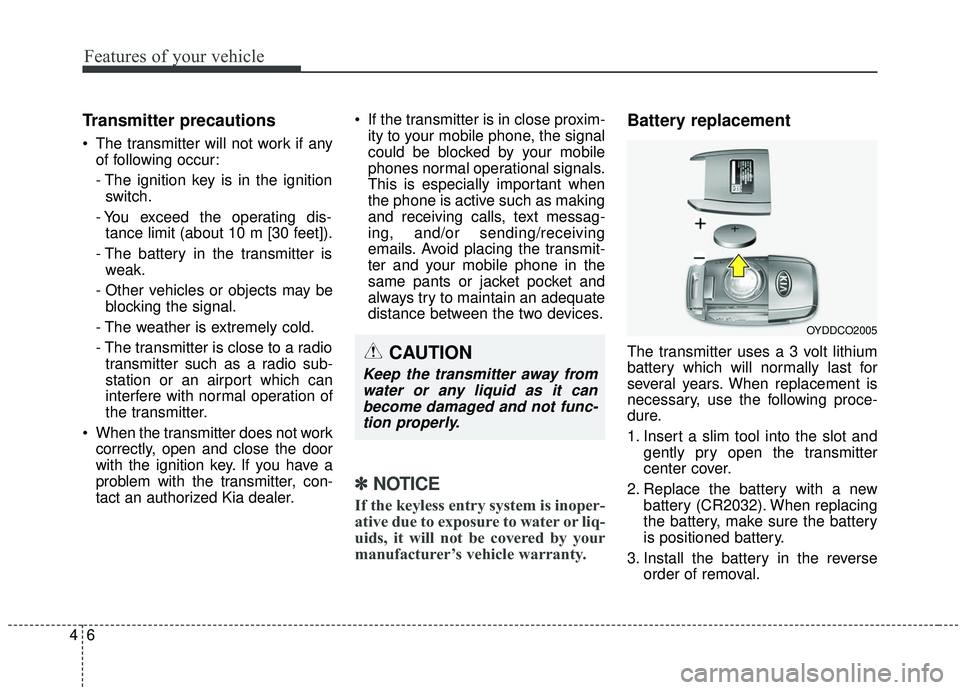
Battery replacement
The transmitter uses a 3 volt lithium
battery which will normally last for
several years. When replacement is
necessary, use the following proce-
dure.
1. Insert a slim tool into the slot and
gently pry open the transmitter
center cover.
2. Replace the battery with a new battery (CR2032). When replacing
the battery, make sure the battery
is positioned battery.
3. Install the battery in the reverse order of removal.CAUTION
Keep the transmitter away fromwater or any liquid as it canbecome damaged and not func-tion properly.
OYDDCO2005