2019 KIA SOUL EV warning
[x] Cancel search: warningPage 132 of 455
353
Safety features of your vehicle
Problems may arise if the sensorinstallation angles are changed
due to the deformation of the front
bumper, front end module, body or
front doors and/or B pillar where
side collision sensors are installed.
Have the vehicle checked and
repaired by an authorized Kia deal-
er.
Installing bumper guards (or side step or running board) or replacing
a bumper (or front door module)
with non-genuine parts may
adversely affect your vehicle’s col-
lision and air bag deployment per-
formance.Air bag inflation conditions
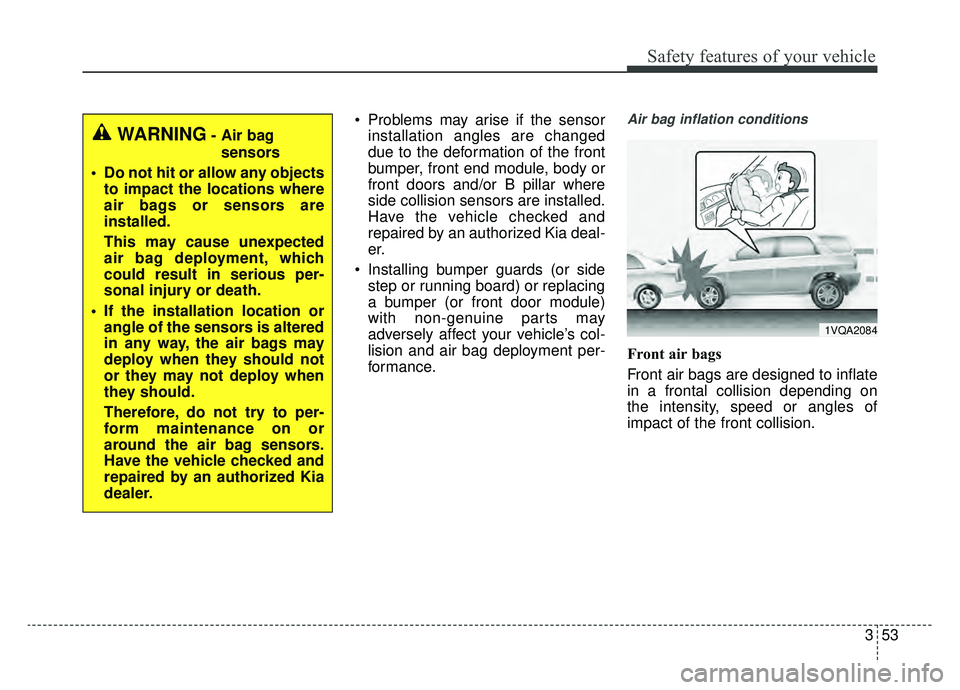
Front air bags
Front air bags are designed to inflate
in a frontal collision depending on
the intensity, speed or angles of
impact of the front collision.
1VQA2084
WARNING- Air bag
sensors
Do not hit or allow any objects to impact the locations where
air bags or sensors are
installed.
This may cause unexpected
air bag deployment, which
could result in serious per-
sonal injury or death.
If the installation location or angle of the sensors is altered
in any way, the air bags may
deploy when they should not
or they may not deploy when
they should.
Therefore, do not try to per-
form maintenance on or
around the air bag sensors.
Have the vehicle checked and
repaired by an authorized Kia
dealer.
Page 136 of 455
357
Safety features of your vehicle
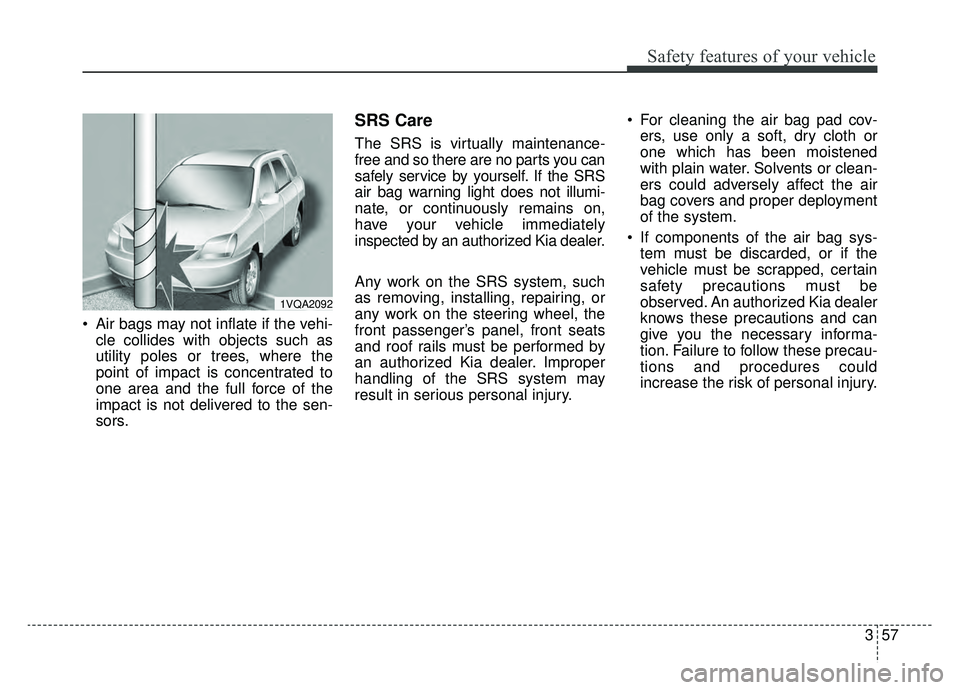
Air bags may not inflate if the vehi-cle collides with objects such as
utility poles or trees, where the
point of impact is concentrated to
one area and the full force of the
impact is not delivered to the sen-
sors.
SRS Care
The SRS is virtually maintenance-
free and so there are no parts you can
safely service by yourself. If the SRS
air bag warning light does not illumi-
nate, or continuously remains on,
have your vehicle immediately
inspected by an authorized Kia dealer.
Any work on the SRS system, such
as removing, installing, repairing, or
any work on the steering wheel, the
front passenger’s panel, front seats
and roof rails must be performed by
an authorized Kia dealer. Improper
handling of the SRS system may
result in serious personal injury. For cleaning the air bag pad cov-
ers, use only a soft, dry cloth or
one which has been moistened
with plain water. Solvents or clean-
ers could adversely affect the air
bag covers and proper deployment
of the system.
If components of the air bag sys- tem must be discarded, or if the
vehicle must be scrapped, certain
safety precautions must be
observed. An authorized Kia dealer
knows these precautions and can
give you the necessary informa-
tion. Failure to follow these precau-
tions and procedures could
increase the risk of personal injury.
1VQA2092
Page 137 of 455
Adding equipment to or modi-
fying your air bag-equipped
vehicle
If you modify your vehicle by changing
your vehicle's frame, bumper system,
front end or side sheet metal or ride
height, this may affect the operation of
your vehicle's air bag system.
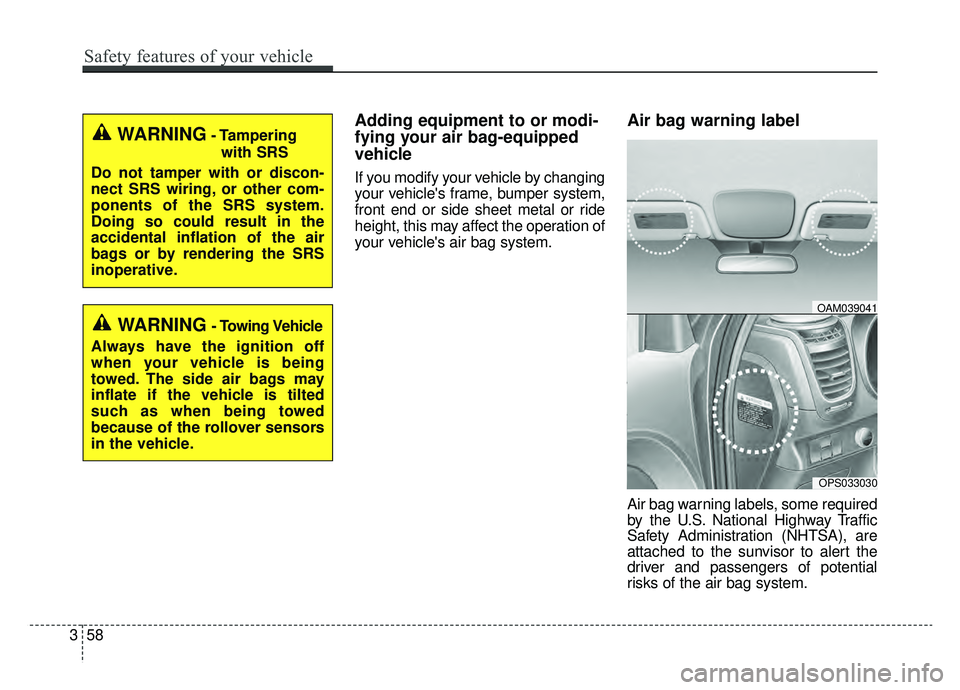
Air bag warning label
Air bag warning labels, some required
by the U.S. National Highway Traffic
Safety Administration (NHTSA), are
attached to the sunvisor to alert the
driver and passengers of potential
risks of the air bag system.
WARNING- Tamperingwith SRS
Do not tamper with or discon-
nect SRS wiring, or other com-
ponents of the SRS system.
Doing so could result in the
accidental inflation of the air
bags or by rendering the SRS
inoperative.
WARNING- Towing Vehicle
Always have the ignition off
when your vehicle is being
towed. The side air bags may
inflate if the vehicle is tilted
such as when being towed
because of the rollover sensors
in the vehicle.
OPS033030
OAM039041
358
Safety features of your vehicle
Page 139 of 455
• A/V mode . . . . . . . . . . . . . . . . . . . . . . . . . . . . . . . . . . . 4-\
48
. . . . . . . . . . . . . . . . . . . . . . . . . . . . . . . . 4-48
. . . . . . . . . . . . . . . . . . . . . . . . . . . . 4-52
Trip computer . . . . . . . . . . . . . . . . . . . . . . . . . . . . . 4-61
. . . . . . . . . . . . . . . . . . . . . . . . . . 4-61
. . . . . . . . . . . . . . . . . . . . . . . . . . . . . . . . . . . . \
4-62
. . . . . . . . . . . . . . . . . . . . . . . . . . . . . . . . . . . . \
. . 4-64
Warning and indicator lights . . . . . . . . . . . . . . . . 4-65
. . . . . . . . . . . . . . . . . . . . . . . . . . . . . . . 4-65
Parking distance warning . . . . . . . . . . . . . . . . . . . 4-76
. . . . . . . 4-76
warning. . . . . . . . . . . . . . . . . . . . . . . . . . . . . . . . . . . . \
4-78
. . . . . . . . . . . . . . . . . . . . . . . . . . . . . . . . 4-79
Rear view monitor . . . . . . . . . . . . . . . . . . . . . . . . . 4-80
Lighting . . . . . . . . . . . . . . . . . . . . . . . . . . . . . . . . . . 4-81\
. . . . . . . . . . . . . . . . . . . . . . . . . . . . . 4-81
. . . . . . . . . . . . . . . . . . . . . . . . . 4-81
. . . . . . . . . . . . . . . . . . . . . 4-82
electric control system . . . . . . . . . . . . . . . . . . . . . . . 4-82 . . . . . . . . . . . . . . . . . . . . . . . . . . . . . . 4-82
. . . . . . . . . . . . 4-85
. . . . . . . . . . . . . . . . . . . . . . . . . . . . . . . 4-86
Wipers and washers . . . . . . . . . . . . . . . . . . . . . . . . 4-87
. . . . . . . . . . . . . . . . . . . . . . 4-87
. . . . . . . . . . . . . . . . . . . . 4-87
. . . . . . . . . . . . . . . . . . . . . . . . . . . . 4-87
. . . . . . . . . . 4-89
Interior light . . . . . . . . . . . . . . . . . . . . . . . . . . . . . . 4-90
. . . . . . . . . . . . . . . . . . . . . . . . . . . . . . . . . . . 4-\
90
. . . . . . . . . . . . . . . . . . . . . . . . . . . . . . . . . . 4-91\
. . . . . . . . . . . . . . . . . . . . . . . . . . 4-92
. . . . . . . . . . . . . . . . . . . . . . . . . . . . . . 4-92
. . . . . . . . . . . . . . . . . . . . . . . . . . . 4-92
Defroster . . . . . . . . . . . . . . . . . . . . . . . . . . . . . . . . . 4-93
. . . . . . . . . . . . . . . . . . . . . . . . 4-93
Automatic climate control system. . . . . . . . . . . . . 4-94
. . . . . . . . . . 4-95
. . . . . . . . . . . . 4-96
. . . . . . . . . . . . . . . . . . . . . . . . 4-106
. . . . . . . . . . . . . . . . . . . . . . . . . . . . 4-107
. . . . . . . . . . . . . . . . . . . . . . 4-109
4
Page 141 of 455
Features of your vehicle
44
Record your key number
The key code num-
ber is stamped on
the key code tag
attached to the key
set. Should you
lose your keys, this number will
enable an authorized Kia dealer to
duplicate the keys easily. Remove
the key code tag and store it in a safe
place. Also, record the key code
number and keep it in a safe and
handy place, but not in the vehicle.
Smart key function
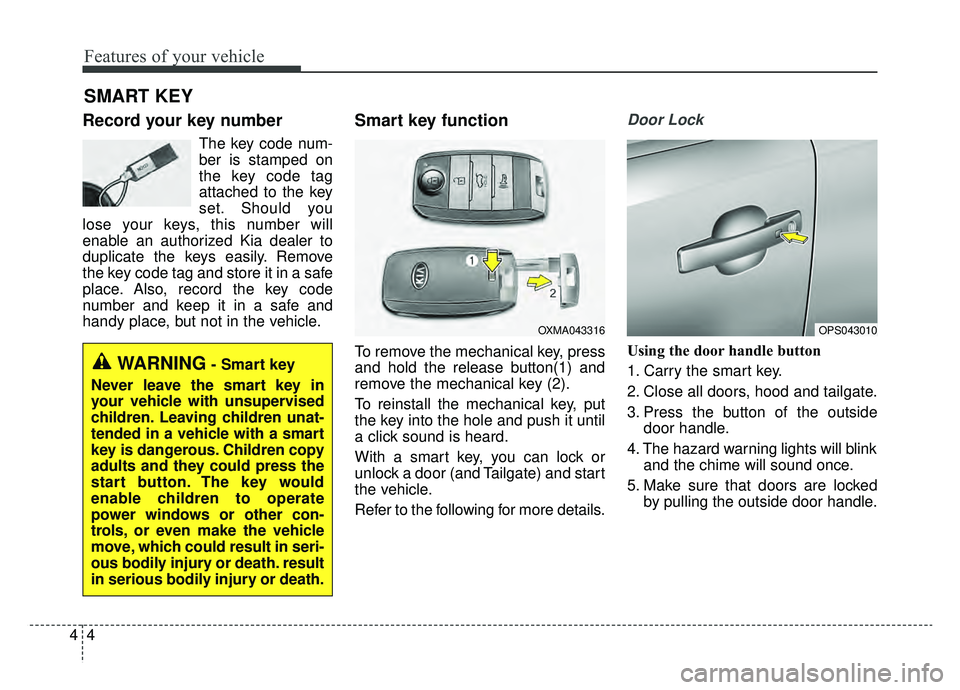
To remove the mechanical key, press
and hold the release button(1) and
remove the mechanical key (2).
To reinstall the mechanical key, put
the key into the hole and push it until
a click sound is heard.
With a smart key, you can lock or
unlock a door (and Tailgate) and start
the vehicle.
Refer to the following for more details.
Door Lock
Using the door handle button
1. Carry the smart key.
2. Close all doors, hood and tailgate.
3. Press the button of the outside door handle.
4. The hazard warning lights will blink and the chime will sound once.
5. Make sure that doors are locked by pulling the outside door handle.
SMART KEY
OXMA043316
WARNING- Smart key
Never leave the smart key in
your vehicle with unsupervised
children. Leaving children unat-
tended in a vehicle with a smart
key is dangerous. Children copy
adults and they could press the
start button. The key would
enable children to operate
power windows or other con-
trols, or even make the vehicle
move, which could result in seri-
ous bodily injury or death. result
in serious bodily injury or death.
OPS043010
Page 142 of 455
45
Features of your vehicle
The button will only operate when the
smart key is within 28~40 in. (0.7~1m)
from the outside door handle.
Even though you press the outside
door handle button, the doors will not
lock and the chime will sound for 3
seconds if any of following occur:
• The smart key is in the vehicle.
The POWER button is in ON posi-tion.
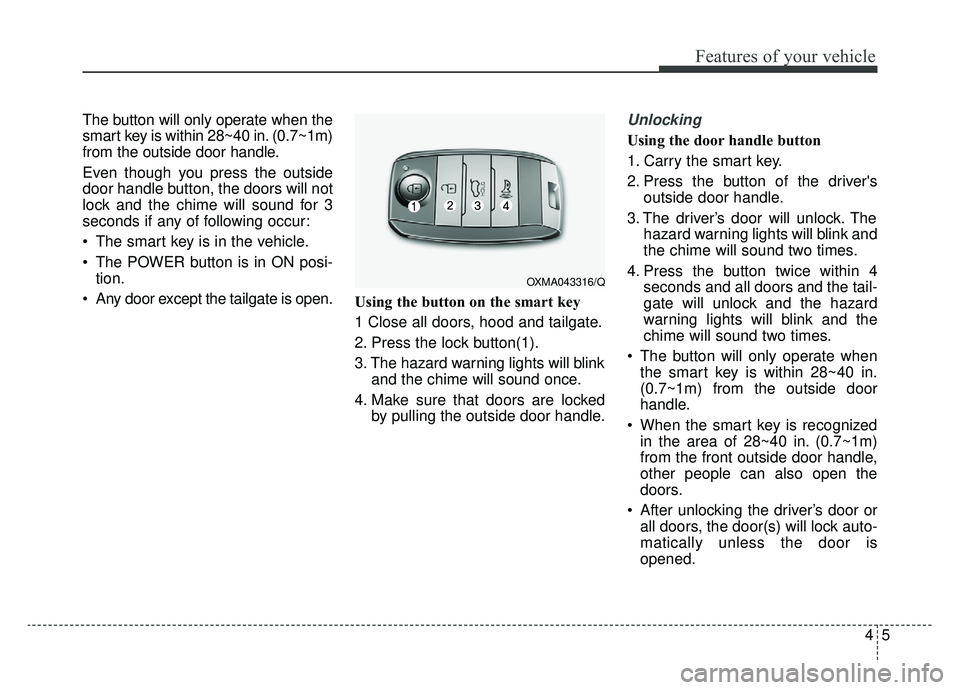
Any door except the tailgate is open. Using the button on the smart key
1 Close all doors, hood and tailgate.
2. Press the lock button(1).
3. The hazard warning lights will blink
and the chime will sound once.
4. Make sure that doors are locked by pulling the outside door handle.Unlocking
Using the door handle button
1. Carry the smart key.
2. Press the button of the driver'soutside door handle.
3. The driver’s door will unlock. The hazard warning lights will blink and
the chime will sound two times.
4. Press the button twice within 4 seconds and all doors and the tail-
gate will unlock and the hazard
warning lights will blink and the
chime will sound two times.
The button will only operate when the smart key is within 28~40 in.
(0.7~1m) from the outside door
handle.
When the smart key is recognized in the area of 28~40 in. (0.7~1m)
from the front outside door handle,
other people can also open the
doors.
After unlocking the driver’s door or all doors, the door(s) will lock auto-
matically unless the door is
opened.
OXMA043316/Q
Page 143 of 455
Features of your vehicle
64
Using the button on the smart key
1. Press the unlock button(2) of thesmart key.
2. The driver’s door will unlock. The hazard warning lights will blink and
the chime will sound two times.
3. Press the unlock button(2) twice within 4 seconds and all doors and
the tailgate will unlock. The hazard
warning lights will blink and the
chime will sound two times.
✽ ✽NOTICE
After pressing the button, the doors
will lock automatically unless any
door is opened within 30 seconds.
✽ ✽NOTICE
You can activate or deactivate the
Two Turn Unlock function. Refer to
"User settings" in this chapter.
Tailgate unlocking
Using the tailgate handle button
1. Carry the smart key.
2. Press the tailgate handle button.
3. When all doors are locked, the
hazard warning lights will blink two
times.
Once the tailgate is opened and
then closed, the tailgate will lock
automatically.
If you are within 28~40 in. (0.7~1 m)
from the outside tailgate handle, with
your smart key in possession, the
tailgate will unlock and open when
you press the tailgate handle switch.
Using the button on the smart key
1. Press the tailgate unlock button(3) for more than 1 second.
2. When all doors are locked, the hazard warning lights will blink two
times.
Panic
1. Press the panic button(4) for morethan 1 second.
2. The horn sounds and hazard warning light flash for about 30
seconds.
Start-up
You can start the vehicle without
inserting the key. For detailed infor-
mation refer to the “POWER button”
in chapter 5.
Page 147 of 455
Features of your vehicle
10
4
DOOR LOCKS
.Operating door locks from
outside the vehicle
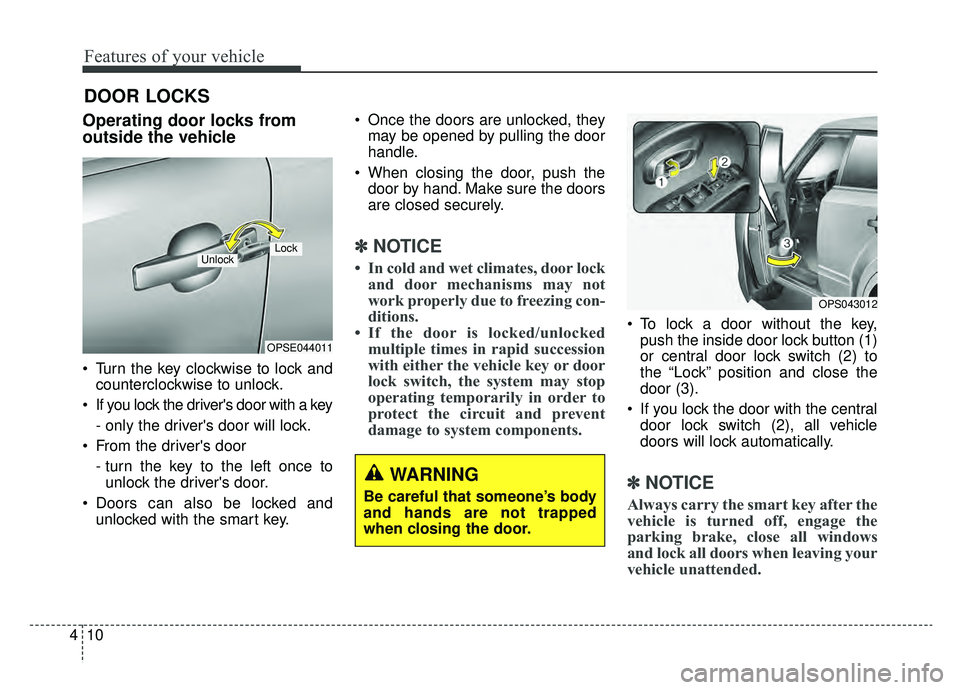
Turn the key clockwise to lock and
counterclockwise to unlock.
If you lock the driver's door with a key
- only the driver's door will lock.
From the driver's door
- turn the key to the left once tounlock the driver's door.
Doors can also be locked and unlocked with the smart key. Once the doors are unlocked, they
may be opened by pulling the door
handle.
When closing the door, push the door by hand. Make sure the doors
are closed securely.
✽ ✽ NOTICE
• In cold and wet climates, door lock
and door mechanisms may not
work properly due to freezing con-
ditions.
• If the door is locked/unlocked multiple times in rapid succession
with either the vehicle key or door
lock switch, the system may stop
operating temporarily in order to
protect the circuit and prevent
damage to system components.
To lock a door without the key,
push the inside door lock button (1)
or central door lock switch (2) to
the “Lock” position and close the
door (3).
If you lock the door with the central door lock switch (2), all vehicle
doors will lock automatically.
✽ ✽ NOTICE
Always carry the smart key after the
vehicle is turned off, engage the
parking brake, close all windows
and lock all doors when leaving your
vehicle unattended.
OPSE044011
LockUnlock
OPS043012
WARNING
Be careful that someone’s body
and hands are not trapped
when closing the door.