2019 KIA SOUL EV park assist
[x] Cancel search: park assistPage 205 of 455
Features of your vehicle
68
4
Dual-diagonal braking system
Your vehicle is equipped with dual-
diagonal braking systems. This
means you still have braking on two
wheels even if one of the dual sys-
tems should fail.
With only one of the dual systems
working, more than normal pedal
travel and greater pedal pressure are
required to stop the vehicle.
Also, the vehicle will not stop in as
short a distance with only a portion
of the brake system working.
If the brakes fail while you are driv-
ing, shift to B position for additional
engine braking and stop the vehicle
as soon as it is safe to do so.Anti-lock Brake System
(ABS) Warning Light
This warning light illuminates:
Once you set the POWER button to the ON position.
- It illuminates for approximately 3seconds and then goes off.
When there is a malfunction with the ABS (The normal braking sys-
tem will still be operational without
the assistance of the anti-lock
brake system).
In this case, have your vehicle
inspected by an authorized Kia
dealer.
WARNING - Parking Brake
& Brake Fluid Warning Light
Driving the vehicle with a warn-
ing light ON is dangerous. If the
Parking Brake & Brake Fluid
Warning Light illuminates with
the parking brake released, it
indicates that the brake fluid
level is low.
In this case, have your vehicle
inspected by an authorized Kia
dealer.
Page 213 of 455
Features of your vehicle
76
4
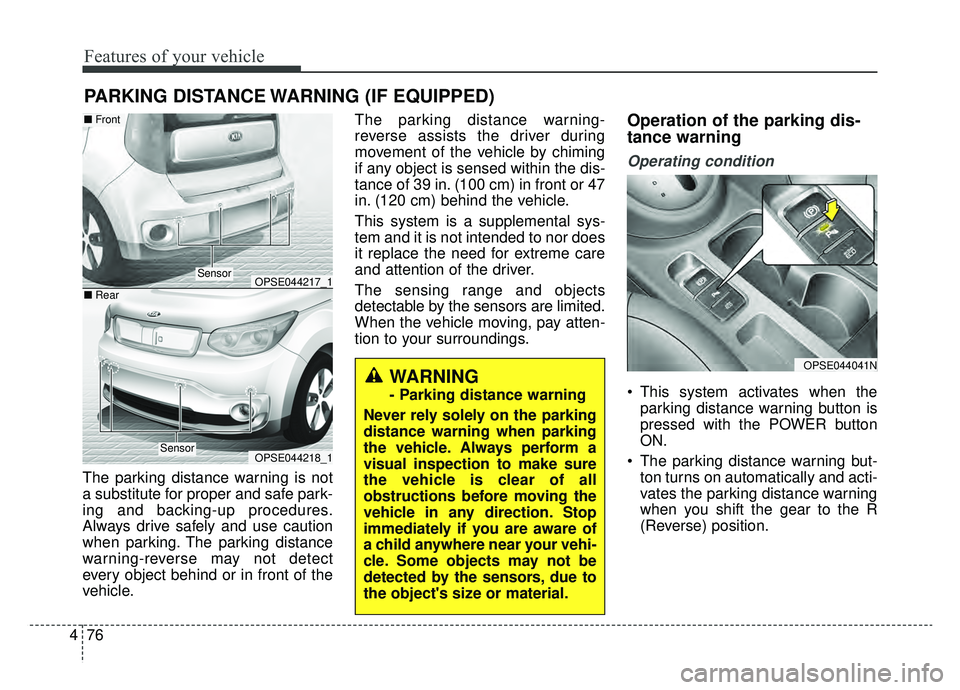
The parking distance warning is not
a substitute for proper and safe park-
ing and backing-up procedures.
Always drive safely and use caution
when parking. The parking distance
warning-reverse may not detect
every object behind or in front of the
vehicle. The parking distance warning-
reverse assists the driver during
movement of the vehicle by chiming
if any object is sensed within the dis-
tance of 39 in. (100 cm) in front or 47
in. (120 cm) behind the vehicle.
This system is a supplemental sys-
tem and it is not intended to nor does
it replace the need for extreme care
and attention of the driver.
The sensing range and objects
detectable by the sensors are limited.
When the vehicle moving, pay atten-
tion to your surroundings.
Operation of the parking dis-
tance warning
Operating condition
This system activates when the
parking distance warning button is
pressed with the POWER button
ON.
The parking distance warning but- ton turns on automatically and acti-
vates the parking distance warning
when you shift the gear to the R
(Reverse) position.
PARKING DISTANCE WARNING (IF EQUIPPED)
OPSE044217_1
OPSE044218_1
Sensor
■ Front
■ Rear
Sensor
OPSE044041NWARNING
- Parking distance warning
Never rely solely on the parking
distance warning when parking
the vehicle. Always perform a
visual inspection to make sure
the vehicle is clear of all
obstructions before moving the
vehicle in any direction. Stop
immediately if you are aware of
a child anywhere near your vehi-
cle. Some objects may not be
detected by the sensors, due to
the object's size or material.
Page 336 of 455
63
What to do in an emergency
If the vehicle stalls at a cross-
road or crossing
If the vehicle stalls at a crossroad or
crossing, set the shift lever in the N
(Neutral) position and then push the
vehicle to a safe place.
If you have a flat tire while
driving
If a tire goes flat while you are driv-
ing:
1. Take your foot off the acceleratorpedal and let the vehicle slow
down while driving straight ahead.
Do not apply the brakes immedi-
ately or attempt to pull off the road
as this may cause a loss of con-
trol. When the vehicle has slowed
to such a speed that it is safe to do
so, brake carefully and pull off the
road. Drive off the road as far as
possible and park on a firm level
ground. If you are on a divided
highway, do not park in the medi-
an area between the two traffic
lanes. 2. When the vehicle is stopped, turn
on your emergency hazard flash-
ers, set the parking brake and put
the transaxle in P.
3. Have all passengers get out of the vehicle. Be sure they all get out on
the side of the vehicle that is away
from traffic.
4. When changing a flat tire, follow the instruction provided later in
this section.
If the vehicle stalls while driv-
ing
1. Reduce your speed gradually,keeping a straight line. Move cau-
tiously off the road to a safe place.
2. Turn on your emergency flashers.
3. Try to start the vehicle again. If your vehicle will not start, contact
an authorized Kia dealer or seek
other qualified assistance.
IN CASE OF AN EMERGENCY WHILE DRIVING
Page 341 of 455
What to do in an emergency
86
IF THE VEHICLE OVERHEATS
1. Pull off the road and stop as soonas it is safe to do so.
2. Place the shift lever in P and set the parking brake. If the air condi-
tioning is on, turn it off.
3. If coolant is running out under the vehicle or steam is coming out
from underneath the hood, stop
the vehicle. Do not open the hood
until the coolant has stopped run-
ning or the steaming has stopped.
If there is no visible loss of coolant
and no steam, leave the vehicle
running and check to be sure cool-
ing fan is operating. If the fan is not
running, turn the vehicle off.
4. Check for coolant leaking from the radiator, hoses or under the vehi-
cle. (If the air conditioning had
been in use, it is normal for cold
water to be draining from it when
you stop). 5. If you cannot find the cause of the
overheating, wait until the radiator
temperature has returned to nor-
mal. Then, if coolant has been lost,
carefully add coolant to the reser-
voir to bring the fluid level in the
reservoir up to the halfway mark.
6. Proceed with caution, keeping alert for further signs of overheat-
ing. If overheating happens again,
call an authorized Kia dealer for
assistance.
Serious loss of coolant indicates
there is a leak in the cooling system
and this should be checked as soon
as possible by an authorized Kia
dealer.
WARNING- Radiator cap
Do not remove the radiator cap
when the radiator is hot. This
may result in coolant being
blown out of the opening and
cause serious burns.
Page 410 of 455
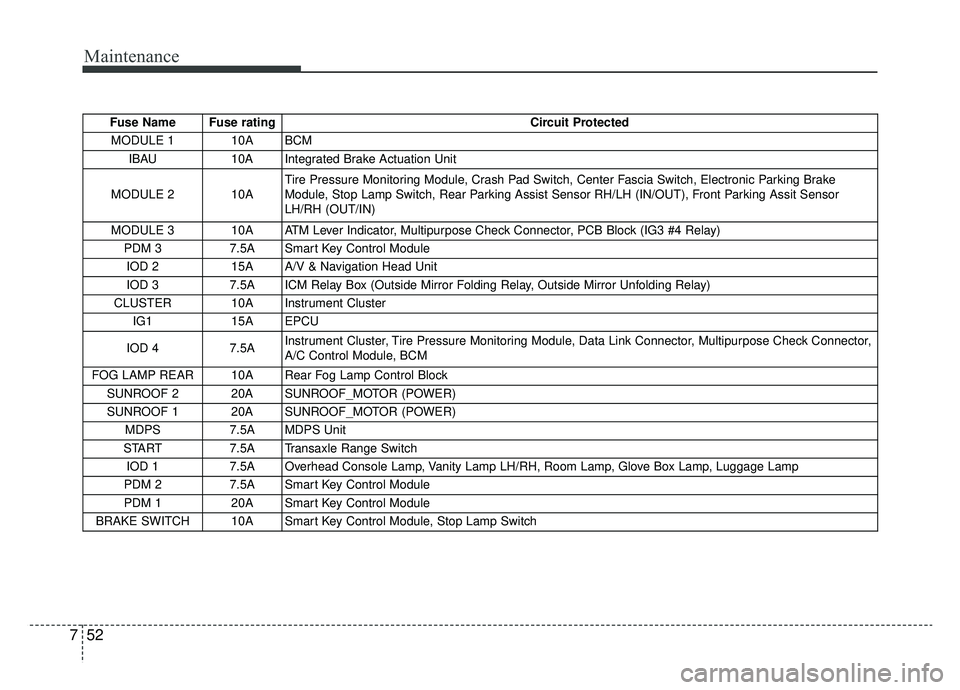
Maintenance
52
7
Fuse Name Fuse rating Circuit Protected
MODULE 1 10A BCM IBAU 10A Integrated Brake Actuation Unit
MODULE 2 10A Tire Pressure Monitoring Module, Crash Pad Switch, Center Fascia Switch, Electronic Parking Brake
Module, Stop Lamp Switch, Rear Parking Assist Sensor RH/LH (IN/OUT), Front Parking Assit Sensor
LH/RH (OUT/IN)
MODULE 3 10A ATM Lever Indicator, Multipurpose Check Connector, PCB Block (IG3 #4 Relay) PDM 3 7.5A Smart Key Control Module
IOD 2 15A A/V & Navigation Head Unit
IOD 3 7.5A ICM Relay Box (Outside Mirror Folding Relay, Outside Mirror Unfolding Relay)
CLUSTER 10A Instrument Cluster IG1 15A EPCU
IOD 4 7.5A Instrument Cluster, Tire Pressure Monitoring Module, Data Link Connector, Multipurpose Check Connector,
A/C Control Module, BCM
FOG LAMP REAR 10A Rear Fog Lamp Control Block SUNROOF 2 20A SUNROOF_MOTOR (POWER)
SUNROOF 1 20A SUNROOF_MOTOR (POWER) MDPS 7.5A MDPS Unit
START 7.5A Transaxle Range Switch
IOD 1 7.5A Overhead Console Lamp, Vanity Lamp LH/RH, Room Lamp, Glove Box Lamp, Luggage Lamp
PDM 2 7.5A Smart Key Control Module
PDM 1 20A Smart Key Control Module
BRAKE SWITCH 10A Smart Key Control Module, Stop Lamp Switch
Page 449 of 455
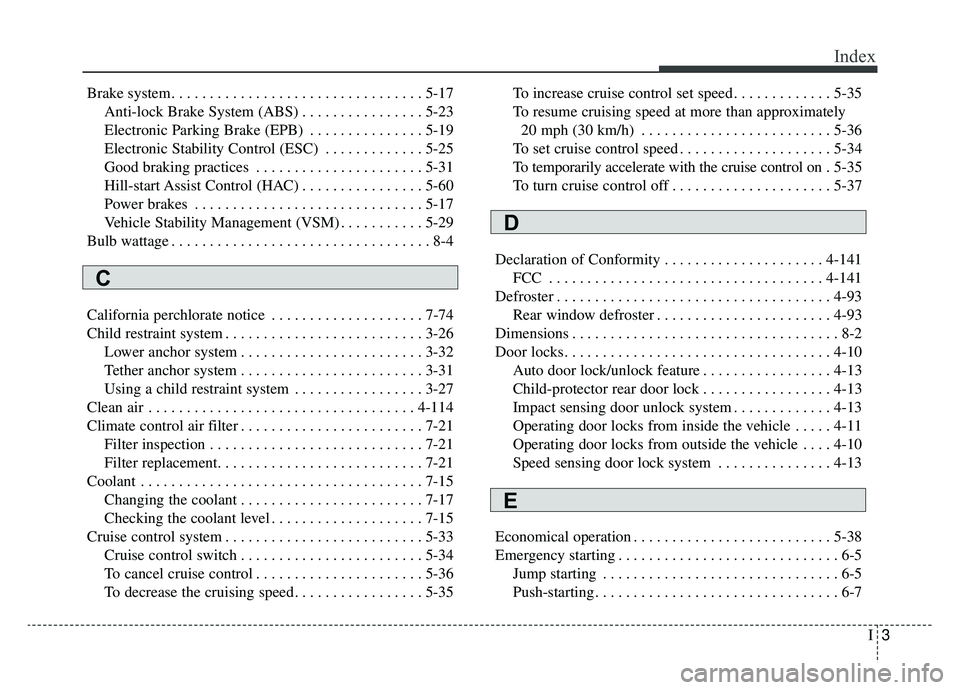
I3
Index
Brake system. . . . . . . . . . . . . . . . . . . . . . . . . . . . . . . . . 5-17Anti-lock Brake System (ABS) . . . . . . . . . . . . . . . . 5-23
Electronic Parking Brake (EPB) . . . . . . . . . . . . . . . 5-19
Electronic Stability Control (ESC) . . . . . . . . . . . . . 5-25
Good braking practices . . . . . . . . . . . . . . . . . . . . . . 5-31
Hill-start Assist Control (HAC) . . . . . . . . . . . . . . . . 5-60
Power brakes . . . . . . . . . . . . . . . . . . . . . . . . . . . . . . 5-17
Vehicle Stability Management (VSM) . . . . . . . . . . . 5-29
Bulb wattage . . . . . . . . . . . . . . . . . . . . . . . . . . . . . . . . . . 8-4
California perchlorate notice . . . . . . . . . . . . . . . . . . . . 7-74
Child restraint system . . . . . . . . . . . . . . . . . . . . . . . . . . 3-26 Lower anchor system . . . . . . . . . . . . . . . . . . . . . . . . 3-32
Tether anchor system . . . . . . . . . . . . . . . . . . . . . . . . 3-31
Using a child restraint system . . . . . . . . . . . . . . . . . 3-27
Clean air . . . . . . . . . . . . . . . . . . . . . . . . . . . . . . . . . . . 4-\
114
Climate control air filter . . . . . . . . . . . . . . . . . . . . . . . . 7-21 Filter inspection . . . . . . . . . . . . . . . . . . . . . . . . . . . . 7-21
Filter replacement. . . . . . . . . . . . . . . . . . . . . . . . . . . 7-21
Coolant . . . . . . . . . . . . . . . . . . . . . . . . . . . . . . . . . . . . \
. 7-15 Changing the coolant . . . . . . . . . . . . . . . . . . . . . . . . 7-17
Checking the coolant level . . . . . . . . . . . . . . . . . . . . 7-15
Cruise control system . . . . . . . . . . . . . . . . . . . . . . . . . . 5-33 Cruise control switch . . . . . . . . . . . . . . . . . . . . . . . . 5-34
To cancel cruise control . . . . . . . . . . . . . . . . . . . . . . 5-36
To decrease the cruising speed . . . . . . . . . . . . . . . . . 5-35 To increase cruise control set speed . . . . . . . . . . . . . 5-35
To resume cruising speed at more than approximately
20 mph (30 km/h) . . . . . . . . . . . . . . . . . . . . . . . . . 5-36
To set cruise control speed . . . . . . . . . . . . . . . . . . . . 5-34
To temporarily accelerate with the cruise control on . 5-35
To turn cruise control off . . . . . . . . . . . . . . . . . . . . . 5-37
Declaration of Conformity . . . . . . . . . . . . . . . . . . . . . 4-141 FCC . . . . . . . . . . . . . . . . . . . . . . . . . . . . . . . . . . . . \
4-141
Defroster . . . . . . . . . . . . . . . . . . . . . . . . . . . . . . . . . . . . \
4-93 Rear window defroster . . . . . . . . . . . . . . . . . . . . . . . 4-93
Dimensions . . . . . . . . . . . . . . . . . . . . . . . . . . . . . . . . . . . 8-\
2
Door locks. . . . . . . . . . . . . . . . . . . . . . . . . . . . . . . . . . . 4-\
10 Auto door lock/unlock feature . . . . . . . . . . . . . . . . . 4-13
Child-protector rear door lock . . . . . . . . . . . . . . . . . 4-13
Impact sensing door unlock system . . . . . . . . . . . . . 4-13
Operating door locks from inside the vehicle . . . . . 4-11
Operating door locks from outside the vehicle . . . . 4-10
Speed sensing door lock system . . . . . . . . . . . . . . . 4-13
Economical operation . . . . . . . . . . . . . . . . . . . . . . . . . . 5-38
Emergency starting . . . . . . . . . . . . . . . . . . . . . . . . . . . . . 6-5 Jump starting . . . . . . . . . . . . . . . . . . . . . . . . . . . . . . . 6-5
Push-starting . . . . . . . . . . . . . . . . . . . . . . . . . . . . . . . . 6-7
C
D
E